Customized Kamparoo Offroad Popup Camper!

WookinPaNub

New member
I meant to put this together much earlier, but time and priorities don’t often follow with intent. My purpose is to share with others my travel down this path to selecting my offroad traveling means so that they might benefit from some of the thought process just as I did from others before me. This isn’t a sales pitch, everyone makes their own choices based on their needs and this is simply my story of choosing mine and an option out there that may not be known to many and be of interest.

Last year I started getting the desire to have the means to go somewhere in my offroad vehicle and spend days / weeks / possibly months in a given location. Part of this I must confess was triggered by the plan to move to Colorado from the east coast in the next few years, and if I was going to do this I was going to ‘do it right’. What I ended up with is seen below, a very capable tow behind that I plan to use for years and years to come. What follows is the story of how I got there.

2012-10-03_11-56-59_102.jpg Wetaskiwin-20120904-00729.jpg
 

WookinPaNub

New member
I started by researching as much as I could find related to that area, a great source being the Expedition Portal and Jeep Forum websites. I started to draw up my options and then narrow down what was right for me. Now bear in mind my considerations will differ greatly from others and is simply intended for awareness, not a direction in someone else’s personal choice necessarily…

I liked the idea of having just one vehicle that could go where I wanted to go, for a reasonable cost, with my camping / offroading needs in mind. Here are some things I looked at:
1) Offroad vans :I saw these in Iceland and was pretty amazed by these very offroad capable behemoths with all the necessities built right inside. But to pick one of these up had a rough entry fee in the 50-70k given the van and conversion. That was a bit out of my price range. And there are some older VW vans (Syncro) that are scaled down versions of this, but didn’t meet my rock crawling offroad needs.
2) Offroad truck with camper : I’ve seen a lot of really nice setups, and again very capable rigs. And being able to walk around to the back and be inside your sleeping quarters all ready to go is a very nice attribute. But I’m also a big rock crawler, and having seen the issues (turning radius, long wheel bases, etc) these trucks have in the rock parks I couldn’t see not being able to do that aspect of my life.
3) ‘True’ offroad vehicle with a camper top : Given I already had the offroad vehicle in a ’03 Wrangler TJ this seemed initially like a great merger and I figured I would start there vs other vehicles like Land Rovers, etc. And there are a lot of options now for Jeeps, like the Action Camper, Ursa Minor, etc. But one thing I love about my Jeep is riding topless in the summertime (as well as the additional weight of these camper types making rock crawling more difficult)

So at this point I had to change gears a bit, and look for an option where the camping / living was separated from the vehicle...
1) RV towing an offroad vehicle : Now this is the plush lifestyle that doesn’t sacrifice a things. A great place to live for weeks on end, your capable 4x4 in tow. For me, however, the additional cost of an RV was a bit out of the question (as well as crappier gas mileage than my Jeep already got). Further, I liked the idea of being able to offroad to a remote area and setting up camp, not being having to use a trailer park as a base camp.
2) Pull behind camper : By this point I had narrowed down that I a) didn’t want to give up or compromise my rock crawling capability b) to be able to readily use a soft top as a convertible if I so chose c) be able to take my camping into remote areas (basically wherever my Jeep could get to now. That took me into my chosen option of a pull behind camper.
 

WookinPaNub

New member
Little did I realize that this was again just the start of yet another decision making process, as there are a gazillion options out there for tow behind campers. So I started narrowing the search:

1) Rugged with good clearance – this eliminated the (IMO) wannabes like Fleetwood, Jayco, Coleman, Camplite, etc. I’ve read issues on their quality and had serious reservations with them breaking down in the backcountry. Further, even their ‘offroad’ versions were pretty low on clearance.
2) GVWR under 2k – My little Wrangler TJ has the torque to pull a heavy trailer but a Short Wheel Base which severely limits what I can tow to 2k lbs. And the lighter the trailer the better, as the Jeep would have to pull this over some pretty rough ground. This knocked out ones like the Moby1 XTR and the Campa ATT, which are great trailers but too close to the GVWR with their dry weights.
3) Wheelbase – From the remaining list I looked at wheelbase – little strange of a consideration right? Maybe… But having done a fair bit of offroading I wanted the trailer tires to ‘follow’ my Jeeps tracks. Where I put my Jeep tires to clear obstacles is where I wanted the trailer tires to follow to clear those same obstacles. If they were wider than the Jeep they had the potential to get ‘caught’ on obstacles outside my wheelbase. If they were substantially narrower it wasn’t only just that similar issue but also one of rollover (narrower wheelbase and high center of gravity). Google it – it happens, even with the top of the line trailers. This knocked out the Jumping Jack (very easy to setup, but low clearance and too wide), and then the Dinoot and Campa Cub (too narrow with a high CoG for my tastes).
4) Ease of setup / access – I wanted something that I could setup quickly in the worst weather, had a place to stand up in, and that my wife wouldn’t fall down some ladder at 3AM going to the bathroom and disturb my beauty sleep. This removed the roof rack options as well as others like the Moby1 XC, Tentrax, Adventure Trailers Horizon and Chaser, the MOPAR option, etc.
5) Customizable – Either by myself or the manufacturer, with options for a fridge / solar panel charging / water supplies / onboard power / etc.
6) Simple in design / ease of maintenance – There are some great trailers from South Africa and Australia, but without dealers in the US or near to it. I wanted it simple so either I could fix it or I had access to a dealer relatively close to the US I could contact.
 

WookinPaNub

New member
By the time I got to this point I was down to the following 2 options:

1) Haultent – I loved this was US made, aluminum (very light), easy to erect, and spacious on the inside. It was also customizable with some of the options I wanted and I felt I could add the rest without big issues. Starting price of under 10k was also a bonus.
2) Kamparoo – This is an Australian manufacturer with a solid reputation of making great offroad trailers. They just so happen to have a distributer in Canada, which was close enough for me. Also very light weight, very simple in design, insanely easy to setup, good customization options, the ability to ‘add a room’ doubling your space for long stays, and a starting price (for their offroad version) at 8k.

With a targeted list, I started reading reviews. Not only of the campers but the distributers as well. HaulTent had a few that I could find, Kamparoo significantly more for both their campers in general as well as for the ease of working with their distributor (Glen). Given this, I started digging further into Kamparoo, and I liked what I found:
- Manufacturing a suite of offroad campers since 1968 in Australia
- Already designed for some very harsh environments
- Rigorous testing in those environments
- Campers are manufactured in Australia then shipped to Canada (Wetaskiwin, Alberta)
- GVWR of 800 lbs, which gives a great baseline to add desired customizations and still have a trailer well under the 2k threshold
- Good starting price point of 8k to customize further
- Simplistic yet efficient and rugged platform
- Clamshell design allows extremely quick deployment and packing by anyone, and extremely spacious inside
- “Base’ configuration allows step in access (no ladders), and the ability to stand up inside comfortably
- A number of add on customizations available
- Excellent willingness by the distributor to further customize to my desired specifications
- Great distributor support (as seen on existing threads and my own personal experience)

I had made my choice, and then it was on to making the dreams a reality.
 

WookinPaNub

New member
With the selection made, I then worked with Glen to lay out what I was looking for in my Kamparoo platform:

1) Clearance : The standard tires are on 14” rims and that wouldn’t keep up with my Jeep. Further I wanted to run the same tires and rims on the trailer as my Jeep (35”) so they could be used as a ‘swap’ in case of issues on the trail. This basically drove the decision to not use the stock trailer frame, but to design out one based on that design but thicker and hot galvanized. What I got was more ruggedized for my needs, a stronger axle, with a beefed up leaf / coil suspension along with a longer draw bar.
2) Water tank / pump : If I was going to be out for days / weeks at a time I needed a good sized water tank and a way to easily access that water.
3) Onboard power with multiple charging options : To supply power to the fridge and other goodies I anticipated using, I wanted a 12V battery system that could be charged via the Jeep, via solar panels, or plugging into the AC outlets at home. This system needed to provide power for both DC and AC devices. This added in a couple of charge controllers, an inverter, and a 7Pin wiring setup.
4) Oversized / specially shaped storage well : To accommodate the water / battery a larger storage well than standard was needed. Further I wanted the back beveled to be able to clear outcrops at high angles of incline.
5) Covered storage / Fridge : I also wanted to have a protected place for my fridge and any other items I didn’t want to be in the elements. This required an additional storage box added on to the tongue with a slide out drawer for the fridge on one side and a slide out drawer for more gear on the other. Everything lockable so gremlins can’t steal my food and a storage try with tie downs added to the top for more non-protected storage.
6) Uncovered storage : I was also looking for some additional storage on the outside that could be used for items like jerry cans for gas or addtl water. A simple boxed in area between the actual camper and the fridge storage box would fit the bill.
7) Big gear storage : Given the camper box itself was engineered to hold another 300-400 lbs as is, I wanted to tap into that capability should I need to (for bikes, solar panels, generator, etc). So the camper top would get additional cross bar supports for strength and tie down loops for securing those items.
8) Propane : Given I may be in areas where it may be too cold to heat with electric from the battery, I added the 20lb tank propane option, easily replaceable and fillable just about anywhere.
9) Add A Room : Future plans would sometimes have us in the same place for weeks if not months, and with durations like that it’s nice to have the option for more ‘stretch out’ space. I opted for the Add A Room which attaches directly to the camper, doubles the living space, all of which is standing room.
10) Stopping power : While the trailer weight is low I didn’t want to rely solely on the Jeeps brakes to keep the trailer from pushing me up and down steep inclines and declines. Electric brakes were added and wired into the system.
11) Custom fenders : Those bigger tires were going to throw up more debris on the road, so I needed to cover them up. Reinforced aluminum fenders went on, beveled to not get caught on obstructions, and strong enough that I can stand on them to reach objects on the camper top.
12) Adjustable ‘feet’ : Now that my trailer was taller and I fully anticipated being on uneven ground, Glen came up with a simple yet elegant design that made every support ‘foot’ independently adjustable.

So realistically, if you think about it, what I kept was the camper box itself and customized just about everything else around it. During this time Glen and I had a number of joint design sessions, talking about desires and how best to implement them into the Kamparoo design. His knowledge of how everything worked together and to take my customization to the next level was invaluable. By the time we got to the point of pulling the trigger I was extremely confident in his abilities to turn this into a reality for me.
 

WookinPaNub

New member
Glen kept me updated throughout the process and I even scheduled a trip up to see the camper prior to completion to ensure everything was as I wanted it (after all, I intend to use this for the next couple decades in some harsh locations). I was picked up and taken to the shop and spent the better part of the afternoon reviewing the current trailer, tweaking things I wanted done differently upon review, and confirming the next direction. The quality was fantastic. Aluminum plating was everywhere for strength and rigidity, and the storage boxes / wells / tray were all aluminum. This makes for a very light yet strong platform. Aluminum welding is not easy, and the aluminum work was absolutely astounding. The folks in Glen’s shop were very helpful and accommodating, and when I left I had a good feeling that the next time I saw the trailer it would be exactly what I envisioned.

Glen handled customs and the paperwork and the trailer was delivered in excellent condition. I did my initial high level shake down, found some awning poles missing, and Glen had them shipped to me within a week. Now it was time for a more rigorous break in.

The only access I had readily available was in North Carolina’s Uwharrie ORV area so I packed up the Jeep, hooked up the trailer, and loaded it with a couple hundred pounds of gear. On the way down I got a lot of looks and conversations in parking lots with people wanting to know more about the camper – it’s not your typical one that is for certain. And after some talks with the locals familiar with the trails and what we were trying to do we headed out to the recommended trails.

It performed beyond expectations, well beyond expectations actually and I feel I had some very high ones to begin with. The trailer never came close to touching on any steep incline or decline I came across, the tires bounced right over the obstacles just like the Jeeps before it. It followed the Jeep right up and over anything I came across, and without breaking a sweat. A number of other offroaders were amazed to see this popup going through the trails we were, and as easily as we were. Many thumbs up were received along with even more questions on the trailer setup.

Getting the trailer home showed no damage, everything still in spec and tight. It speaks highly to the quality of the construction and the simplicity of the design. While I still intend to do some more runs on the east coast before taking it to Colorado, I have no qualms that it will work exceptionally well out there as a weekend or long term stay in some very inaccessible locations. And with a GVWR dry of around 1100lbs I don’t have an qualms the Jeep can take it there.

So were there cons? Sure, but darn few and all easily resolvable with Glen. The biggest one was a delay in delivery due to the aluminum storage boxes not being completed. While there were reasons with the fabricators availability, Glen and I worked out a mutual agreement on how to balance that out in other areas. Same thing with the missing awning posts, they were shipped to me within a week. The bottom line is I’m thrilled with what I got, the quality of the build, and the simplification of the process / excellent communication with Glen. I’d make the same choice again in a heartbeat…
 

WookinPaNub

New member
So many of you are probably wondering what the cost of this was compared to the other options. I can simplify that with a couple of thoughts.

1) For 8k on the TransContinental model, it’s a fantastic option right out of the gate unaltered IMO. Seeing how the camper performed and the quality of the build I have every faith this base option would work for quite a few who want to have a capable offroad camper.
2) Mine was heavily modified and basically designed to my exacting specifications. It’s basically a custom one of a kind trailer. Needless to say it cost more, but it will help to understand how that compared to some other known campers on the market and the upgrades that contains.
3) The great thing about Glen and his shop is the ability and willingness to meet your needs. That means that anything between the base model and my uber customized version is possible with them. And for less than you might think.

For comparison, the following is what I’m including in the comparison. I’m not including things like the controllers, special coupler / hitch, inverters, custom tires / rims, fridge (which is a 1k+ option by itself). Basically this is the camper, ruggedized and upfitted storage for easier comparison.

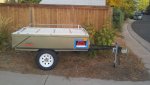
1) Standard camper box (clamshell)
2) Stronger, extended, galvanized frame
3) Coil and leaf spring suspension upfit w/ 24” shocks
4) Electric brake axle
5) Water tank and hand pump
6) Custom sized / shaped aluminum storage well
7) Custom aluminum fenders
8) Add A Room addition with wall modifications (addtl length and door for fridge tray)
9) Installing battery and wiring for 3 point charging solution
10) Custom aluminum fridge box with dual sliding trays, locking doors (with gaskets), ventilation, and addtl storage tray on top
11) Addtl aluminum storage tray between camper box and fridge box
12) 20lb propane holder and tank
13) Adjustable support ‘legs’
14) Addtl aluminum strengthening to camper box storage area, mechanical tie downs

So while I won’t provide exact costs for that, I can relate it to some others on the market. The most recognized in this class of performance is the Campa and Adventure Trails options so I’ll use that and let he reader compare how the options stack up.

Campa Cub : Comes in a $8500 (base) - my spec’d out trailer with the options above was higher
Campa AT: I found this (base) listed at $14750 – my cost was lower
Adventure Trailer Horizon: Comes in at $10,481 (base) - my cost was higher
Adventure Trailer Chaser: Comes in at $7236 (base) – my cost was higher
Adventure Trailer Teardrop: Comes in at $13852 (base) – my cost was lower

A final addition that just recently came out, and seems to be a very good comparable, is the Adrenaline Camper. Aluminum for lightweight, offroad suspension / tires, clamshell opening, extremely ruggedized, etc. Base model shows to be $17500. In comparison to this my trailer, with the options above AND the addition of the controllers / inverters / tires / fridge / EVERYTHING else (so my current complete setup) was less than that…

So if you’ve read this far you get a gold star. Hope this helps, as I was helped by similar postings of others before me. I’ve also got a couple short videos of the camper in action, but no way to post them with my acct, sry. Enjoy, and happy camping!
 

bknudtsen

Expedition Leader
Thanks for the detailed write-up of your research and ultimate decision. Very well thought out and justified.

What are the white pvc looking pipes for? Also, do you have some shots of the interior of the tent?
 

mmuthart

Observer
Very cool. NICE LIFT! I love Kamparoo's. Here's mine: what I started with and how it ended up.

Couple of questions for you: I'm very interested in the custom aluminum fridge box you have...what did that option cost you? And do you have any dimensions for it?

Also, x2 on what the white tubes are used for?

Thanks!
 

Attachments

  • Kamparoo_1.jpg
    Kamparoo_1.jpg
    159.6 KB · Views: 35
  • S.FrkBoiseFall2011_3.JPG
    S.FrkBoiseFall2011_3.JPG
    267 KB · Views: 55

WookinPaNub

New member
I had two 6" PVC pipes added and lashed to the camper top. These are for the awning poles - a standard awning on one side and the add a room on the other. Given the number of poles both are completely full. Even if I didn't have the Add A Room I would still recommend this dual 6" setup vs the standard single 4". It's a cheap addition and a great additional protected storage area.

Getting pictures of the inside are hard without a fisheye lens, so here is what I have and then a description of what it is like:
2012-10-13_13-26-46_300.jpg

There is a zippered door on both sides when the camper is deployed, so you can enter through either. When you enter you step on to a platform / entry area where I can (and I am 6'1") stand comfortably without hitting my head. This area is actually large enough to put in a chair to sit down and take off your shoes. Towards the rear is a large zippered window, looking towards the front you see the mattress in the picture. The mattress folds up and allows access to the storage box below where my water tank and battery are located. On eaither side are more windows and another large window at the very front. I anticipate ventilation to be a non-issue.

I don't have any pictures of the Add A Room deployed, I believe you can find some on the Kamparoo site. It really does double the living area size.

Hope this helps, any other questions let me know.
 

WookinPaNub

New member
Fridge box is 60" long, 24" high, 18" wide. I had them add in slide out trays on both side, lockable gasketed doors, and the cross ventilation (front and rear side) slats for the fridge. Also had the 4" tray with tie down slots added on top for additional storage. Cost for the box with these specs came out slightly over 1k.

Think I failed to mention that the fridge tray is designed to slide the fridge roughly midway for better weight balance. Similar reason for locating the water tank and battery as low as possible in the storage well right above the axle to decrease the center of gravity.
 

Forum statistics

Threads
185,958
Messages
2,880,245
Members
225,627
Latest member
Deleman
Top