Black Friday Ambo

flightcancled

Explorer
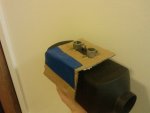
Haha right on then! Seller has gone silent. Hope I didn't jinx it! It would fit so well under the jump seat: wheel well exhaust, side intake, heat directed towards the bed in the center of the living space.

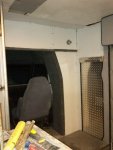
Still tidying things up in this overhaul I somehow got myself into. Crossed the cab off the list today. Lost an hour to the seat belt re-install. Damn things wouldn't spool out the belt without me jimmying the mechanism. Finally remembered rollover stories where people had to cut the belts off- they only work when straight up- DUH!!!

3 more panels in the front corner and I am free and clear to start something else- hooray! Too bad that hinges on if I can just figure out how to put the ceiling back together in a relatively seamless way

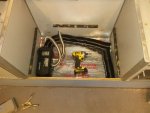
Sourcing parts for the kitchen locally and cheaply had thus far proven unfruitful. Hopefully when people have the combined Xmas credit card bills and need to pay taxes things start flying onto craigslist.


Sent from my iPhone using Tapatalk
 

patoz

Expedition Leader
Did you take the entire ceiling out, and is yours one piece molded fiberglass? If so, and other than sitting on top of the cabinets, what holds it up?
 

flightcancled

Explorer
Ugh.

It's a cellulose board with a texture top coat. Like tile board but not smooth. Four boards make up the ceiling leaving a gap in the middle for the wire chase which is covered by padded panels. Similarly they left the front open because with the reach through there were cabinets along the entire front ceiling.

I have the fun decision to make of weather to tear the whole thing down or try and patch it. Fiberboard probably can't be hung from the ceiling because it will sag like crazy so I am still scratching my head a bit.

Here's the seller's photo- all I have that shows the ceiling on hand.

975853bef8543101d153b5e5c988cd4d.jpg


Sent from my iPhone using Tapatalk
 

patoz

Expedition Leader
Well, I hate that you have fiberboard but at least it sounds like you have access above it, if you need it.

Mine is one piece molded fiberglass gel-coat, with two rows of recessed lighting, three AC/DC florescent lights, and a front to back wiring channel next to the driver's side cabinets. It was put in first and then the cabinets underneath it, but they stop about 3/4" below the ceiling and the gap is hidden by the upholstered trim. So it doesn't look like they are supporting it in any way. Maybe, there are screws closer to the walls that I can't see.

The long grab rail is mounted with 1 1/4" long screws, which go into a heavy metal bar above the fiberglass, since this rail is considered safety equipment. I took the rail out to gain some much needed headroom, and the ceiling doesn't sag or flex at all. The only access I have for running wires across, etc. is thru the 8" holes where lights are mounted.

IMAG0549.jpg
 

flightcancled

Explorer
Indeed there does not seem to be any elegant ceiling solution I have seen. Anything you do up there has to start flat despite gravity, be cut into a bunch of times, and hopefully be removable.

At least I don't have the insane padded Vinyl ceiling that the donor ambo had. There was no changing that, and any tear would be impossible to make disappear.


So I've noticed that my 30A "battery charger" is also being used to run the fluorescent lights in the box. At some point I am thinking of building a shore power sub-panel so I can run more house functions without having to drain the batteries while I am plugged in. It would be nice to have the LED lights available as well as the counter lights for cooking and the cabin ceiling lights.

I've also noticed that my house bank is seemingly charging when it shouldn't be, and truck batteries have drained when they shouldn't be. Looks like the banks are connected somewhere by accident. I don't know how that happened. Everything was 100% correct before the rusty floor fiasco. It is also entirely possible I just linked them with the selector switch a few times by accident.


Sent from my iPhone using Tapatalk
 
Last edited:

tgreening

Expedition Leader
How about this. Get yourself some more diamond plate. Cover the entire section above the pass through, including the gap on the ceiling, carry that all the way to the starboard bulkhead and also cover the square area above the diamond plate door. If you wanted you could even replace that padded section with the diamond plate. It would at least look like it was done that way from the beginning, and maybe tie it all together from an esthetic standpoint.


0f8a3c91bdb3ba383874cbe15945ec3c.jpg
 

Bikersmurf

Expedition Leader
Indeed there does not seem to be any elegant ceiling solution I have seen. Anything you do up there has to start flat despite gravity, be cut into a bunch of times, and hopefully be removable.

At least I don't have the insane padded Vinyl ceiling that the donor ambo had. There was no changing that, and any tear would be impossible to make disappear.


So I've noticed that my 30A "battery charger" is also being used to run the fluorescent lights in the box. At some point I am thinking of building a shore power sub-panel so I can run more house functions without having to drain the batteries while I am plugged in. It would be nice to have the LED lights available as well as the counter lights for cooking and the cabin ceiling lights.

I've also noticed that my house bank is seemingly charging when it shouldn't be, and truck batteries have drained when they shouldn't be. Looks like the banks are connected somewhere by accident. I don't know how that happened. Everything was 100% correct before the rusty floor fiasco. It is also entirely possible I just linked them with the selector switch a few times by accident.


Sent from my iPhone using Tapatalk

I had the same problem with my starting batteries. Turned out a PO had wired the center terminal on the isolator to the (+) on the Starting battery. When the house batteries ran down a bit, they'd be 'charged' off the starting batteries... No good. Hope you can sort it out.
 

flightcancled

Explorer
Got the thing together again finally. I was procrastinating a little bit with these last pieces. I had to cut them a little oversized in.one direction, pin them on, and then slowly trim and pin until they were in tight, remove, and repeat. For some reason the first time is never good enough.

Better photos to come. I need to find or make a cover for that light still in the top corner. You can also see the color difference between the old carpet and the new. I will have to fix that or it will drive me nuts.
 

Attachments

  • uploadfromtaptalk1419209662370.jpg
    uploadfromtaptalk1419209662370.jpg
    522.8 KB · Views: 41

patoz

Expedition Leader
Looks good Alex!

Is that the light that was in the old compartment that was there? And what is your plans for the compartment door, are you going to leave it as a function door?
 

flightcancled

Explorer
It'll look better once I am done and can caulk the seams.

That's the back of the projector I retrofitted into one of the scene lights.

The door extends below the floor into a hidden storage area. Its where they would have added the drawer for the house batteries. I haven't decided what that slot will be yet, but the door will remain at least for now. If/ when I do paint I will consider welding it shut. Right now I am toying with putting a fantastic fan into the door to vent the fumes from cooking. It also would make a draft directly over the bed from the back door windows.
 
Last edited:

flightcancled

Explorer
The Espar Airtronic D2 showed up. Wow wow wow! I might have to break guy code and read all the directions first here boys. There is quite a bit going on in this setup.

The unit appears to be brand new. Included is the 7 day timer and the inside temperature sensor. Bonus! Absent are the vents for the ducting and the gasket to direct mount to the floor. No worries, I wasn't planning on that anyway. The unit is going right above the wheel well, not a good spot to hack through anyway.

I will probably vent exhaust to the side of the rig, and intake from below. Ducting the interior air will.be a similar head scratcher with cabinets built onto the exterior cabinets on both sides.

Merry Xmas!
 

flightcancled

Explorer
Here's everything.

e1811571e67ca15755087429a88f3f38.jpg


Started by making a stencil for a side mount bracket.
 

Attachments

  • uploadfromtaptalk1419456801259.jpg
    uploadfromtaptalk1419456801259.jpg
    497.2 KB · Views: 30

flightcancled

Explorer
So today the seat came off, more insulation went on the wheel well while I still had a chance, then I started drilling holes in my baby.

Combustion intake goes down into the wheel well and then back through the rear wall of the wheel well into the air space behind the fuel tank fill.

Exhaust ports directly out the side. The directions want a few foot space with both below the rig. I wasn't super comfortable doing that given the apron these rigs have.

988f9ba9c1229037fad22a2cdbb746c5.jpg


Here it is mocked up without wiring or fuel.supply/pump. The fuel pump will be mounted inside to prolong its life and protect the wiring contacts from corrosion. The impact is positioned where I will add a coolant heater down the line. At that point I will just add to the system as necessary.

Right now the entire wall is out so I can route the wiring for the controls to the house switch panel. Fun fun.
 

Attachments

  • uploadfromtaptalk1419538547100.jpg
    uploadfromtaptalk1419538547100.jpg
    533.3 KB · Views: 34

flightcancled

Explorer
Ok guys need some help. While trying to sort out how I am getting fuel I snuck my head above the tank and found this where the fuel lines are coming from. Is this a spare fuel tap!?

Otherwise I need to get creative or drop the tank... Espar wants you to drill a separate feed into the tank. I am guessing that means I can't just tap into my existing fuel line for some reason.

d92de98878d81e7173bd6c7f23801020.jpg


6d9dbe7e6e7cc545ae7f81cce2902af0.jpg


37f33f6feafb9f6a14cd8fadf8a33027.jpg
 

tgreening

Expedition Leader
My guess is its a breather and thats a roll over check valve.

Hard to tell from the pic but I'm guessing thats sticking out of the fuel sending unit assembly? Here's what I would do. I'd get myself a new fuel sending unit and drill a hole in that vs the tank. There is usually empty space on top of them. Drill the hole and get some steel fuel line and make myself a pickup tube and silver solder it into the new hole. Put a filter sock on it. Drop tank, swap them out, modify the old one as a shelf spare, and move on.

I'd sure rather do that than drill a hole in the tank. Them recommending against taping into an existing line might have something to do with flow concerns with the fuel system demand starving the heater, or even the other way around. Might not be a problem, but not sure I'd risk having to redo it if it turned out to be.

But thats just me. :)
 
Last edited:

Forum statistics

Threads
185,897
Messages
2,879,550
Members
225,583
Latest member
vertical.dan
Top