Ford E350

dar395

Adventurer
new ferd 003.JPGnew ferd 002.JPGnew ferd 004.JPG
did you add a tow hitch to the front or just change the front bumper?

Yes I did add a front hitch! In the second photo it's there but really hidden well. Here are some closer shots of the hitch, rated at 10k, 500# on the hitch and I'm also showing a winch mount plate. This is a Draw tite, the added tow ring/points seem to be very well built and added a little to the front-end look.

Will be used to transport light weight motorbike and at time supply rack.
 

dar395

Adventurer
Having the paint of the body fully cleaned and waxed the van is starting to take shape. Removed all the inside panels and cleaning the next prep will be insulation.


new ferd 001.JPG


In the process a door cable broke in the rear barn doors, that been a trip and hold up as not only did I need a tool for the removal I have to wait for the parts
 

dar395

Adventurer
This has been a slow start process in building the van, for just over a month it has been barely touched. We have plans for the end of this month to use it so I'm forcing a little time off (4 days) to get the project moving.

I was able spend a little time working on the lay-out which seems to be working out well. Tires were installed and looking a little beefier as well.


DSCN0934.JPGDSCN0939.JPGDSCN0936.JPG
 

dar395

Adventurer
Longer term Van

We're looking at longer stays in this van, for us that is a time frame of 3-4 weeks with miles around 3-5k per trip. With these planned time/miles being the base of the build items such as water, comfort in the useable space and other living utilities will be part of the planning process.

More water, shower, storage as well as entertainment are all being added but in a frame of budget so most if they wished could travel in a van in this budget range.

We were able to meet van travelers through-out our past travels in our old (Delta Dawn) van, we took notes not so much to see what could be a perfect build for us but just how far can we take it with-in a tight cost budget, and what or how many items of comfort can we build in to her. Many of our understandings and idea's came from here, others in the middle of the desert to the ocean shores of the East Coast we hope we're able to pass an idea or two along!
 

dar395

Adventurer
DSCN0937.JPGDSCN0938.JPGDSCN0933.JPG


Adding in a front seat swivel was a must for this van, just the added service of the seat at camp and the interior space added will be welcomed, using Harbor freight mats (closed cell product) to control road noise and added insulation value under all flooring.

As always here's the money shot! as I removed the seat for the cleaning and install, seat base came from Discountvanparts.com and was a clean fit and seems to work as intended.
 

dar395

Adventurer
DSCN0946.JPGDSCN0949.JPGDSCN0948.JPG

Locating the battery box mounting holes on the frame, the articles I found directing the proper mounting of these showed that the factory mounting was here on the right side. After taking a look under the left side you'd note parking brake cables as well as air conditioning lines. They fit well upon the frame, you are able to see them from a side view but are higher than the muffler. Nice, neat and no interior space used for the two house batteries!:ylsmoke:

Starting of the interior build!
 

Attachments

  • DSCN0942.JPG
    DSCN0942.JPG
    117.5 KB · Views: 40

dar395

Adventurer
DSCN0954.JPG

Mounting the sub flooring with self tap screws, all was processing along and then just one more hole to go and I tapped right into the air conditioning supply line that runs under the floor right next the left rear wheel well:Wow1:, that was not intended, I must say if you've never done this try to avoid it or try to move out of the van quickly! 1/8 inch hole can change your mood, but that's what makes these steel tents our very own in a way that many may never understand.
 

dar395

Adventurer
DSCN0947.JPG

I should have added that installing the battery boxes I did need to use a bolt fish to access the holes behind the muffler, sometimes the simple tools work best.:Mechanic:
 

dar395

Adventurer
DSCN0958.JPGDSCN0955.JPGDSCN0957.JPG


After meeting another van-er (?) (one of them from far away Canada) out in Moab near Yuma I was able to fully understand his concept of a platform build. This style is where the van is built in two or more layers the first being your "footprint" in which case our footprint will cover much of the floor base or about 8' from the rear doors to just about the side door step well. This seems like a lot of "real estate" to consume at the beginning, but much of this plan gives back a greater amount of storage and a very simple living and set-up for both sleeping area and dining all able to be completed in under two mins or less.

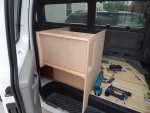
A big part of this type of build is the use of an out-rigger style to the main support frames passing through the center section on the van. This build design will be mostly 1/2 inch and 3/4 inch cabinet grade plywood, our choice is oak facing.

There will be no doors just open spaces that will have a raised framing as an opening to help "contain" items while traveling, we used part of this system in our old van and after thousands of miles it work very well for us.

These photo's show that the frame cut-outs are used to form the out-riggers, an important note to take from these photo's is that the outrigger's are kept back from the plastic side panels to help keep the noise of rubbing down, The 3/4 inch plywood works well for this task, and again no waste!
 

dar395

Adventurer
DSCN0961.JPGDSCN0962.JPGDSCN0967.JPG

The left side out-riggers mostly in place but a quick check of the time I see that it's flying by and I need to start on another sheet of plywood, This will be the start of the second tier of the platform build.
 

dar395

Adventurer
This second step is where you will start to see dedicated storage area's, in this area you'll see outside cooking needs.

DSCN0970.JPG

In this first one you'll see the stove, grill and way to the back an area for 6 gas bottles, in this van build all of our items will not only use the gas bottle's (Buddy Heater Inside) but we hope that if we need replacements we could find them being Colemen name plated.

DSCN0971.JPG

WE found that being way out camping a table is a needed item to just sit down and have that great fresh Trout with a little lemon some raw fry's wild asparagus an nice young bottle of wine, but in a van they are hard to store but hey we're planning this out!

DSCN0972.JPG

the bottom divider acts as a support to the 1/4 plywood for the table when the bed plywood base sheet is installed all will work well for the space taken, if you note this photo also show's the seat turned towards the rear.
 

dar395

Adventurer
:Wow1:

DSCN0973.JPGDSCN0974.JPGDSCN0975.JPG

Here you'll see the start of the process to complete the first tier, installing the flooring for the "cabin" or "living" area, I did not use the underlayment sheet, it's just stapled to the sub floor.
 

dar395

Adventurer
DSCN0977.JPG

While installing the flooring Fed-ex brought our new frige, this is our second one as the first had major damage during shipment. We're looking at green for our décor and on-line at wally world they have a lot of colors in these and free shipping. We,ve had one in our old camper and it was a great added option, we're going in the same direction with this one.

DSCN0979.JPGDSCN0980.JPG

As you can see very little power runs this unit, we've checked other unit and this seems to be the lowest consumption low cost unit found. We also tested it out and it work well for our needs!:beer::1888fbbd:
 

goneagain

Observer
are those battery boxes OEM? Funny enough, I was looking under my van today and mused about adding two more OE style boxes for house batteries.
 

Forum statistics

Threads
185,980
Messages
2,880,471
Members
225,705
Latest member
Smudge12
Top