Barn Door for JK factory hardtops

jscherb

Expedition Leader
Any idea to making the steps on the hinges to work with a RTT like this so you dont need an external/extra ladder? The hinges and your door grid idea could work together here.

attachment.php


I have no interest in a RTT but the idea popped into my head.

Don't most RTT's come with ladders? Mine did, I always assumed they all came with something.

But as BradS wrote, having steps like these would be a big help in setting up a folding RTT like the one I have - getting all the prop rods in place for the awnings on all 4 sides requires getting up closer to the tent than even a tall geek like me can do from the ground. The rods are easily visible in this photo...

RTTandKitchen5_zps4wckdihc.jpg
 

jscherb

Expedition Leader
there isn't a hinge anywhere near that tent's door opening, you would have to turn the tent around and mount it the opposite way its designed to be
There are other places steps like these could be mounted without drilling; I've already shown how they can mount to the tailgate hinges. I can imagine a way to mount them to the top of the tub, between the tub and the hardtop, for example.

Edit: But I should add that my current focus is mounting them to the door and tailgate hinges. Maybe later I'll work on other locations.
 

akpostal

Adventurer
Ive got a JK so the RTT is probably not an option for me, plus I have a trailer tent that doesnt need climbing a ladder, and I dont want to climb up and down a ladder.

I just like the idea steps on your hinges. With the steps on a rear door hinges and the grid with another step you could get rid of the ladder on RTTs on the JKU platform. Just an idea I got in my craw.

ETA: Probably an issue if you have large dogs in the RTT.

ETA to ETA: your fender design could be the second step to get into the RTT like the one posted without a ladder.
 
Last edited:

jscherb

Expedition Leader
I got word today from Joel at Retrofit Offroad that the Multipod LEDs I've posted about in this thread are now available on their web site. The various custom mounting brackets haven't made it to the site yet, but they're all in stock and they're working on the photography and text of the listing so they should be up soon as well.
 

kriegersa

New member
Awesome stuff as always jscherb.

This thread has become almost like a mail order magazine for me haha.

I am really interested in the HD door hinges because I just noticed on my driver rear door hinge the paint is bubbling a bit, and instead of pulling it, stripping the paint, trying to knock off the crud under the paint and re-painting it I would MUCH rather go with something designed by you to replace them with.

I look forward to seeing the progress on these!

Thanks again for all the work you do!
 

jscherb

Expedition Leader
Awesome stuff as always jscherb.

This thread has become almost like a mail order magazine for me haha.

I am really interested in the HD door hinges because I just noticed on my driver rear door hinge the paint is bubbling a bit, and instead of pulling it, stripping the paint, trying to knock off the crud under the paint and re-painting it I would MUCH rather go with something designed by you to replace them with.

I look forward to seeing the progress on these!

Thanks again for all the work you do!

Thank you very much.

The HD door hinges are designed with a slightly larger base than the factory hinges; hopefully in most cases the extra size will hide the corrosion/paint issues that plague JKs up through the mid-2015 model year.

Background facts:

Prior to the middle of the 2015 model year, the e-coat primed hinges were bolted in place on the e-coat primed doors and then the final paint was applied. Inevitably water gets in between the hinge and the door and corrosion starts. The factory fix in the middle of the 2015 model year was to put a piece of stick-on plastic on the back of the hinge before bolting the hinge to the door. Everything still is just e-coat primer, but the idea is that the plastic separates the aluminum hinge from the steel door and corrosion won't be as common.

Jeep issued a Technical Service Bulletin on the problem in 2013 (TSB# 23-021-13), it can be found online.
 

Lee_N

Member
Aluminum on steel causes galvanic corrosion due to the dissimilar metals. The plastic is to electrically isolate the two but it sounds like it doesn't work so well.

If you need another quick project (yeah, right), how about creating some HD TJ/YJ door hinges? I need some of those and think that would be a product also in demand.
 

jscherb

Expedition Leader
If you need another quick project (yeah, right), how about creating some HD TJ/YJ door hinges? I need some of those and think that would be a product also in demand.

I've already got more project ideas than I can ever get to and I add a few more ideas to the list every week. I need more time in my day to even make a dent in the list. But doing a TJ version of the HD hinges wouldn't require any time from me - after the company releases the JK HD hinges if they do well enough in the market to justify a TJ version I'll make that suggestion to them - their engineers can easily come up with a TJ version based on the design of the JK version. I probably wouldn't even be needed to test them, probably enough volunteers could be found.
 

jscherb

Expedition Leader
I've posted photos of my RTT on the Safari Cab...

RTTandKitchen6_zpsd0gh5m6h.jpg


... and photos of the new Garvin rack basket I've adapted to the Safari...

GarvinOnJK4_zpsdviy5xrj.jpg


And I've adapted the RTT crossbars to mount on top of the Garvin:

RTTCrossbars_zpsmkmnrppg.jpg


I haven't put the RTT on top of the Garvin yet because I haven't had time, but one thing I've been thinking about is the extra length of the Garvin compared to the RTT - there's probably 16-18" of the Garvin ahead of where the RTT will mount. Seems like that space should be used, so I sketched the following idea for an "RTT Companion" storage box.

RTTStorageBox2_zps3qjvolcp.jpg


RTTStorageBox3_zpsjrv7hxlg.jpg


RTTStorageBox1_zpsalzsbryu.jpg


The contents of the box could easily be accessed from within the RTT, just unzip the front flap and screen and open the top of the box. Could be a good place to store pillows, bedding, etc., stuff that would be needed once the RTT was opened up. And it could be easily accessed using the door hinge steps I'll be prototyping when I get back from this trip.

These are just rough "idea starter" sketches for now. I've sketched it as being done in diamondplate aluminum, but it could be molded in fiberglass. I also sketched it as being rectangular, but it could be tapered in the front to cut wind resistance - if I were to streamline it a bit I'd definitely want to mold it in fiberglass because it's much easier to sculpt nice shapes in fiberglass.

I'll do more sketches after I install the RTT on the Garvin and I see how much room is really available.
 

jscherb

Expedition Leader
I tested the DIY awning on the trail in Colorado this week at Hurricane Pass (12,370'). I'm very pleased with how it performed. There was a light breeze at this altitude so I needed the guy lines/stakes to secure it but the ground was very rocky so instead of pounding the stakes in I laid them on the ground and put rocks on them - worked fine.

HurricanePass1_zpsnjrlxx5l.jpg


HurricanePass2_zps98xw2dnz.jpg


HurricanePass3_zps9s75zwhx.jpg


HurricanePass4_zpshiwci2ye.jpg


I tried it in some higher wind earlier on the trip and there is one improvement I can recommend. The Ikea window shade I used has a maximum extension of about 6', of which I'm only using 4'. In higher winds the return spring on the shade isn't strong enough to resist the wind, so the wind pulls the shade out futher than the necessary 4'. The solution is to shorten the shade length so that when the fiberglass poles are inserted they put tension on the fully extended/shortened shade. I'll make this mod to the shade when I get back from the trip.
 

jscherb

Expedition Leader
Looks like an awesome trip! Man, what a view! :beer:

Here's another view, taken from the same location, standing by the passenger fender of the Jeep and looking down on Lake Como. To the left on the trail below leads down to Poughkeepsee Gulch and to the right leads up to California Pass. A trail leads down from where this photo was taken to that trail.

LakeComo_zpsrqlanugc.jpg


Good idea to shorten the material.

If it's helpful to people I can post photos of shortening the shade.
 

jscherb

Expedition Leader
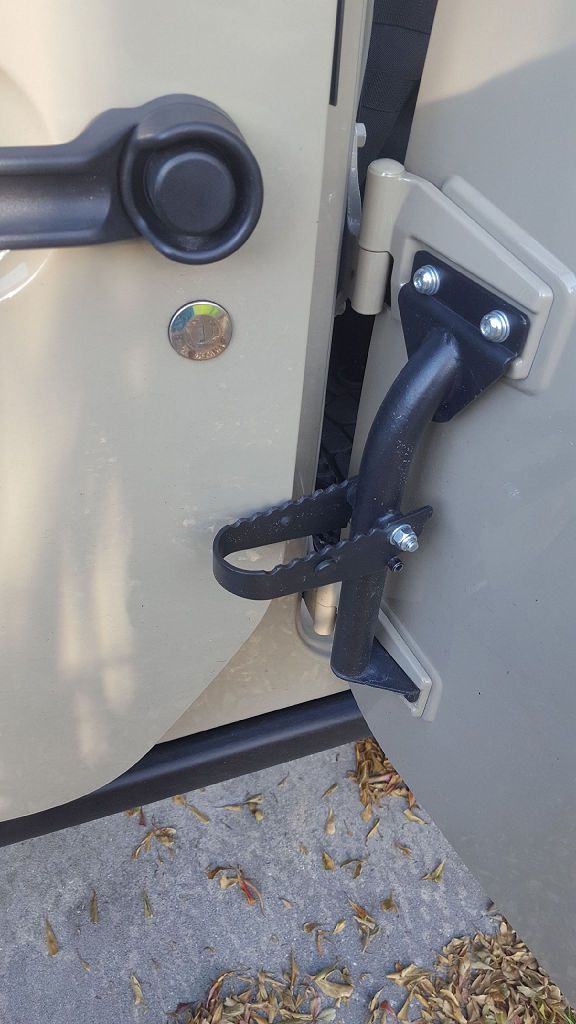
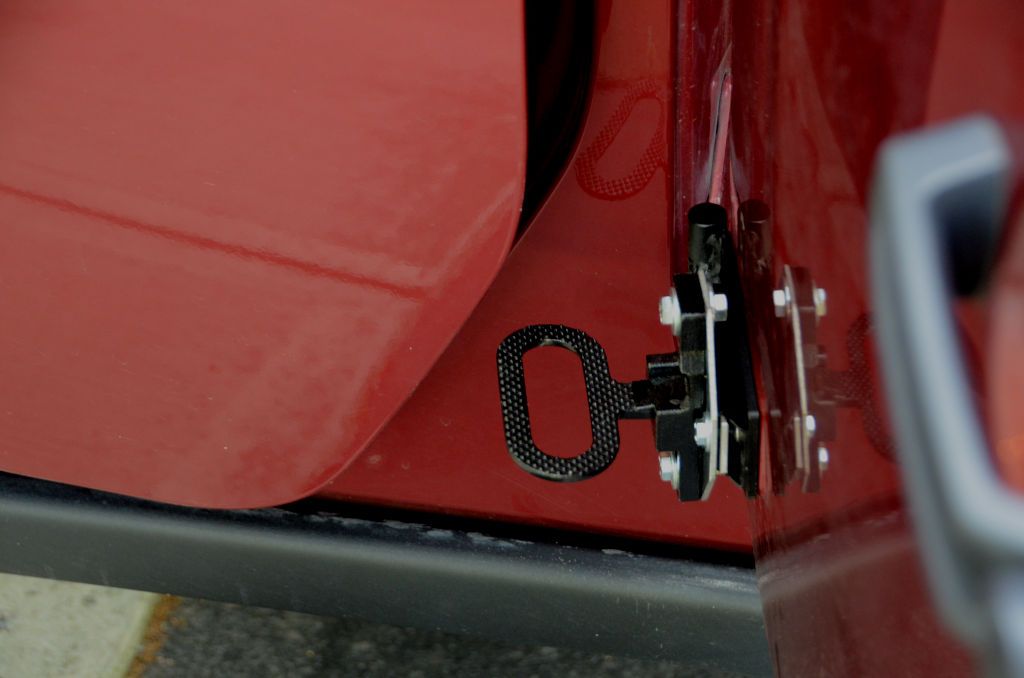
I installed one of the preproduction door hinges today so I could finalize a design for mounting a step.

HingeStep1_zps8ne0m4ja.jpg


The mounting hardware worked out very easily; it's just a mounting plate, a nut plate that slides inside the hinge, and a few bolts and nuts. The bolts I used wouldn't be the final choice if these went into production, they're just what I had handy. I haven't painted the mounting plate yet, it's still raw steel.

The step performed just fine in the 225-lb. gorilla test.

HingeStep2_zpsu5ih5fwe.jpg


One thing I like about this design vs. the other door hinge steps on the market is that you don't have to remove the hinge bolts to install/remove the step - the step installs to the hinge without loosening the door hinge bolts, so it's a lot easier to install/remove. It's quick to install, so I might only have the steps on the Jeep when I've got the rack on the top, and I'd remove the steps when I remove the rack.

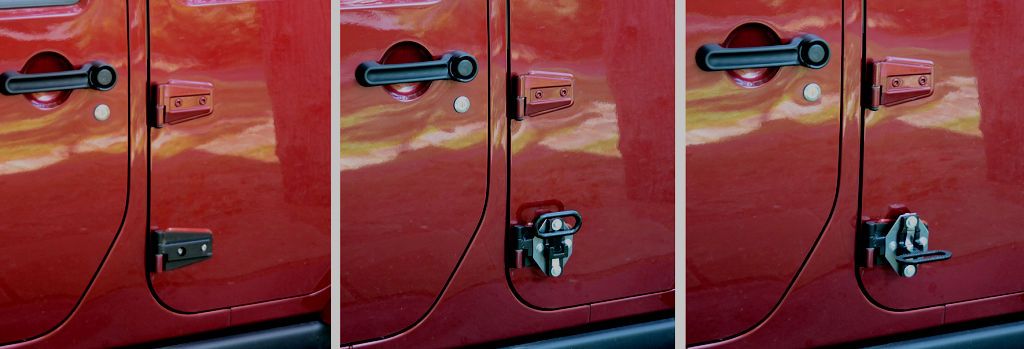
I did some research on the other hinge-mount steps on the market, and with some help from Donny discovered that all of the other steps on the market interfere with the front door when they're hinged down and the rear door is open:

KargoMasterSteps2_zpsu7uuivsk.jpg


The way this step mounts directly to the bottom hinge, it doesn't interfere:

HingeStep3_zpsgghje3yx.jpg


On the other hand, this step is lower than the Kargo Master step on Donny's Jeep because that step mounts on a bar between the two hinges.

So now some design decisions... the step mounted to the lower hinge is lower than the Kargo Master step; I don't know how big a deal that would be. But a second step could be mounted on the upper hinge, which would allow for climbing higher than the Kargo Master single step. BTW a step on the upper hinge would interfere with the driver's door when the back door was open, just like the Kargo Master interferes. A step on the bottom hinge never interferes.

I could add a bar like the Kargo Master and mount the steps to the bar, and there could be several mounting locations on the bar for one or two steps, but that would add cost - as it is I spent about $11 for the step itself (paid retail), and the mounting bracket is a simple laser-cut piece of steel so it would be very inexpensive.

I welcome your thoughts on this.
 

thechadwick

New member
I know you're taller than the average bear but from what it looks like the lower step height looks well-suited for reaching anything on the rack. With one on either side, I'd bet that all but the most vertically challenged would have no trouble with just the one step on the lower hinge. I think the trade-off of having the step mounted slightly lower, and no chance of dinging up my $750 door is a no-brainer. Plus like you said, always an option to put another one on the top for those that want it.

How did it feel standing on it? Did you notice much flex that you'd want to be ginger with getting up and down regularly? The price is right on the step and I can see myself picking the hinges up with two steps as a bundle as soon as they're available. Any idea on the timeline retrofit might be looking at for release?

*edit: you know now that I think of it, that step would be the perfect spot to install those cup holders you're always talking about:sombrero:
 

danraposo

New member
I can't wait for these hinges to hit production and sale. My back door hinges are all corroded and stiff as hell. I would love to replace all my hinges with these.


Sent from my iPhone using Tapatalk
 

Forum statistics

Threads
185,980
Messages
2,880,466
Members
225,705
Latest member
Smudge12
Top