jscherb
Expedition Leader
Here's an idea for a budget roof rack basket using two inexpensive Harbor Freight ATV Cargo Carriers:

This rack is to go on my custom hardtop, but my hardtop has an XJ rack on it so this idea will work with any rack that's similar to the XJ rack. Here's a rough drawing/photo simulation of what the rack would look like on my Jeep:

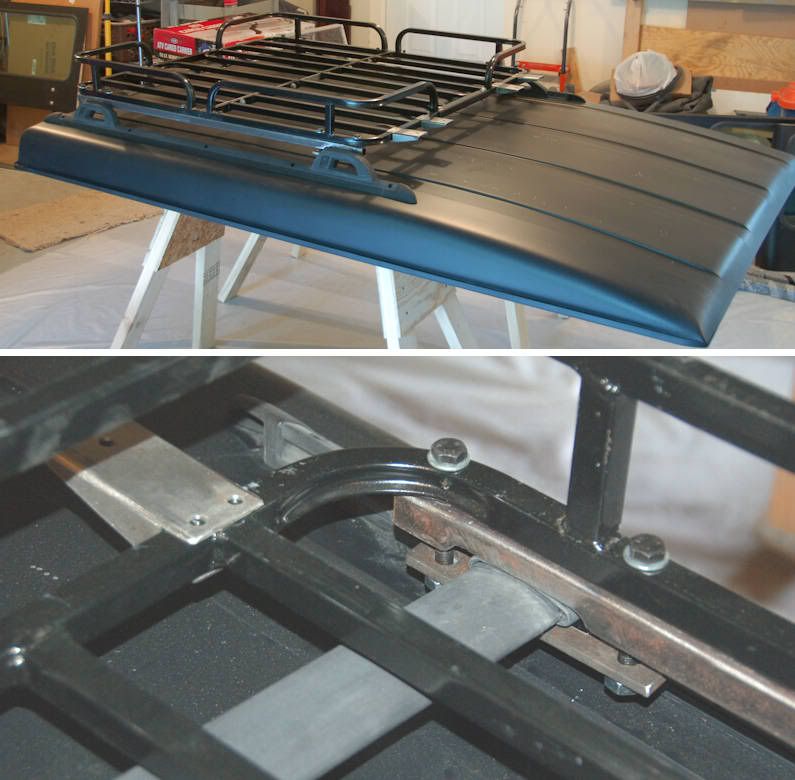
I finished up the rack basket today, all it needs now is priming the new parts and painting. The bottom photo shows a close-up of how it attaches to the XJ rack bars, after it's painted I'll put some rubber on the clamp surfaces to cushion it a bit.
Here's a photo of the rack mounted on my roof panel:
One thing I like about this basket is how the "fence" doesn't go all the way around and leaves a "valley" down the center - this will make it easier to carry long items like 2x4's on the rack.
All this took besides two Harbor Freight $32 racks ($39.99 regular price - 20% off coupon) was:
- 1 48" piece of 1/8" x 1" steel (to bolt the center together)
- 2 48" pieces of 1" square steel tubing (to strengthen the sides/form the mounts)
- 8 3/8-16 x 1" bolts/washers/nuts to bolt the baskets together in the center
- 24" of 5/16" x 1" steel strip to form the bottom of the clamps
All of the original bolts/nuts/washers supplied with the HF baskets were also used.
Total cost of the project was about $75.
The only modifications required to the HF racks were drilling holes to mount the side stiffening/mounting rails.
The light brackets (you can see one in the photo above) were made from 8" of 2" square tubing split lengthwise into a 1" channel, and will be attached with 8 1/4-20 x 1 1/2" bolts/washers/nuts. I'll drill the holes in the basket for the light brackets when I decide to mount lights on it. I'm thinking these lights would be a good size: 55 Watt 5" Fluted Light by Pro Comp and Other Jeep Parts and Jeep Accessories by 4 Wheel Drive Hardware-RH2
This rack is to go on my custom hardtop, but my hardtop has an XJ rack on it so this idea will work with any rack that's similar to the XJ rack. Here's a rough drawing/photo simulation of what the rack would look like on my Jeep:
I finished up the rack basket today, all it needs now is priming the new parts and painting. The bottom photo shows a close-up of how it attaches to the XJ rack bars, after it's painted I'll put some rubber on the clamp surfaces to cushion it a bit.
Here's a photo of the rack mounted on my roof panel:
One thing I like about this basket is how the "fence" doesn't go all the way around and leaves a "valley" down the center - this will make it easier to carry long items like 2x4's on the rack.
All this took besides two Harbor Freight $32 racks ($39.99 regular price - 20% off coupon) was:
- 1 48" piece of 1/8" x 1" steel (to bolt the center together)
- 2 48" pieces of 1" square steel tubing (to strengthen the sides/form the mounts)
- 8 3/8-16 x 1" bolts/washers/nuts to bolt the baskets together in the center
- 24" of 5/16" x 1" steel strip to form the bottom of the clamps
All of the original bolts/nuts/washers supplied with the HF baskets were also used.
Total cost of the project was about $75.
The only modifications required to the HF racks were drilling holes to mount the side stiffening/mounting rails.
The light brackets (you can see one in the photo above) were made from 8" of 2" square tubing split lengthwise into a 1" channel, and will be attached with 8 1/4-20 x 1 1/2" bolts/washers/nuts. I'll drill the holes in the basket for the light brackets when I decide to mount lights on it. I'm thinking these lights would be a good size: 55 Watt 5" Fluted Light by Pro Comp and Other Jeep Parts and Jeep Accessories by 4 Wheel Drive Hardware-RH2
Last edited:


")
