EarthRoamer XV-JP Summary Build Thread

mhiscox

Expedition Leader
About a month ago, I went to a Sprinter builder's thread on another forum when I wanted to get a quick look at the work he had done. It was a great build, but he was one of those guys that showed all of the gory details of how everything went together, so it took quite a while to figure out what the finished product actually looked like and why.

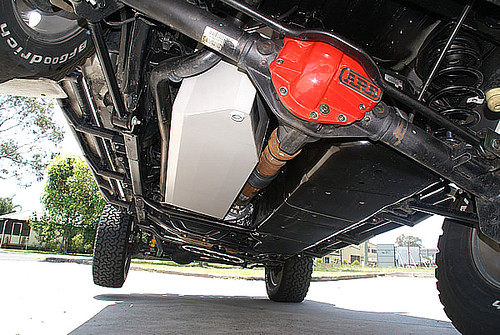
And that was the point at which it struck me that our main XV-JP thread has the same problem. It was moving along OK for a while, but then we, quite correctly I think, got into the specifics of how things were built and why they were done a certain way. The result was that there are now nearly 700 posts to wade through on the main thread, and if someone just wants to know a little something about what's going on, there's too much detail.

So I'm going to do a summary build thread that sort of cuts to the chase about how the EarthRoamer XV-JP got turned into our one-off, self-contained Wrangler motorhome. Before beginning, however, here's where to go to get all of the rest of the relevant information:

The big thread is here; it discusses pretty much everything about the truck and why it got modified the way it did:

http://www.expeditionportal.com/forum/threads/51254

But there are near two dozen threads around the Portal that reference the XV-JP, and they may, depending on your interest, be worth a look. Some of the principal ones are:

-- EarthRoamer announces the XV-JP and we all get excited: http://www.expeditionportal.com/forum/threads/3838.

XV-JP 01.jpg


-- The XV-JP does the Rubicon: http://www.expeditionportal.com/forum/threads/7694 (and an ExPo video here: http://www.expeditionportal.com/component/content/article/41-w/1847).

XV-JP_and_Expeditions_West_On_Rubicon-25.jpg


-- Scott Brady buys, builds, tests and uses an XV-JP: http://www.expeditionportal.com/forum/threads/13788 and http://www.expeditionportal.com/forum/threads/14395,

XV-JP_in_process.jpg


-- and Scott drives his through Central America to Panama: http://www.expeditionportal.com/forum/threads/23639.

calakmul (1).jpg


Then I buy this 2007 XV-JP, the third one made, off of eBay in the fall of 2008:

-- And I get a skillful driver to fetch it for me and drive it through the Rockies and take cool photos: http://www.expeditionportal.com/forum/threads/19489.

2949392006_bab8cc8695_b.jpg


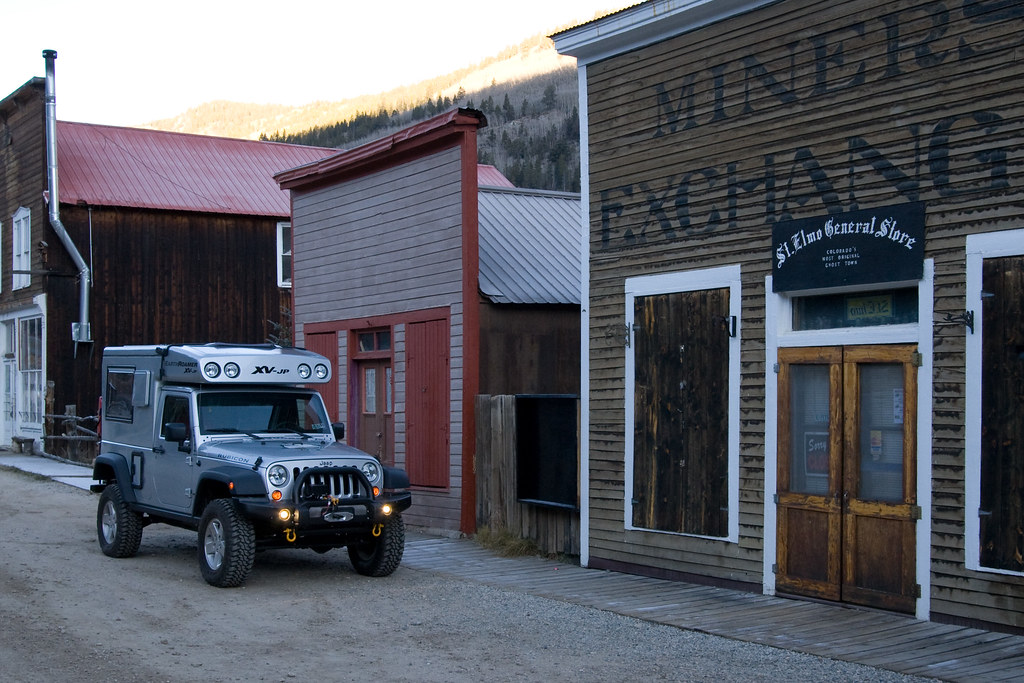
-- And, after we finished it, Paul Jensen gave it a test drive around the Northwest, taking really nice photos as he went: http://www.expeditionportal.com/forum/threads/76018

2+-++(11).JPG


It'll take a few days to post up all of the information. If anything that gets posted produces a question, don't hesitate to ask.
 
Last edited:

mhiscox

Expedition Leader
And we're off . . .

The truck was purchased used after the original purchaser decided, after a whopping 1400 miles, that it wasn't all he'd hoped for. It was purchased from a dealer in Philadelphia through an eBay transaction,

xvjp-1.jpg


And I was able to get a Pennsylvania-based senior ExPo member to drive it out to EarthRoamer's Colorado offices (and provide an adventurous test run through the Rockies),

xvjp-38.jpg


from whence I picked it up and drove it back to Portland.

P1000704.jpg


So far, so good, but the truck wasn't in the Oregon weather for long before it became clear that it wasn't set up for long periods of time in the wet. The biggest issue was a problem with water getting into the tent from various leaks, made worse by the impossibility of finding enough good weather in the Northwest winter to get things dried back out. The tent mildewed, metal cabin parts rusted, and long-term use turned up another dozen shortcomings for my particular situation. All in all, the whole design, while perhaps perfect for certain people in certain places, wasn't going to work for me.

The biggest change was to give up on the fully-opening tent with its giant bed and instead go with a Westfalia-type clamshell top that would give standing room but needed less space and had less drippy tent material to wrangle. This was done by using pneumatic struts installed by Upscale Automotive to open the front lip of the tent, leaving the existing hinge for the rear.

Lifting roof 08.jpg


Lots about the interior and the cabin systems wasn't right for me, either, so Upscale also took out the curbside refrigerator and toilet and some other components.

ER Upscale 01.jpg


Upscale also mounted the Foxwing awning, with the thickness of the cabin fiberglass providing plenty of thickness to make mounting the awning brackets very secure. Similarly, the aluminum Jaos roof rack was mounted on isolation bushings straight through the top.

P1010541.jpg


There was much to like about the way EarthRoamer built up the front. An AEV bumper was equipped with a Warn 9.0RC winch and synthetic line. The fog light holes were filled with Hella projector driving lamps that come on with the high beams.

xvjp-5.jpg


The XV-JP comes equipped with four PIAA HID aux lamps in what we've come to call the “nose cone.” On top of the nose cone is 80 watts worth of solar panels.

P1010783.jpg


The original Goodyear mud terrains got squirrelly early in their life and I replaced them with Goodyear Duratracs (285/70R17s) on Grand Cherokee steel winter wheels. The MT/Rs had been rubbing from the get-go, so Spidertrax spacers got added.

P1010780.jpg


More soon.
 
Last edited:

GR8ADV

Explorer
Hi Mike. I always love to read about this fine machine and what you have done and had done. The simplicity of the summary made me chuckle. It is kind of like Winston Churchill summarizing his life by saying he was born, worked in government and then died. Thank you.

:sombrero:

edit, ok so I thought that you were done....my bad. :)
 
Last edited:

mhiscox

Expedition Leader
Moving on . . .

It was all well-and-good to change the roof opening around, but it left no choice but to create custom made walls. Some thought was given to having hard-sided walls, but after thinking it through, the best thing to do seemed to be to make them out of waterproof breathable fabric. The tent material was laboriously planned, cut and installed under the direction of James Lombardo.

ERJK5.JPG


Total weight of the tent pieces is three or four pounds, well under 10% of the original fabric weight. Additionally, the fabric beaded water, making it pretty easy to shake off most all of the rain before rolling up the sides up for storage. It takes between two and five minutes to put the tent up, depending on how much you want to secure it. There are probably enough snaps and (very) aggressive Velcro strips to hold it in place in a hurricane. It takes about ninety seconds to put it down. The accompanying Foxwing awning is also very quick to deploy and store, though like the tent, a lot depends on how bombproof you've decided to make it.

ERJK10.JPG


James also designed and executed the truck’s impressive vinyl graphics. They get many favorable comments.

ERJK6.JPG


Even running the new DuraTracs, the on-pavement handling of the truck, which weighs 7,000 pounds, was not real good. On the recommendation of Scott Brady, who owned an XV-JP at the same time, James installed the Nth Degree (now AEV) suspension. Scott’s recommendation of the 3.5 inch springs in the front and the 4.5 inch springs in the rear was perfect. On-pavement ride is freaky good and stability is excellent.

P1010795.jpg


The rear bumper and rack from Wilderness Products was quite a production. Big spare tire and two full Jerry cans . . . must have been an easy 130 pounds on it even before adding the ax, shovel, and storage case there was plenty of room for. When I bought the truck, I thought this was all to the good, but in real life, it was a pain.

ER19.jpg


If the rack was latched, you couldn’t get out of the back door of the cabin or use the rear window. And to even just open the rear to toss in a jacket, you had to carefully unlatch the rack and carefully set it all the way open; you didn't want it swinging free given its considerable momentum. So the rack was removed and a Pelican case, mounted on isolation bushings, was put in its place. I had previously used a similar case on my Sprinter camper and found it very handy.

P1010794.jpg


At first glance, mounting the big case would seem to preclude using a receiver-mounted motorcycle carrier, but it turns out there's no interference. (Just lucky.)

P1010400.jpg


The XV-JP, with its impressive drag coefficient and road hugging weight, struggled to reach a 300 mile range, and a combination of headwinds, stop-and-go traffic, high-speed freeway cruises or plodding off-road runs could easily put it below 250. I was fortunate that Long Ranger made a fuel tank for the JK, and also that James Lombardo could procure one and install it. The truck now has 40 gallons of capacity, reliably giving 500+ miles of range.

4711984527_4c06092bb5.jpg


The bad news was that the aux tank had to go exactly where EarthRoamer put the two 105 amp-hour Lifeline AGM batteries that powered the cabin systems. They were temporarily dumped into the cabin, initially being just carried on the floor of the partially-demo’d interior, instead of getting to live down low under the really cool (and really sturdy) EarthRoamer skid plate, which has gone from being over-the-top battery protection to over-the-top aux fuel tank protection.

P1010796.jpg


James Lombardo also added the ARB diff covers. What’s not on display, but is a key modification to the JK, is that it has 5.13 gears. This gearing, while costing some fuel economy, is critical in making the truck perform adequately.

ERJK7.JPG


More to follow. Ask questions if you have any.
 

squeezer

Adventurer
Not a single mention of the super slick no drill stainless steel front license plate mount...(snif') My feeling is hurt!!! :safari-rig:
 

mhiscox

Expedition Leader
Not a single mention of the super slick no drill stainless steel front license plate mount...(snif') My feeling is hurt!!! :safari-rig:
It shouldn't be. That mount will be the most important entry in my subsequent thread about the Jeep's farkles. You don't want to be in this thread; this is the thread for the basic stuff, not the really trick stuff. ;)
 

mhiscox

Expedition Leader
Onward . . .

A very good addition to the rear was to add a retractable step to make it easy to get into the cabin from the rear door. This Bedstep, made by AMP Research does not come in a version for a Jeep; we fabricated ours out of the Toyota version.

P1010789.jpg


The roof rack setup on the Jeep is pretty sophisticated. A key feature is an Alu-Box container that holds a lot of essential stuff that you don't expect to need all the time. There's also the poles for the Foxwing and its attachments, emergency water, gas for the generator or moto, and a pair of MaxTraxs.

P1010555.jpg


In front of the roof rack is the spare tire. This tire, a Mastercraft Courser on an alloy wheel, is narrower and less heavy than the other four, but it is the same diameter.

P1010537.jpg


Because there are lots of reason one might want to be on the roof (and remember that it's thick enough that there's no problem doing that), we added large, heavy duty folding footpads bolted through the side of the cabin. These steps, commonly used on fire trucks, make it easy to get to the roof.

P1010791.jpg


The factory and auxiliary tanks are tied together so they fill was one through one filler neck that's behind the rear fender. The water fill to the 25-gallon fresh water tank is in front of that behind the driver's window. Both fills are covered with screw lids and locking covers.

EarthRoamer Jeep 1.jpg


The truck came from EarthRoamer with a Thetford cassette toilet under a cover on the passenger side. I'm usually a big fan of that product, but in the XV-JP execution, you had to sort of disassemble the interior to get at it, taking up your bench cushions so you could lift the cover.

ER38.jpg


That wasn't going to work, so the toilet and its base was one of the first things to go. The good news, however, is that Paul Jensen figured out a way to build a propane locker that used the exterior door from whence the cassette used to be extracted for access. This gave room for two four-liter bottles, an automatic changeover valve and a solenoid controlled remotely from the cabin. Being able to re-purpose this hatch was one of the best bits of good fortune in the build.

P1010802.jpg


There were some problems with the plumbing, including leakage from the tubing from the grey water tank to its valve (previously in the cabin). In redoing the drainage, a more robust exterior valve was mounted curbside under the passenger seat.

P1010813.jpg


I think that does it for the exterior. Let me know if there are questions.
 

mhiscox

Expedition Leader
On to the interior . . .

Most of this stuff is pretty obvious from the pictures. Ask if there's something you need to know, ask.

There's a good-sized copper-topped counter along the streetside edge. There's room for a 0.7 cubic foot microwave if you want to carry it. There are fiddles on the three open sides.

P1010850.jpg


We built in a single propane propane burner toward the right.

P1010846.jpg


There's also a propane connection at the end of a hose stored at the back edge of the cabin. This can be used for a catalytic heater put on the countertop or, with a stored extension, to get propane outside of the cabin (to a propane campfire, as an example).

P1010848.jpg


The solid-surface material sink is farthest right (directly behind the driver's seat). There is a faucet for purified water at the left. The main faucet is on a hose which pulls out enough to serve for showers.

P1010847.jpg


In the forward underbench space is the Porta-Potti on a slide.

P1010849.jpg


Aft of that is the 35 liter Dometic fridge, also on a slide.

P1010851.jpg


The floor is generally kept covered by a study vinyl material called Plynl. The piece sits loose on the floor.

P1010864.jpg


The floor itself is a built up teak panel with copper end inserts, It, too, lays loose on the floor.

P1010865.jpg


Under the teak floor is a rubber mat floor, which is the sturdiest of all the alternatives; it's what you'd use if you expected things to be messy. Toward the front you can see the shower pan. There's a curtain you can hang from the ceiling and then, by tilting up the teak floor, you can stand on the shower pan and use the sink faucet to take a shower.

P1010866.jpg


At the rear of the cabin, there's a fold-down sold surface table. It was originally held by magnets, which let it fall open accidentally too often, so aggressive Velcro was added.

P1010860.jpg
 

Keyne

Adventurer
Awesome stuff. Such a cool rig. Thank you for posting. I loved reading the build as it was happening but nice to see it here with the details explained. I really wish Earthroamer would build start up the JK project again but do the interior plan and roof like yours. I wonder if without the custom details (e.g. copper counters, inlays, and those awesome cabinets) they could build it reasonably priced. I think yours shows how they could built it using cabinets (the light wood) and materials (leather, windows, etc.) of their other products.

Also, have you used it with a motorcycle attached to the rear? If so how much did it weigh and with it extended aft of the Pelican box how did it impact the weight balance?
 

mhiscox

Expedition Leader
I wonder if without the custom details (e.g. copper counters, inlays, and those awesome cabinets) they could build it reasonably priced.
Thanks for the compliments about the rig, and for raising the issue about the cost. Yes, for a variety of reasons, it'd be significantly less expensive to build this design than ER's original. However, to make it a profitable venture, someone (not me, though I sure thought about it) would have to commit to making, say, ten of them on spec. Once you did that, some important economies of scale would kick in, the most important being that the tent pieces and all of the wooden cabinet and bench pieces could be quickly cut by CNC machinery. Remember, too, that the ER cabins went onto some pretty built-up Rubicons, what with the special bumpers, winch, lights, etc. I would guess my Jeep would have been about $60,000 as built up by ER, and the conversion about $70K. I believe that if you changed that to a $45K Jeep and a $55K conversion, the campers could be sold for the archetypal $99K and they might find buyers. You'd lose some of the things that made ER's version so trick, but the overall functionality would probably improve for many users.

Also, have you used it with a motorcycle attached to the rear? If so how much did it weigh and with it extended aft of the Pelican box how did it impact the weight balance?
My custom Honda XR600R weighs right at 300 pounds,

P1000889 cropped.jpg

and the Joe Hauler carrier adds about 50. Now, I had enough physics to understand that sticking 350 pounds of weight levered off the rear bumper should suck, but it didn't. In fact, I rarely would feel that the moto was there. Chalk that up, I'm sure, to the sturdy attachment of the Wilderness bumper and to the heavy duty Nth Degree springs. When I'd hit a bump, nothing exceptional happened at the rear. I think I'd trust the setup for most trails, partly because the more gruesome it got, the more you'd slow down and that would reduce the force. What might be a problem would be undulating (don't get to write that word much) trails where there was a lot of front-to-back pitching which would fling the carrier up and down considerable distances. That could well cause a problem. But for most of what will be encountered, seems like we're good to go.

FWIW, the carrier is theoretically good to 500 pounds, but change the 300 pound XR to a 500 pound trailie and all bets are off. I'm feeling pretty good about a 300 pound bike when it's bumpy and maybe 400 pounds on pavement, but I personally don't intend to go any higher. Admittedly, though, it's all guesswork.
 

mhiscox

Expedition Leader
And some more:

The XV-JP originally had this interior:

xvjp-12.jpg

with the chest refrigerator and the Thetford cassette curbside and a set of storage cubes on a shelf on streetside, along with the sink. The fabric cubes seemed a workable storage system when I bought the truck, but it wasn't long before it became clear why we don't store our bathroom and kitchen stuff in opaque fabric cubes at home.

So I learned that drawers are vastly superior, and Paul Jensen hand-built an outstanding set into the streetside cabinet.

P1010853.jpg


What looks like two very narrow "drawers" in the above picture are actually pull-out tabletops, placed at the perfect height for eating, keyboarding, game-playing, etc. They were a very good idea and have a lot to do with making the cabin functional.

P1010771.jpg


Most of the controls for the cabin systems and lighting are on a bulkhead at the front of the cabin. From far left to right, the components are: a) under-valance counter LEDs, b) fresh water level and water pump switch, c) pneumatic struts up and down, d) front and rear ceiling LEDs, e) petrol heater switch and thermostat, f) propane solenoid on-off and alarm, g) foldout cupholder, h) multipurpose RAM mount (most often used for LED room light or music player), and h) a Lacrosse "weather station"/clock, with in/out temperatures and max/min memory.

P1010856.jpg


After the house batteries got moved from under the truck, they sat on the floor of the truck for a while while we figured out an interior plan.

P1010235.jpg


I was fortunate that, when laid on their long axes, one on top of the other, they were the right height to fit into the aft end of Paul's curbside cabinet, rearward of the refrigerator, We also installed the Prosine inverter in this area, as well as adding external outlets and a vent for the inverter's heat.

P1010861.jpg


On the front of the back end of the curbside cabinet are the remote panel for the inverter, the Xantrek battery condition/use monitor and a Blue Sea breaker panel with the switch that allows the house battery bank to be connected to the chassis system so you can start the truck should the starting battery die. There's also another conveniently placed folding cupholder.

P1010854.jpg


Seating is on leather-covered cushions, a seat cushion that sits on top of the bench and a back cushion that rests against the curbside cabin wall. The seat cushion (with a small self-inflating pad on top) also serves as the "bed", once it is pulled out some toward the aisle and the foldup "extender" at the front end of the bench is raised to make the bed long enough.

P1010857.jpg


I was able to attach Velcro in strategic places to keep the backrest cushion from falling forward when driving, but that wasn't such a good idea, since the cushion blocks useful vision to the curbside rear. So a different system was used to make it easy to flop the cushion forward and have it stay in place while transiting. When I arrive, I can put the backrest into position without detaching the Velcro.

P1010858.jpg
 
Very curious about your wall vent fan. Is it a fantastic fan roof type vent mounted sideways on the wall? Any problems with it leaking? Thanks for the info.
 

mhiscox

Expedition Leader
Very curious about your wall vent fan. Is it a fantastic fan roof type vent mounted sideways on the wall? Any problems with it leaking? Thanks for the info.
It is indeed a Fantastic vent fan, no different than in the roof of a zillion RVs. It is installed so that the hinge for the vent is to the top, and given that there is a lip all the way around the cover, it doesn't leak. However, one thing about hinging it this way is that you could stick your fingers into the moving blades. Fortunately, anyone tall enough to do that will, one hopes, be smart enough not to.
 

JRhetts

Adventurer
Mike

I ALWAYS enjoy reading your posts, especially the detailed ones. They are full of humor, information, creativity, perseverance and warmth. Just like you.

I also wanted to confirm that the photos are of a real vehicle — not a photoshopped fantasy. For those who have not had the chance to see it, it is a work of art!

My wife and I lived alongside our [just sold] JK for three months driving to Panama; that worked OK, but with all our gear, there was absolutely NO living room inside. This rig would permit an individual to live inside even thru the nastiest weather. Jensen and Hiscox really pulled it off. And from personal experience, it drives great!

Best, John
 

Forum statistics

Threads
185,891
Messages
2,879,278
Members
225,450
Latest member
Rinzlerz
Top