M416 Based Military Off-road Trailer Build - Desert Build with Lock-N-Roll hitch

Bonofied Suiter

Bonofied Suiter
M416 Off-road Trailer Build


I hope you enjoy this build thread on my trailer. My vehicles are always a work in progress but this trailer project is about completed at this point. I'm quite pleased with how it came out and have no regrets. Please check the end of the thread for updates and feel free to comment or ask any questions.


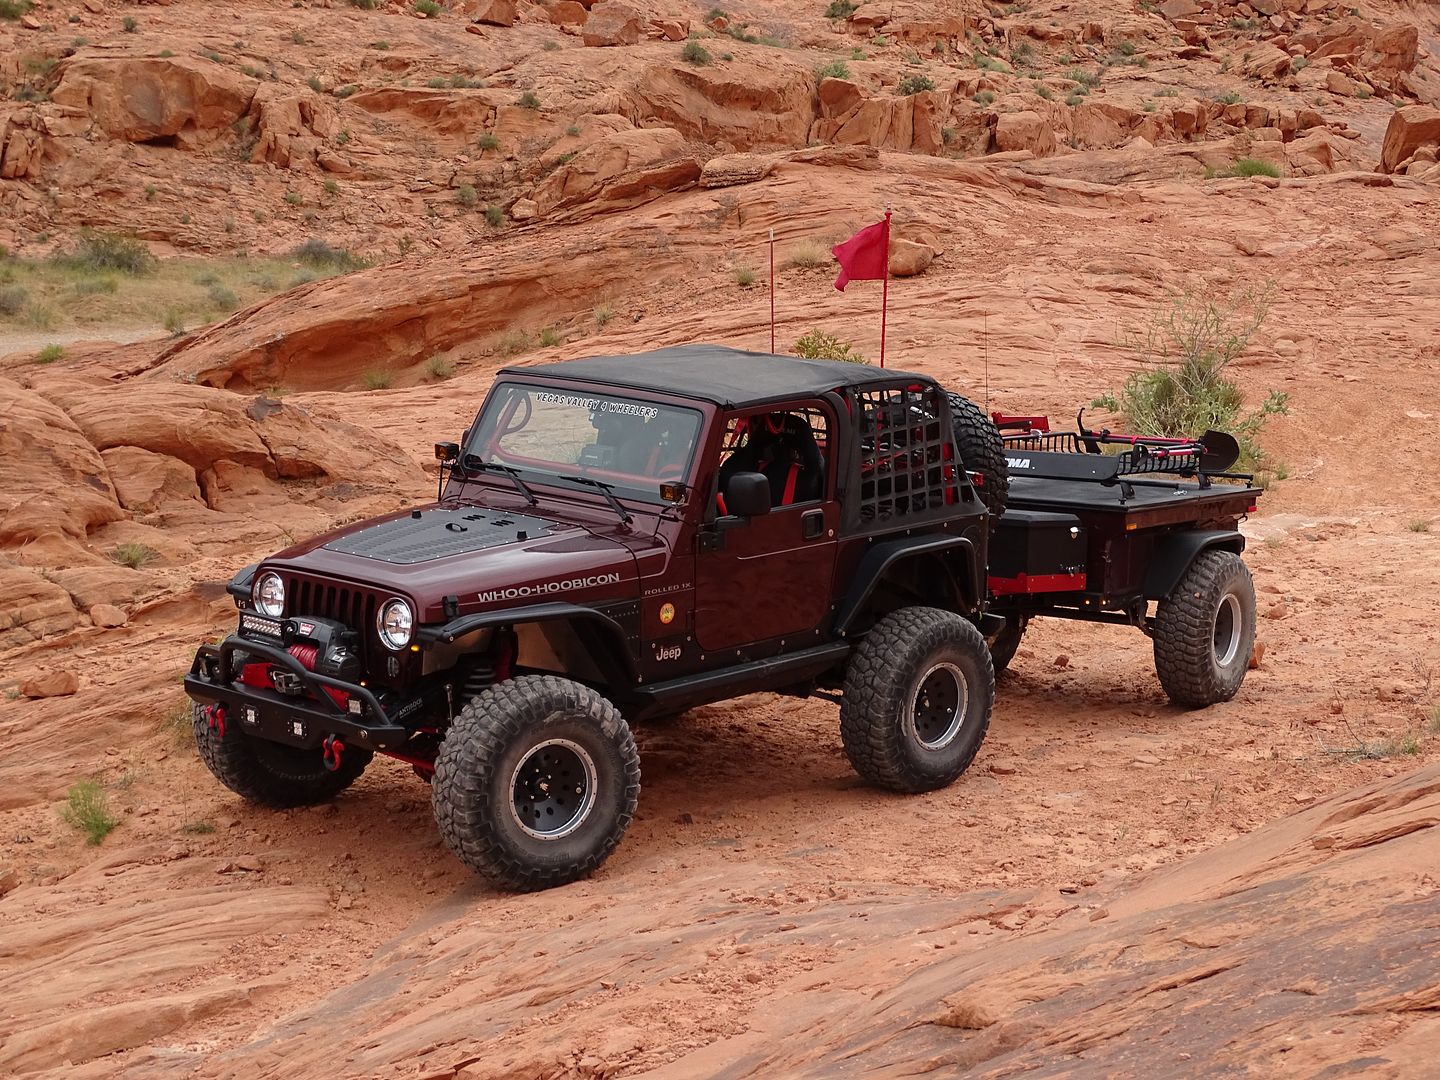
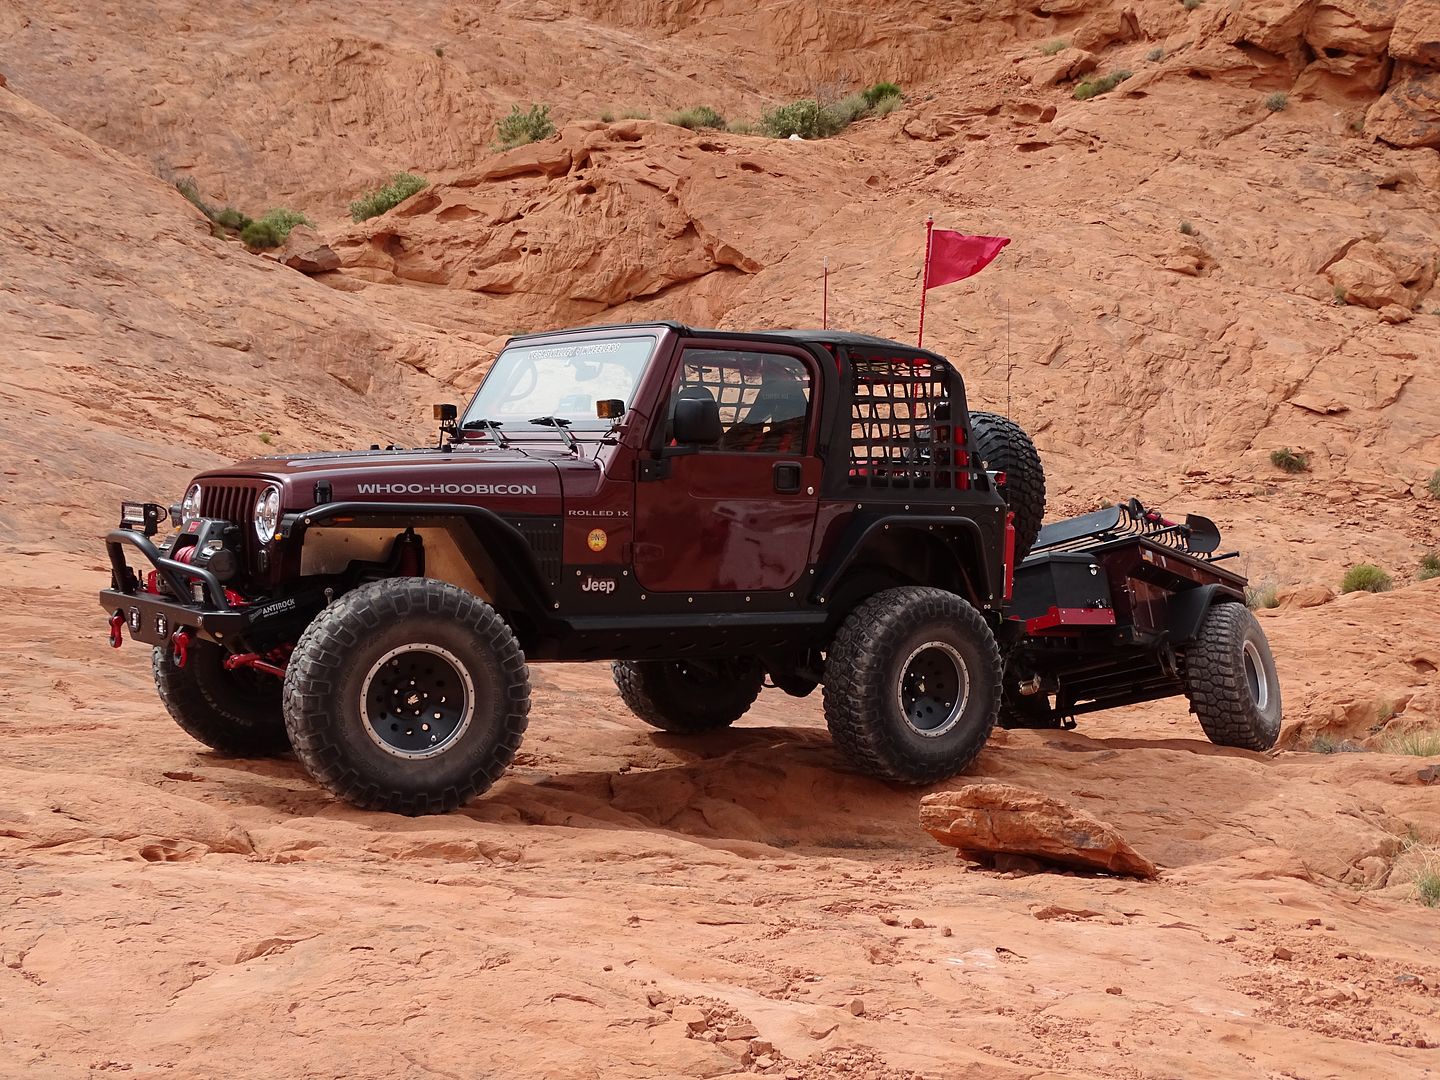
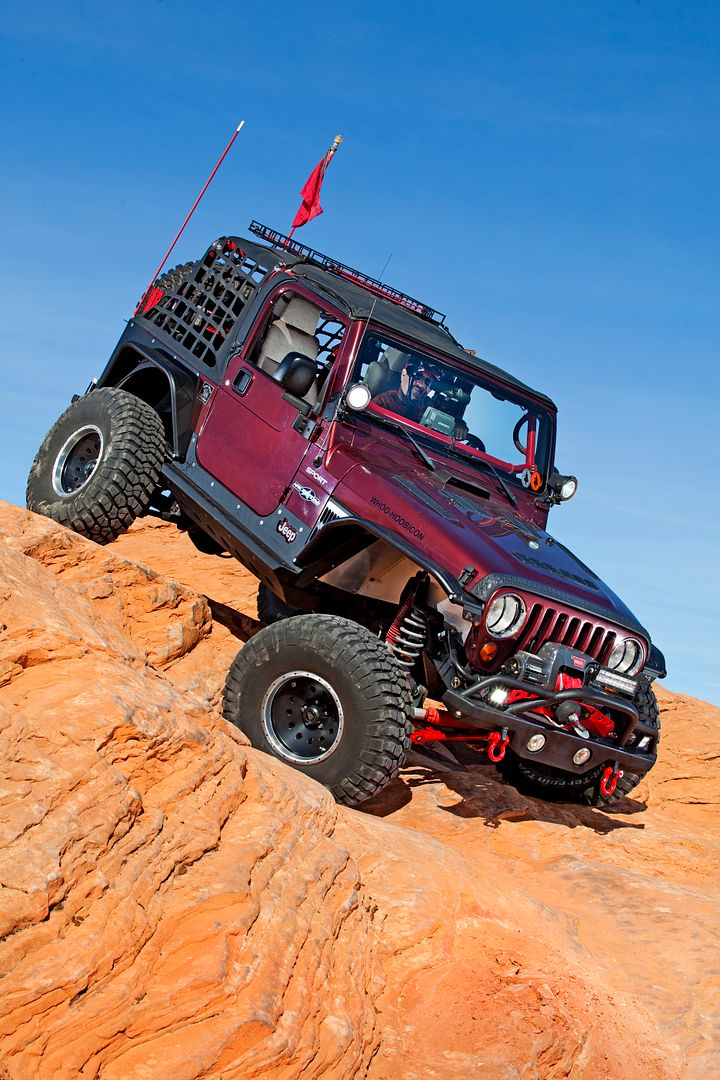
For quite a while after seeing these trailers being used for the Jeeper's Jamboree on the Rubicon Trail to haul in supplies I've wanted one. These trailers impressed me with their design and features. I spent a significant amount of time surfing the web and looking at what people had built and modifications they made to them to make them better. This build borrows on many of the builds that I saw and modifications I liked and some of the things that I wanted to avoid such as doing a spring-over conversion. One major goal is to keep the center of gravity as low as possible while still having the same 35” tires as the Jeep. Here's a photo of our 2003 Jeep Wrangler TJ that will be pulling the trailer. The plan is to paint the trailer to match the Jeep.


I started my search for a nice clean M416 in about January. Good clean M416 trailers are very scarce and I missed out on a few great deals and passed on a few that were more expensive or rougher than what I had in mind. Ultimately, I placed a “looking for” ad in Craig's List and got a call from a gentleman in the San Diego area. He emailed me photos and it looked good. We settled on $800.00 I also located an ad on Craig's list for someone selling a new heavy axle with Jeep hubs , springs and hardware. He was planning a similar upgrade project but chose another route. I live in Las Vegas and both sellers lived only a few miles apart in San Diego.
I made the arrangements, scrounged up the cash and the following weekend and made the trip to buy my M416 and also the axle I needed. I didn't want to tow the trailer home so I brought it home on my car trailer we use for the Jeep on the longer trips.
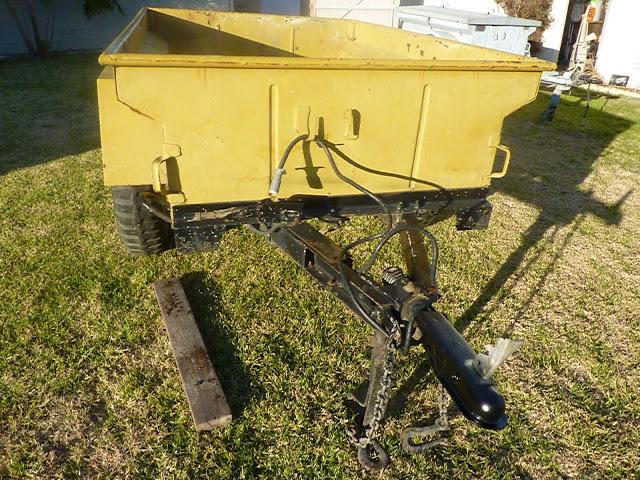
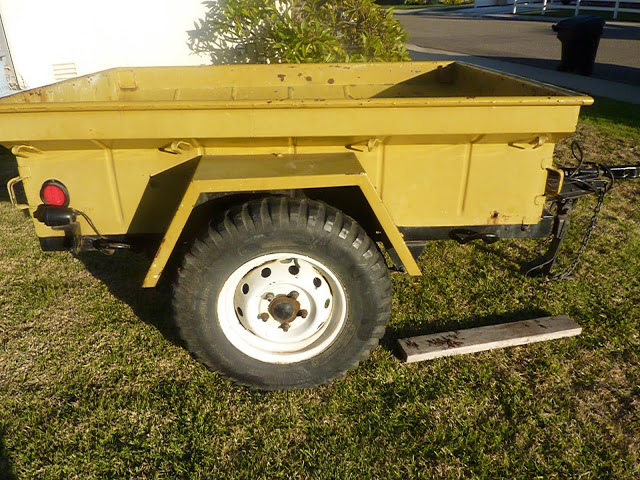
Here are photos of the trailer I purchased. It the tub and frame was in fairly good shape, there are a few rust holes that need to be patched and the lunette ring had been replaced with a standard type trailer hitch. I let the owner of the trailer keep the park brake control and cable as I didn't need it. He didn't have any ownership documents or a title. This ended up being a problem later with the DMV but I was able to work it out over time. I appreciate their assistance.
Here are photos of the trailer as I bought it.


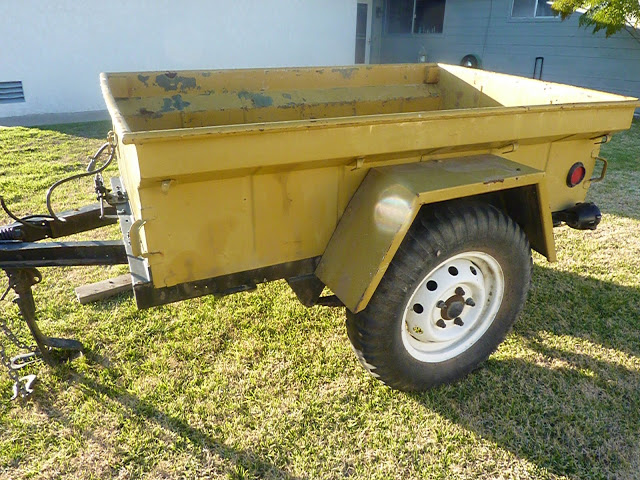
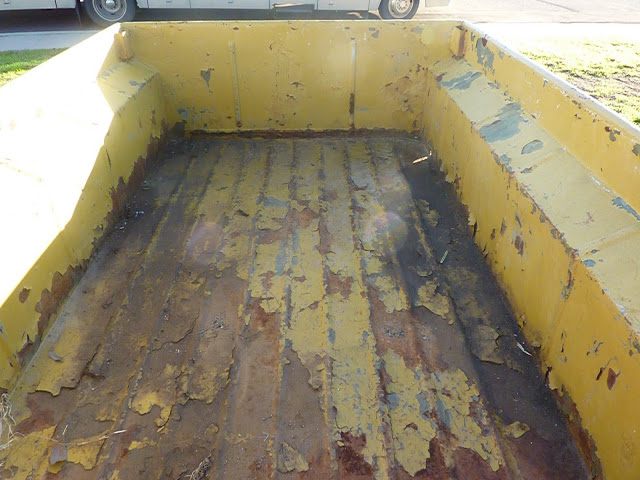
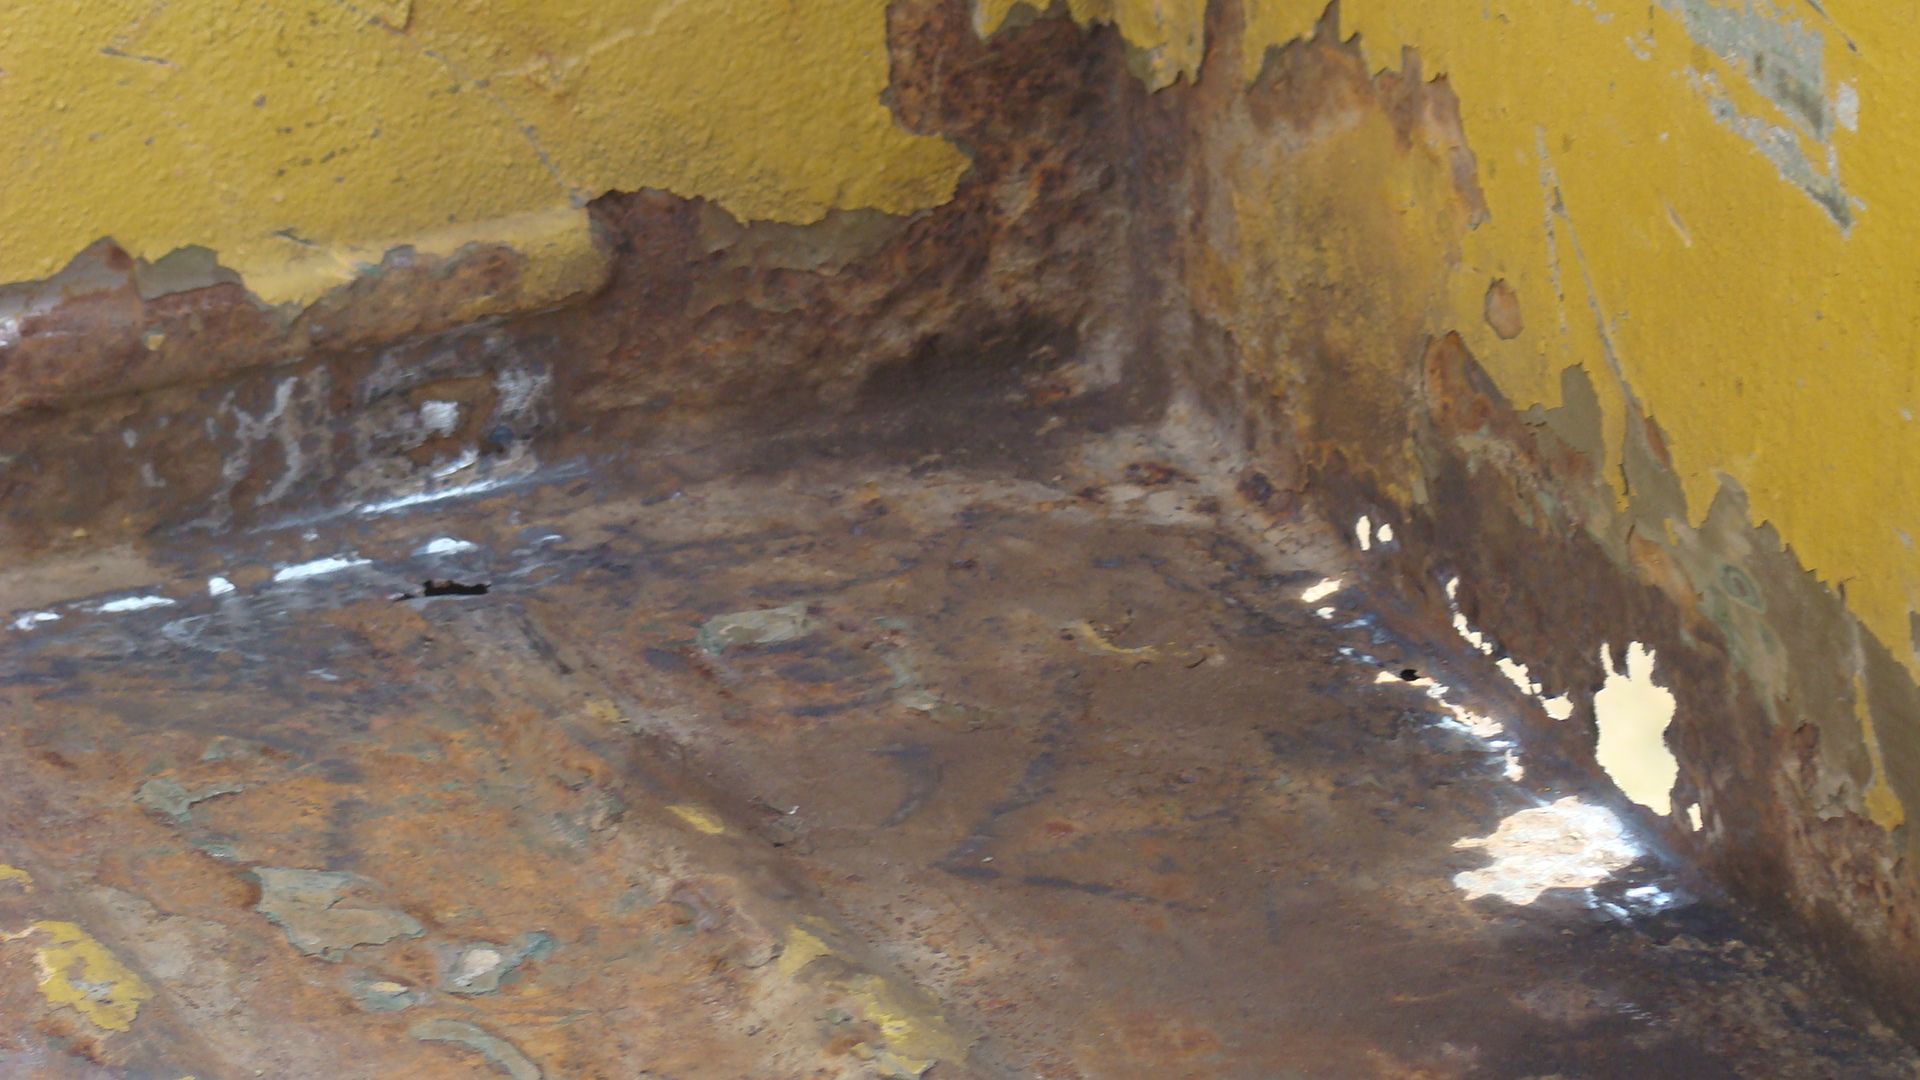
The trailer had seven different colors of paint rust on the floor and frame and evidence that I had been used since it was built sometime in the 1960's. I couldn't find and sign of a serial number on the trailer.
I started to try to strip the paint myself but found it to be far more difficult than I expected. I was able to strip the floor of the trailer but later decided to have the tub bead blasted and I would recondition the frame myself. I did remove the major castings and brackets and sent them with the tub for bead blasting too.


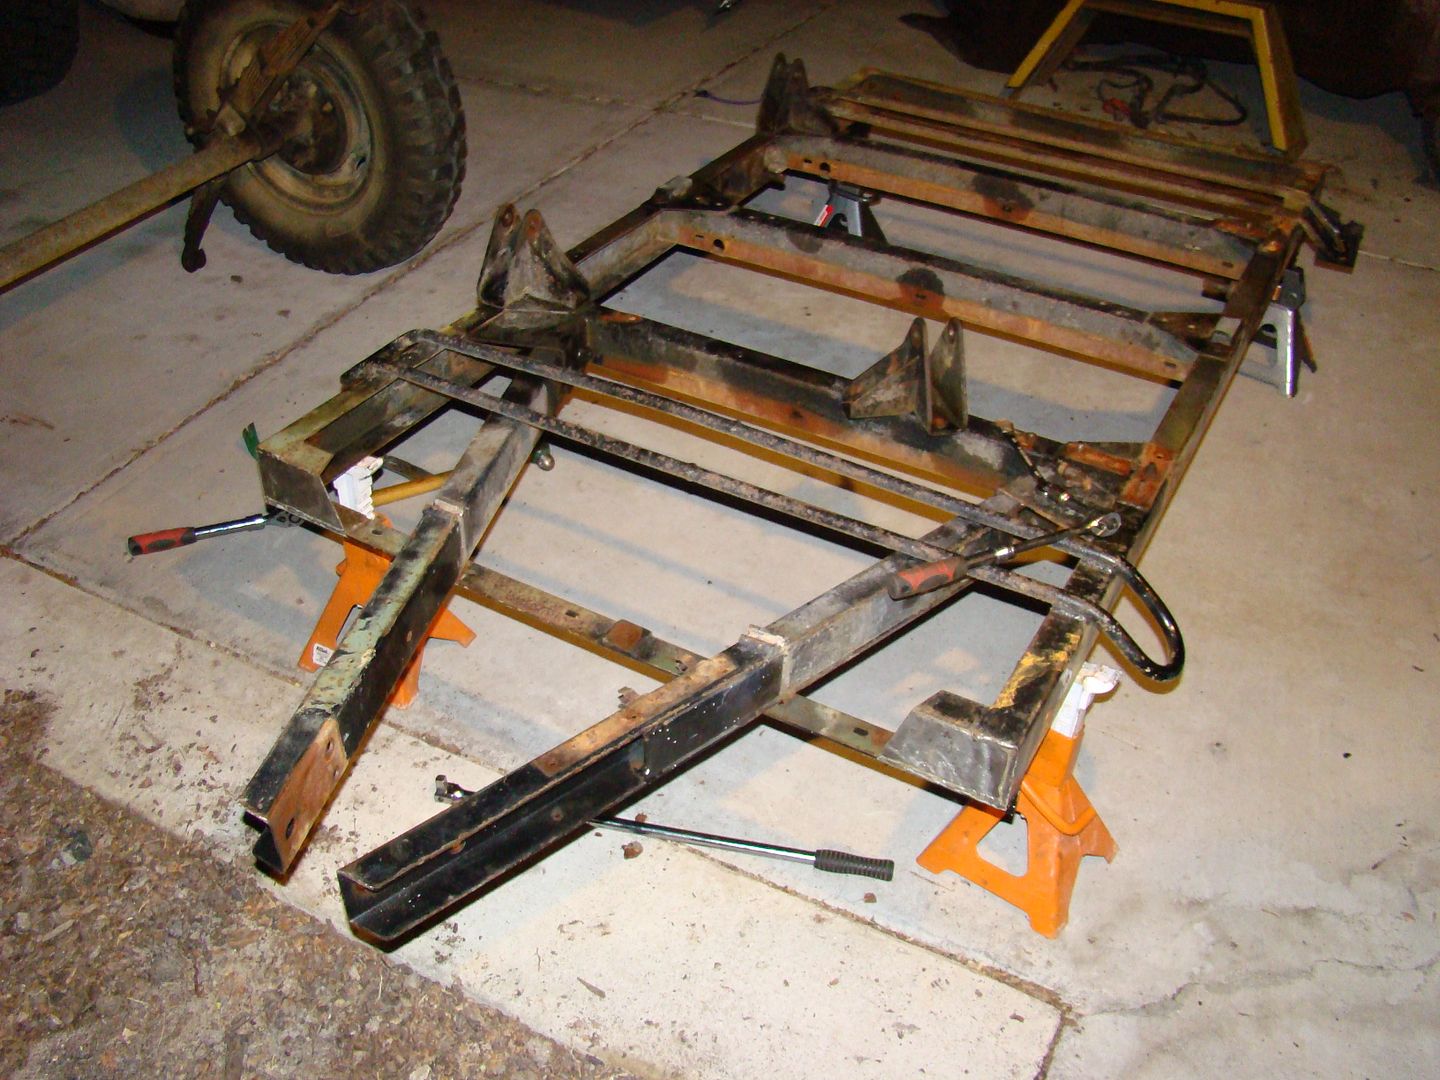
While the tub was out I took the frame down to bare metal with a grinder, flap discs and wire wheels.


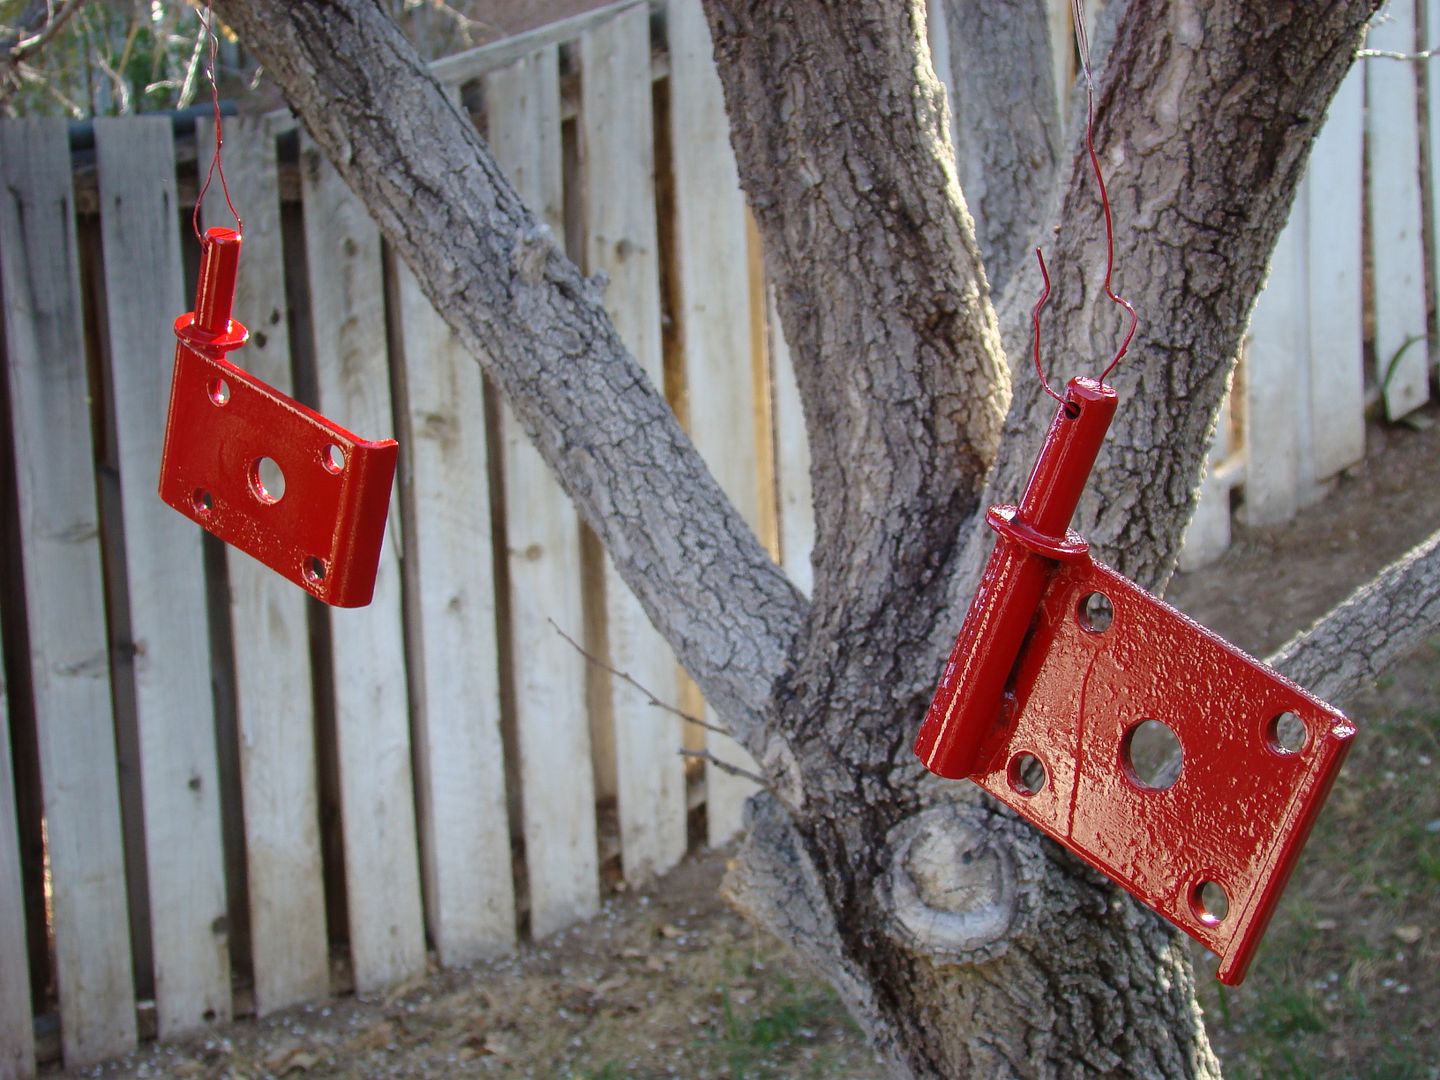
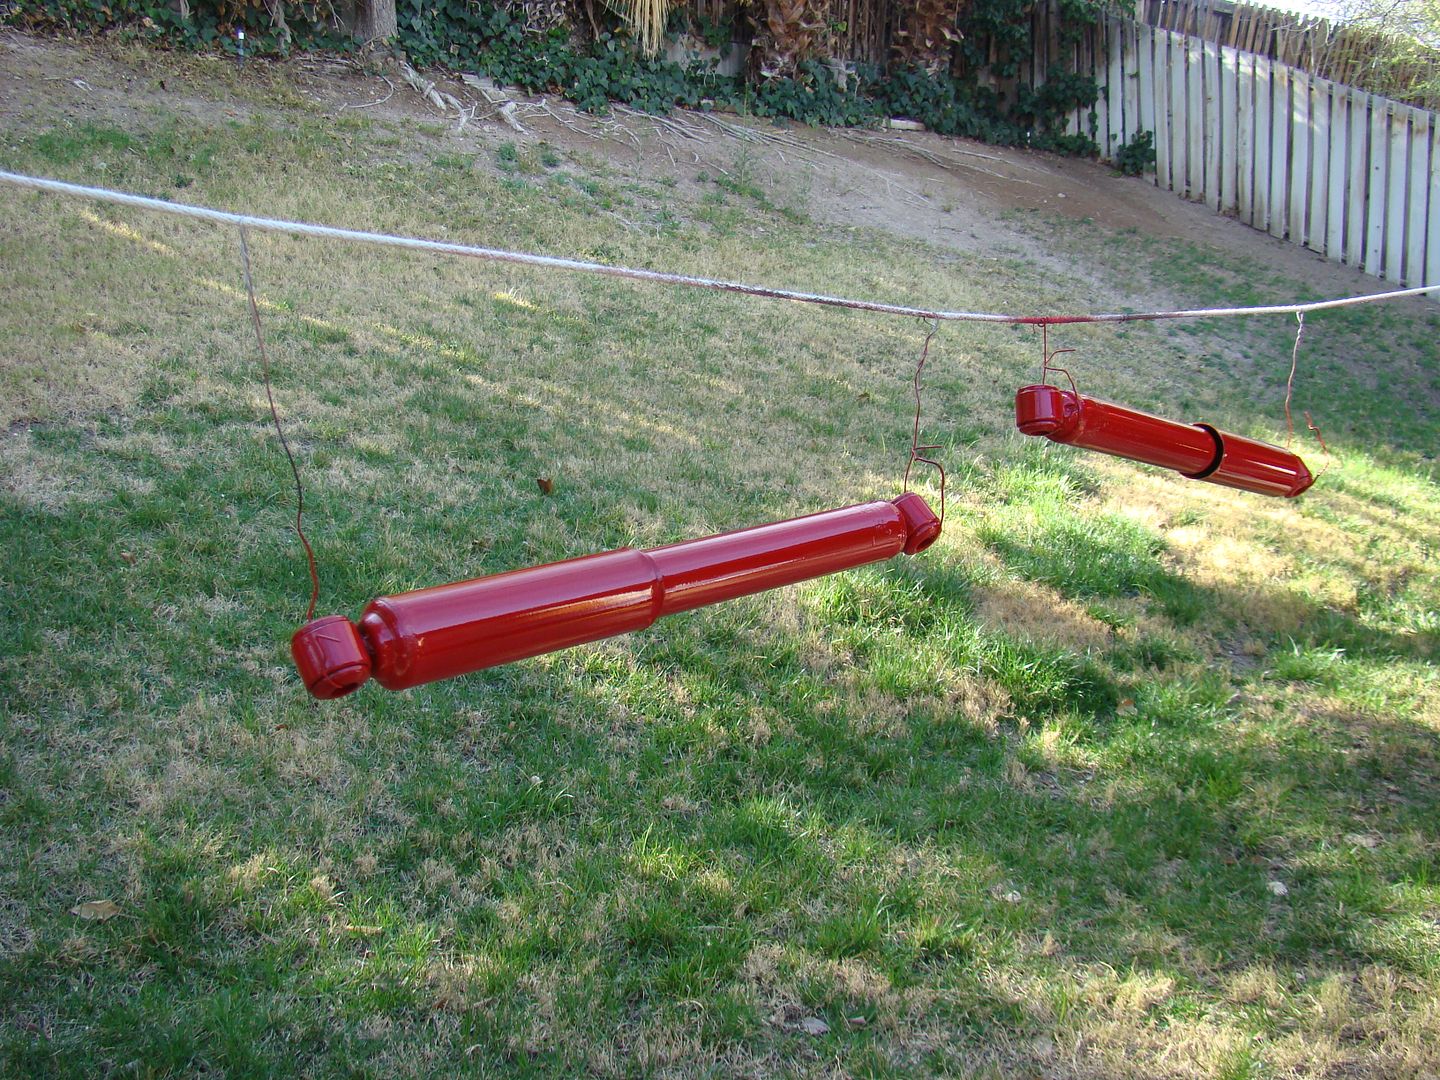
The first coat of paint was a rust converter and the final coats are Rustoleum texture black paint. This paint is a perfect match to the black powder coat on our Jeep. The ultimate plan is for the chassis to be black with red highlights such as the shocks and some trim.


The tub will be painted Sienna Pearl (Maroon) to match the Jeep and the fenders will be custom made by Moab Fab to look similar to the Metal Cloak fenders on the Jeep. The Tub will be lined with a black texture similar to Line-X

More to follow..
 
Last edited:

Bonofied Suiter

Bonofied Suiter
The work on the M416 trailer was set aside for a bit as I broke the rear pinion gear on my Dana 44 rear axle and my attention and resources turned to the Jeep. Besides that the heat in Las Vegas this last week has been extreme in the triple digits. I got a great deal on a tool box for the trailer from Harbor Freight. I painted it with Rustoleum black texture paint which matches the texture on the Jeep. This tool box is a perfect match for the trailer. It was important for me to reuse the front lunette casting that also incorporates that folding landing leg.

In order for the box to clear the Lunette spring and the casting I needed to build this frame to raise the box about an Inch.


I had a raffle prize from Nemesis industries that I couldn't use for the Jeep. I modified it, painted it red and installed it around the base of the tool box. The red trim around the bottom of the tool box comes from a raffle prize from Nemesis Industries that we won but couldn't use. We love Nemesis and their products and their logo is cool so it cut and painted this aluminum piece red and fit it to the box.


Because of the 35" tires that will be replacing the original military tires being taller the flip down landing leg was too short. I've taken a receiver tube and cut it to fit. This and the tube that slides into it gives me enough length and multiple holes to allow height adjustment. I welded a caster wheel to the bottom of the inner tube. The receiver tube parts and caster wheel were purchased from Harbor Freight Tools. The leg didn't come down straight so I added an alignment shim for a Semi truck and cut it to fit.


I Drilled holes and mounted three different power ports and a weather protected toggle switch on the right hand side of the box. One power port is a DIN / Hella socket for our ARB fridge freezer another is a standard 12V socket and the third is a 2 pin connector. The toggle switch will turn on and off the rock lights which will run off the Optima battery. In the lower front of the tool box is a connector for a flat-4 trailer pin. This will allow me to easily connect the trailer to other vehicles beside my Jeep which is setup with a round 6 plug. I went with the round 6 because it will allow me to run trailer brakes and backup lamps on the trailer. On the LH side of the box is a 12V plug that I connect to my small solar panel which trickle charges the battery. The charger came from a Volkswagen and was purchased on Ebay.


Inside the trailer I've mounted an Optima yellow top (deep cycle) battery. On top of the battery sits a 400 watt power inverter and a fuse block. Also on top of the battery is a Battery Bug which monitors the status of the battery. Also inside the tool box is a large terminal block box from a semi trailer.

 
Last edited:

OppugnAll

New member
I like how build is progressing, I have many of the same components, trailer and metal cloak. Update when you get more progress.
 
Very nice. It was like the first time I had seen your build but I luckily realized this post wasn't in Expidition Trailers and it was the first time. Thought I needed to call my doctor for a minute there. You wouldn't happen to have more detailed pics on the tail light build would you?
 

Bonofied Suiter

Bonofied Suiter
Very nice. It was like the first time I had seen your build but I luckily realized this post wasn't in Expidition Trailers and it was the first time. Thought I needed to call my doctor for a minute there. You wouldn't happen to have more detailed pics on the tail light build would you?

Thanks,
I may be able to post up some additional photos. In essence I removed the stock lenses and internals. Then using a die grinder clearanced the opening to allow for a 3-wire sealed beam stop-turn-tail lamp. Additionally I mounted a red 3/4" Maxxima clearance lamp into the large rear hole that the original wires came in from. Inside the housing I connected the marker lamp to the tail lamp wiring. I drilled a hole into the side of the housing facing the frame and routed the three wires from the taillamps to the junction block on the frame. The sealed beam tail lamp is secured into the housing using black silicone sealant. It makes a waterproof secure seal and if needed I should be able to cut and pry it out for service.


I screwed polished stainless steel screws into the vacant holes that held the original lenses on to dress it up. I wired each lamp with to short 3-wire harness and plug so they can be removed, serviced and reinstalled easily I painted the solid aluminum housings with Rustoleum texture black paint.

 
Last edited:
I really like the lights on your trailer and I will attempt to replicate that with this infomation. I am using Grotto lights (TJ) on my Scrap Yard M100 Build because I had them on a shelf, but always planned on going back to the original style lights if I could come up with a way to retro fit them. Thanks.
 

ReyAce

New member
Noticed you were in Las Vegas also... was wondering if you registered that trailer yet?

I have an M101A1 from 1968 I completely rebuilt, and the DMV is really breaking it off in me... I got to a point where it should be registerable:

75912_10151911771411614_1773368114_n.jpg

...and I went down to the DMV twice already, but they said they won't register it without a title, which I don't possess, cuz there has never been one. I tried explaining to them multiple times that all the parts of the trailer can be bought on the Internet (which I mostly did), so how can I be expected to have a title when there never was one?? But it was like talking to the wall... was wondering if you fared any better?
 

Septu

Explorer
Noticed you were in Las Vegas also... was wondering if you registered that trailer yet?

I have an M101A1 from 1968 I completely rebuilt, and the DMV is really breaking it off in me... I got to a point where it should be registerable:

...and I went down to the DMV twice already, but they said they won't register it without a title, which I don't possess, cuz there has never been one. I tried explaining to them multiple times that all the parts of the trailer can be bought on the Internet (which I mostly did), so how can I be expected to have a title when there never was one?? But it was like talking to the wall... was wondering if you fared any better?

If most of the parts came from the net, couldn't you register it as a custom build?
 

ReyAce

New member
If most of the parts came from the net, couldn't you register it as a custom build?

Funny... what's what I thought.

They thought otherwise because I left the plate with the serial number on the trailer. Therefore "it has a serial number and should have a title". Nevermind that I could buy a new plate in about 10 seconds, or even make my own :smilies27
 

Bonofied Suiter

Bonofied Suiter
Sorry for my lack of updates. I haven't had time to do much on the trailer lately. The chassis and tool box are almost completed. The rusted out section in the left rear corner has been repaired and the original mounting holes for the reflectors have been filled in. I will be using more modern looking side and rear reflectors. I still have to rebuild the right side front corner of the body and some of the pieces I will need to fabricate requires a bending brake which I purchased from Harbor Freight. Once the body is fully patched I will be working out the dings and dents then primer and paint to match the Jeep on the outside and spraying a black bed lining material inside the tub and around the top lip. After the body is installed on the chassis the trailer will go to Moab Fab for fender design. They will be powder coated black prior to final installation. After the bed liner has fully dried I will be installing 6 aircraft type clip-in anchors into the bed floor.

I thought I was pretty much done with the tool box when I came on the idea of installing a water pump inside. I think it will be a really nice addition without a lot of work. I recently recovered a used 12V Flo-Jet water pump that was pulled off a sweeper truck and replaced because it no longer functioned. The pump is self priming, 60 PSI max and 4 GPM at full flow. I pulled it from the trash and later took the pump apart and found it full of small rocks. Once it was cleaned up it tested fine. The plan is to mount it inside the corner of the tool box and plumb it to two black poly bulkhead fittings that will come out at the left side of the tool box. They will have about 1" of 1/2" male pipe coming out. The first one connects to a suction hose with a screen filter which will drop into our water source and a sprayer hose screws on to the other 1/2" pipe stub. The sprayer has a high flow / low flow and off position to conserve water. The pump shuts off automatically when the sprayer is shut off. 12V power to the pump will be controlled by a nearby waterproof on/off toggle switch and a red LED indicator above the switch will be a reminder if we were to leave the power on. Plastic caps will screw on the pipe stubs when not in use to keep dirt out. Water can be heated by our Zodi propane instant shower. Cycling the water from and back into the main shower water tank should heat the water for the power shower in just a few minutes. The Zodi shower works fine but can easily be scalding hot or too cold and just sprinkles from a pump running on D cell batteries.
 
Last edited:

Bonofied Suiter

Bonofied Suiter
Just finished patching the weak areas of the body. Still have to straighten out the floor and prep for paint. Haven't registered it yet. Will contact you when I get to that point.
 

UK4X4

Expedition Leader
In regards to registering my self built trailer in CA, I put together a design book with all the reciepts and internet orders for the parts,
explained it was self built and made with all tax paid parts.

They gave me a sticker and it was registered...I think it was arround 30usd.

They did'nt do it straight away mind you, they took the book to a supervisor and had him agree to it, no tax to pay and out the door, relatively simple.
 

Bonofied Suiter

Bonofied Suiter
More updates to be added soon. I tried to move this thread to a more appropriate section. Here is a link to it. There is more detail on the lunette modification there. When I purchased the trailer the eye had been replaced with a standard ball type hitch. I torched off the ball hitch and had a friend who is a professional welder adapt a square hitch tube purchased at HF to the Lunette shaft. To make sure it would be rock solid and safe the square tube needed to be split and collapsed so he could weld it centered along the Lunette shaft. I am quite pleased how it turned out. There are photos on the other thread.

http://www.expeditionportal.com/forum/threads/117304-M416-Based-Off-road-Trailer-build-with-Lock-N-Roll-Trailer-Hitch?highlight=m416
 

Forum statistics

Threads
185,541
Messages
2,875,682
Members
224,922
Latest member
Randy Towles
Top