PcCruiser's M101a2 build

Pccruiser

Observer
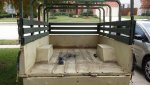
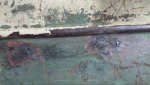
Well got a little headway today. Sanded down quite a bit of the tub. Power washed it. Tore through my angle grinder and square sander but kept trucking!

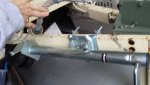
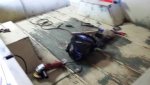
Mounted the wheel jack mount to the front.

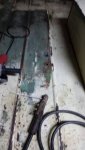
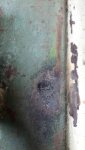
Also, there were a lot of bolts that seemed to just be filling in holes they didn't want to repair. So I laid little beads at a time with the stick welder and ground it down to see how it filled in the hole. Worked pretty well. Not too concerned it's not flat since I'm about to cover it with bed liner.

Tomorrow I'll try to tack a small piece of steel stock underneath so I can run more strait beads over the larger holes.

Sent from my SCH-I545 using Tapatalk
 

Attachments

  • uploadfromtaptalk1384146448034.jpg
    uploadfromtaptalk1384146448034.jpg
    47.9 KB · Views: 58
  • uploadfromtaptalk1384146470713.jpg
    uploadfromtaptalk1384146470713.jpg
    90 KB · Views: 56
  • uploadfromtaptalk1384146493845.jpg
    uploadfromtaptalk1384146493845.jpg
    55.9 KB · Views: 55
  • uploadfromtaptalk1384146517542.jpg
    uploadfromtaptalk1384146517542.jpg
    59.6 KB · Views: 56

NJAdam

Workin' on it...
Looking forward to your build. I'm about to start mine as soon as I can get my garage back in order.

So many ideas on this site!
 

Pccruiser

Observer
Looking forward to your build. I'm about to start mine as soon as I can get my garage back in order.

So many ideas on this site!

Ya. I did the same thing. Took awhile to start my build but got the garage in shape. Built a nice wrap around work bench and got organized with my tools. Necessity.

Sent from my SCH-I545 using Tapatalk
 

Pccruiser

Observer
So I got the rest of the holes finished, cleaned up the bed, sprayed rust reformer on a few rust spots then when back over the tub with some Rustoleum rattle can professional primer. Don't have a ton of pictures will get more later. Ready to roll on the bed liner this week.


Sent from my SCH-I545 using Tapatalk
 

Attachments

  • uploadfromtaptalk1384881783395.jpg
    uploadfromtaptalk1384881783395.jpg
    88.1 KB · Views: 44
  • uploadfromtaptalk1384881897896.jpg
    uploadfromtaptalk1384881897896.jpg
    55.1 KB · Views: 44

Pccruiser

Observer
Weird issue I am having though. Will get pictures later tonight

I pulled the bolts out and tilted the trailer up using the dump feature. An awesome feature by the way. But now it doesn't line up and I cannot get the tub to latch back down.

The notches line up on the left but don't on the right. For all my strength I cannot move it. Am I missing something? Even if I got the right to line up it seems the left would then be out of alignment.

I mean did they use a winch to force pull it on?

Am I going to have to cut the bracket and re-weld it aligned correctly?

Sent from my SCH-I545 using Tapatalk
 

Mark Harley

Expedition Leader
Don't cut it.
Loosen the nose bolts and it will drop back into line.
These trailers are not meant to be dumped, they just have a folding tongue for transport in cargo ships and air transport.
dumping when loaded puts a strain on the angled spring hanger bolt.
 

RagnarD

Adventurer
My brother in law had the same problem when he pulled his bolts to dump. He eventually got it back together but it sounds like there is a lot of strain relieved when the just the front bolts are removed. Like Mark said, try loosening the bolts on tongue bracket or the leaf spring brackets.

Funny how the longest part of a project like is getting the garage ready. Spent more money on a shed to clean out garage than I did for the trailer and parts.
 

Pccruiser

Observer
Harbor freight HVLP gun $12.99 with coupon and borrow / buy a compressor.
thinned oil base paint or automotive paint mixed at the source and ready to spray.

Spray cans are good for small jobs but as everything else the volume of pigment and contents have been reduced
so a can does not cover much.

Post some pictures of your progress.

So I was about to bed line the tub tonight but I think I should just go ahead and paint the entire thing first then I can tape of and bed line the interior. I think I'll get better lines that way. Missed my camping trip with it anyway so there is no rush.

Here is the paint I plan on using:
http://www.lowes.com/pd_86511-90-V7...oduct_qty_sales_dollar|1&page=1&facetInfo=Oil

What do you think Mark?

Also - what ratio did you use to thin paint? 15%?
 

Pccruiser

Observer
So I was about to bed line the tub tonight but I think I should just go ahead and paint the entire thing first then I can tape of and bed line the interior. I think I'll get better lines that way. Missed my camping trip with it anyway so there is no rush.

Here is the paint I plan on using:
http://www.lowes.com/pd_86511-90-V7...oduct_qty_sales_dollar|1&page=1&facetInfo=Oil

What do you think Mark?

Also - what ratio did you use to thin paint? 15%?

Alternatively I could do this: http://www.lowes.com/pd_46054-90-77...oduct_qty_sales_dollar|1&page=1&facetInfo=Oil

But I like the darker color on the other one and the fact that it is a primer and paint all in one.
 

Mark Harley

Expedition Leader
Looks like a good choice.
See what thinning instructions are on the can.
If none start small you can always thin more.

If you use the HF HVLP gun it is very forgiving.

Post your results.
 

Pccruiser

Observer
Looks like a good choice.
See what thinning instructions are on the can.
If none start small you can always thin more.

If you use the HF HVLP gun it is very forgiving.

Post your results.
o

Cool. Yes I will use the HF gun. I'm thinking two to three quarts should be enough to cover the outside (underside will be different and tub bedlined. Not going to paint the entire tub just over spray areas to tape for cleaner lines).
 

Pccruiser

Observer
That rustoleum is a good choice and cost effective. You don't thin it by % you thin it by time buy a viscosity cup and time it. It should take about 12-15 sec to run out. Here's a link on that stuff:

http://www.spraygunworld.com/Information2/Viscosity.html

Thanks for the tip and link!

I bought all my paint and needed supplies to build a temp paint booth in my garage. Just got a new 33 gallon 165psi Husky compressor so I can't wait to put it to use.

Since I'm not going to bare metal I got the Bull's Eye 1-2-3 primer to lay down on the trailer over the old paint and ares I rust reform (as well as bondo to even out under coats of years of military paint and dents).

But a cold front just came through Texas so it may be a bit before I paint. Plenty of prep work to do though!
 

Scoutman

Explorer
My brother in law had the same problem when he pulled his bolts to dump. He eventually got it back together but it sounds like there is a lot of strain relieved when the just the front bolts are removed. Like Mark said, try loosening the bolts on tongue bracket or the leaf spring brackets.

I pulled the bolts and dumped mine by hand this weekend even knowing all the issues posted on the interwebs about getting things to align back properly. As you can guess, ours didn't line up either. One of the reasons I bought this trailer was for the dump feature but learned afterwards of the problems. I would still like to make it dump but my intention was to add a ram or a hand jack to get it to raise up. Of course the root problem is still the play in the tongue arms and getting pins to align. So has anyone seen, or have any ideas of, modifying the spring hanger bracket to make it settle into the same spot everytime?
 

Pccruiser

Observer
Well wife and I have been talking and I simply don't have the time for this right now. Now that I run the Web development at my company my free time is bingo.

I am considering selling the trailer and saving up for a year or two for a pre made trailer. Here are the latest pictures. If I get no bites I may still paint it and still build the lid since I already have all the steel.

Here are the pics of the current state including the welds I made to the holes in the bottom of the bed. I may redo those now that I have access to a mig welder (used a stick welder and had to do little tacks at a time so I wouldn't burn through). Didn't care about texture since I was going to bed line it.

Tires are Cooper Discoverer 235/85/16 with most all the tread.

Surge breaks work great and so do the hand breaks.

Thinking $900 OBO is fair. Let me know what you guys think.

I have led lights and a wiring harness and I have the original lights and harness pulled off.

I have all the paint etc if you want. Also have the duplicolor bed liner. I will include the pintle hitch with ball for an additional $75.

Would love to see this go to a good home and the TLC it deserves.

uploadfromtaptalk1397587093534.jpg
uploadfromtaptalk1397587210910.jpg
uploadfromtaptalk1397587576445.jpg
uploadfromtaptalk1397587611541.jpg
uploadfromtaptalk1397587659516.jpguploadfromtaptalk1397587730965.jpg

Sent from my SCH-I545 using Tapatalk
 

Forum statistics

Threads
185,919
Messages
2,879,672
Members
225,497
Latest member
WonaWarrior
Top