A little something I have been working on...

Workhorse

Observer
Hello, I have been developing this in my garage since last year, before Cruise Moab 13. It is a roof top tent lighting system using LED lighting. I am pretty happy with what I have so far. I will be making more of what I have if
there is any interest in something like this? Here are a few photos of my work.
Thanks!
DSC_0008.jpgDSC_0009.jpg
 
Last edited:

Workhorse

Observer
A little more information about what went into my light system on my RTT...

I built a main harness that comes into the tent at the "fulcrum point" where the tent pivots at. From there the harness splits with one tangent going up the center support pole and over to an enclosed water proof LED light that is attached (semi-permanently) to the crossbar with clips. The other tangent of harness goes toward the door/entrance where an on/off/dimmer switch is located. The power source can either be hard wired to your battery or plugged into a power point using the cigarette lighter adapter.

The LED lights used produce 400 Lumens per 18" section which is the size of light that is in my tent (Eezi-Awn Series 3 1200) in the pictures. I believe that a 12" length LED would be more than sufficient for a tent this size. There is minimal power draw, about 6oo milliamps per 18" long section of LED light. The wire harness is assembled using a sonic wire welding process to maintain maximum continuity. The wires are wrapped in protective loom from start to finish. A weatherproof Deutsch Tech connector is used for the outside of the tent connection (to power source). The on/off/dimmer switch I use is one that operates from touch. Touch it and it turns on. Touch it again and it turns off. Touch it on and then hold it to gradually light up or dim down the lights. Touch again and it turns off. It needs human touch much like an ipod or smart phone to work. It is pretty neat really.

I will take some more detailed photos and post them up this weekend sometime.
 

Workhorse

Observer
Frank,

I would like to answer any questions you may have regarding other specifics of the system I have designed and manufactured in my garage. It is super simple to install, and very effective overall as clearly shown in the photos. I have this in a kit form that I have put together after testing over the last year. As I stated previously , it is based on the dimensions of the Eezi-Awn tent product line and would work with any Eez-Awn tent available (and more than likely the ARB Simpson III or TJM tents as well as they appear to have very similar dimensions). I started with the tent I have (Eezi-Awn) but look to expand the design to other models eventually if there is any/enough interest.

I'd like to help in any way I can. Thanks for your interest and let me know how I can help.

Thanks.

Ross-
 

Attachments

  • steam1.jpg
    steam1.jpg
    467.6 KB · Views: 73

Fhunter1

Adventurer
Ross,

I have a Conquerer Compact and I am thinking this is much easier than trying to find a flashlight at night :) . My wife also likes to read at night so this is also a big plus/

Drop me a quick PM with pricing, etc and we can see where it goes from there.

Frank
 

Workhorse

Observer
I will look into that red filter are speaking of. Best I can tell it might comprise of a cover for the LED light bar I provide. Give me a bit to figure something out to offer. I will work on it, give me some time.

Thanks for your interest and input!!

Ross-
 

Workhorse

Observer
I bought a new tent from Paul at Equipt Expedition Outfitters recently and have installed into my new tent my LED light system. Here are a few photos of the install.

Here is the new tent mounted to my newly refurbished M100 trailer.
005-2.jpg

The power source lead comes from outside the tent through the fulcrum of the tent (hinged section) and routes up to where the light mounts on the tent crossbar and over to where the switch is located near the door. Everything mounts neatly with cable ties and loom clamps. The power source(s) provided are either a cig lighter adapter or a fused direct hard wire option.
009-2.jpg

The loom clamps attach the wire harness to the floor of the tent. It leaves a very clean looking install.
010-2.jpg


016-2.jpg

Here is a photo of how the wire harness leads up to the crossbar of the tent to the actual LED lamp, as well as the lead that goes to the dimmer switch provided located near the door to your tent.
020-2.jpg

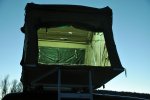
And here it is installed and lit up. It is pretty simple to install and only takes about 20 minutes or so with a screw driver. No more head lamps or "Honey would you point the flashlight over here?" ever again.
022-2.jpg
 

Workhorse

Observer
Before...
005-2.jpg


After...
028-2.jpg

I have (but would again) post specifications of my LED light system if there is interest in the details.

Thanks for checking out my tent lighting system!

Ross-
 

boznian2

New member
This looks like a nice, clean, well-made setup but as others have mentioned I think it really needs a red light option. Personally I wouldn't put this in until it had this option available. Just my 2 cents.
 

60Dan

Explorer
Real quick way to remedy the bright white light is RED electrical tape!

Sounds goofy, but I did it on my trailer table lights and it makes the world of difference.

You can make the light dimmer and dimmer by adding layers of tape, and if you don't like it, just peel it off!

Here is a comparison shot:

BEFORE


After, with one LED taped over
 

Workhorse

Observer
Dan, the kit I build has a dimmer switch incorporated into the system so you wouldn't need to add too many layers per se, but dim it down to your preferred lumen level output and there you go.

I like the red electrical tape idea. Looks like it works really well!
 

Forum statistics

Threads
185,835
Messages
2,878,710
Members
225,393
Latest member
jgrillz94
Top