You are using an out of date browser. It may not display this or other websites correctly.
You should upgrade or use an alternative browser.
You should upgrade or use an alternative browser.
Barn Door for JK factory hardtops
- Thread starter jscherb
- Start date
jscherb
Expedition Leader
Im liking this. How rigid will this keep from twisting?
The panel will be made from 1/8" aluminum and will have a 1/2" lip bent around all 4 sides, this will provide the necessary stiffness.
jscherb
Expedition Leader
To test the size and fit of the overhead panel design I made up a mockup by taping a full-scale printout to a piece of cardboard. The photo at left shows the panel in the down position; at the right it's in the up position. The angle of the photo is a little deceptive because the panel is above the rear door opening even though it looks in the photo like it might be slightly below the opening. The panel isn't visible in the rear view mirror because it's above the bottom of the roll bar crossbar and above the opening of the rear door so it doesn't obstruct the view out the back at all.
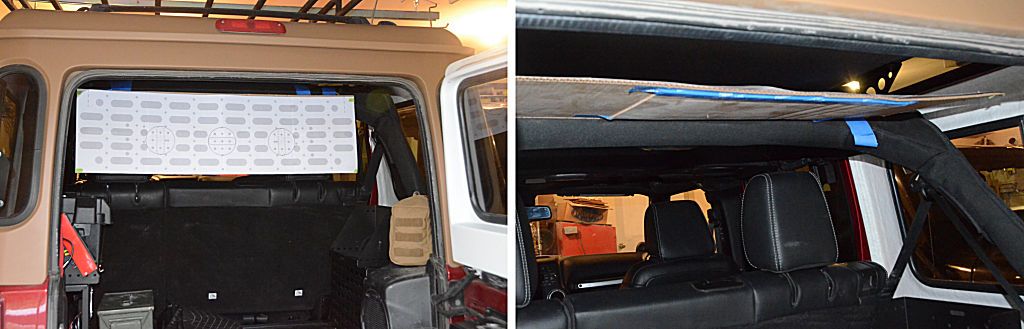
In this photo I'm holding a 20-liter (5.2 gallon) Rubican in place in both positions. This Rubican is slightly larger than the 4-gallon Rotopax.
Next I'll proceed to making a prototype in aluminum.
In this photo I'm holding a 20-liter (5.2 gallon) Rubican in place in both positions. This Rubican is slightly larger than the 4-gallon Rotopax.
Next I'll proceed to making a prototype in aluminum.
jscherb
Expedition Leader
Travel and other projects have kept me from working on the JL Grille Kit for the past month but I got some time this weekend to make some progress. When I last posted about the project I had finished a fixture for holding a factory grille to make the mold. This fixture holds the very flexible plastic factory grille rigid while molding and also increases the margins on the mold so the edges of the part can be made a little longer for trimming after removal from the mold.
The next step is to convert the JK grille to a replica of a JL grille. Since the slots in the JL grille are more complicated than just being holes in the grille, I made an intermediate mold for the slots. I'll mold seven identical slots using the intermediate mold and then I'll assemble them into the factory JK grille. I could make all of the slots separately, but making a mold for them assures they'll all be exactly the same. Here's the intermediate slot mold:
I've made the slots with a forward bend to match the bend in the JL grille.
Since most of the photos of JLs I've seen so far have inserts in the slots I've made the slot mold with integrated inserts so they will look like these when finished:
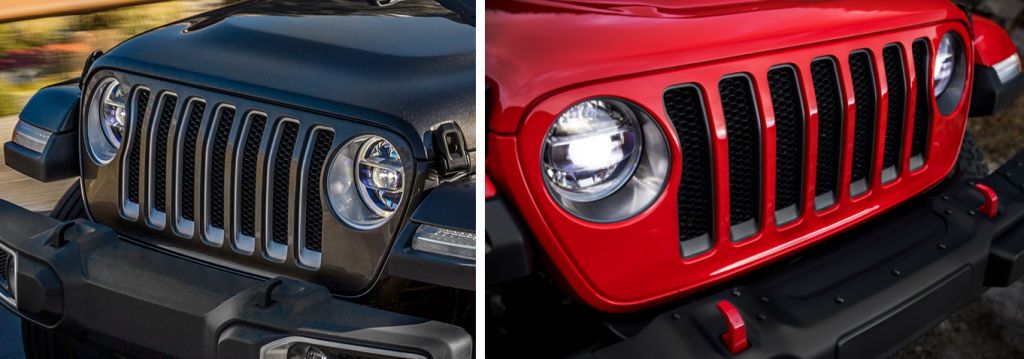
The Safari Concept Jeep revealed last year also has inserts in the slots:
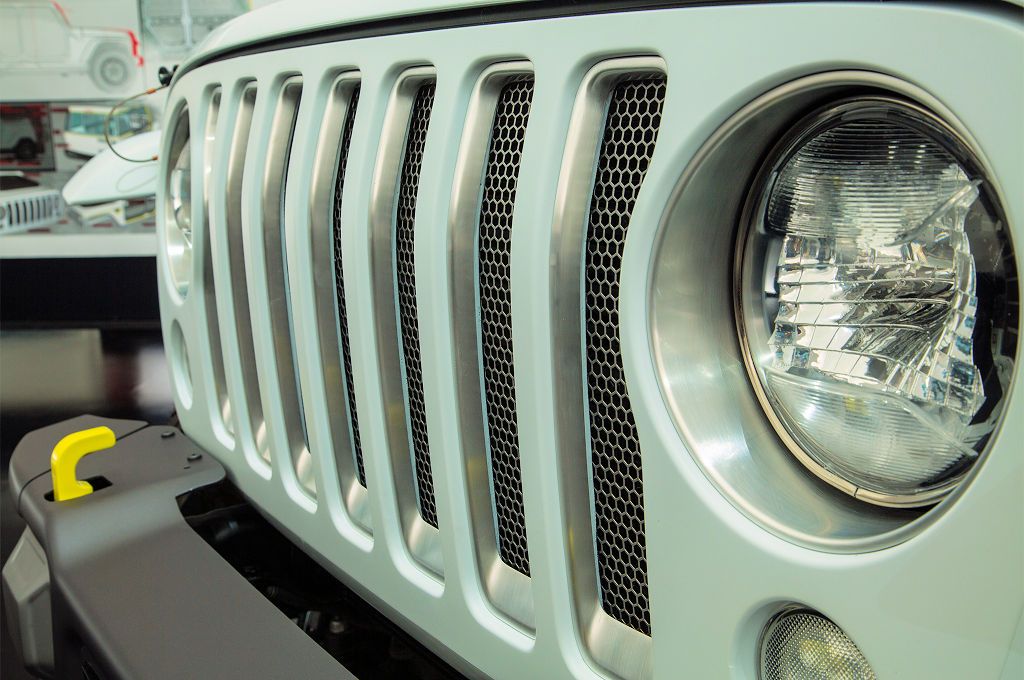
The outer two slots will need to be modified because they'll intersect with the headlight recesses, but even so starting with 7 identical slots will make the final result much more accurate than doing it any other way.
The next step is to convert the JK grille to a replica of a JL grille. Since the slots in the JL grille are more complicated than just being holes in the grille, I made an intermediate mold for the slots. I'll mold seven identical slots using the intermediate mold and then I'll assemble them into the factory JK grille. I could make all of the slots separately, but making a mold for them assures they'll all be exactly the same. Here's the intermediate slot mold:
I've made the slots with a forward bend to match the bend in the JL grille.
Since most of the photos of JLs I've seen so far have inserts in the slots I've made the slot mold with integrated inserts so they will look like these when finished:
The Safari Concept Jeep revealed last year also has inserts in the slots:
The outer two slots will need to be modified because they'll intersect with the headlight recesses, but even so starting with 7 identical slots will make the final result much more accurate than doing it any other way.
jscherb
Expedition Leader
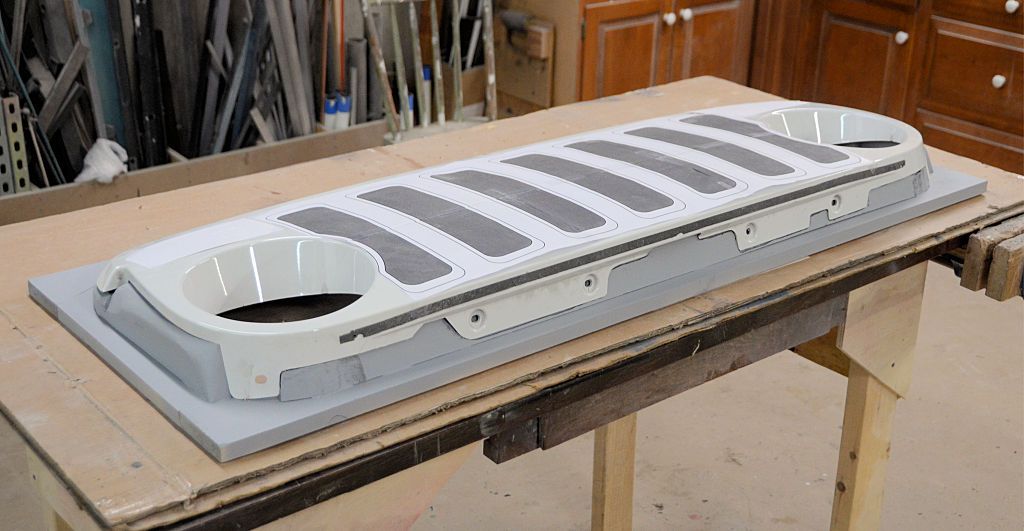
I made the first prototype overhead swing-down cargo panel this morning. Here it is on the workbench with the full-size printout that served as a template.
You can see the Molle grid holes, but what might not be evident:
- The rows and columns of small holes between the Molle grid holes are for QuickFist clamps and other similar devices for mounting things like shovels, tools, flashlights, etc.
- There are three sets of mounting holes for Rotopax and Rubican containers so anything from 3 1-gallon to a pair of 2-gallon to a 4-gallon can be mounted there.
- There are also holes for mounting a Hi-Lift.
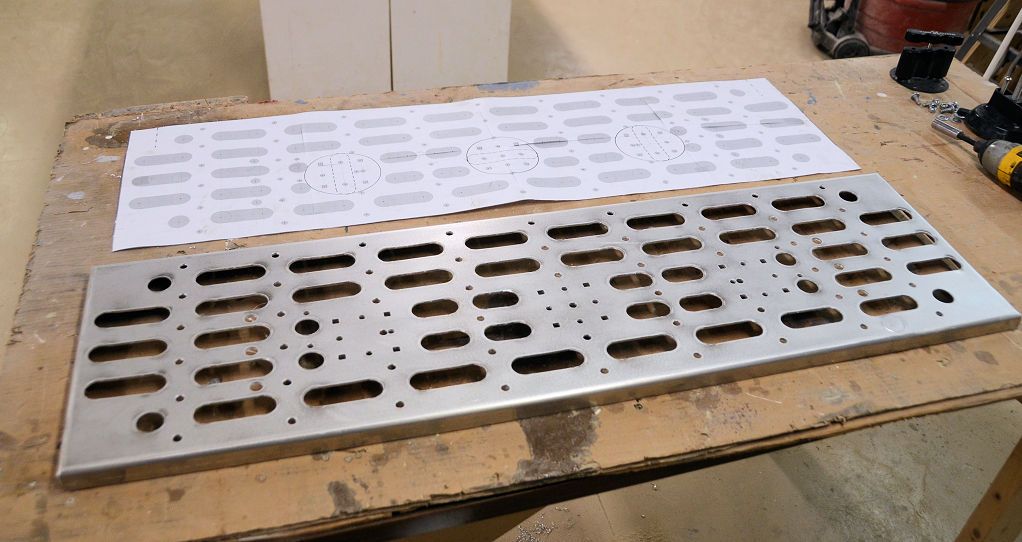
This afternoon I'll test-mount various things to it to make sure the hole spacing is accurate and I'll also do a few photos of it in the Jeeps. Haven't made up the mounting/swing-down hardware yet but I have received all the necessary parts to make it.
You can see the Molle grid holes, but what might not be evident:
- The rows and columns of small holes between the Molle grid holes are for QuickFist clamps and other similar devices for mounting things like shovels, tools, flashlights, etc.
- There are three sets of mounting holes for Rotopax and Rubican containers so anything from 3 1-gallon to a pair of 2-gallon to a 4-gallon can be mounted there.
- There are also holes for mounting a Hi-Lift.
This afternoon I'll test-mount various things to it to make sure the hole spacing is accurate and I'll also do a few photos of it in the Jeeps. Haven't made up the mounting/swing-down hardware yet but I have received all the necessary parts to make it.
jscherb
Expedition Leader
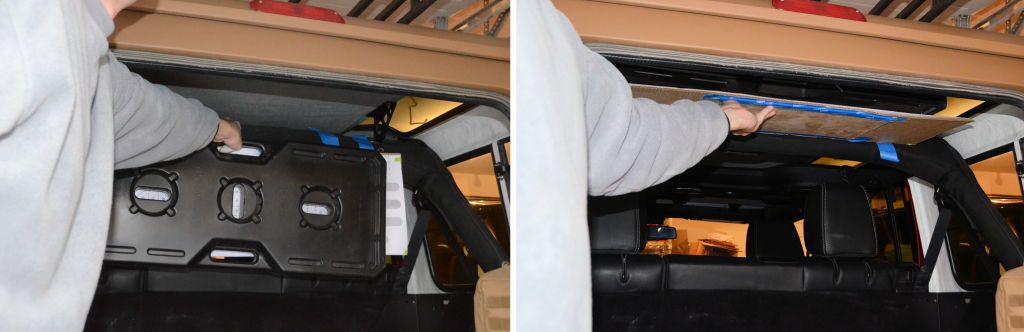
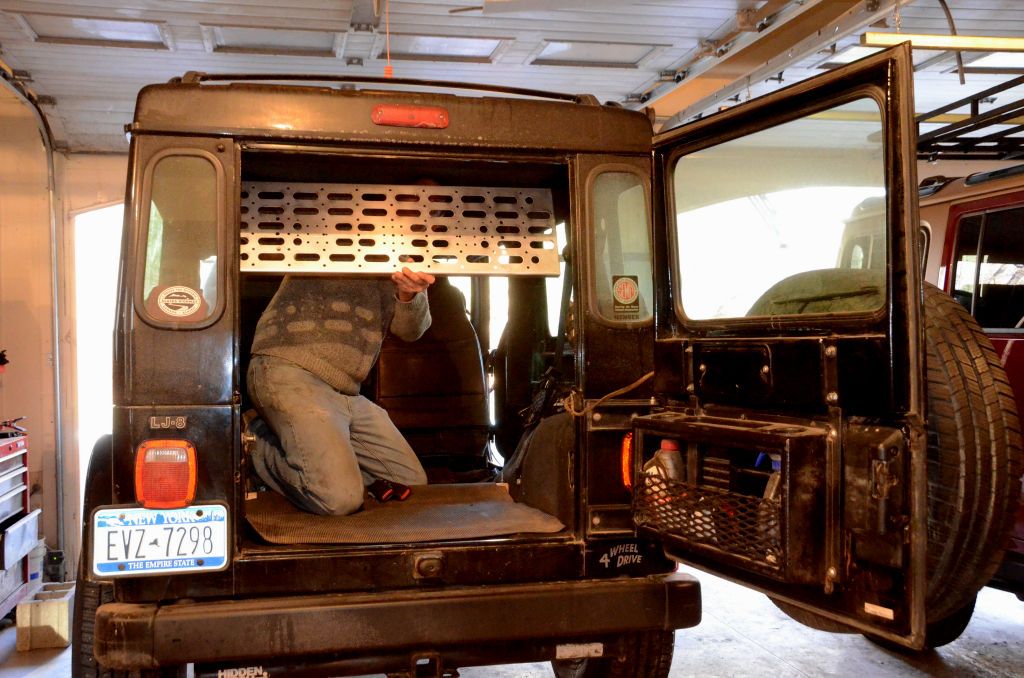
Verifying the overhead storage panel in the JKU... left, the panel is above the bottom of the roll bar and doesn't interfere with the view out the back; on the right I'm holding it where it will be when swung down for access.
Holding it in place in the JKU:

The same panel will fit in the LJ too although it will require different mounting hardware. Shown in the down position.
Holding it in place in the JKU:
The same panel will fit in the LJ too although it will require different mounting hardware. Shown in the down position.
jscherb
Expedition Leader
Trying out some gear to make sure the hole patterns work as planned.
First pair of photos: on the left is a 2-gallon Rotopax; I only have one but two will fit. On the right is a pair of 10 liter (2.5 gallon) Rubicans:
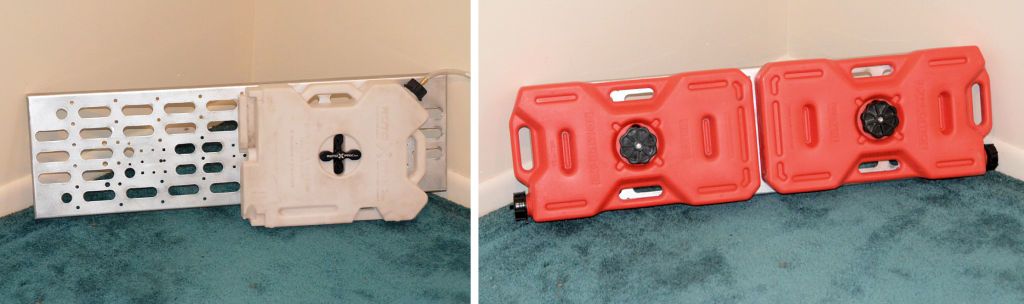
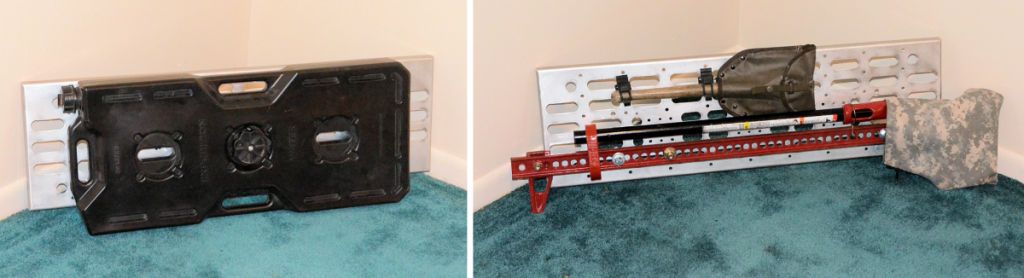
Next, on the left is a 20 liter (5.2 gallon) Rubican; a 4-gallon Rotopax is a bit smaller and will also fit. On the right a HiLift is mounted along with a folding shovel; the shovel is mounted with QuickFist clamps.
And, on the left is a bunch of random Molle pouches and on the right I've used straps to secure two folding chairs to the panel.
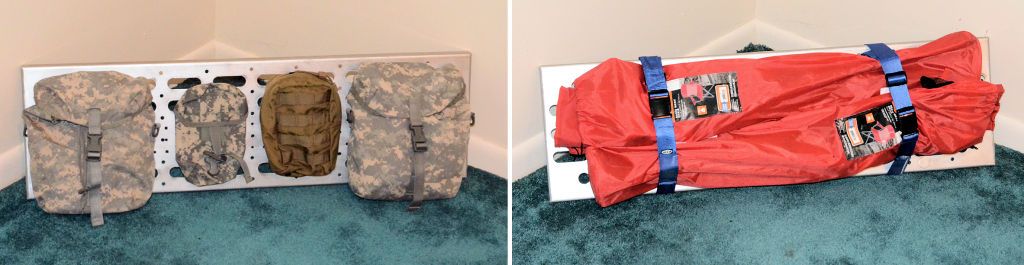
All of the holes I designed into the panel worked out as planned.
Just have to make the mounting brackets and swing-down mechanism and it'll be ready for testing on the road and trail.
First pair of photos: on the left is a 2-gallon Rotopax; I only have one but two will fit. On the right is a pair of 10 liter (2.5 gallon) Rubicans:
Next, on the left is a 20 liter (5.2 gallon) Rubican; a 4-gallon Rotopax is a bit smaller and will also fit. On the right a HiLift is mounted along with a folding shovel; the shovel is mounted with QuickFist clamps.
And, on the left is a bunch of random Molle pouches and on the right I've used straps to secure two folding chairs to the panel.
All of the holes I designed into the panel worked out as planned.
Just have to make the mounting brackets and swing-down mechanism and it'll be ready for testing on the road and trail.
jscherb
Expedition Leader
If I remember correctly, you make the oval molle holes with a hole saw and a saber saw, correct? Your design and the patience to execute it are very impressive.
Thanks, yes normally that's what I do, and yes it takes some patience. But in this case since there were so many holes to make I decided not to use a hole saw. I went to a local fab shop that's very friendly to my projects - they let me use their "big tools" like the press brake and press shear. To punch the holes this morning I used their "Iron Worker". An Iron Worker is a large machine specifically built for punching holes and notches. These are photos of the Iron Worker, my aluminum panel is sitting on the machine in both photos. Using the Iron Worker is only marginally less work than using a hole saw, but it makes more accurate holes than a hole saw does.
Before taking the panel down to their shop I drilled a 1/8" pilot hole for each place I planned to punch a hole, drilling the pilot holes ensured perfectly accurate placement of the punched holes. I marked the locations for the pilot holes by center punching through my full-size printout of the panel design, there are center marks on the printout for every hole. In the photos below none of the holes have been punched yet so you can see all the pilot holes I drilled.
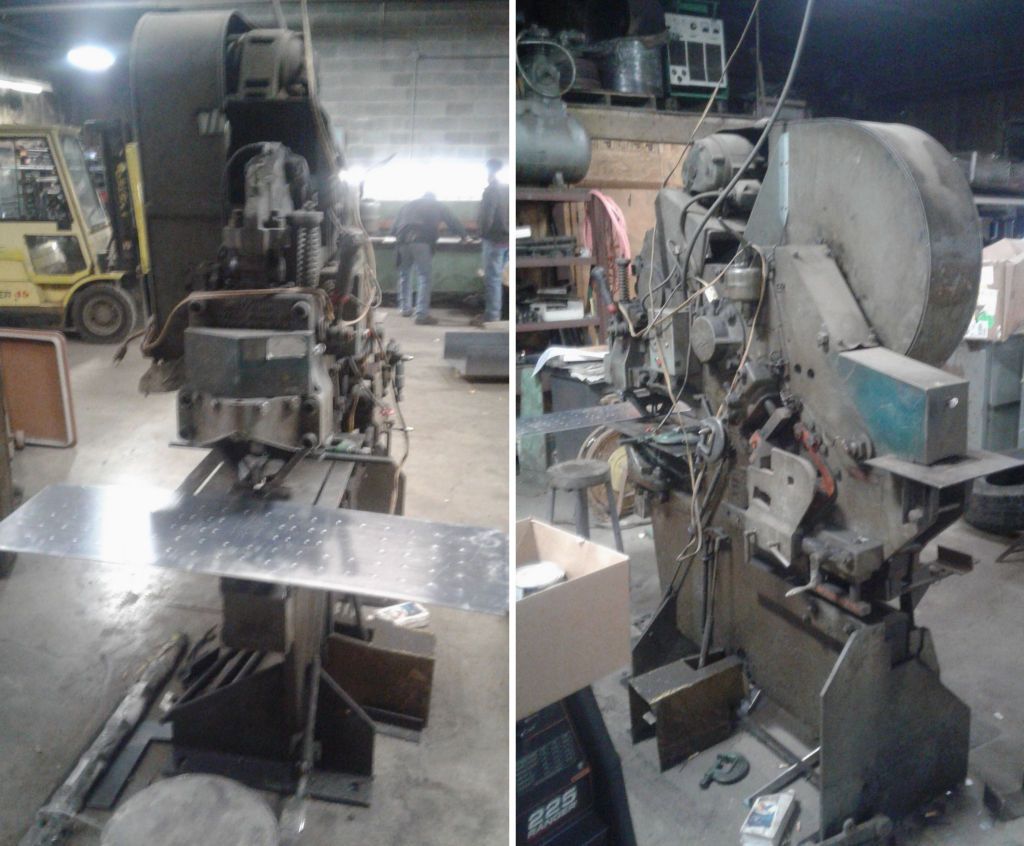
Side note: in the background of the first photo the guys are cutting a piece of steel plate in the press shear. It's capable cutting a 12' width of steel sheet in one shearing action, and can cut a 6' length of 3/8"-thick steel plate. Not something I'd ever have in my home workshop. Their press brake can do 12'-long bends and is even larger than the shear in the photo.
After I punched the holes with the Iron Worker, I used their press brake to put a 3/4" bend along each long end or the panel (no way my homemade bending brake can do a 40" long bend 1/8" aluminum), and then I used one of their manual box and pan brakes to put a similar bend on each short end. Then I brought the panel home and used my saber saw to turn each pair of holes into an oval. In this next photo I'm back in my own workshop, in the process of turning the holes into ovals.
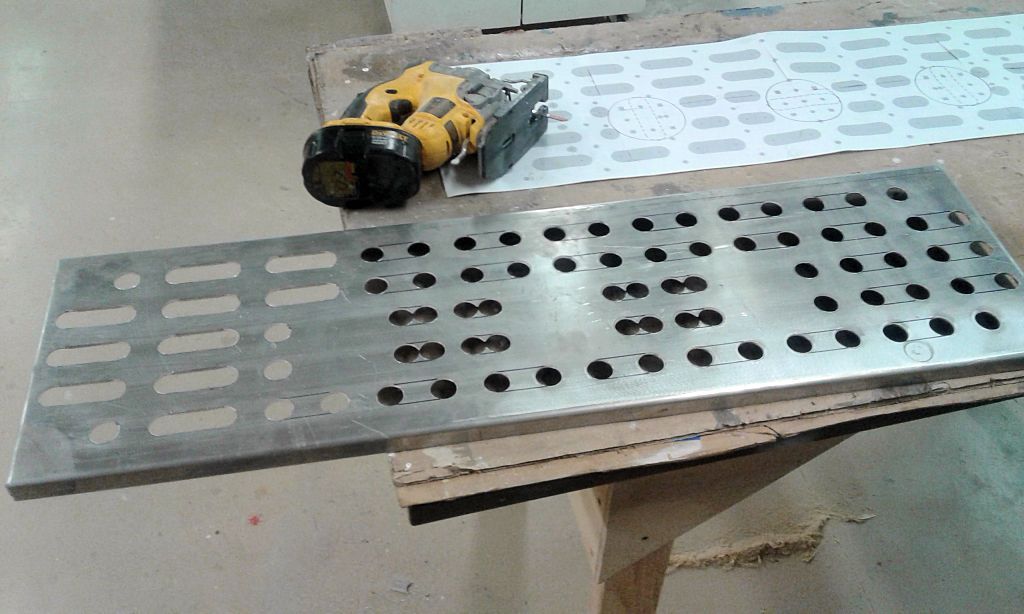
Even with the Iron Worker it's a lot of work to make so many holes, but the punch makes the holes (and resulting slots) more accurate.
Also there are 4 holes for mounting each Rotopax that need to be square for carriage bolts, so I converted all 12 of those from 1/4" round holes to 1/4" square holes with a small square file.
Normally I would do almost everything on a panel like this in my home workshop with my drill press, a few drill bits, a hole saw and my sabre saw. The only thing I can't do at home are the long edge bends, my homemade bending brake works really well for smaller/thinner projects but these bends are beyond its capabilities.
Last edited:
jgaz
Adventurer
Thanks for that update. I'm familiar with all the tools you mentioned having used them while I was still employed. I miss having access to them!
The reason I commented on your patience is that I'm still making the adjustment to doing things the home shop way since retirement. I can handle most things I need to do at home, it just takes longer.
The reason I commented on your patience is that I'm still making the adjustment to doing things the home shop way since retirement. I can handle most things I need to do at home, it just takes longer.
jscherb
Expedition Leader
Thanks for that update. I'm familiar with all the tools you mentioned having used them while I was still employed. I miss having access to them!
The reason I commented on your patience is that I'm still making the adjustment to doing things the home shop way since retirement. I can handle most things I need to do at home, it just takes longer.
I always do as much as possible in my home shop. The only thing I can't really do here is long bends in sheet metal and bends in heaver gauges (>16 gauge). Other than that, all the projects I do in metal, fiberglass and cloth are fabricated, molded and sewed at home. My home workshop is better than most but by no means over the top, so I still often have to improvise my methods to fit the tools I do have in order to achieve the desired result. Also I do all of my design with my capabilities in mind, so it isn't often I think up something I can't build.
jscherb
Expedition Leader
Another option I may add to the design - when I strapped the folding chairs to the panel it made me think about storing other loose things up there so maybe a basket option would be useful. It would basically be a fence around the edge to contain things. This is the concept, might implement it as sheet metal so it's more like the expensive overhead cargo trays that are on the market (but much less expensive):

jscherb
Expedition Leader
The other day someone told me that rather than have a JL-styled grille for his JK he wanted a 9-slot grille like the Willys MB. Since I've got drawings of both the MB and JK grilles on hand, I showed him what it might look like.
An MB grille overlaid on a JK grille:
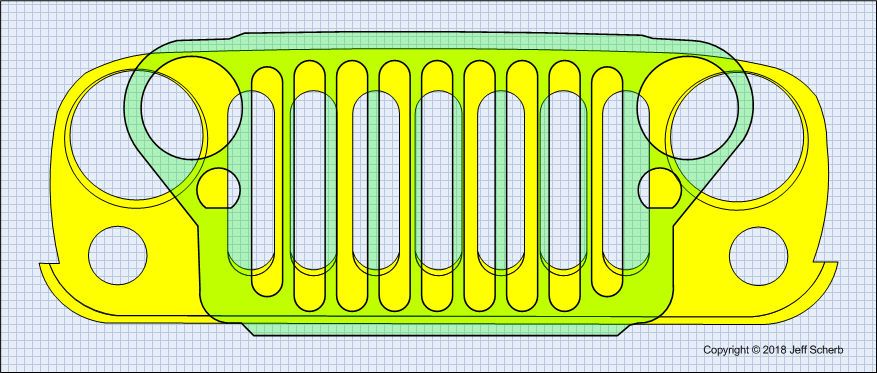
What a 9-slot JK grille might look like with the MB slots adjusted to match the proportions of the JK grille:
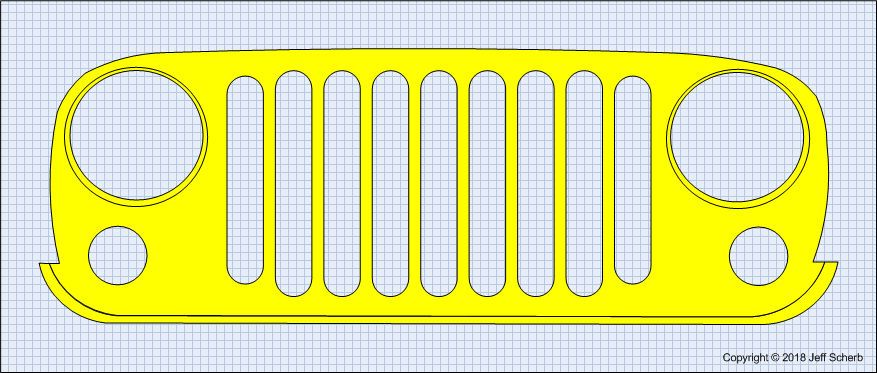
I don't plan to build a 9-slot grille for the JK, just did the images above because I had the MB grille drawing on hand and it was easy to do a JK 9-slot drawing to show him.
An MB grille overlaid on a JK grille:
What a 9-slot JK grille might look like with the MB slots adjusted to match the proportions of the JK grille:
I don't plan to build a 9-slot grille for the JK, just did the images above because I had the MB grille drawing on hand and it was easy to do a JK 9-slot drawing to show him.
jscherb
Expedition Leader
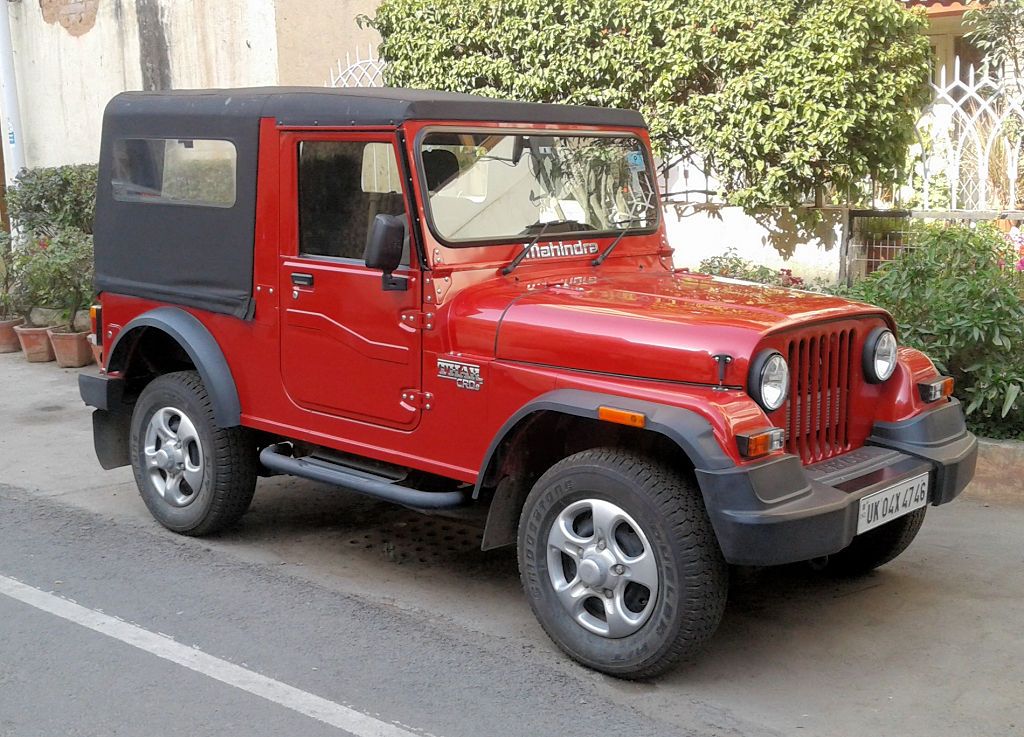
I won't be able to make any progress on projects for a bit because I'm on an assignment out of the country, but that doesn't mean I'll be away from jeeps (note: lower case "j"). This one is parked next door to where I've been staying the last few days, it's a current model here. I may rent one for a day while I'm here to see how they drive.
Last edited: