You are using an out of date browser. It may not display this or other websites correctly.
You should upgrade or use an alternative browser.
You should upgrade or use an alternative browser.
Barn Door for JK factory hardtops
- Thread starter jscherb
- Start date
jscherb
Expedition Leader
I would buy it!
I would by a complete Safari top with the Barn Door or the Barn Door itself if they were available!
If a company or individual with interest in bringing the barn door to market contacts me I'll be happy to discuss it with them, but I don't have any plans to seek out potential companies to try and interest them in the product.
I don't think there would be enough demand for them to make it worth the trouble for me to find a company to manufacture and market them, so I haven't tried to find a company to bring it market.
I did post a question a while back asking if people would be interested in a DIY-finish kit which would include the fiberglass parts but leave the finishing and mounting up to the buyer but almost nobody was interested in that idea.
I kept the molds so if anything changes more can be made or they can go into production if a company thinks there's a market for them.
What would be involved in finishing it? I just need the upper, no holes for wipers, etc. I can mount it.
jscherb
Expedition Leader
What would be involved in finishing it? I just need the upper, no holes for wipers, etc. I can mount it.
That depends on how unfinished it would be when delivered
") .
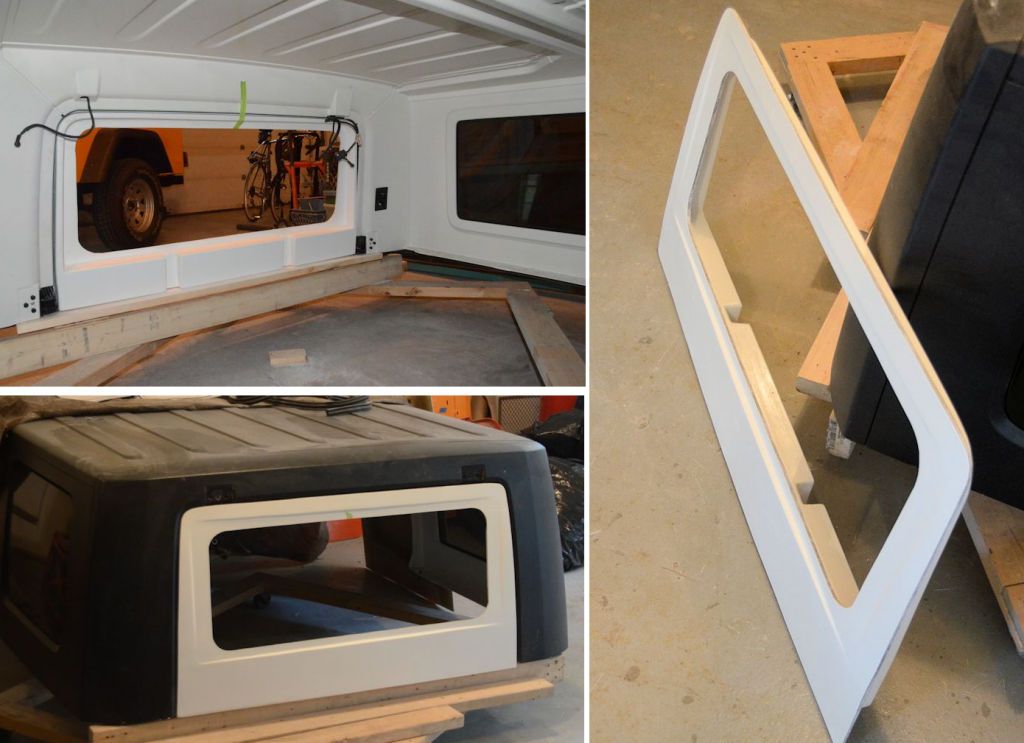
. The minimum finishing when delivered would probably be: Inner and outer skins of the shell bonded together, rough trimming of the outside edge done, window hole not cut out. No mounting hardware, wiring or window supplied. What you'd get would look something like the photos below, except that the window hole wouldn't be cut out. I think this would be the least cost way a barn door kit could be sold; the more it was finished before delivery the higher the cost would be.
Installer would need to:
1. Fabricate and install mounting hardware. Plans for the hardware could be provided, it's pretty simple and installs pretty easily on the tailgate.
2. Do a final fitting and trim around the outside, best done after mounting to take into account any variances in the installer's mounting hardware.
3. If a window is to be installed, cut the hole for the window. DIY windows would be safety glass that a local glass place could cut, installed with standard glass gasket.
4. If a wiper is to be installed, source wiper parts (sources could be provided), cut an access hole to install the motor, drill for the motor shaft and install the motor. Make up a wiring extension that connects to the factory hardtop wiring, runs under the rug to the passenger side of the Jeep, and into the barn door.
5. If a defroster grid is to be installed, make up a wiring hardness as above and install an aftermarket defroster grid kit on the window glass.
6. If the washer is to be used, source a washer nozzle, decide on where the washer nozzle is to be located, install it, and run a hose extension from the Jeep's hardtop washer hose to the nozzle.
7. Update the hardtop liftgate weatherstrip - the weatherstrip for the factory hatch has two recesses at the bottom that protrusions in the hatch weatherstrip fit into. Without those protrusions on the barn door, there will likely be a leak at those points. Instructions for updating the weatherstrip would be provided.
8. If the hardtop is a later model "wide hatch" version (2011-present), wide swing tailgate hinges must be installed. These could be manufactured in small quantities and included with the barn door shell for approximately $150.00 per pair.
9. Paint the fiberglass shell as desired.
Steps 3, 4, 5 and 6 would be optional, not required if you didn't want those options. I'm guessing most people would want a window (step 3), but some may not want the other options.
Last edited:
Early on owning my '14 JK I would have jumped on the Barn Door Kit. While I still think its a good idea but I like my no spare rack more and it is more useful with the lift glass as I can get to stuff from either side.
If I had the spare on the gate or a separate carrier out back Ild be chomping for a barn door setup.
As it is Ild like to delete the rear wiper/washer/defrost combo. Never used them in the 10 years I had my ZJ, I have no use for them on the JK.
I think if the word and pics got out to more JK/JKU owners, the Barn Door Kit would have a big market.
Last edited:
jscherb
Expedition Leader
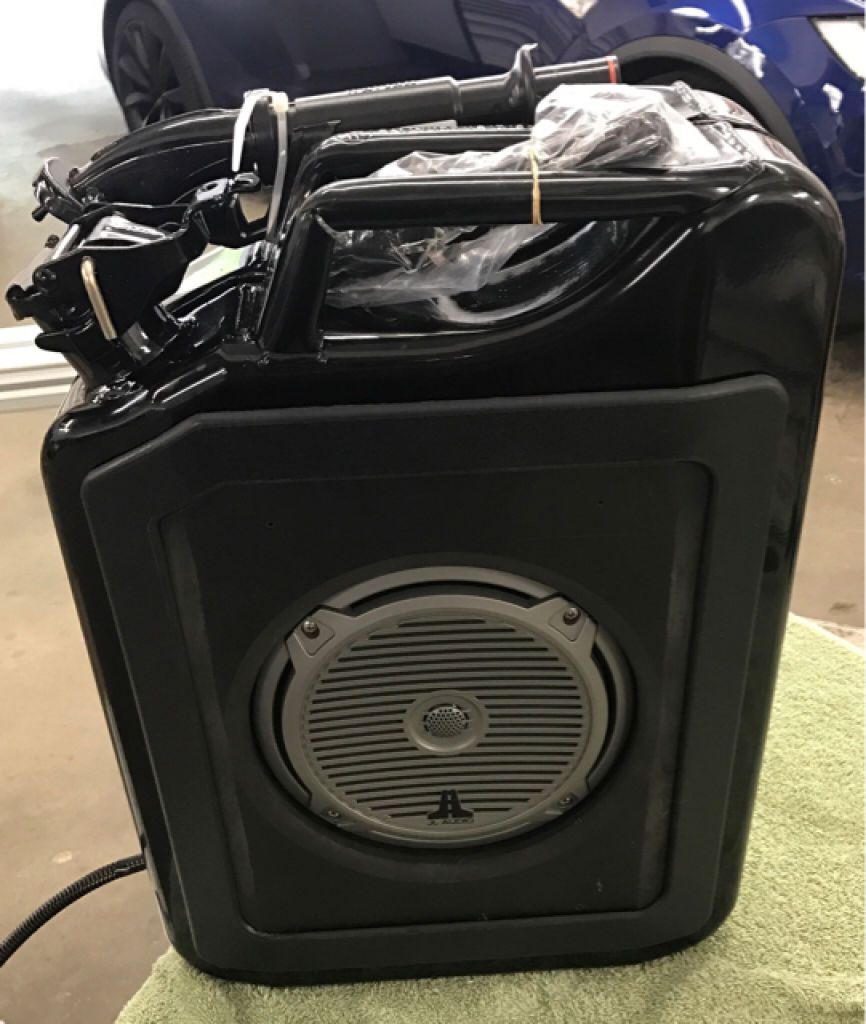
A few weeks ago I posted photos sent to me by Matt, who modified his jerry can and his side mount to dispense water through a spigot (http://forum.expeditionportal.com/t...for-JK-factory-hardtops?p=2298120#post2298120). Today he sent me photos of some other modified jerry cans he used in his local Memorial Day parade.
His Jeep is the one two behind the second fire truck, with the lights on the light bar...

He says:
His Jeep is the one two behind the second fire truck, with the lights on the light bar...
He says:
Speakers and microphone worked great. Added a great element to the town parade. I broadcasted patriotic music and was able to call out names of the kids I recognized along the route!
Next project . . . jerry can margarita-maker machine?
jscherb
Expedition Leader
Two weeks ago I posted about the HD door hinges I designed and said that I'd have preproduction samples in my hands very soon. (http://forum.expeditionportal.com/t...for-JK-factory-hardtops?p=2301110#post2301110). Met with MORryde today and they pulled a preproduction sample off the welding line for me to check out (it was still warm when they handed it to me). This sample hasn't been tumbled yet to prep it for powder coat, it's literally just come from welding.
I'm very impressed with it. It's all stainless steel, and they followed my prototype very closely, check the link above to compare mine with this one. It's 1/8" larger all around than the factory hinges so it will hide the typical corrosion that happens under the hinges. This first run is only a small number for their own internal testing; as soon as they do some fit testing they'll do a larger preproduction run for testing by me and others.
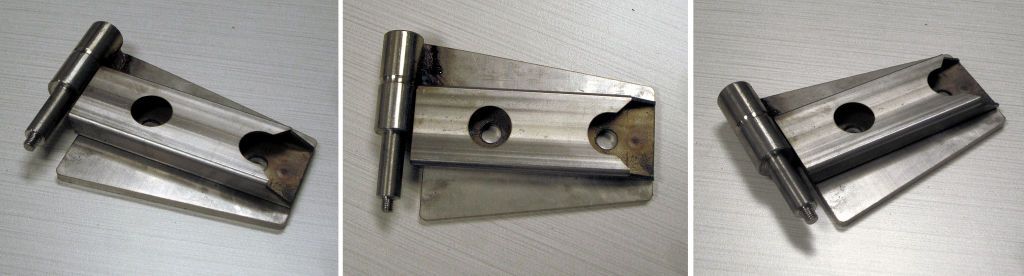
They say they can hit the price target I challenged them to hit.
Yes, now that I've seen the preproduction versions I can say they will be compatible with the Tuffy locks.
I'm very impressed with it. It's all stainless steel, and they followed my prototype very closely, check the link above to compare mine with this one. It's 1/8" larger all around than the factory hinges so it will hide the typical corrosion that happens under the hinges. This first run is only a small number for their own internal testing; as soon as they do some fit testing they'll do a larger preproduction run for testing by me and others.
They say they can hit the price target I challenged them to hit.
Love these @Jeff Looking forward to hearing more about these in the future. heh not sure I want to go through having to remove the dead bolt door locks I just installed.. matter of fast.. would the Tuffy dead bolts work with this setup?..
Yes, now that I've seen the preproduction versions I can say they will be compatible with the Tuffy locks.
jscherb
Expedition Leader
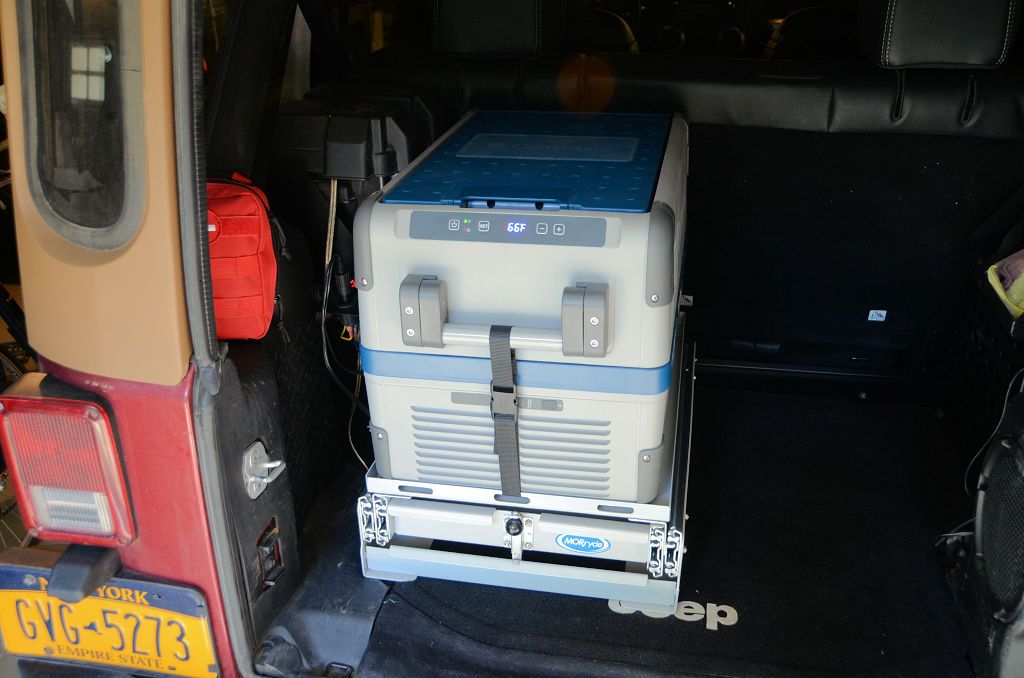
I've continued to test the wiring for the fridge and I've made a few minor updates to it, but one issue it took me a while to sort out was that in low voltage situations the fridge compressor would sometimes fail to start. When the indicated voltage was low but still above the voltage set for shutdown it would run a while and fail to restart as it cycled off and back on. Turns out is was the Dometic power plug was part of the problem - it made good enough contact in the socket to provide voltage to the fridge but not enough current could pass to start the compressor in low voltage situations. Like many such plugs, only one side is wired, so it only relies on the one contact; that contact being flat and the inside of the socket being curved, the contact area is fairly small. This isn't necessarily a criticism of the Dometic part, most of these plugs are like this, but in this case of the plug I have the contact was marginal.
I added a bit of solder to the contact to improve the size of the contact area. Works fine now. Passing this along in case anyone else needs to solve a similar problem.
I'm very pleased with the way the wiring is working. The fridge is powered by the dedicated battery when the Jeep isn't running and when the Jeep is running the fridge runs off the Jeep power and the battery gets charged.
Haven't had time yet to work on the slide, mounting the fridge to it or the fold-down tables yet. I did review the fridge/slide concepts with MORryde when I ws there the other day (since they supplied me with the slide) and they were very interested in following the project for commercial possibilities. Hopefully I'll get some time at the end of this week to get back to working on the project.
TrailBadger
Banned
Good to know.. I've also contacted McGard about their door hinge locks as these are more like a wheel lock which mounted to the door hinge bolt point.. Would offer a cleaner look because it just a tad larger than the current torx head retaining bolt. But according tot he wife, she's not thrilled with your hinge designs even after I explain the differences etc.Yes, now that I've seen the preproduction versions I can say they will be compatible with the Tuffy locks.
Also there's a fellow on another forum who's asking about a total coverage hard top and of course I suggested your Safari top as well as the Smittybilt Safari top as these are the only two that I'm aware of that do not utilize any sort of freedom panels.
Getting back to your hinge design, I also submitted an idea to McGard in reference to how their door locks are designed. Theres one thing that many seem to be over looking and I could be just viewing this as over kills, but placing these door/hinge locks on these hinges is one thing.. Why hasn't anyone created these same type of locking bolts as a replacement to the current torx bolt/screws jeep installs on these hinges from the factory.
jscherb
Expedition Leader
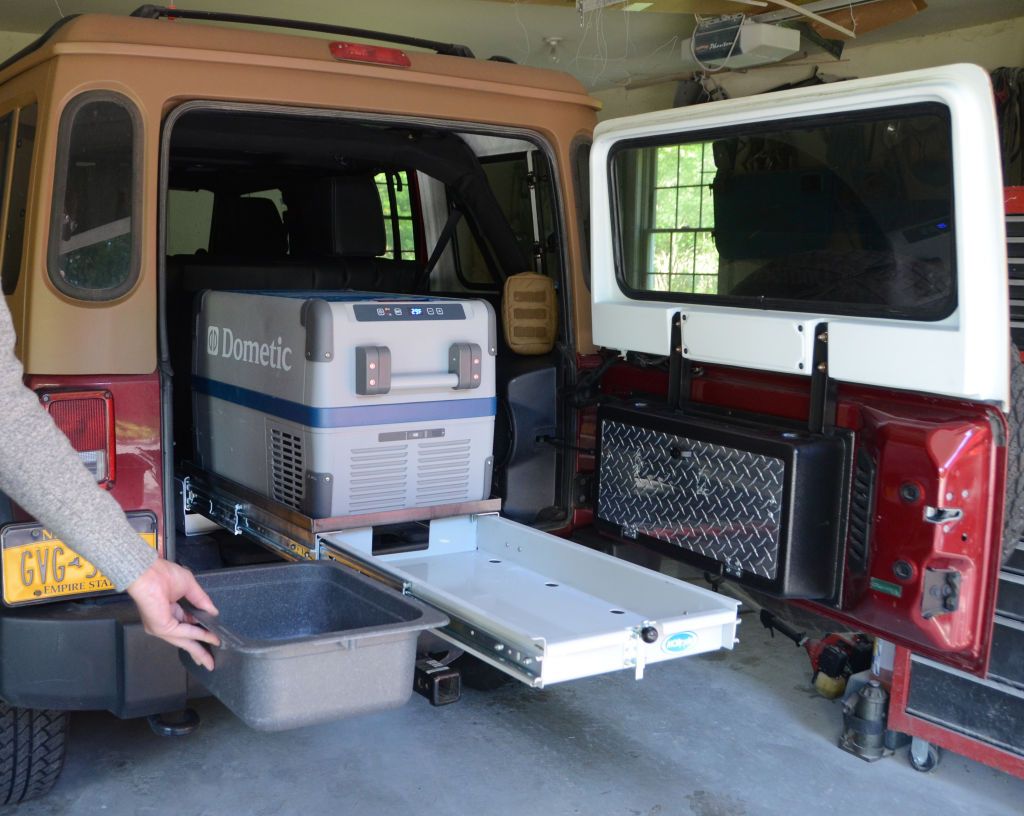
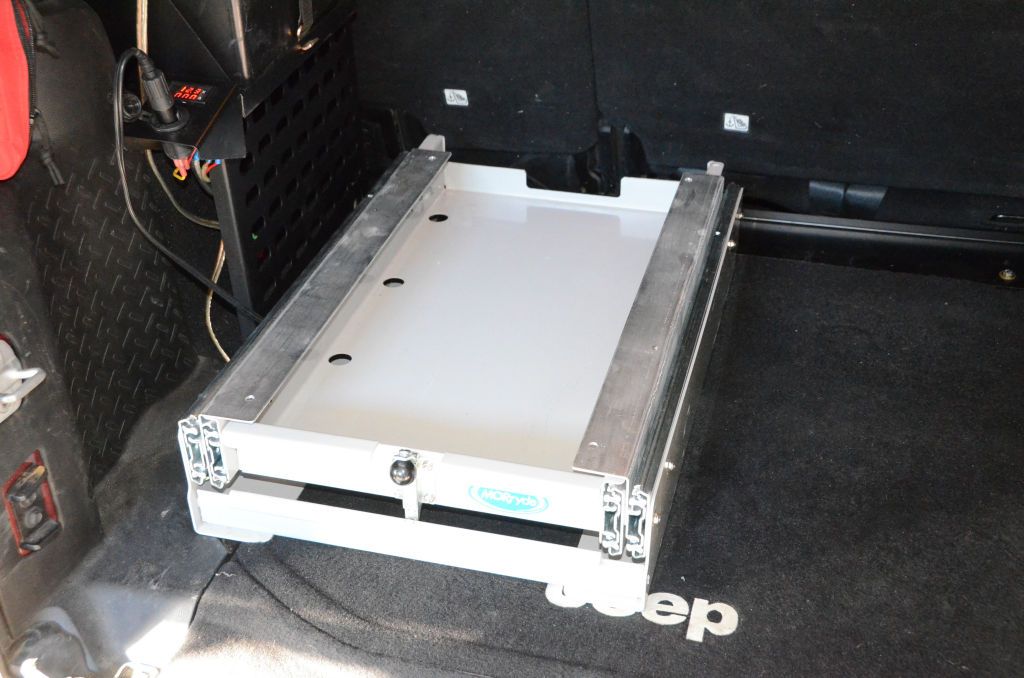
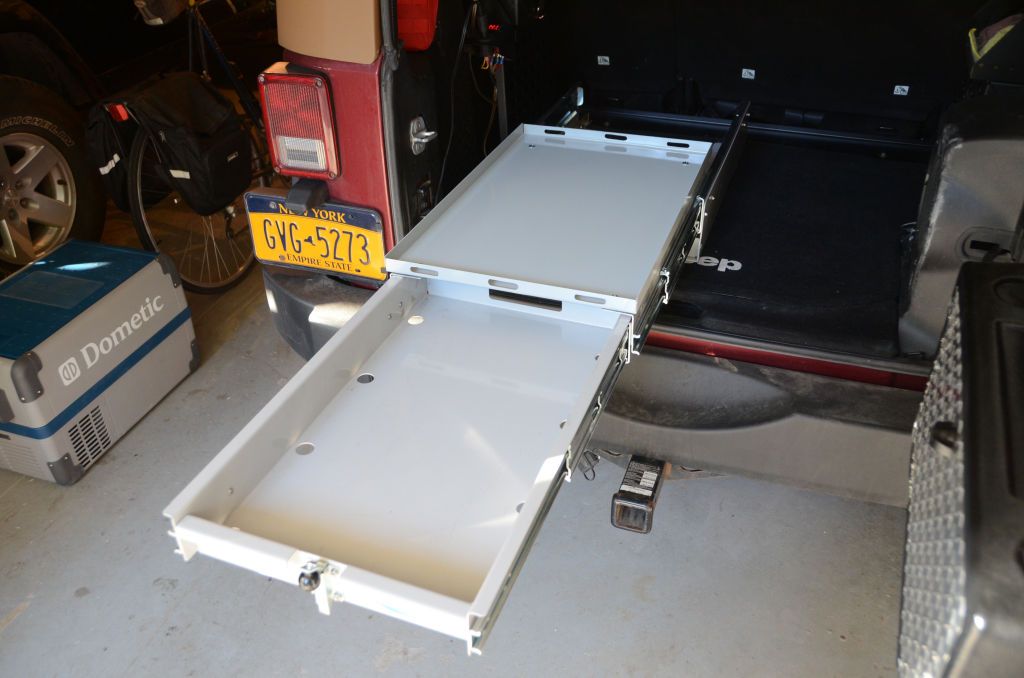
I got some time to start work on the fridge slide/kitchen project yesterday so I made up brackets and a tray to mount the fridge on top of the slides. The fridge and drawer under it operate separately. It's easiest to show with a video:
I still need to cut some tie-down slots into the sides of the tray for securing the fridge, and the tray needs to be painted, that's next, along with prototyping the the fold-down table ideas.
Maybe could also include a kitchen sink in the plan, I picked this one up the other day when I was in the RV Capital of the World...
jscherb
Expedition Leader
Here are some details on how I mounted the fridge to the slide. The basic slide unit is a MORryde SP156-115 "Front Pull" freezer tray (http://www.morryde.com/products/200-freezer-tray?return=/product-category/2-sliding-trays). It's a double extension unit, which worked out really well in this application.
I made a pair of angle brackets out of aluminum; these bolt between the two slides that are used for the double extension. One small mod I made to the MORryde drawer was to trim the back of it a bit lower. As it comes from MORryde the back of the drawer is high and wouldn't allow the drawer to pull out from under the fridge tray I added. This trimming could be avoided by making the brackets below a little taller so the bottom of the new tray would be high enough for the tall back of the drawer to clear.
I made up a new tray out of 16-ga. steel. The sides are simple bends and the corners are not welded. I cut tie-down slots in in the front and back. The tray bolts to the brackets pictured above. I found a nice match rattle can paint in the hardware store.

The fridge gets secured to the tray with simple straps in the front and back. These are made of 1" webbing and inexpensive buckles I picked up in the Walmart fabric department.
No drilling in the Jeep was required to install the slide. A bracket spans between the two factory hold-down points just behind the rear seat, and back of the slide unit bolts to that bracket. A third bolt goes into the factory tie-down bolt location along the side of the Jeep, one hole needed to be drilled in the slide base for this bolt. So far the unit seems very secure with only these three bolts.
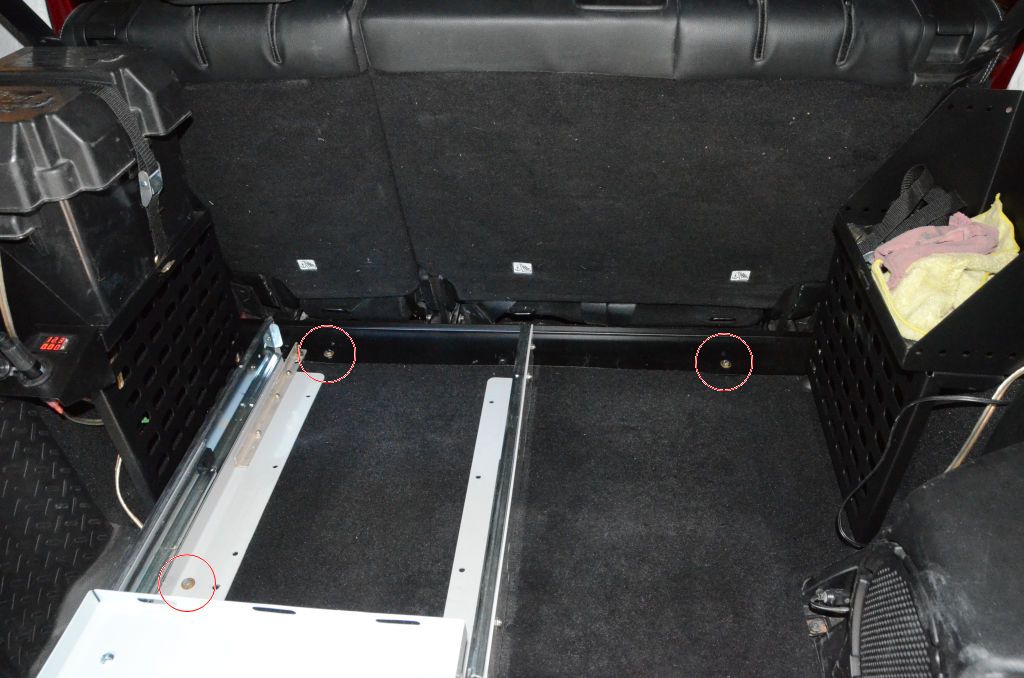
Since I don't want the fridge in the Jeep all the time, this mounting arrangement makes it very quick to install or remove the entire unit - less than 5 minutes and the slide and its mounting brackets can be removed or installed, so the full Jeep cargo area can be available for daily use but the fridge installed in minutes when needed.
I sent the above photos along to MORryde with the suggestion that maybe the brackets and tray could be produced as a "Jeep Accessory Kit" they could offer to go along with their SP156-115 tray.
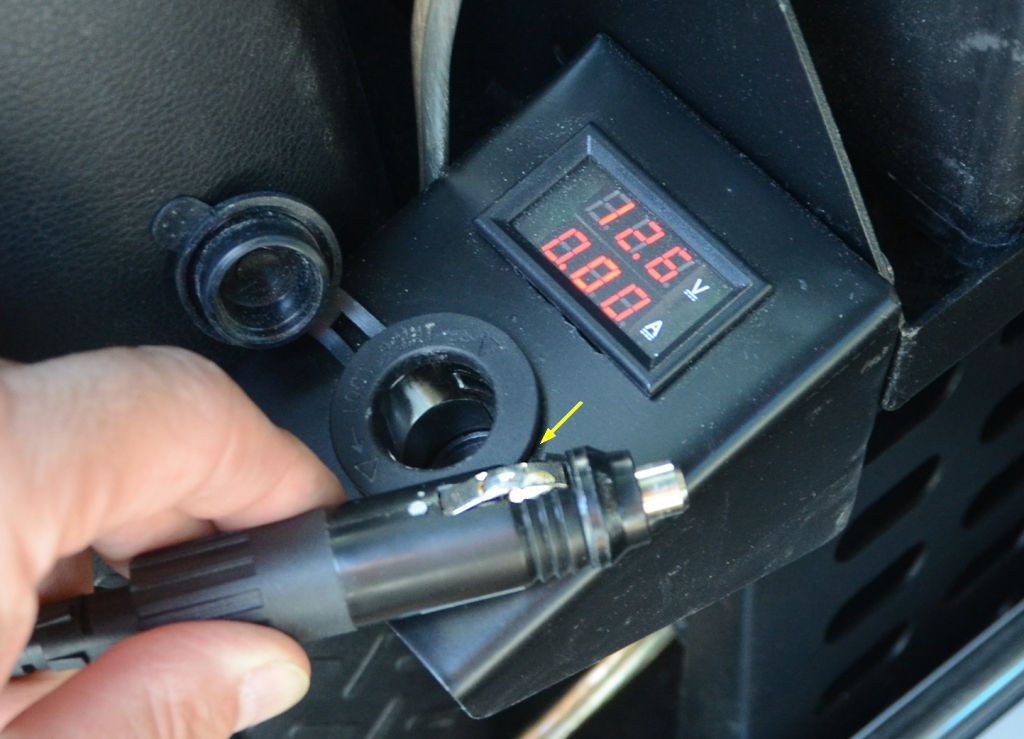
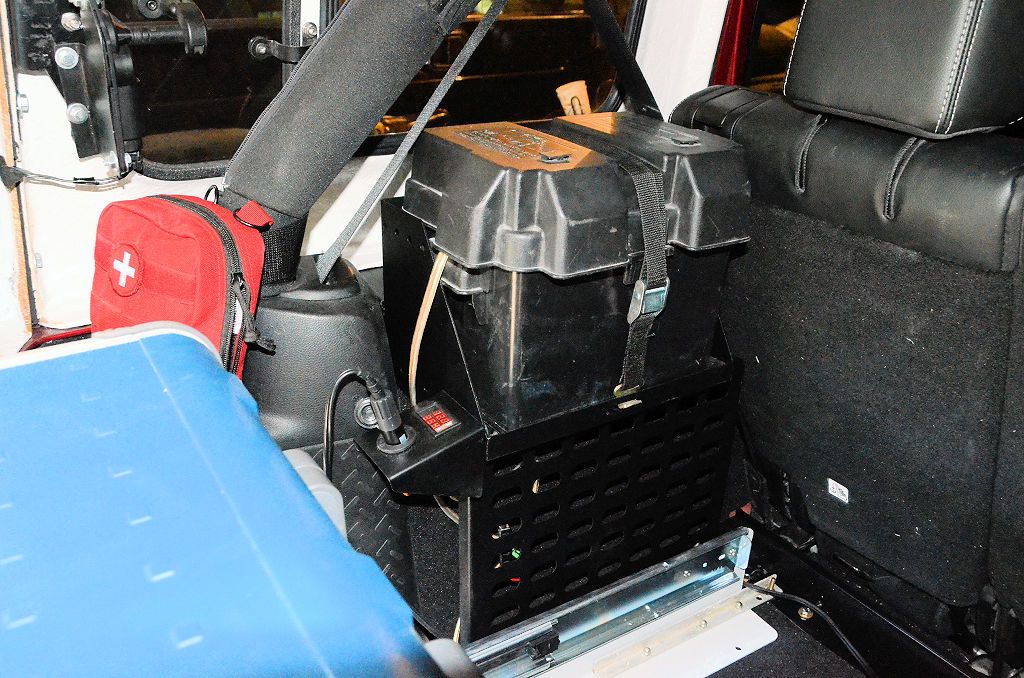
And a quick summary of the power - I've got a battery in a battery box sitting in a MORryde JK Ammo Can tray - the tray works great for this purpose and no drilling in the Jeep required. Bolted to the front lower side of the ammo can tray is a bracket containing a power outlet and a digital volt/amp meter (the holes are already in the tray for bolting this in place so again no drilling). A wiring harness connects to the Jeep in two places - the main power is drawn from the battery (and fused), and the second place a plug goes into the rear power outlet of the Jeep. The plug is connected to a relay, which disconnects the fridge battery from the Jeep battery when the Jeep is not running, so the fridge doesn't drain the main battery. When the Jeep is running, the fridge runs off Jeep power and the fridge battery gets recharged by the Jeep, and when the Jeep is not running the relay disconnects the fridge battery from the Jeep and the fridge runs only off the fridge battery.
Next: prototyping a fold-down table that will bolt to the slide.
I made a pair of angle brackets out of aluminum; these bolt between the two slides that are used for the double extension. One small mod I made to the MORryde drawer was to trim the back of it a bit lower. As it comes from MORryde the back of the drawer is high and wouldn't allow the drawer to pull out from under the fridge tray I added. This trimming could be avoided by making the brackets below a little taller so the bottom of the new tray would be high enough for the tall back of the drawer to clear.
I made up a new tray out of 16-ga. steel. The sides are simple bends and the corners are not welded. I cut tie-down slots in in the front and back. The tray bolts to the brackets pictured above. I found a nice match rattle can paint in the hardware store.
The fridge gets secured to the tray with simple straps in the front and back. These are made of 1" webbing and inexpensive buckles I picked up in the Walmart fabric department.
No drilling in the Jeep was required to install the slide. A bracket spans between the two factory hold-down points just behind the rear seat, and back of the slide unit bolts to that bracket. A third bolt goes into the factory tie-down bolt location along the side of the Jeep, one hole needed to be drilled in the slide base for this bolt. So far the unit seems very secure with only these three bolts.
Since I don't want the fridge in the Jeep all the time, this mounting arrangement makes it very quick to install or remove the entire unit - less than 5 minutes and the slide and its mounting brackets can be removed or installed, so the full Jeep cargo area can be available for daily use but the fridge installed in minutes when needed.
I sent the above photos along to MORryde with the suggestion that maybe the brackets and tray could be produced as a "Jeep Accessory Kit" they could offer to go along with their SP156-115 tray.
And a quick summary of the power - I've got a battery in a battery box sitting in a MORryde JK Ammo Can tray - the tray works great for this purpose and no drilling in the Jeep required. Bolted to the front lower side of the ammo can tray is a bracket containing a power outlet and a digital volt/amp meter (the holes are already in the tray for bolting this in place so again no drilling). A wiring harness connects to the Jeep in two places - the main power is drawn from the battery (and fused), and the second place a plug goes into the rear power outlet of the Jeep. The plug is connected to a relay, which disconnects the fridge battery from the Jeep battery when the Jeep is not running, so the fridge doesn't drain the main battery. When the Jeep is running, the fridge runs off Jeep power and the fridge battery gets recharged by the Jeep, and when the Jeep is not running the relay disconnects the fridge battery from the Jeep and the fridge runs only off the fridge battery.
Next: prototyping a fold-down table that will bolt to the slide.
Comanche Scott
Expedition Leader
Looks good, but the fridge is set too warm for a good IPA. Try between 45*F and 50*F.
jscherb
Expedition Leader
Looks good, but the fridge is set too warm for a good IPA. Try between 45*F and 50*F.
Actually I've been doing my testing with it set at 35 but it was out of the Jeep overnight while the paint on the new tray was drying. It installed and plugged in just before the photos were taken so it's on its way down to 35.
Forum statistics
Members online
- ExpoMike
- ataco
- CH261XL
- gdaut
- str8nm
- michel77
- steve_e
- DirtySocks
- SwtS
- Tomadoggy
- deanerbeano
- driveby
- clbedford
- Jynxxy22
- Driftwood77
- tano
- normal_dave
- Nailhead
- GeePack
- garrettwilson05wk
- ebrabaek
- bbuckley21
- Delsh
- Willsfree
- svmaple
- 1965 Land Cruiser
- High Shelter
- b. rock
- jtolle777
- Ozarker
- smokeysevin
- Kingsize24
- Megan_dfw
- altadoc
- poo_head
- Savagenut
- Doodad
- Over the hill
- Titan_Bow
- gregmchugh
- Raspy
- kmacafee
- Jasalvas
- a1gemmel
- wfv56
- drakoniac
- AmboFan
- Todd n Natalie
- rsmccull
- 3IMOH
Total: 675 (members: 69, guests: 606)