Battleship Jones: 2015 Tacoma DCLB Build Thread

Scott B.

SE Expedition Society
Well that was expensive.

Anyone wanna come help me take some differentials out then put them back in? :smiley_drive:

I would if I lived closer!

If you haven't seen them yet, there are several good write-ups on differential removal on TW.

I did both of mine by myself. The rear was easy. The front was not hard, but more involved. And, an extra set of hands would have been nice.

Don't forget to take pictures! ;)
 

Adventurous

Explorer
After acquiring the fridge last fall, I found out very quickly that I needed a constant hot outlet. While the fridge was good while fridging, it doesn't have the same insulating properties as a cooler. It was okay, but it certainly won't keep frozen things frozen. The Tacoma 12V outlets are only hot when the keys are in the ignition, which isn't exactly conducive to keeping the fridge at temperature. I know there is a jumper mod you can do to keep them hot, but that still requires running the fridge power cord all the way to the front of the truck.

Thus, I decided to add a 12V plug to the back of the center console. I went with one of these: https://www.amazon.com/gp/product/B001U4ZZPK/ref=oh_aui_detailpage_o07_s01?ie=UTF8&psc=1

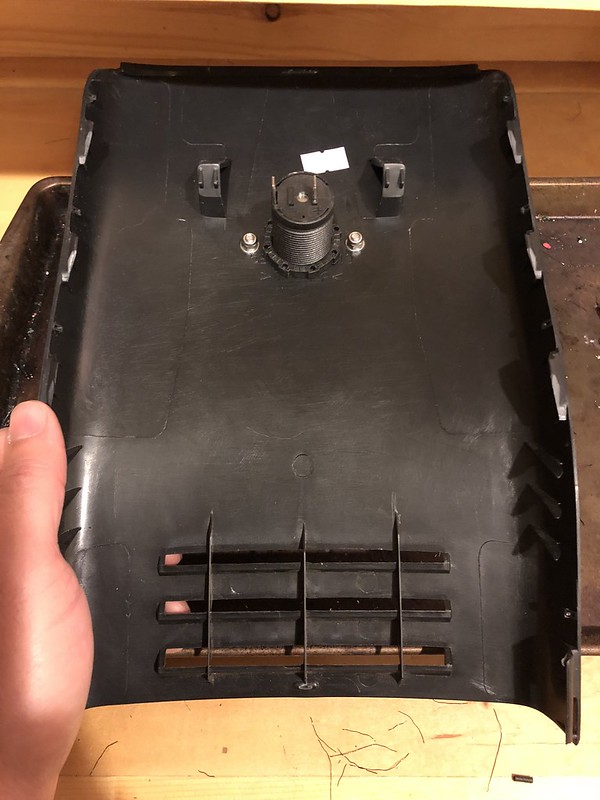
After pulling out the center console, I fiddled around a bit and figured out that I could remove the back panel. It can be pried free very carefully with a screwdriver. Made it quite a bit easier to get everything mounted. The goal was to locate it as high as possible, but, if you go too high you'll start to interfere with the cup holder. It ended up like so.
Untitled by Tim Souza, on Flickr

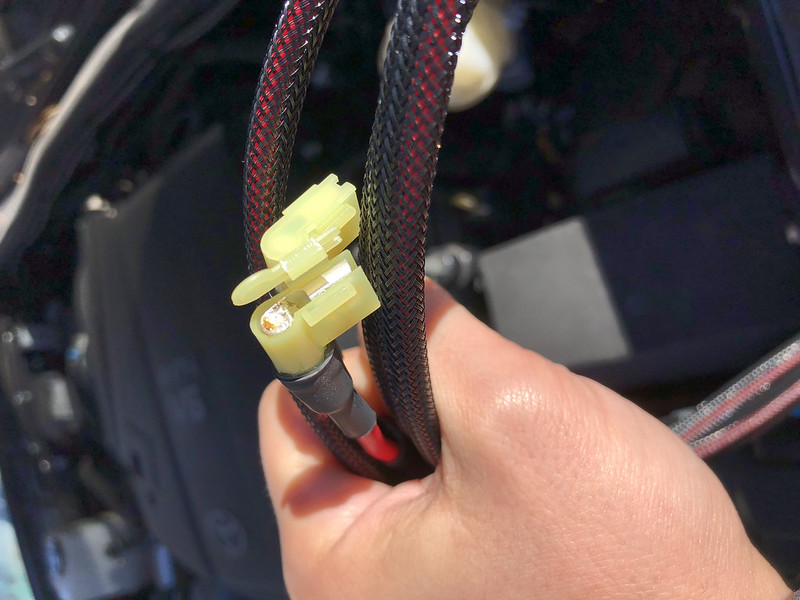
I used blue loctite and nylock nuts, its enough of a PITA to take this all apart that I wanted to make sure it stays put. Now, considering how long the Blue Sea socket is, the problem with this location is that there isn't a whole lot of space for terminals to fit. I had to source some right angle flag terminals and they tucked in just nicely. They could be crimped to the wire using ratcheting crimpers, but it doesn't crimp the top part of the terminal like the flag terminal crimpers do. I sneaked a soldering iron in there and filled it up good, it won't be going anywhere now. Fridge doesn't pull a ton of current, but I used 10ga wire, clad it in PET sheathing, and put a Delphi plug on the end so it can plug into the Bussmann block.
Untitled by Tim Souza, on Flickr

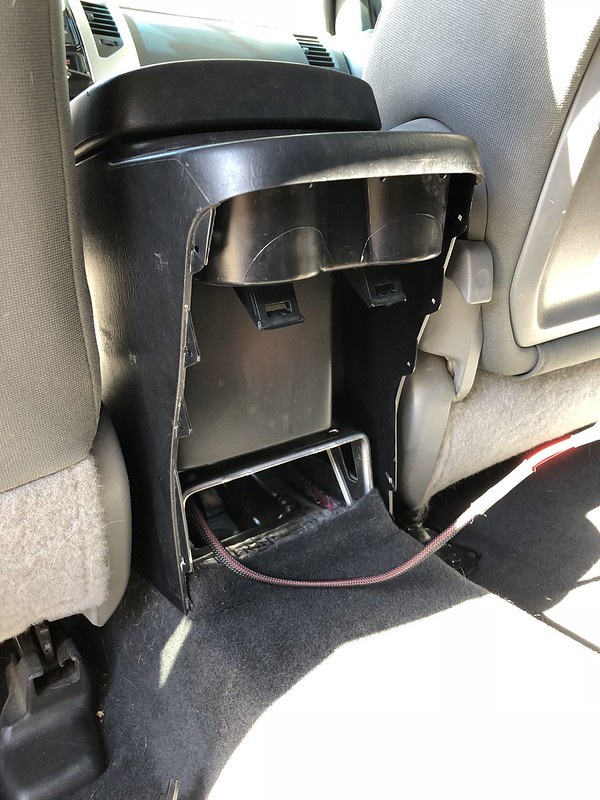
Wires were fed through the firewall grommet, routed underneath the radio and zip tied in several places to the wiring loom that goes to the shifter. I installed the center console first without the back panel so I could ensure the wire length was correct.
Untitled by Tim Souza, on Flickr

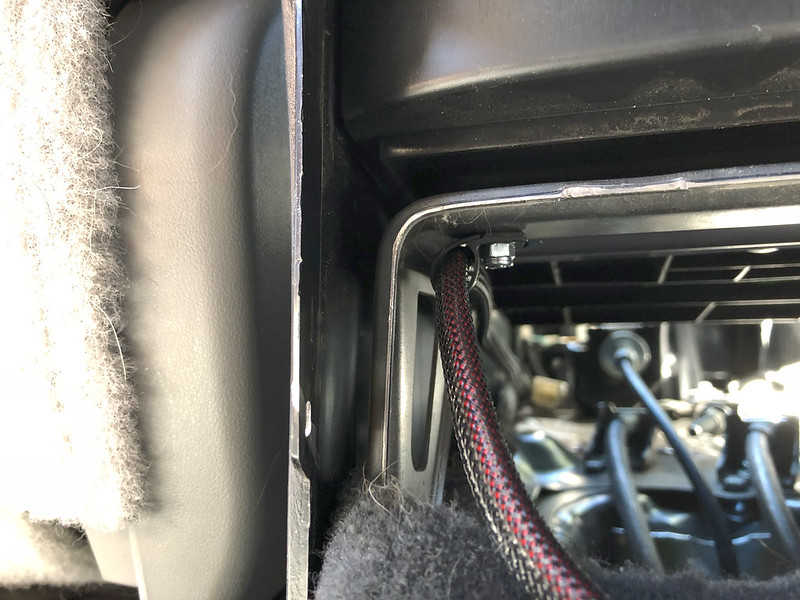
There was a lot of dead space towards the back of the wiring harness, so I utilized a spare hole in the center console brace to capture it. Again, nylock nut used to make sure things stayed put.
Untitled by Tim Souza, on Flickr

Now, I think the brace was made using a punch process as the edge was super duper sharp. I filed it down to ensure it wouldn't cut the wires AND put a piece of wire loom over the PET sheathing for added protection. Terminals connected, panel put back on, and center console re-installed.
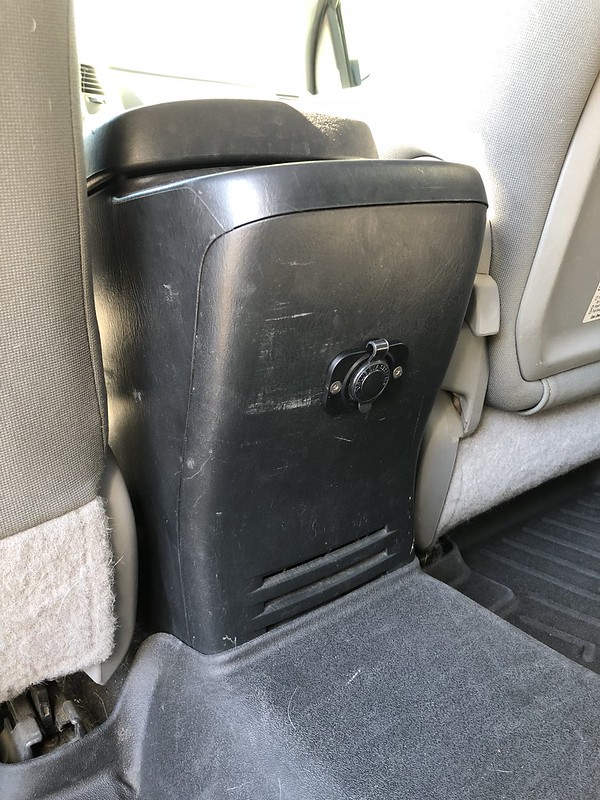
Untitled by Tim Souza, on Flickr

Done. Bussmann block isn't back in the truck so this isn't hot yet, but it should do the trick when the fridge makes it back into the truck. Right now it'll be running off of the starting battery until I can get my dual battery system installed.
 

Adventurous

Explorer
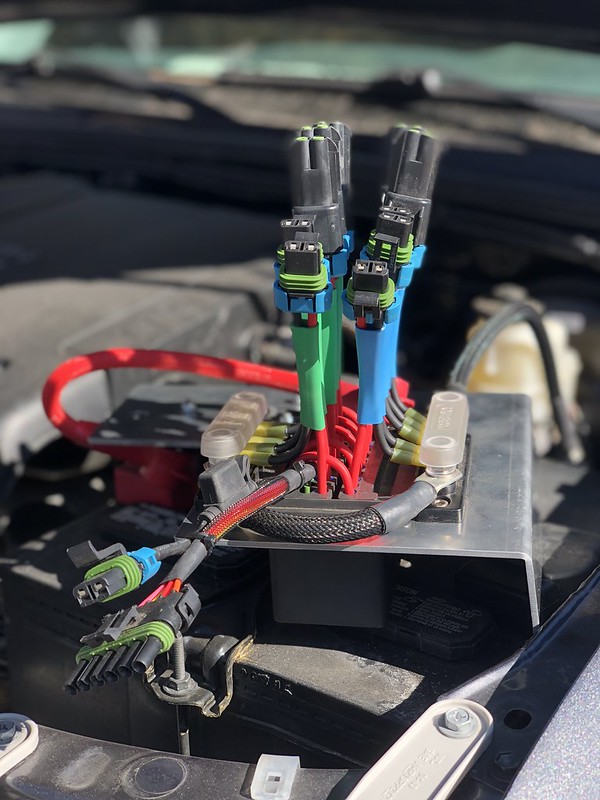
Finally got the Bussmann block back into the truck this past weekend. Before it went to the repair shop last fall, I had pulled it all out as there were a few things I needed to address. When building the block initially, I didn't have the right combination of tanged/tangless terminals on hand to properly assemble the block and the connections. So there were a few places I ended up using tangless when I needed tanged and vice versa, which led to situations where the terminal could back out enough to disengage with the fuse or mating terminal and break the connection...except you'd never know. I fixed all of those up with the proper terminals, replaced all of the 16 gauge jumpers I had used with 10 gauge for flexibility purposes, and added different color heatshrink to the fused and relayed circuits to differentiate them.

Untitled by Tim Souza, on Flickr

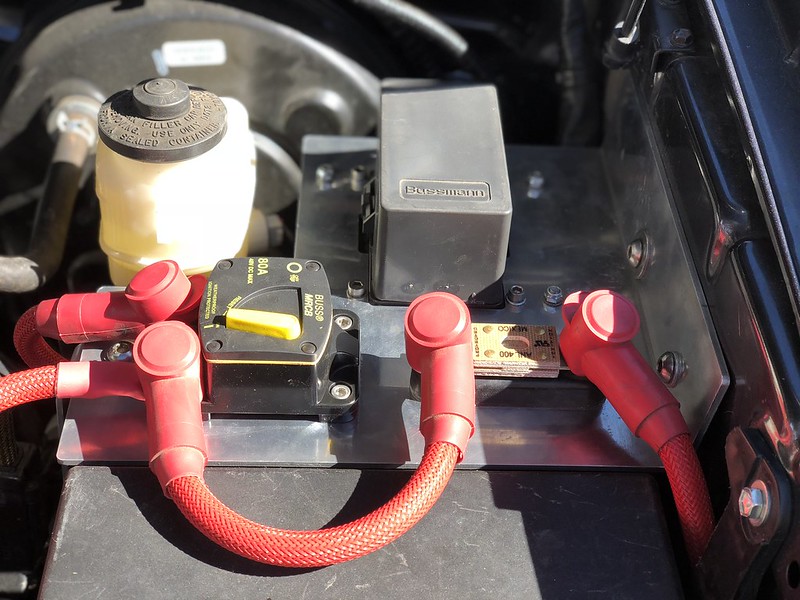
The only other change was to swap from a 100A breaker to an 80A. The 100A was leftover at the time, but the Bussmann block can only handle 80A, so I swapped it out to keep everything protected and avoid any issues. All connected and back in the truck. Flipped the switch and everything works! Same goes for my USB outlets and fridge plug, both of those are receiving power.

Untitled by Tim Souza, on Flickr

Electrical goodies should more or less be settled at this point. I ran a harness to the remote ACR switch so when I'm ready to install that I can just plug into it and go.
 

Adventurous

Explorer
The bussman block & wiring looks fantastic. There's something so satisfactory about clean, properly done electrical.

Right? I take great satisfaction for neat, organized wiring. The way I look at it is electrical gremlins from aftermarket accessories often plague people, if I can keep everything adequately protected and routed it should prevent that.
 

Adventurous

Explorer
Anyone have a good source for water jet or CNC plasma cutting and press braking? I would prefer aluminum, but steel would work for me too.

I'm drawing up some of my own mounts for the Derale transmission cooler, not a huge fan of the mounts that they offer. Looking to solicit a few quotes and see if it's a reasonable endeavor.
 

Scott B.

SE Expedition Society
Anyone have a good source for water jet or CNC plasma cutting and press braking? I would prefer aluminum, but steel would work for me too.

I'm drawing up some of my own mounts for the Derale transmission cooler, not a huge fan of the mounts that they offer. Looking to solicit a few quotes and see if it's a reasonable endeavor.

That sounds awfully fancy!

I just cut and bent some 1" aluminum flat bar.
 

tjalward

Observer
I noticed in an earlier photo that you've got your BedRug sitting overtop of the bed stiffeners. Do you think it's possible to install the stiffeners overtop of the bed rug (making holes in the rug as necessary)? I'd imagine that the rug should compress...

I'd highly recommend not attempting that - if it is even possible to accomplish in practice. I don't think the rug will compress enough on the sides or bottom. And if the TC stiffeners are not firmly seated to the surface they are mating to, it won't serve its purpose. Besides, the bolts have to line up and they can't if there is something in the way of fully seating (not sure you could get the bolts started kind of thing)

I have a bedrug and truckvault and TC stiffeners, just like Tim does. At first I installed the vault over the top, but recently I removed the vault spacers to lower it down as much as possible, and removed the rug. The truckvault wings don't fit as tightly, but the whole thing is better without the foam backed carpet to wick up any water, and the sides of the bedrug aren't in the way of the stiffeners. Mind you, I don't sleep in the back, so my usage model is different than yours. If you want the rug, with some sort of drawer or storage assembly, I'd cut the rug around the stiffeners or just leave it over the top.
 

tjalward

Observer
Thanks for the great feedback!

I do recall the stiffeners being a challenge to install, so perhaps placing them overtop of the bedrug will be impossible or not worth the downsides. Cutting the bedrug is not something I considered, but perhaps not a bad option.

And yes, the current plan is to make a custom drawers solution to sit overtop, and sleeping in the bed.

The bedrug may be worthwhile for you. I recently had a water leak though. the bedrug soaked up all the water and transferred it to the wood of my truckvault, rather than letting it go out the drain holes.. Luckily I noticed and removed the TV before it soaked in. Everything is fine and both dried out completely. If it would have been TV alone, it would have drained normally and I probably wouldn't have even known. Something to think about. When I put the TV back in, I will paint with something heavy duty and thick, especially on all the wood end grain to prevent any issues in the future. I suppose the bedrug does provide a layer of insulation as well, besides something soft and not so cold to touch on the areas around your platform. That may outweigh the potential downsides.

You can cut it really easily, and it didn't fray for me in the places I cut it (on the floor section around the area that used to have a D-ring). You could also cut with a soldering iron to ensure that no fraying would happen. Let me know if you are interested in buying the used bedrug for try-out? I will be selling soon, either here or TW or craigslist. PM if you want to discuss more and get pictures, etc. It really is still in very good condition, I never even mounted (velcro) the sides to the truck.

Thanks,
Travis
 

Adventurous

Explorer
Thanks for the great feedback!

I do recall the stiffeners being a challenge to install, so perhaps placing them overtop of the bedrug will be impossible or not worth the downsides. Cutting the bedrug is not something I considered, but perhaps not a bad option.

And yes, the current plan is to make a custom drawers solution to sit overtop, and sleeping in the bed.

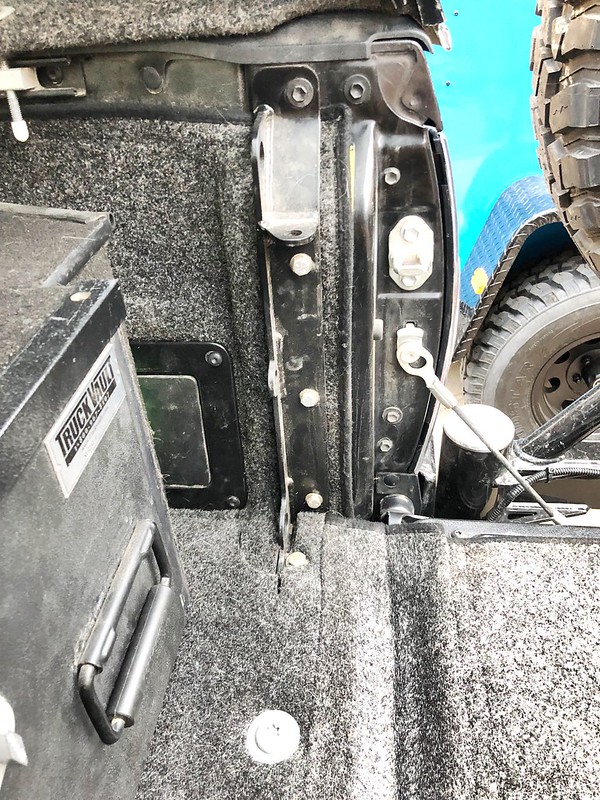
Travis is spot on. I initially tried to put the stiffeners over the top of the Bedrug, but the bottom portion of it with the foam backer is just too soft to be able to snug down the bolts adequately. So I ended up at this compromise, the bottom of the TC stiffener is under the Bedrug and the side leg is over the top. I found the side carpet had quite a bit less give to it so I wasn't concerned about it going over the top AND it keeps it in place nicely. If I was doing it again, I'd probably let the bolts for the bottom leg stay under the Bedrug.

Untitled by Tim Souza, on Flickr

I used a soldering iron to melt a hole in the Bedrug and to make sure the edges wouldn't fray. Same thing with cutting it, my propane fueled Dremel soldering iron kit has a blade attachment that plowed through it nicely.
 

Adventurous

Explorer
Untitled by Tim Souza, on Flickr

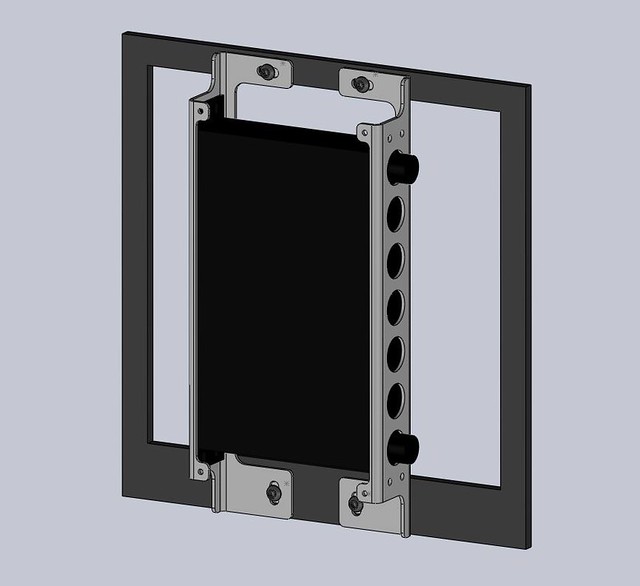
Transmission cooler mounts modeled. Top attaches in the OEM horn bolt holes, bottom hits the cross member and will require two holes to be drilled. This will allow me to eliminate the OEM transmission cooler and mount a Derale 52506 in its place. You'll have to excuse the rudimentary radiator support, I wasn't going to invest the time in making that super detailed as there are a lot of features. :)
 

Adventurous

Explorer
that's a misconception and a half...

Most engineer don't.

Ain't that the truth. A small portion of the engineers I have worked with have any experience with manufacturing processes. It was funny how many of the kids walking into the machine shop were bamboozled that what they drew up in Solidworks was impossible to make.
 

tjalward

Observer
Untitled by Tim Souza, on Flickr

Transmission cooler mounts modeled. Top attaches in the OEM horn bolt holes, bottom hits the cross member and will require two holes to be drilled. This will allow me to eliminate the OEM transmission cooler and mount a Derale 52506 in its place. You'll have to excuse the rudimentary radiator support, I wasn't going to invest the time in making that super detailed as there are a lot of features. :)

Dang dude, those look nice. I'd bet you could make money if you had multiple sets made, and then put together a package of cooler + mounts + hose/clamps needed for the job. Especially if you had trans temp data before and after :)

I'll probably just be going with the aluminum flat bar stock method, bending as appropriate to have it fit as snug as possible. But I will also have the supercharger junk to deal with so not nearly as much room.
 

Forum statistics

Threads
188,015
Messages
2,901,191
Members
229,411
Latest member
IvaBru
Top