Adventurous
Explorer
At some point in the past I alluded to my rear spring hangers being a little tweaked, not a ton, just a little, but it was only going to get worse from there. In the past the common response was to remove the OEM shackle and go with a shackle flip, but, there are a lot of additional issues that happens when you go that route, some of which are easy to correct, some of which are far more difficult.
Within the past few years a couple of companies have started working on OEM replacements for the inverted shackle configuration. The two that I am most familiar with, Archive Garage and Bay Area Metal Fab both released theirs near the end of last year. Both are both bolt on, made with plate steel, come with OEM length replacement shackles, utilize poly bushings, and have zerk fittings on the shackles to keep everything happy. I chose to go with the BAMF version for no particular reason other than they were running a killer Black Friday sale at the time.
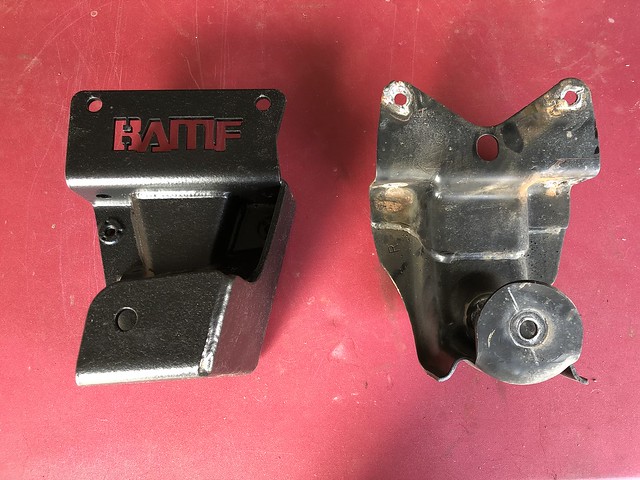
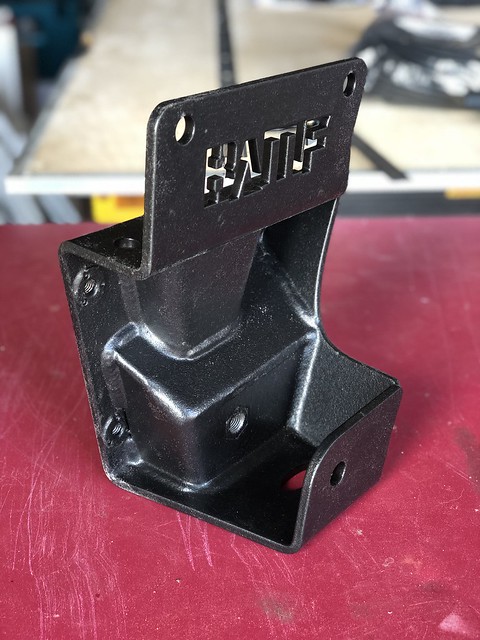
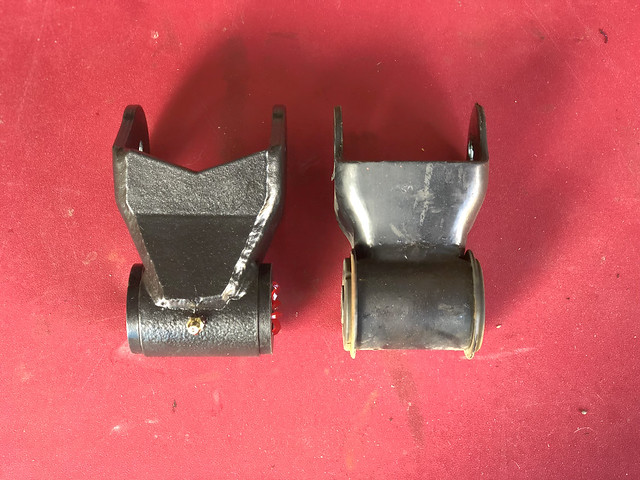
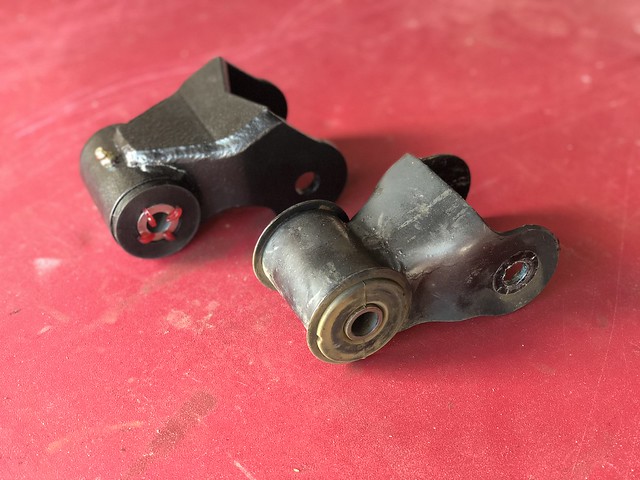
I won't get into removing process for removing the stock shackles and hangers, suffice to say I am glad I had the fab shop burn out the rivets with a plasma torch when I was having other work done. With those out of the way we can begin preparing the BAMF kit for installation. Here are a few side by side shots to show how robust the kit is compared to the OEM.
Hangers:
 Untitled by Tim Souza, on Flickr
 Untitled by Tim Souza, on Flickr
Shackles:
 Untitled by Tim Souza, on Flickr
Goodbye squeaky creaky loaded rubber bushing!
 Untitled by Tim Souza, on Flickr
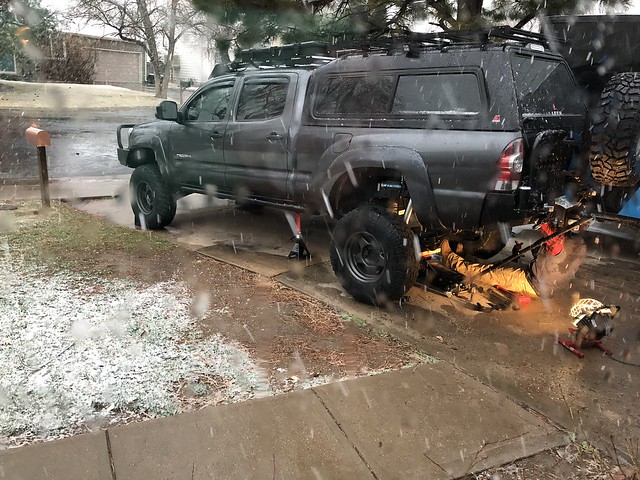
With the stockers removed the 4 frame holes need to be reamed out a little to accommodate the 1/2" grade 8 hardware. Upsizing to 1/2" would be fine, I chose to go with 9/16" to allow for tolerances and misalignment. The frame was a little rusty and gritty, so I wire wheeled, primered, and gloss black enamel painted it. While waiting for the paint to dry, Mother Nature gifted me a bit of an impediment.
 Untitled by Tim Souza, on Flickr
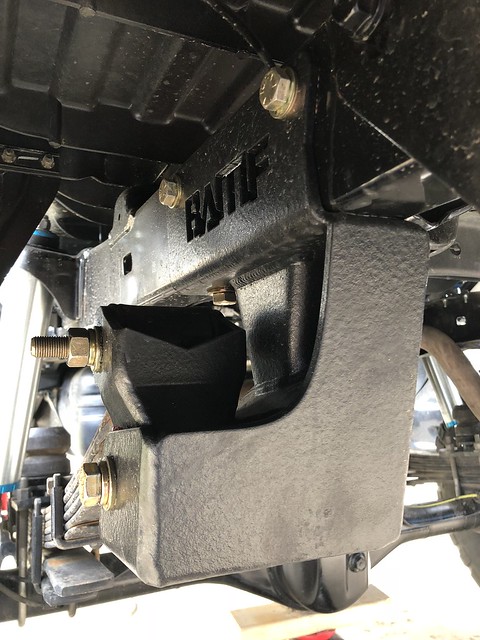
What was once a beautiful day first yielded a little rain, then some pea sized hail, then came the big fat snowflakes. Knowing I had to get it all back together so I could be at work Monday morning meant embracing the cold and the wet and working through it. Install is pretty easy, bolt shackle onto leaf spring, bolt hanger onto frame, bolt shackle into hanger. In my case, the bolt holes lined up well. All provided nuts are either nylock or have a split washer, bolts going through the shackle were greased to prevent seizure and blue loctited as well. Shackle and shackle hanger bolt were both torque to 89 ft*lbs per OEM spec, the 1/2" bolts were tightened until I felt like they would not come off easily.
 Untitled by Tim Souza, on Flickr
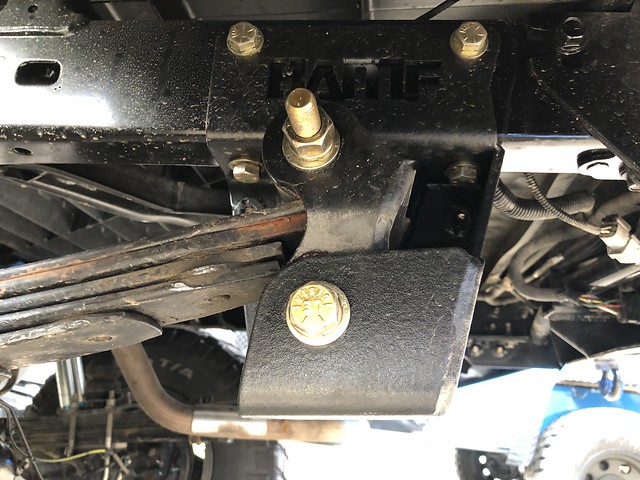
Shackle angle at ride height:
 Untitled by Tim Souza, on Flickr
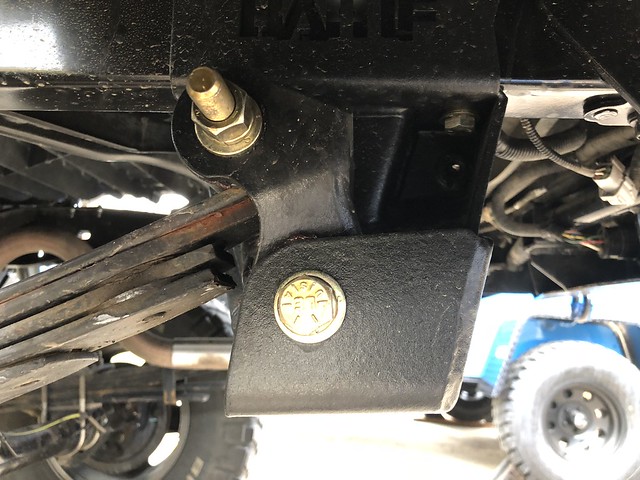
Shackle angle at full droop (shocks till connected and limiting travel):
 Untitled by Tim Souza, on Flickr
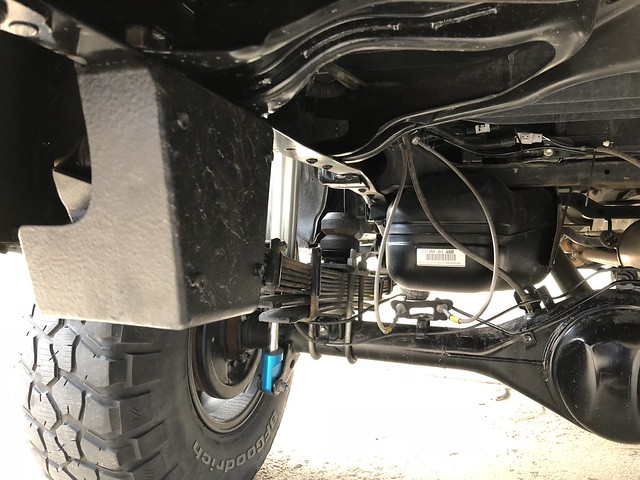
Leaf spring shape at ride height. Fairly flat but still have a little bit of arch to them and shouldn't go negative at bump.
 Untitled by Tim Souza, on Flickr
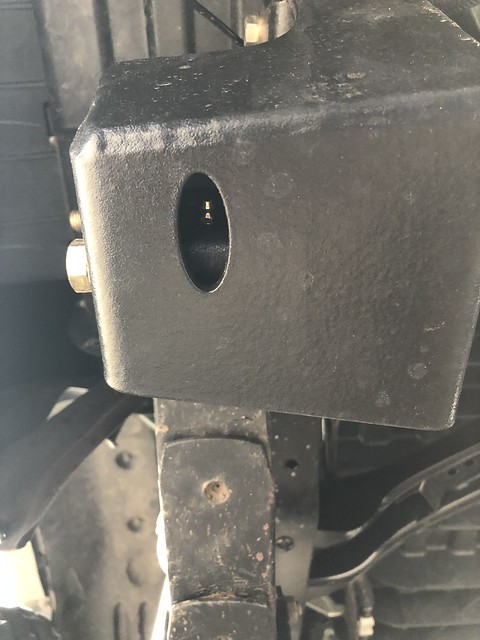
There's a little port on the bottom which I'm not sure if the intent was to easy access to the grease nipple or for drainage, but if the former, it's a little tough and would likely require a flexible needle tip or a 45* or 90* zerk fitting. This was one of the identified weaknesses with the kit.
 Untitled by Tim Souza, on Flickr
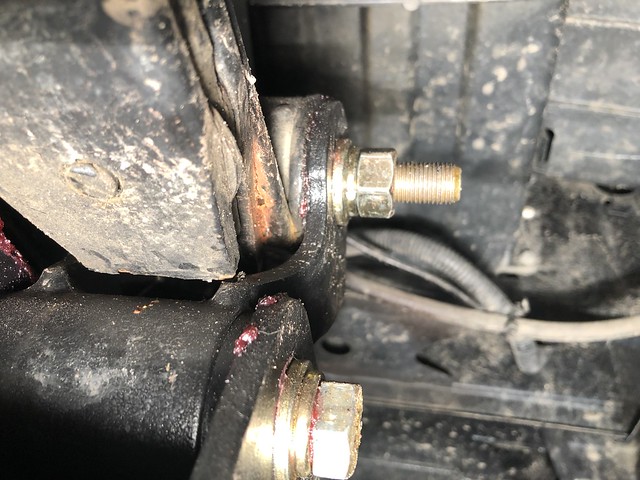
The second, and it may be unfair to blame this on BAMF, is the bit of interference I get between the shackle and the end of one of my leafs on the Dakar pack. This could be the result of multiple factors, but for reference I have the Dakar pack plus the D29XL add-a-leaf, with all leaves drilled for isolator pads. It adds a bit of height between pads (probably wouldn't contact if the isolators weren't spacing things out, or if I wasn't using an add-a-leaf) but would probably be okay if the Dakar pack wasn't so shifty and stayed centered. The contact only occurs on compression and I would imagine will self clearance at some point if I don't decide to knock the corner of the offending leaf before then.
 Untitled by Tim Souza, on Flickr
The last areas of improvement are the hardware (upper shackle bolt on mine is longer than ideal, as was the lower bolt) and the captive nut used on the hanger side of the lower bolt. I would have preferred a recess in the back of the hanger and a nut on the back side in case things were to get buggered up somehow. On the plus side, I like that you can add on an additional cross member between the two shackles to help prevent flexing or movement which should also have the upside of stiffening up the rear end a smidge.
How do they ride? Great! There is a difference, albeit slight, on small bump compliance. They also got rid of a large amount of the creaking and groaning I would get from the rear end during normal driving which I attribute to replacing the loaded rubber bushing with a greased poly one. I have noticed a clunk on compression that can be traced to the interference noted above, but that should go away if I modify the leaf, convince the Dakar pack not to move around so much, or knock the corners off of the offending leaf spring.
I've seen reports of a few of the kits, of which these are the first bunch, having a few issues but none with mine. I don't have any time on the Archive kit or any others so no compare and contrast can be provided there. We'll see how they perform long term, but initial impression is that I received a solid, well built replacement hanger.
Within the past few years a couple of companies have started working on OEM replacements for the inverted shackle configuration. The two that I am most familiar with, Archive Garage and Bay Area Metal Fab both released theirs near the end of last year. Both are both bolt on, made with plate steel, come with OEM length replacement shackles, utilize poly bushings, and have zerk fittings on the shackles to keep everything happy. I chose to go with the BAMF version for no particular reason other than they were running a killer Black Friday sale at the time.
I won't get into removing process for removing the stock shackles and hangers, suffice to say I am glad I had the fab shop burn out the rivets with a plasma torch when I was having other work done. With those out of the way we can begin preparing the BAMF kit for installation. Here are a few side by side shots to show how robust the kit is compared to the OEM.
Hangers:
 Untitled by Tim Souza, on Flickr
 Untitled by Tim Souza, on Flickr
Shackles:
 Untitled by Tim Souza, on Flickr
Goodbye squeaky creaky loaded rubber bushing!
 Untitled by Tim Souza, on Flickr
With the stockers removed the 4 frame holes need to be reamed out a little to accommodate the 1/2" grade 8 hardware. Upsizing to 1/2" would be fine, I chose to go with 9/16" to allow for tolerances and misalignment. The frame was a little rusty and gritty, so I wire wheeled, primered, and gloss black enamel painted it. While waiting for the paint to dry, Mother Nature gifted me a bit of an impediment.
 Untitled by Tim Souza, on Flickr
What was once a beautiful day first yielded a little rain, then some pea sized hail, then came the big fat snowflakes. Knowing I had to get it all back together so I could be at work Monday morning meant embracing the cold and the wet and working through it. Install is pretty easy, bolt shackle onto leaf spring, bolt hanger onto frame, bolt shackle into hanger. In my case, the bolt holes lined up well. All provided nuts are either nylock or have a split washer, bolts going through the shackle were greased to prevent seizure and blue loctited as well. Shackle and shackle hanger bolt were both torque to 89 ft*lbs per OEM spec, the 1/2" bolts were tightened until I felt like they would not come off easily.
 Untitled by Tim Souza, on Flickr
Shackle angle at ride height:
 Untitled by Tim Souza, on Flickr
 Shackle angle at full droop (shocks till connected and limiting travel):
 Untitled by Tim Souza, on Flickr
Leaf spring shape at ride height. Fairly flat but still have a little bit of arch to them and shouldn't go negative at bump.
 Untitled by Tim Souza, on Flickr
There's a little port on the bottom which I'm not sure if the intent was to easy access to the grease nipple or for drainage, but if the former, it's a little tough and would likely require a flexible needle tip or a 45* or 90* zerk fitting. This was one of the identified weaknesses with the kit.
 Untitled by Tim Souza, on Flickr
The second, and it may be unfair to blame this on BAMF, is the bit of interference I get between the shackle and the end of one of my leafs on the Dakar pack. This could be the result of multiple factors, but for reference I have the Dakar pack plus the D29XL add-a-leaf, with all leaves drilled for isolator pads. It adds a bit of height between pads (probably wouldn't contact if the isolators weren't spacing things out, or if I wasn't using an add-a-leaf) but would probably be okay if the Dakar pack wasn't so shifty and stayed centered. The contact only occurs on compression and I would imagine will self clearance at some point if I don't decide to knock the corner of the offending leaf before then.
 Untitled by Tim Souza, on Flickr
The last areas of improvement are the hardware (upper shackle bolt on mine is longer than ideal, as was the lower bolt) and the captive nut used on the hanger side of the lower bolt. I would have preferred a recess in the back of the hanger and a nut on the back side in case things were to get buggered up somehow. On the plus side, I like that you can add on an additional cross member between the two shackles to help prevent flexing or movement which should also have the upside of stiffening up the rear end a smidge.
How do they ride? Great! There is a difference, albeit slight, on small bump compliance. They also got rid of a large amount of the creaking and groaning I would get from the rear end during normal driving which I attribute to replacing the loaded rubber bushing with a greased poly one. I have noticed a clunk on compression that can be traced to the interference noted above, but that should go away if I modify the leaf, convince the Dakar pack not to move around so much, or knock the corners off of the offending leaf spring.
I've seen reports of a few of the kits, of which these are the first bunch, having a few issues but none with mine. I don't have any time on the Archive kit or any others so no compare and contrast can be provided there. We'll see how they perform long term, but initial impression is that I received a solid, well built replacement hanger.

 Untitled
 Untitled
 Untitled
 Untitled
 Untitled
 Untitled
 Untitled
 Untitled
 Untitled
 DSC_3904