Battleship Jones: 2015 Tacoma DCLB Build Thread

mrblah

Observer
Ain't that the truth. A small portion of the engineers I have worked with have any experience with manufacturing processes. It was funny how many of the kids walking into the machine shop were bamboozled that what they drew up in Solidworks was impossible to make.

That's a bad engineer. while I have 0 experience actually milling and cutting in the shop, I sure can visualize it and even virtually fab it before sending it to the shop floor.

But it is a common thing. We learn to do hard math and loose sight of the easier solutions in the process.
 

Adventurous

Explorer
Gear change pt. 1

Last Thursday the diffs from ECGS arrived. Both were built with Nitro 4.88 gears and ARB air lockers. Figuring the rear would be the easier of the two, I chose to tackle that first and get my mojo going.

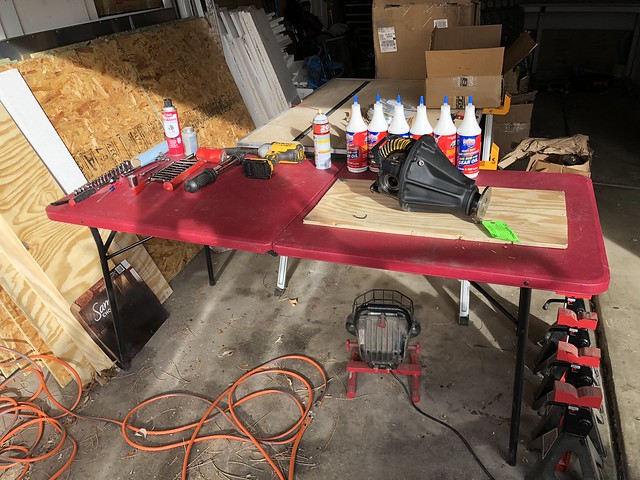
In advance I laid out all the tools I thought would be necessary and created a diff swap work station. There actually aren't too many tools involved to make this one happen.

Tool List:
(x2) 14mm wrenches OR torque adapters (would have preferred these in hindsight)
12mm socket
10mm socket
Torque wrench
Small screwdriver
Soft faced hammer
(x2) Impact sockets (doesn't matter what size, just used for spacers)
(x4) jack stands
Floor jack
3 qts gear oil of choice
1 tube grey RTV

Untitled by Tim Souza, on Flickr

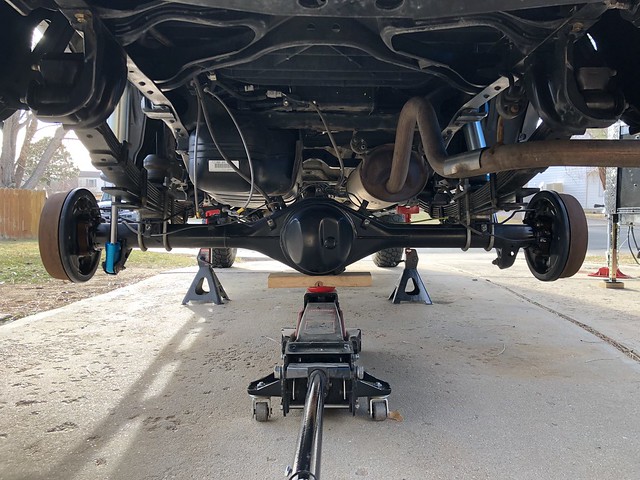
Then came the safety related stuff. As I would be crawling under the truck a bundle and needed it lifted up safely, the front wheels were chocked, jack stands placed under the frame, there were a pair of jack stands under the drums (not shown), and the jack was supporting the rear axle. Safety first!

Untitled by Tim Souza, on Flickr

Per usual, it is a good idea to hit the bolts with PB blaster a few days before the surgery takes place to give it adequate time to work. This is more important in rusty climates, but I do it here anyway to make it easy on myself.

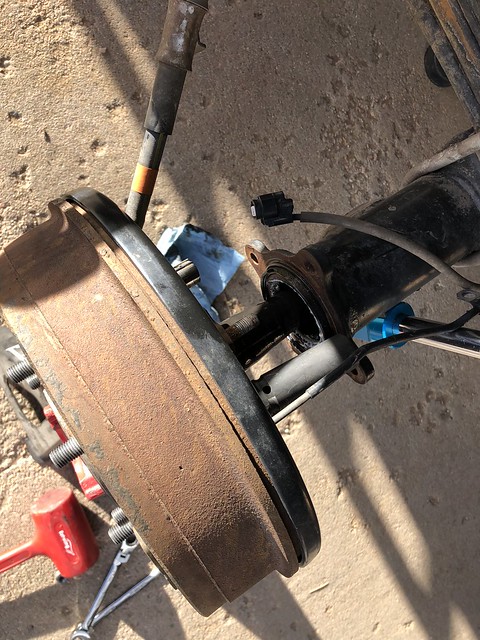
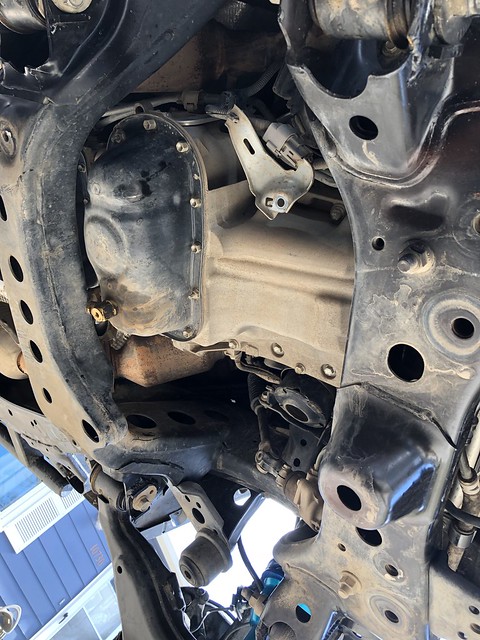
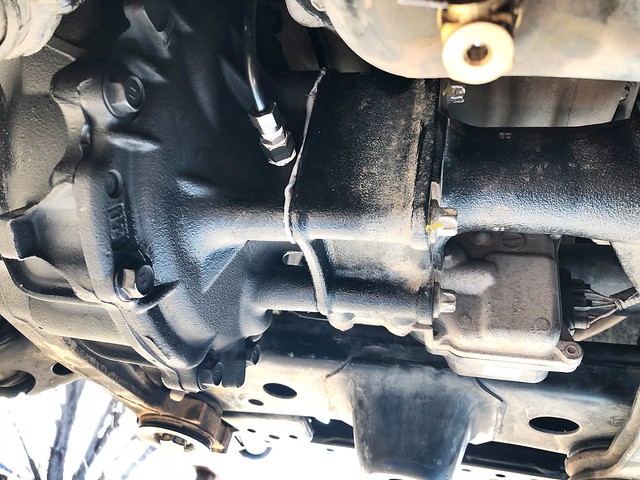
The disassembly process is pretty straightforward. In order to pull the 3rd member you have to get the axle shafts out far enough to wiggle it free. To that end, the sensors on the rear hubs must be disconnected and the e-brake cable bracket also has to be undone from the leaf springs.

Untitled by Tim Souza, on Flickr

With those out of the way I undid the 4 bolts holding the hub to the axle. Credit goes to the Monkeyproof write-up on Tacomaworld, but if you remove the 6 bolts holding the brake hard line to the axle, you should be able to slide the axle shafts out far enough to get the 3rd member out without having to disconnect and bleed the brakes after. It takes a wee bit of force to get it out far enough, but it will. Impact sockets were used to keep the axle out, jack stands were used to support the axle and prevent it from wrecking the axle seals.

Untitled by Tim Souza, on Flickr

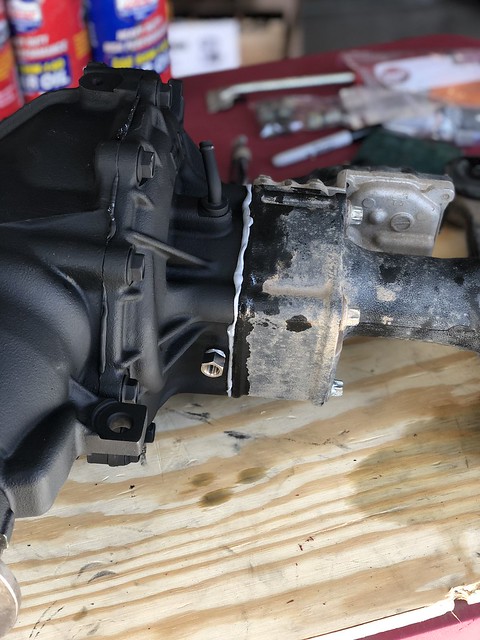
With those out of the way you can undo the 4, 14mm driveshaft bolts and secure that to the exhaust hanger above. This should give you the space to undo the 10, 12mm nuts and washers holding the 3rd member to the axle. Once those are undone all it takes is a little wiggling to get the 3rd member out. Be prepared, it is a bit heavy and awkward. I had a furniture moving dolly handy to set it onto so I could roll it out from under the truck. All done!
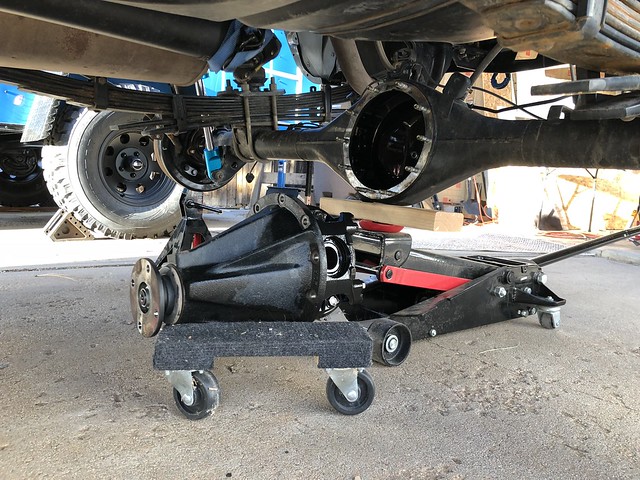
Untitled by Tim Souza, on Flickr

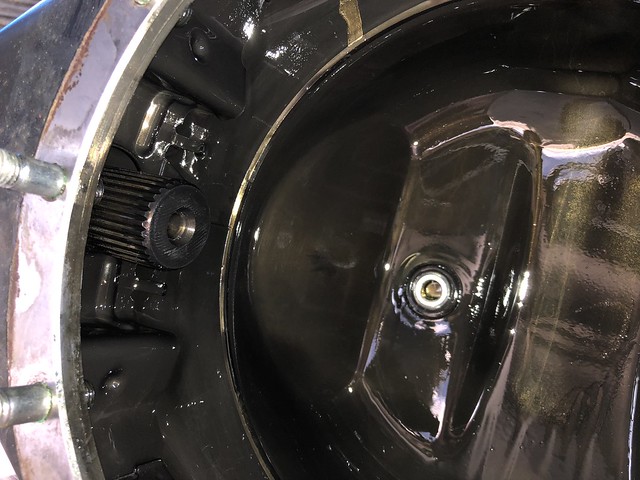
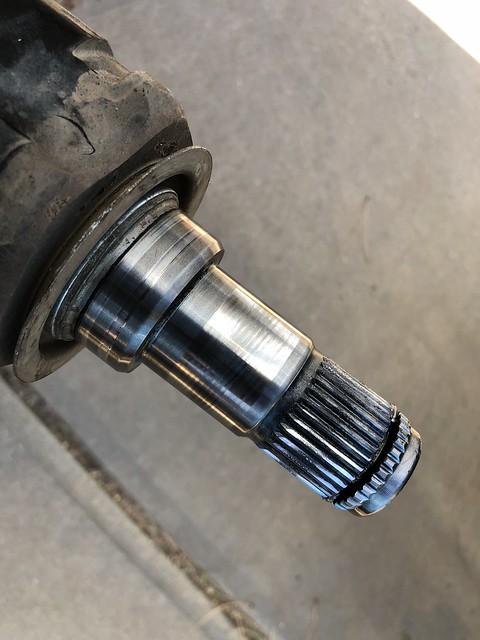
While I was in there I made sure the splines on the axle shafts looked good. No sense in putting it all back together only to find out that they were twisted or something.

Untitled by Tim Souza, on Flickr

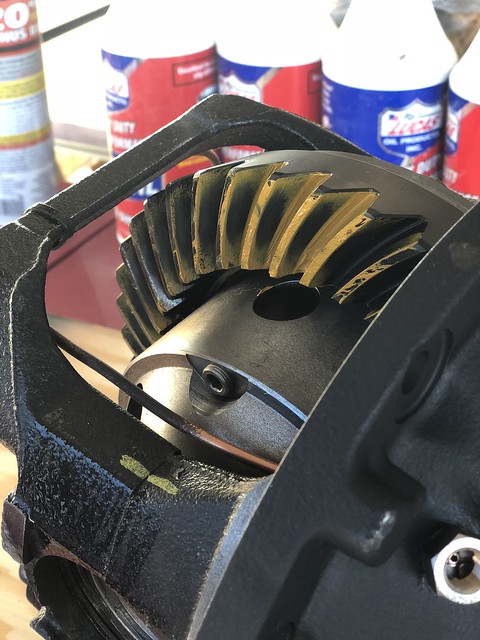
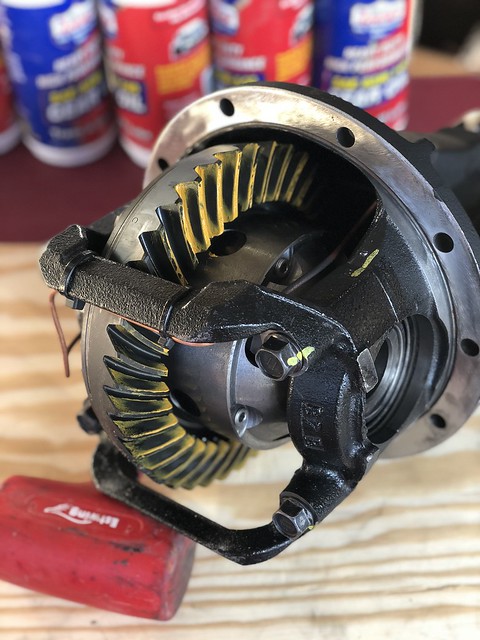
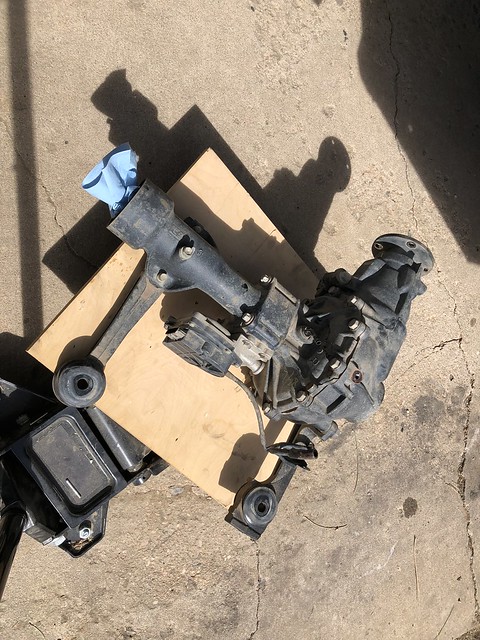
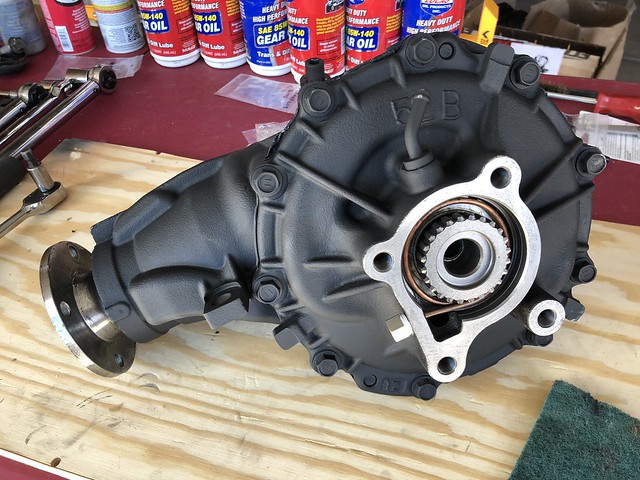
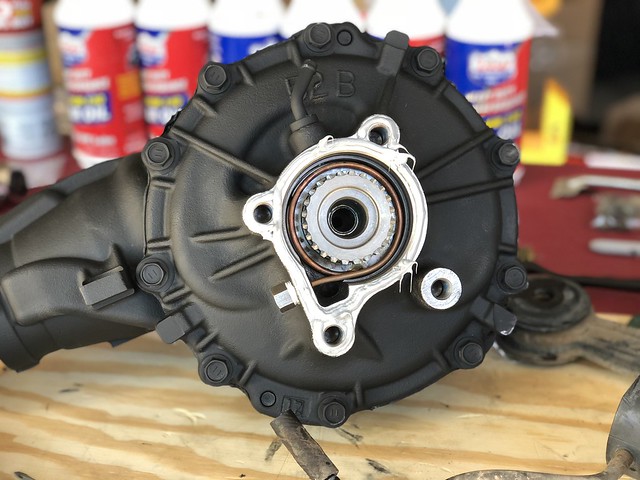
Before the new one can go in some time and care needs to be put into preparing everything for a successful transplant. The mating surfaces on both the diff and the axle were cleaned with a brass brush, Scotchbrite pads, and Brakleen before re-assembly. Be careful not to let any material fall into the diff or the axle, you probably won't be screwed if some does, but you are certainly better off without it. Some pics of the gear tooth pattern before installation.

Untitled by Tim Souza, on Flickr

Untitled by Tim Souza, on Flickr

I'm no expert, but it looks like they did a good job getting it all set up. Patterns on the drive and coast side are centered and not too deep or shallow.

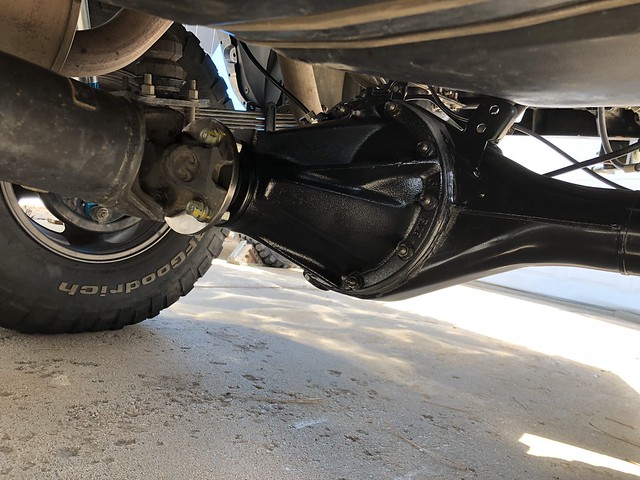
Not too much to share from the re-installation, it is more or less the opposite of the removal so nothing fun to share there. I used grey RTV instead of a gasket, and put blue Loctite on the driveshaft bolts, the differential bolts, and the hub bolts before torquing them to 65 ft*lbs, 18 ft*lbs, and 27 ft*lbs respectively. Grey RTV was allowed 24 hours to cure before the differential was topped off with fresh Lucasoil 85W-140 non-synthetic oil per ECGS recommendation. Following this I went in with some gloss black enamel (diff came shipped with matte paint, which is fine, it just holds dirt more) and a paint pen to mark all bolts. And the finished product!

Untitled by Tim Souza, on Flickr

The ECGS break-in differs from other sources by a little bit, their initial heat cycle calls for 15-20 minutes of driving instead of 15-20 miles per some other sources. I will stick to 15-20 minutes and have done 4 heat up cool down cycles with conservative driving and no heavy acceleration. I'll reserve comments for after the 500 mile break in period, it's a bit difficult to judge the performance of the new gears when I can't really use the skinny pedal liberally.

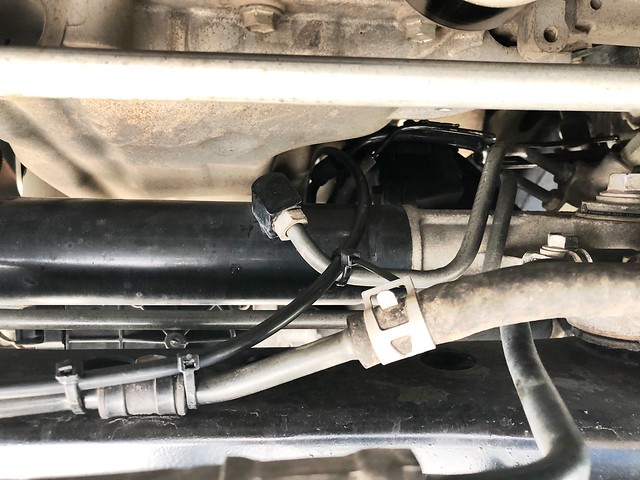
Locker isn't connected at the moment as the air line isn't long enough to run how I'd like. I was hoping to follow the wiring harness/fuel lines that run along the driver's side frame rail up to the front before jogging over to the passenger side and connecting to the compressor in the front passenger corner of the engine bay. Either I have to re-think my approach and go along the passenger frame rail, splice in an adapter to use the extra line from the front locker, or, find a neat way to route it along the passenger side frame rail. Maybe that's a DCLB problem only...still thinking about it, but in the mean time I connected the air line and zip tied the coil up under the bed to prevent any gunk from getting lodged in there.

Write up for the front to come...
 
Last edited:

DaveInDenver

Middle Income Semi-Redneck
Does ARB say to use zip ties to hold the internal plumbing? Seems like nylon would get brittle with the heat. Just curious, I'm love/hate about zip ties, so my OCD would have made me replace them with stainless even if ARB and ECGS say it's OK.
 

Adventurous

Explorer
Does ARB say to use zip ties to hold the internal plumbing? Seems like nylon would get brittle with the heat. Just curious, I'm love/hate about zip ties, so my OCD would have made me replace them with stainless even if ARB and ECGS say it's OK.

They came with zip ties from ECGS. So I'd wager that it's okay, but perhaps I'll stick a borescope in there when I drain the diffs at 500 miles to see how they are holding up.
 

Adventurous

Explorer
Started the air locker install today and ran into a few interesting things. One, I was sent two different style locker solenoids, one that had three ports, one that had two ports. This:

Untitled by Tim Souza, on Flickr

and this:

Untitled by Tim Souza, on Flickr

Not sure if that was intentional? Every install I've ever seen has had the two port one, but who knows.

Second, and just as an FYI for those doing a dual ARB install, the circuit for the front locker will only engage if the rear locker is engaged. Being the idiot I am, I didn't read the entire manual and just hooked everything up using the wiring diagram and spent 1.5 hours troubleshooting it when the front locker didn't work. If only I turned a few pages further in the manual, I would have seen that that is by design. You live in you learn I guess.
 

Adventurous

Explorer
Gear Change Pt. 2

Update!

The three port solenoid is ARB's new model that allows for the two to be daisy chained if there are space constraints. Must be very new as the folks at ECGS hadn't even seen it yet, but, they were kind enough to send me a two port model even though nothing is wrong with the one I have so I could maintain consistency. Thumbs up for that!

Onto the front re-gear. I found this one to be more challenging and time intensive than the rear. Part of this was because there are more things to disassemble/strip, part of this was because it was a bit of jockeying game to get the differential out of it's home. It's happily nested up there for sure.

Anyway, same rules apply to the front as the rear, chock the tires, use jack stands, be safe. With this done it's pretty straightforward and I won't beat the process to death. Other's have documented this better than I have, and I was elbow deep in grease and gear oil, so you'll have to excuse the relative lack of pictures.

Drain the diff -> pull the wheels -> pop the tie rods -> undo the axle nut -> pound the CV axle out of the hub -> undo the lower knuckle bolts -> swing the spindle assembly out of the way. At this point the CV axles should be ready to pull. You can either get a pry bar in between the diff and CV and pop it out, put a drift on the flat and punch it out, use a slide hammer and attachment, whatever is your choice. Just get those CV axles free and they can be removed from the vehicle. Take care not to damage a boot or spline while getting them free. While they axles are out it's a good time to check the seat on the driver's side to make sure the needle bearing hasn't buggered it up.

Untitled by Tim Souza, on Flickr

Mine was fine, so I chose not to replace it. There are a few things to undo/remove from the differential before it can be unbolted. There are some breather lines that run along the top that are a royal PITA to reach, and the ADD plug (not so bad). I undid the driveshaft flange at this point and it is the same as the rear, 4 14mm bolts, and this time you have the benefit of using the cross member that's right there to brace the wrench while you get in there with an impact gun or breaker bar. Once this is free the differential can be unbolted, it's held on by 2 bolts at the front and one nut at the rear. I removed the rearmost nut first, then used a jack to support the diff while I pulled the front two. It takes a bit of balancing it keep it on the floor jack yet still wiggle it out of cradle. Would be much easier if a friend was there to remove the bolts while you bench press the diff in and out. Anyway, I managed and tada!

Untitled by Tim Souza, on Flickr

Now a prerunner.

Untitled by Tim Souza, on Flickr

With the diff on the bench you can begin transferring parts over. The mounts need to removed from the old diff as does the ADD tube. I hit a bit of a stumbling block when I put the front diff on the table and found myself staring at this.

Untitled by Tim Souza, on Flickr

Everything I've read says ECGS ships diffs without the stub shaft, but unless my eyes were deceiving me, I could swear I was looking at the stub shaft already installed. I compared my two diffs side by side to make sure I wasn't overlooking anything, then called them to make sure I wasn't crazy. Apparently they sometimes do ship diffs out with the stub shaft already in there, score for me!

ADD tube face was cleaned up as was the differential mating face. Same formula as before, brass brush + scotchbrite + Brakleen. Nice and clean now.

Untitled by Tim Souza, on Flickr

A generous bead of grey RTV was applied...

Untitled by Tim Souza, on Flickr

and the two were mated.

Untitled by Tim Souza, on Flickr

Even squeeze out all around let me know that things should seal up properly. Blue Loctite was applied to all of the supporting bracketry plus the bolts holding the ADD tube on. They were all torqued to spec and paint marked.

I set about reversing the process to get everything back together with one notable exception, I did not use the floor jack for re-assembly. It was much, much easier to roll the diff under with the furniture dolly, transfer it onto my body, then bench press it into place and use every available limb to keep the diff in place while I got the front two bolts started. With the diff in place I made sure it was all greased/oiled up then set the CV axle into the diff, but also re-installed it into the hub. I tried multiple times to get it back in while the hub side was free floating but didn't have enough hands to keep it supported and run the pry bar and hammer. So into the hub it went. Once I did that it was easy to get it all back together.

I waited 24 hours per Permatex before filling up the diff and have noticed no signs of leaks so far. Yay for that! I'd hate to have to pull all that apart again...

ECGS locates the air locker port here:

Untitled by Tim Souza, on Flickr

Which makes it pretty darn convenient to run the air line over the diff, secured to the breather tube, then along some hard line and up into the engine bay.

Untitled by Tim Souza, on Flickr

From there it's simply a matter of plugging it into the solenoid and hitting the switch to confirm it all works. That's where I ran into a little bit of a snag. I hooked up the switches via the ARB wiring diagram, hit the front locker switch, and nothing happened. Launched into troubleshooting mode, went nutso with the multimeter pinning everything trying to find why I had no voltage through that switch. Turns out ARB intentionally wires it so that the front cannot be activated unless the rear is as well. No explanation as to why, but if you flip past the initial wiring diagram and go to the 'dual locker' setup they tell you that. Oops, silly me. Anyway, with that solved I flipped on the rear switch (dead for now), then hit the front, and was happily greeted with the compressor cycling and the locker blow-off when unlocking.

Job well done! 4wd works and there are no funny noises or indications that the transplant wasn't a complete success. Feels good to have that out of the way. :)
 

Adventurous

Explorer
Last Tuesday I also came home to a pretty box from Downsouth Motorsports with some King rear shocks inside. Mmm, pretty blue ano. Having done the fronts a few months back I was anxious to get the rear sorted out as well. I went with DSM because they offer a Dakar specific version of the rear shocks which I'm pretty sure consists of swapping out the lower eyelet to a longer one to obtain a shock with a longer eye to eye length. This is what the King looks like next to the 'Dakar model' Icons.

Untitled by Tim Souza, on Flickr

Approximately the same OAL, but the King substitutes additional shaft length (har har) for eyelet. That's probably better from a design standpoint,but when the King's cost 2X what those Icons did I see why they compromise was made. The 2.5s are huuuuge.

Untitled by Tim Souza, on Flickr

Remember how the OME shocks wouldn't fit because they interfered with the lower shock mount?

20141103-P1010229 by Tim Souza, on Flickr

I ran into this same problem with the Kings as well. The Icons use a rubbing bushing in the eyelet which allows them to make the OD of the rod end smaller. The Kings use a spherical bearing and a larger rod end. To get around this I took a hammer and punch and hammered that little reinforcement lip back a little. It took a few good whacks across the length to push it back enough to get the Kings in.

Untitled by Tim Souza, on Flickr

Untitled by Tim Souza, on Flickr

No comparison construction wise. It's almost unfair to compare the two because of the 2X cost of the Kings, BUT, there are a few design features that I really like. 1 is the spherical bearing in the lower eyelet. That alone should prevent any sort of binding or loading like the rubber bushing might. Second, and this one was a very nice touch, the hardware for the upper stem had some thought put into it. On the Icons, it has two rubber bushings sandwiched by a top hat and nut. With the Kings, it is a similar two bushing sandwich with top hat and nut, but the top bushing has a sleeve that runs through the shock mount and nests inside the lower bushing. I find this to be a nice touch due to the wear I noticed on the stems of my Icons from rubbing the shock mount during articulation. Even when adequately tightened, there was enough movement to allow rubbing and there were witness marks and even a little bit of material removal. Hopefully the addition of this sacrificial inner sleeve will keep things tidy. Lastly, the reservoir mounting brackets are a nice touch as well. Instead of drilling a hole in the frame and using a self-tapper to hold the reservoir mount on (same mount as their high end Omega shocks), the Kings utilize existing bolts and holds on the top of the frame to mount. It's that kind of attention to detail that IMO makes them stand apart.

With ~ a week under their belt I can say the on-road characteristics are much the same as the front, buttery smooth and planted through all of the obstacles a commuter is bound to face. Compression adjuster is set on the softest setting at the moment, but I may end up dialing in a few clicks. They pass the swingout jiggle test, defined as the amount of wiggle on my swingout mounted tire carrier over speed bumps, with glowing marks. Still waiting to see dirt, but initial impressions are quite positive. Looking forward to getting them out in the dirt soon and seeing what they are capable of!
 

tjalward

Observer
Awesome, great work, congrats on getting all that done on your own. BTW, just to make you feel a little bit better, I also spend a crazy amount of time trying to diagnose the front locker not working by itself before I realized the harness requires the rear locker to be engaged first! Doh!
 

Loubaru

Adventurer
Thanks for the review on the Kings. I'm trying not to loose the smooth ride on my Tundra with lifting it so highly leaning towards Kings. Seems to be a lot of QA problems with Icon and from what I've read their valving is less comfortable on the street.
 

Adventurous

Explorer
Thanks for the review on the Kings. I'm trying not to loose the smooth ride on my Tundra with lifting it so highly leaning towards Kings. Seems to be a lot of QA problems with Icon and from what I've read their valving is less comfortable on the street.

If you are going to lift, I would 500% recommend Kings over Icon or OME, especially if you pony up and get the compression adjusters. With the Kings, you can make your truck ride like a car, or, with a few turns of the dial, make it ride like a truck, and with a few more turns, make it ride like an HD truck. The Icons I had were adjuster-less, but you start at HD truck status; the ride feels more jarring over the small stuff but on heavy hits they blow through their travel.

Between the ride and the QC, your money is better off spent with Fox or King.
 

DaveInDenver

Middle Income Semi-Redneck
Kings over Icon or OME
My feeling is this isn't apples-to-apples, at least for OME. For the money you get a lot of improvement with OME, so the question IMO is Icon vs King (and FOX). The digressive valving is something people seem to love or hate and when you're spending that kind of money quality needs to be top notch.

So my personal opinion is if you're budgeting for big shocks with remote reservoirs there's King and everyone else. Still, I went with non-reservoir FOX 2.5 in front, 2.0 in back, and love them, but wish I'd done adjustable in the rear in hindsight. I didn't have nearly the money to do full on King on all 4 corners but still I have zero complaint with them and wouldn't hesitate to recommend them, too, at 1/2 what a King kit would cost.
 

Adventurous

Explorer
Solid build thread Tim! Great job with the thorough write-ups and photos that accompany.

Thank you! That means a lot coming from you.

And to update, damn you, damn you ARB for the terrible, awful, profanity inspiring tubing you supply with your locker kits. It has such ingrained memory that trying to fish it from the rear differential up to the engine bay is pure misery. :mad:
 

tjalward

Observer
DOH! Yeah that tubing has some memory. I stretched mine out in the driveway with a sawhorse and a brick, left it in the sun for a while, with tension on it. The good thing is, once you have it in place it will again freeze up with memory, and stay put even if the zip ties break :)
 

Forum statistics

Threads
185,815
Messages
2,878,493
Members
225,378
Latest member
norcalmaier
Top