Healeyjet
Explorer
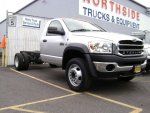
Delivered to the local dealers lot today. We ordered it the beginning of April so production and delivery took two months, not bad considering it was built in Mexico and delivered to Canada.
Dodge Ram 5500 SLT 4x4 Bright Silver diesel. Will leave it at the dealers lot until the Kelderman air suspension and King shocks arrive in town. Then, once the suspension is installed, we will deliver it to the camper builder for construction of the camper which should take three-four months. We hope to hit the road for 1-3 month adventures across North America then coming back home to check the mail and cut the grass
The camper is a solid aluminum paneled box with no popup or slides, solidly fixed to the frame. It is a forest road/bad road motor home more than it is a rock crawler so no need for a three point mounting system. We hope to have 41" tires which will give us a departure angle of 21 degrees which will be more than enough for where we plan to go. If we are going to a wheeling area we can tow the Jeep. We wanted a bed on the main floor so no bed over the cab except a small 36" area that can be converted into a bed if we decide to take grandchildren with us when we get them. For now it is just Annie and I. We will have 2 250w solar panels on the roof,2 290am hour AGM batteries and a 3000w inverter to help with powering the camper. The Ram is also outfitted with dual 220 amp alternators so they will act as a mini generator should we need. An induction cooktop, convection microwave and compressor fridge will handle the food chores. The bathroom is a wet bath with a small sink and a Nature's Head composting toilet. We will have an 85 gallon fresh water tank and a 50 gallon grey tank. The fresh tank is located inside the cabin under the bed so protected from freezing. The walls will have three inch think insulation as we would like to go north as late in the year as possible. The cabin will be have extended three season capabilities but not set up to be below -25 but I don't want to be in that weather either. Three exterior storage compartments will handle all of the items that cannot go inside the cabin like the propane bbq and tools. The back of the truck will have the swing out spare tire rack, a swing out storage box of some sort and a bike rack for two bikes. Once we get the final details for the camper portion I will include the drawings.
I have to thank XRACER144 in Winnipeg. Seeing his build gave me the confidence to undertake this. Unlike XRACER I am not building the interior. Time is the biggest push for us right now as we have roughly a five year window to see North America and I just don't have the time to do what would end up as a three year build for me.
If you have read my ramblings this far thanks. I know there are many of us out there like myself that consider the build process a large part of the adventure so I will try to include as many details as I can.
This is a photo of our truck delivered to the lot today. This is as close as I could get to it tonight but will be able to get up close tomorrow.
Ward

Last edited:

