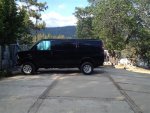
First post to this forum, but have been lurking and benefitting from the great information on this site. I have been searching for a four wheel drive van since February and finally decided on a 2010 Express AWD. My main use for this van is for a winter travel camper vehicle to support my skiing addiction. It will also be used for year round outdoor activities such as mountain biking, rock climbing, fly fishing, and getting to trail heads. It will be used for moderate offroad use, but not too extreme. I have a 69 bronco that I have built and upgraded over the last 24 years that is set up really well for offroad trail and rock crawling. Here is the van as I purchased it:
View attachment 289914
It is a no window cargo van with 3.73 gears and G80 locking differential. It has remote power locks, power windows, and the wraparound headlights with chrome grill, and double side doors. I was hoping to also get rear and side door push out windows, cruise control, and tilt steering. I will likely add or live with out these.
My current plans for the van are to make an insulated and heated camper interior and add a 4-5" lift with some 33" tires.
So far I have installed a suspension lift using torsion keys, front shock spacers (temporary until I buy longer shocks probably Bilstein 5100 #24-186643), 2" rear lift blocks, and longer KYB 3/4 ton Express rear shocks (KYB 554348). I might upgrade rear springs to 3/4 ton suburban springs, but will wait to see how it rides once it is built out and loaded, drives well empty. This was all pretty easy and most of the information came from this forum. Thank you for that!
Here it is with the 2-3" suspension lift
.JPG")
I also did a 2" body lift. This was a little more to bite off, I wasn't able to find any aftermarket kits or information for more than a 1" body lift (zurens build). The body lift was pretty straight forward using twelve 2" body lift spacers and 12- M14.2 x 150mm long bolts. A few modification are needed to make everything work properly. I had to make 2" fan shroud spacers to drop the lower shroud down. This required some minor trimming of the bottom two corners to clear the bottom of the core support and two new holes drilled in the shroud. For spacers I used about 3 feet of 1"x2" .095 wall aluminum tube cut and mitered to follow the shape of the shroud seems. Six longer M6 x 170 mm bolts are needed to connect the upper and lower shroud. The steering intermediate shaft was not long enough so it was cut, sleeved and welded to extend it 2". Aftermarket extensions may be available through Performance Accessories, but cost around $150. That is all that needs modifying.
A 2" body lift creates some big bumper to body gaps so the bumper mounting brackets needed modifying. The fronts were the most work. I removed the bottom two lips and welded new pieces in to create the 2" rise, A 2" square tube is used to space the top down. This requires a tiny bit of trimming to the front frame horns, about 1/4". If you don't mind trimming more (about 1.5" you could just remove the bottom lip and drill a hole in the bottom of the bracket.
Before:
.JPG")
After:
.JPG")
The rear bumper was pretty simple, It only requires one new slot in the end of the frame horn and one slot on the bumper bracket lengthened. The bolt spacing needed to get a little closer so I used the bolt tabs from the side support brackets. The side support brackets can just be moved up one hole and only use one bolt instead of two. The spare tire will likely be mounted to swing out carrier, but if not I will either move the hole mount up for more ground clearance and to utilze the lowering hoist hole in the body. A hole could be drilled in the plastic bumper cover to allow it to work in its current location.
Middle slot was added
.JPG")
Bottom slot was extended up and down
.JPG")
Here is the van with 2-3" suspension lift and 2" body lift:
.JPG")
The bumpers were test fitted with the modified brackets but left off so I can strip the chrome and paint them black, I will also paint the chrome grill while it is off.
I am currently shopping for wheels and tires will probably go with the new BFG All Terrain KO around 33" tall.
Thank you to all you AWD Express/Savana guys who have shared your builds!
View attachment 289914
It is a no window cargo van with 3.73 gears and G80 locking differential. It has remote power locks, power windows, and the wraparound headlights with chrome grill, and double side doors. I was hoping to also get rear and side door push out windows, cruise control, and tilt steering. I will likely add or live with out these.
My current plans for the van are to make an insulated and heated camper interior and add a 4-5" lift with some 33" tires.
So far I have installed a suspension lift using torsion keys, front shock spacers (temporary until I buy longer shocks probably Bilstein 5100 #24-186643), 2" rear lift blocks, and longer KYB 3/4 ton Express rear shocks (KYB 554348). I might upgrade rear springs to 3/4 ton suburban springs, but will wait to see how it rides once it is built out and loaded, drives well empty. This was all pretty easy and most of the information came from this forum. Thank you for that!
Here it is with the 2-3" suspension lift
I also did a 2" body lift. This was a little more to bite off, I wasn't able to find any aftermarket kits or information for more than a 1" body lift (zurens build). The body lift was pretty straight forward using twelve 2" body lift spacers and 12- M14.2 x 150mm long bolts. A few modification are needed to make everything work properly. I had to make 2" fan shroud spacers to drop the lower shroud down. This required some minor trimming of the bottom two corners to clear the bottom of the core support and two new holes drilled in the shroud. For spacers I used about 3 feet of 1"x2" .095 wall aluminum tube cut and mitered to follow the shape of the shroud seems. Six longer M6 x 170 mm bolts are needed to connect the upper and lower shroud. The steering intermediate shaft was not long enough so it was cut, sleeved and welded to extend it 2". Aftermarket extensions may be available through Performance Accessories, but cost around $150. That is all that needs modifying.
A 2" body lift creates some big bumper to body gaps so the bumper mounting brackets needed modifying. The fronts were the most work. I removed the bottom two lips and welded new pieces in to create the 2" rise, A 2" square tube is used to space the top down. This requires a tiny bit of trimming to the front frame horns, about 1/4". If you don't mind trimming more (about 1.5" you could just remove the bottom lip and drill a hole in the bottom of the bracket.
Before:
After:
The rear bumper was pretty simple, It only requires one new slot in the end of the frame horn and one slot on the bumper bracket lengthened. The bolt spacing needed to get a little closer so I used the bolt tabs from the side support brackets. The side support brackets can just be moved up one hole and only use one bolt instead of two. The spare tire will likely be mounted to swing out carrier, but if not I will either move the hole mount up for more ground clearance and to utilze the lowering hoist hole in the body. A hole could be drilled in the plastic bumper cover to allow it to work in its current location.
Middle slot was added
Bottom slot was extended up and down
Here is the van with 2-3" suspension lift and 2" body lift:
The bumpers were test fitted with the modified brackets but left off so I can strip the chrome and paint them black, I will also paint the chrome grill while it is off.
I am currently shopping for wheels and tires will probably go with the new BFG All Terrain KO around 33" tall.
Thank you to all you AWD Express/Savana guys who have shared your builds!
Attachments
Last edited:
.JPG")
.JPG")
.JPG")
.JPG")
.JPG")
.JPG")
.JPG")
.JPG")
.JPG")
.JPG")
.JPG")
.JPG")
.JPG")
.JPG")
.JPG")