You are using an out of date browser. It may not display this or other websites correctly.
You should upgrade or use an alternative browser.
You should upgrade or use an alternative browser.
3rd Gen 22re Pickup. TAT and TET slow budget build.
- Thread starter Thoryota
- Start date
Thoryota
Observer
Thanks Clay. Since I put on the new wheels I have had about 6 ask me if the truck was for sale. I am planing on building off of the trail gear bumper. I have the material sitting in my shop as we speak just haven't had the time to start on it. I am going to do a single tube for the bottom with a piece of flat plate welded to the ends of the tube. Then I will weld two 1/2'' plates to the bottom tube for my hinge. (Planing on doing it on both sides so each side acts as a hinge and latch). Also planing on having it removable being that I use my truck for truck purposes. For the mount to the bumper I am going to use two 1/2'' plates cut and and drilled on both sides for the mounts there. The pins I am going to use are 5/8'' tractor hitch pins.(The ones with the red rubberized coating) I was then going to have a single upright on the right hand side of the main tube with two support tubes going at a 30 degree angle or so for the spare tire. (Will probably change this thing as I go). Then on the left hand side of the main tube I am going to put a double jerry can mount for the jerry cans. I have all this in my head and none of it on paper or measurements. Just got a bunch of junk laying around I am going to put to use.
Thoryota
Observer
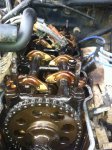
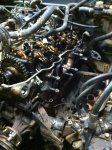
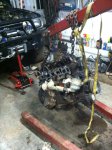
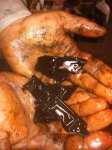
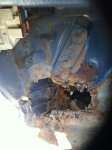
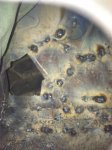
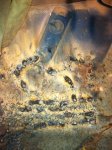
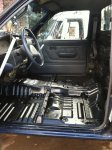
After 253,000 faithful miles the timing chain guides in the 22re have wore out. The other night on the way home I lost all heat out of the vents and the temp gauge started going up. Lucky I was about a mile from home. Got the truck home and pulled the oil fill cap off the valve cover. It had the dreaded milkshake. Pulled the spark plugs and did a compression test. Plugs were dry and looked good. Compression numbers are #1 160psi, #2 150 psi, #3 130 psi, and 150 psi on #4. This determined that the head gasket hadn't popped. The next morning I pulled the valve cover to see if there was any grooves in the timing chain cover. The pictures here show what I found.
I ordered the dual row timing chain conversion kit with metal timing chain guides and full headgasket set with toyota head bolts from LCEngineering. The dual row timing chain conversion kit comes with everything one needs to convert the single row timing chain to the dual row. It wasnt the cheapest set out there but it should make the engine out last the rest of the truck now.
I ordered the dual row timing chain conversion kit with metal timing chain guides and full headgasket set with toyota head bolts from LCEngineering. The dual row timing chain conversion kit comes with everything one needs to convert the single row timing chain to the dual row. It wasnt the cheapest set out there but it should make the engine out last the rest of the truck now.
Attachments
Thoryota
Observer
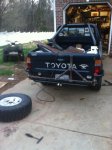
On Tuesday brown santa aka the UPS guy delivered my much needed and awaited parts. Everything is made in the USA or imported from Japan. No cheap quality stuff here.
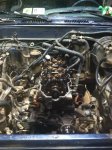
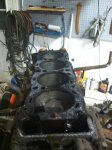
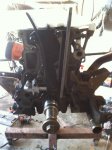
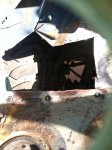
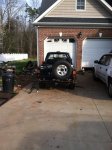
Friday night a buddy and I started tearing down the truck. The 3rd picture is what we got accomplished in the last two days. The plan is to have the engine pulled and on a stand by next tuesday. I am going to go through the whole engine and put all new gaskets where they are needed. The oil leaks are nice at keeping the rust down but they have to go.


Friday night a buddy and I started tearing down the truck. The 3rd picture is what we got accomplished in the last two days. The plan is to have the engine pulled and on a stand by next tuesday. I am going to go through the whole engine and put all new gaskets where they are needed. The oil leaks are nice at keeping the rust down but they have to go.

Thoryota
Observer
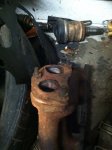
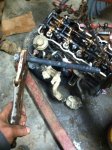
Spent most of the afternoon pulling stuff off of the truck. Got the exhaust manifold pulled. Surprisingly none of the bolts were seized or even that tight. I had no issues pulling the manifold. I have heard many a story on how the studs seize in the head or break off in the manifold. Didnt have a single issue. Guess I got lucky. Found the exhaust leak I have had for years. Thought the manifold was cracked but it was just the down pipe broken off at the flange. I will weld it back together and run it till I can save up for a header. Pulled the front pulleys and the power steering pump. Who ever designed the power steering pump bracket needs to be shot. Running one of the heater hoses through the bracket is the worst design I have ever saw. Its like a mechanic slept with the engineers wife, so the engineer got payback kind of screwed up design. Also got the alternator off. It hasnt been off since the truck was built.
Attachments
Thoryota
Observer
So a lot has happened since I posted last Sunday. We have been quite productive in tearing the 22re down. Not as fast as I would like but slow progress is better than no progress.
First we got the lower air intake manifold off. What a hassle this was. Who ever was in charge of designing the wiring harness needs to be flogged with a wiring harness. It fought us the whole time.
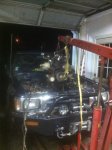
Next we unbolted the engine from the transmission and motor mounts and got her pulled out of the truck. This is the first time this engine has ever been out in twenty two years. I will start to clean up the block tonight. Because twenty two years of oil and dirt makes for a mess.
We then set the engine on the ground to prepare for the fun job. Removing the old head bolts. All went well until we got to the number two exhaust side head bolt. What a nightmare. The bolt was seized into the block and amidst trying to get it to turn we rounded the head off with the impact gun. At this point I thought we was done. We tried putting a set of vice grip pliers on the head of the bolt and hitting it with a hammer. Nothing. The vice grips kept slipping off. We then tried a set of easy outs. This would of worked better except for the fact easy outs only go up to 16 mm and the head bolt is 17mm. So after this nasty discovery we kept at it with the vice grips to "machine" the head down to size. After doing that for 3 hours we were finally able to use the easy out. We then put the easy out into a matching size socket and stuck it on our 600 ft/lb torque wrench. It would still not budge. We kept turning the block every time we tried turning the bolt. So we then called in my buddy Nate who is a lot larger than me to pull on the wrench while Jon and I held the block in place. It worked finally. After 4 very stressful hours it was out. I now owe Nate a steak dinner. I guess when you tell someone you will buy them a steak they get very motivated. Thank you Nate your steak will be coming soon.
Here you can see why the bolt was not willing to give up its home. The threads are caked with old dried up oil. After dealing with this thing and the truck in general I am going to stick to working on International Harvester tractors for a living. Automobile stuff is just not for me.
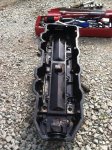
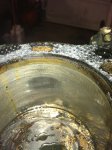
Here you can see the head mating surface on the block. I have lots of scraping left to do to clean it up for the new head gasket. The old head gasket was in good shape other than where it tore when the head was removed. There was very little water on top of cyl #1 and #3. Maybe a half a spoonful on each cylinder. I think I caught the timing chain just in time.
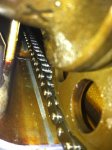
Here you can see what the bore looks like after 253,000 miles. Still has the cross hatching. Got to love a Toyota.
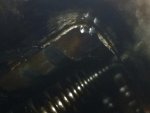
Wednesday after pulling the head, I then pulled the oil pan. Someone has been in the oil pan before because there was lots of black rtv and no oil pan gasket. I am guessing they did the rear main seal when the clutch was done. Any how the oil pickup screen on the pickup looked clean. I will be spraying it out just in case. After dropping the pan and draining the little bit of oil that was left over I found my timing chain guide. Well whats left of it. This is the drivers side guide. Its not supposed to look like this.
I then pulled the timing chain cover and water pump. (Sorry no pictures, my hands were to oily to mess with my phone). The drivers side guide just had the upright section that bolts to the block still in place. The passenger side looked good. I did find that one of the bolts that holds the passenger side guide in place was loose. It was only a matter of time before it fell into the oil pan or the oil pump drive gear and made a mess. Also the timing chain tensioner housing that holds the tension spring was cracked almost all the way through on both sides. It wasnt going to be very long before this failed and destroyed a bunch of stuff. This makes me grateful the timing chain did fail when it did.
First we got the lower air intake manifold off. What a hassle this was. Who ever was in charge of designing the wiring harness needs to be flogged with a wiring harness. It fought us the whole time.
Next we unbolted the engine from the transmission and motor mounts and got her pulled out of the truck. This is the first time this engine has ever been out in twenty two years. I will start to clean up the block tonight. Because twenty two years of oil and dirt makes for a mess.
We then set the engine on the ground to prepare for the fun job. Removing the old head bolts. All went well until we got to the number two exhaust side head bolt. What a nightmare. The bolt was seized into the block and amidst trying to get it to turn we rounded the head off with the impact gun. At this point I thought we was done. We tried putting a set of vice grip pliers on the head of the bolt and hitting it with a hammer. Nothing. The vice grips kept slipping off. We then tried a set of easy outs. This would of worked better except for the fact easy outs only go up to 16 mm and the head bolt is 17mm. So after this nasty discovery we kept at it with the vice grips to "machine" the head down to size. After doing that for 3 hours we were finally able to use the easy out. We then put the easy out into a matching size socket and stuck it on our 600 ft/lb torque wrench. It would still not budge. We kept turning the block every time we tried turning the bolt. So we then called in my buddy Nate who is a lot larger than me to pull on the wrench while Jon and I held the block in place. It worked finally. After 4 very stressful hours it was out. I now owe Nate a steak dinner. I guess when you tell someone you will buy them a steak they get very motivated. Thank you Nate your steak will be coming soon.
Here you can see why the bolt was not willing to give up its home. The threads are caked with old dried up oil. After dealing with this thing and the truck in general I am going to stick to working on International Harvester tractors for a living. Automobile stuff is just not for me.
Here you can see the head mating surface on the block. I have lots of scraping left to do to clean it up for the new head gasket. The old head gasket was in good shape other than where it tore when the head was removed. There was very little water on top of cyl #1 and #3. Maybe a half a spoonful on each cylinder. I think I caught the timing chain just in time.
Here you can see what the bore looks like after 253,000 miles. Still has the cross hatching. Got to love a Toyota.
Wednesday after pulling the head, I then pulled the oil pan. Someone has been in the oil pan before because there was lots of black rtv and no oil pan gasket. I am guessing they did the rear main seal when the clutch was done. Any how the oil pickup screen on the pickup looked clean. I will be spraying it out just in case. After dropping the pan and draining the little bit of oil that was left over I found my timing chain guide. Well whats left of it. This is the drivers side guide. Its not supposed to look like this.
I then pulled the timing chain cover and water pump. (Sorry no pictures, my hands were to oily to mess with my phone). The drivers side guide just had the upright section that bolts to the block still in place. The passenger side looked good. I did find that one of the bolts that holds the passenger side guide in place was loose. It was only a matter of time before it fell into the oil pan or the oil pump drive gear and made a mess. Also the timing chain tensioner housing that holds the tension spring was cracked almost all the way through on both sides. It wasnt going to be very long before this failed and destroyed a bunch of stuff. This makes me grateful the timing chain did fail when it did.
Attachments
-
 yota timing chain 9.jpg114.5 KB · Views: 41
 -
 yota timing chain 10.jpg87.8 KB · Views: 35
 -
 yota timing chain 11.jpg104.2 KB · Views: 43
 -
 yota timing chain 12.jpg103.5 KB · Views: 38
 -
 yota timing chain 13.jpg83.3 KB · Views: 46
 -
 yota timing chain 14.jpg89.5 KB · Views: 47
 -
 yota timing chain 15.jpg106.6 KB · Views: 43
Thoryota
Observer
Didn't get a whole lot of anything done yesterday. Had to run to town a few times with a couple of friends to get parts for their projects so that didn't leave me a whole lot of time to accomplish stuff. I was however able to clean the mating surface on the block where the head gasket goes and clean the old rtv off where the oil pan gasket goes. I also cleaned and painted the valve cover. I used IH 2150 Red Iron Guard enamel part number 991012N spray paint I picked up from the local Kubota dealer. I am a diehard red tractor man so a IH red valve cover is only fitting.
Attachments
Thoryota
Observer
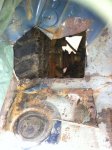
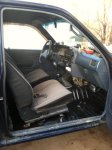
Got a little done this afternoon. I decided that since the truck is down for the timing chain repair I should see how bad the rust is in the cab. This is going to be the longest the truck sits still for the year so its now or wait till I fall through the floor. So with that said I pulled the carpet and the plastic inner fender and finally got to see how bad my cab was. I knew it was bad but not this bad. Any how I will be cutting the bad section out over the next few days and welding in some new sheet metal.
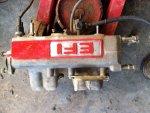
Next I did some painting to the upper intake manifold. My painting skills with a brush are not the best but its not like this truck is a show piece. As that was drying I threw another coat of paint on the valve cover. I am thinking about doing the recessed part of the intake and valve cover in black. It will be kinda like the old style International Harvester colors.
As that was drying I installed the new dual row crank timing gear and the new Toyota oil pump spline drive gear for the oil pump. Next I installed the guides and tensioners. I also cleaned up the gasket mating surface on the oil pan but that is not picture worthy.
Attachments

Thoryota
Observer
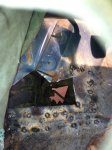
So on Tuesday I decided to tackle the rust in the cab I have been meaning to fix for the last two years. I figured while the truck is down for timing chain work it would be the perfect time to do it. I first removed the seats and the carpet out of the truck. This has to be by far the easiest interior I have dealt with when it comes to removal. Before I started cutting and welding, I removed all the sound deadener from the cab and covered the fuse box with a welding jacket. After that I started to cut out the rust. The first picture is of the rust hole in its entirety. This is after removing the undercoating that was left in place of sheet metal. Next I took a grinder with a cut off wheel and started cutting. (This isnt the best tool for the job due to size but it got it done). Due to the shape of the floor in this section of the cab I could not put a single piece of sheet metal down and form it to fit. The curves are just to complex. So what I did (I don't recommend this method) is I cut strips of metal to fit around the curves in the floor. This method did work but proved to be a hassle when it came to final welding. There was just to many gaps and holes that needed filling. Any how I started bending pieces where I could to make them fit. I used 11 gauge sheet metal for this. It is a touch thicker than what was there originally. As I was doing the final welding to the patch Tuesday night I ran out of welding wire. Sadly at 10:30 at night no one is open to sell me any. I was able to finish up Wednesday night at 9:30. I do not have any pictures of the final product but it looks a lot like the last picture just uglier. Next I am going to clean up the welds some and spray some bedliner inside the cab. Hopefully this will keep the inside of the cab lasting as long as the drivetrain.
Me and sheet metal do not see eye to eye. I would much rather weld pipe overhead with 6010 than do this again. The welder used was a Harbor Freight gasless flux core machine with 0.35 Lincoln Electric 221 innersheild wire. While it did the job I would not recommend using flux core for this kind of work. If I had my choice I would of used a solid core wire mig machine with shielding gas.
Me and sheet metal do not see eye to eye. I would much rather weld pipe overhead with 6010 than do this again. The welder used was a Harbor Freight gasless flux core machine with 0.35 Lincoln Electric 221 innersheild wire. While it did the job I would not recommend using flux core for this kind of work. If I had my choice I would of used a solid core wire mig machine with shielding gas.
Attachments
Thoryota
Observer
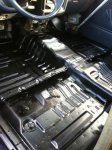
Yesterday after finishing the rust repair on my floor pan I decided to bed line the floor of my truck. The reasons behind doing this are these.
1- The carpet is 22 years old and far from clean. Its more brown and black than the blue it was when it was new.
2- During the summer or really nice days I pull the doors off and run tube doors. This is great till you get caught in the rain. The way the body is shaped water gets thrown up from the road from the tires and soaks you and the carpet in the truck. Other than that one stays fairly dry.
3- I tend to track lots of mud wherever I go. The carpet on the drivers side is brown where the passenger side is a really dingy blue.
4- I can remove the seats and hose out the interior within reason when needed.
5- It was cheap to do. A replacement carpet is over one hundred dollars. A can of spray on bed liner is ten. Its a no brainer at the cost.
After welding in the patch panel in the floor I first started undoing all the electrical connections and plug ins in the floor. The seat belt light connection was the first to go. I first unhooked the clip and removed the drivers side and middle seat belt buckle. These two are one piece. Next I removed the sill plate and popped off the wire harness clip out of the floor. Next I unhooked the clips that hold the seat belt light plug to the floor. This wire is tied into the harness on the drivers side. I then took a piece of string and tied the whole harness to the grab handle in the A-piller. This made it easy to get to and moved it out of the way.
Next I went to the passenger side and started undoing connections. The first one was large plugin under the passenger seat. After unplugging and unhooking from the floor I then removed the rubber grommet from the floor. You can now run the plug and wire and grommet through the drain hole in the floor. The harness will hold itself under the floor out of the way. Next I unhooked the passenger side harness under the sill plate. This is an exact copy of the drivers side in the way it mounts. I then tied it up with some string to the grab handle on the A-piller.
Next I took a wire wheel on an electric drill and cleaned up the residue left from the sound deadner. I removed the sound deadner with a flat head screw driver and a rubber mallet. I was able to chip the deadner off in chunks using this method. Other methods require dry ice and a hammer. I did not have any dry ice available so this was the only way to do it. After wire wheeling everything down somewhat clean I took a shopvac and vacuumed all dirt and left over deadner. This made a clean surface to spray the bedliner on. After doing this I removed all the drain plugs and covered the holes with duck tape. I also covered all the bolt holes with duck tape at the same time. I removed the shifter's and covered the shifter hole in the floor as well. I did not want over spray inside the transmission or transfer case.
Spraying the entire floor only took a couple of minutes. It took longer to prep than it did to do the deed. The product I used was Rustoleum Bed Coating in the aerosol can. One can covered the entire floor in one coat. I bought two cans just in case I needed extra. I might use the extra can and coat my rear bumper not sure yet. The total cost for this project was 21 dollars and some change. Just took some time to make it happen. So far I am happy with the results. I will find out if it cut down on road noise when I get the engine put back together sometime in the next week or two.
Attachments
Thoryota
Observer
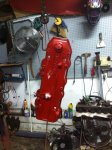
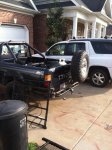
Over the last week while waiting on some parts for the timing chain job I set to work building a tire carrier. I built it using nothing but simple tools. A 4 1/2'' angle grinder with grinding rocks and cut off wheels, and a basic tombstone stick welder. Anyone can do this if they take their time. The tire carrier was built out of stuff laying around. I might have a total of fifty dollars in it. The hinge set up while it works is not perfect. If I ever decide to redo the mount I will redo the hinges for sure. They do work but with the weight of the tire the pins bind up. To open the carrier I have to beat the pin out with a hammer. To latch it shut I have to beat the pin back in. This might be a good thing in the fact that the pins will not jump out going down the road and the tire falls off the back. Also with everything bound up the carrier might not rattle. I need to get the truck running again to see if this is going to be true. Also if I drive both pins out the entire mount is removable so I can use the truck for truck things if needed.
Attachments
Forum statistics
Members online
- Garyindiane
- SwtS
- Probably.stuck
- alanymarce
- MichaelFL
- canoematt
- OVRLND
- 79bj40
- svmaple
- bexpedition13
- 1979ford
- AI Shooter
- nickw
- jlcanterbury
- DorB
- Stan@FourWheel
- LarryHReiger
- brookie0907
- High Shelter
- Jsweezy
- SiberianSoon
- gator70
- AMMO461
- ARDOR
- tacollie
- sterlryu
- Ozarker
- JWag21
- extremer
- Dougnuts
- XCvagn
- ocjk
- GCecchetto
- LivinAnAdvntr
- JCAnthony
- rgallant
- wazzubob
- Deleted Member 183
- Sn00bee
- JoeSeff27
- MrGrodskyi
- fourfa
- Bigly
- Westy
- khulk
Total: 791 (members: 48, guests: 743)