rayra
Expedition Leader
************ETA: My install partially failed, came unstuck - http://www.expeditionportal.com/for...lighting-on-the-vehicle?p=1933674#post1933674 ************
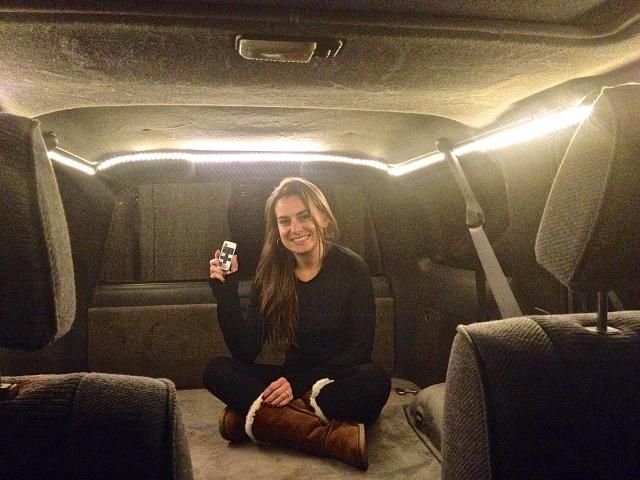
This topic is a gathering of some separate posts made on this miniproject. I've been seeing these LED strips show up in various uses and wanted to add some to my vehicle. One of my hobbies is astronomy and red light is a must. These strings come in many colors and varieties. And prices. I wanted to run a string on the inner face of my Suburban's hatch such that they act as a ceiling light when the hatch is open.
Anyway, here some posts mashed together. Happy to answer any questions about them. I think they have a lot of uses. particularly given their very low price point and power requirements.
These would be great for a trailer or van or SUV as interior lighting, too.
-----
Got my $10 roll pf LED strip lights via Amazon today. They're smaller than I'd anticipated. Which is fine for my purposes.
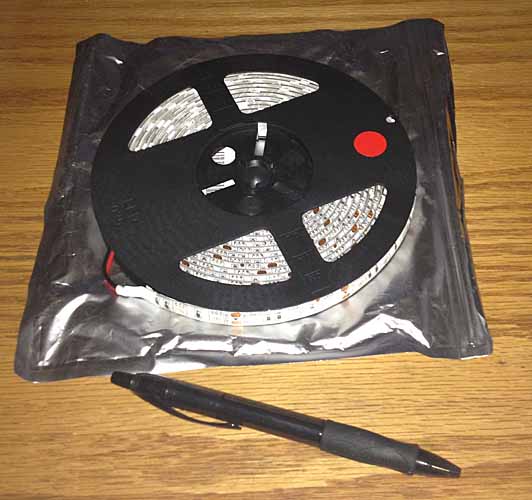
Also not foreseen and readily apparent from the smell as soon as I opened the metallized pouch they came in, the entire strip surface is embedded in a curved clear vinyl / PVC layer, like a continuous casting. Which also suits my purposes. I'd thought it was just a plastic strip with the materials embedded on it. I'm guessing the soft clear layer acts both as protection and as a lens. Need to get some juice in this and see what the light is like in person.
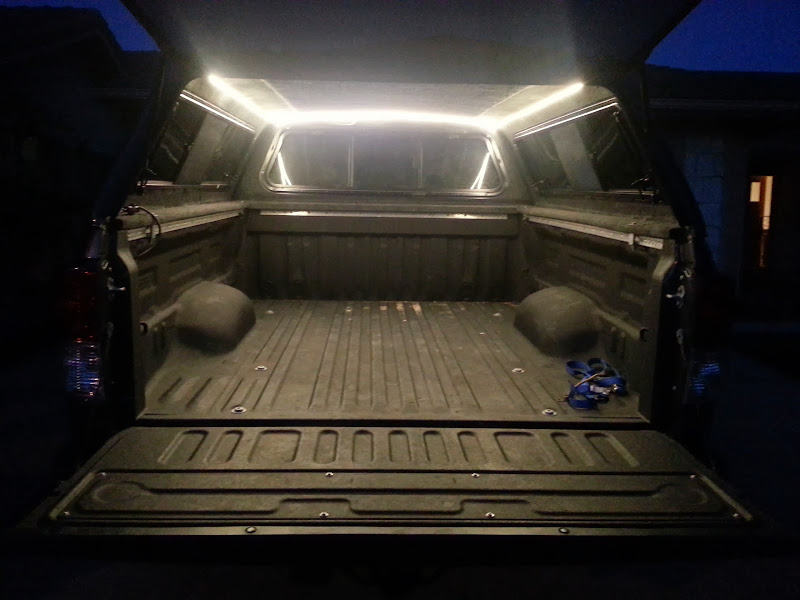
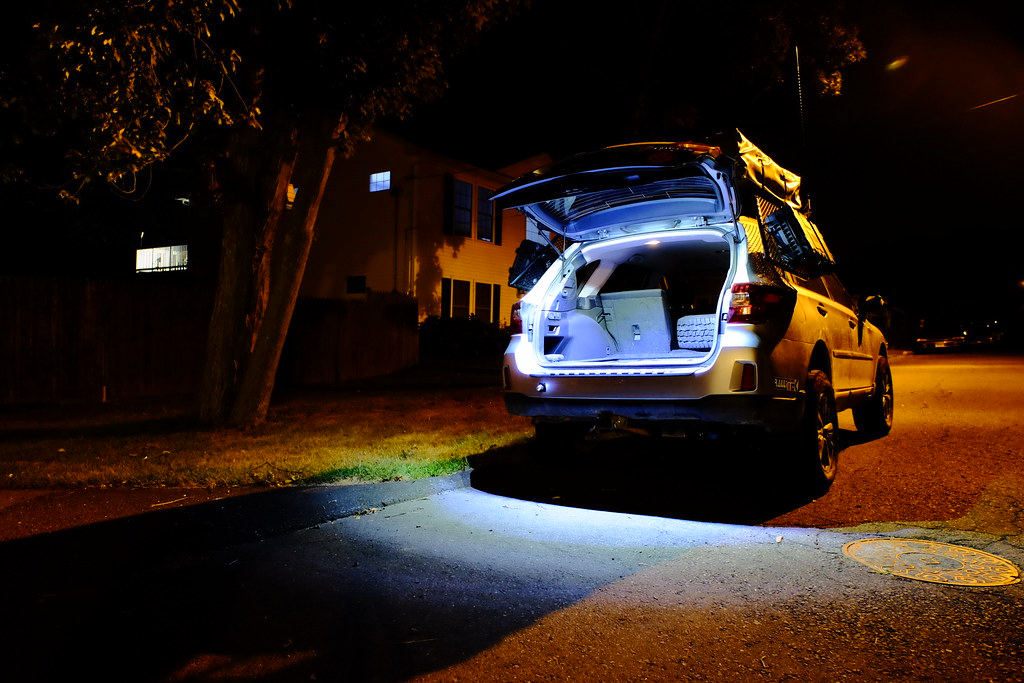
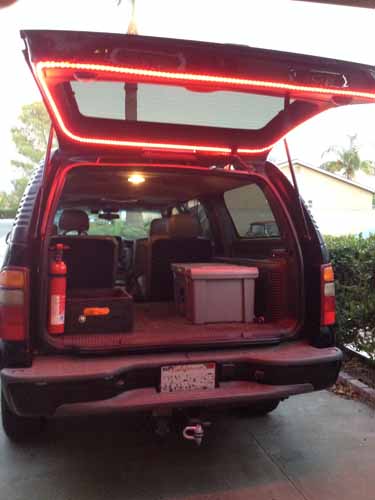
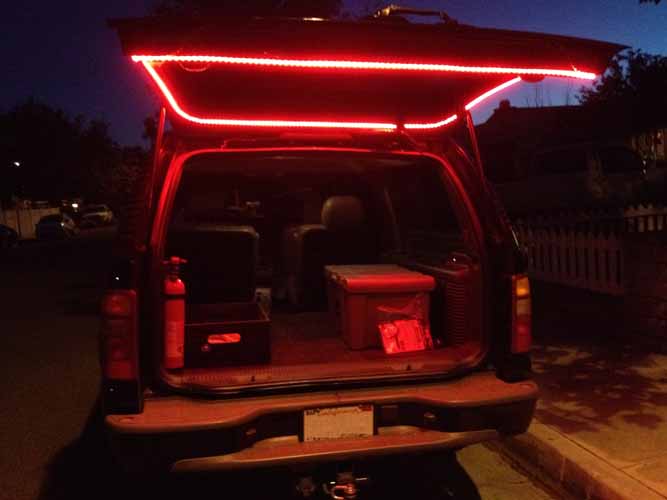
My intended use for this strip is to trim the inner edge of the rear hatch of the suburban, so it acts as a ceiling light when the hatch is open. There's already a always-hot power line in the rear corner of the cargo area, by the hatch, powering a 12v lighter-style socket. I intend to tap that line and feed power to a switch which I'll install somewhere on that right rear pillar, running the wire up near the top corner of the hatch and bridging the gap to the hatch edge itself, where the LED strip will start. The strip will run roughly 13' around three sides of the hatch.
This clear coating is going to complicate my intended install, I'd intended to pinch the flat strip together to 'turn' the corners of hatch. Not sure I can do that now. Although the layer is pliable, it's pretty thick. However the hatch seal area does have a curved radius of sorts. But that would aim the LEDs out to the side rather than towards the ground. Just have to get out there and fiddle with things and find the method that works. The strip appears to be backed with a 3M pressure sensitive adhesive strip. Peel and press.
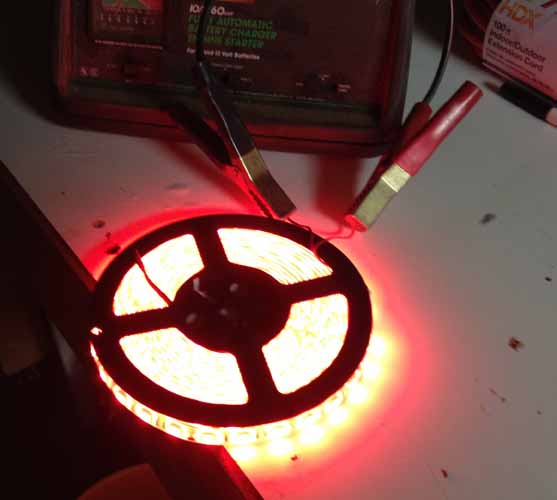
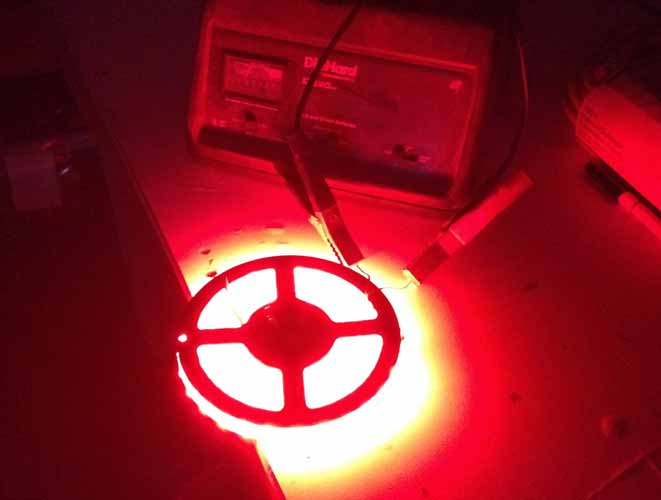
some quick light experiments, using my battery charger as a power source, set at 2amps
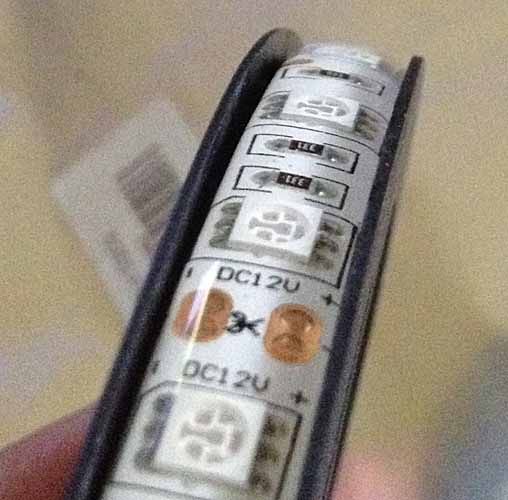
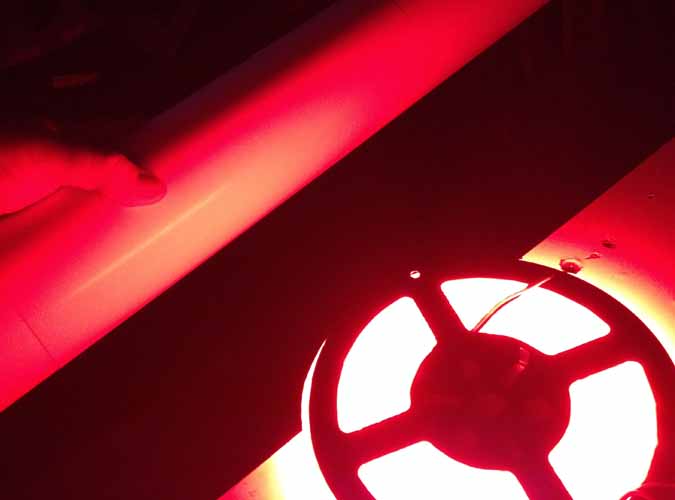
here's a closeup of the strip. The LEDs are the small white square modules on the strip. They each have 3? emission points. That nimbus of yellowish light you see on the strip around each square is the the light immediately reflected back on teh strip by the inner face of the clear layer over the strip. It seems to help with the reflectance / diffusion of the light from the point sources on the strip...

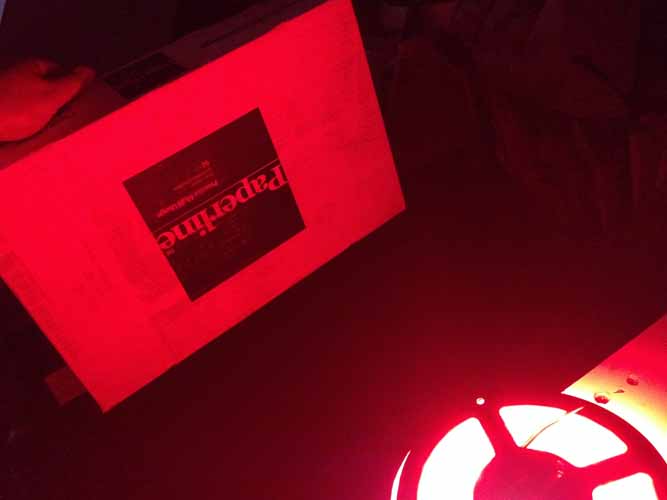
Couple diffusion / light-casting tests. I didn't have a large piece of blank white material to use right at hand. The first is a 4" drainpipe piece held close and it doesn't show any points or 'hotspots' from the LEDs. The second is a box top help further away to show the overall lighting. I think this will work nice as low-level red-light illumination method for various uses.
These are the ones I got, fulfilled by Amazon, counted towards the 'free shipping' tally.
http://www.amazon.com/gp/product/B00N4JBEEU?psc=1&redirect=true&ref_=oh_aui_detailpage_o01_s00
There are even more inexpensive variants available, but they ship direct from China, 2-3 weeks instead of 2-3 days.
-----
So I kinda got my LED light strip installed. Bit of a hack job. I failed to take any in-progress shots. Pulled some of the rear cargo area trim to get the passenger side panel free enough to install a switch in it near the factory 'power port' 12v receptacle. Piggy-backed on its power as that circuit has a 20A and includes the power port on the back of the center console and the 2 in the dash adjacent to the cig lighter. The latter is on its own circuit, which is also always hot. Had a bit of a fiddly mess there, using spade type crimp on connectors and the guillotine-type splice connectors.
I used some speaker wire that was similar to the thin size of the LED strip and it was a bit too thin for the guillotine connector and had some power failures I had to diagnose. And since I was working 'hot' I of course shorted some loose connectors and burned the fuse. Got that all fixed and then set about mounting the lights and hit another obstruction. I'd intended to affix the lights to the inner face of the hatch on the vinyl paneling. But even wiped with acetone the vinyl was too 'greasy' for the 3M PSA to stick properly. And upon further inspection the only other place to attach the strip in the area I'd planned so it would light the rear under the open hatch turned out to me the metal of the hatch itself but right where the main gasket seals. It's now 'sealing' right over the LED strip.
Like most of my fiddling around, this turns out to be a 'Mk1' install. I already see better ways to affix things that won't interfere with the weather seal. And put the switch on the rear pillar where I really wanted it. I was pressed for time and in the middle of the install when I found there wasn't room to put the switch where I wanted, so I improvised. Later I'll make preps to pierce the void of that pillar so there is room to both route the wiring inside it and have the switch where I'd like to have it. But that's another day.
And either location for mounting the strip led to some corner turns that were too tight of a radius, compromising how the strip is mounted. So it's puckered / bunched up as it turns those corners. But when the hatch is closed these areas are being pressed firmly so they ought to stay stuck. And too the relocation of the strip to the metal base of the hatch puts it very close to striking the locking hoops of the hatch. But it works, it's been opened and closed many times without impairment (so far). And it seems ot work real nice so far.
The circumference of the hatch edge is just over 15', so I went all around in a continuous run, cutting less than a foot off the end of the roll.
-----
Doing some rough math on the light strip. The offering pages says 5m, 300 LEDs, 12v, 60 watt. So that's a total power use of 5Amps. But I seemingly drove the whole spool with the 2Amp setting on my battery charger.
5m = 16.4' = ~197". 300 LEDs, that's 1.5 LEDs per linear inch. Or (18) LEDs per foot. Using the 5A figure, a foot worth of this strip would use about a third of an amp. Using the 2A, the value would be about 1/8 of an Amp, which is negligible. If I had a 12V battery bank I'd attach a segment of these and leave it running all the time as emergency lighting. Just let it run, lighting your backup power controls.
For a pumphouse etc, if you've already got 115V power run, a simple 12v wall wart converter would do the job handily, for a few bucks. Or wired to a 12v cig lighter adapter plug, a handy light source for a vehicle.
Have to see if I can dredge up the lumen rating and equivalents and figure the comparative light output of the things.
-----
Here's a good precis on the difference between the two different offerings.
http://www.flexfireleds.com/pages/Comparison-between-3528-LEDs-and-5050-LEDs.html
As offered on Amazon, the 3528 type has the same number of LEDs on the same length reel as the 5050, so the 5050 is brighter per foot.
The 3528 strips on Amazon list 82 lumens / 1.5 watts per foot. That comes to 1/8 Amp per foot, as i calculated for the other type. Good enough for a ballpark consumption estimate.
As for lumens, a 60watt incandescent bulb puts out about 800-1000 lumens' worth of light. So a full 5 meter strand of the 3528 LEDs has an output of about 1300 lumens. between a 75 and 100w bulb.
************ETA: My install partially failed, came unstuck - http://www.expeditionportal.com/for...lighting-on-the-vehicle?p=1933674#post1933674 ************
This topic is a gathering of some separate posts made on this miniproject. I've been seeing these LED strips show up in various uses and wanted to add some to my vehicle. One of my hobbies is astronomy and red light is a must. These strings come in many colors and varieties. And prices. I wanted to run a string on the inner face of my Suburban's hatch such that they act as a ceiling light when the hatch is open.
Anyway, here some posts mashed together. Happy to answer any questions about them. I think they have a lot of uses. particularly given their very low price point and power requirements.
These would be great for a trailer or van or SUV as interior lighting, too.
-----
Got my $10 roll pf LED strip lights via Amazon today. They're smaller than I'd anticipated. Which is fine for my purposes.
Also not foreseen and readily apparent from the smell as soon as I opened the metallized pouch they came in, the entire strip surface is embedded in a curved clear vinyl / PVC layer, like a continuous casting. Which also suits my purposes. I'd thought it was just a plastic strip with the materials embedded on it. I'm guessing the soft clear layer acts both as protection and as a lens. Need to get some juice in this and see what the light is like in person.
My intended use for this strip is to trim the inner edge of the rear hatch of the suburban, so it acts as a ceiling light when the hatch is open. There's already a always-hot power line in the rear corner of the cargo area, by the hatch, powering a 12v lighter-style socket. I intend to tap that line and feed power to a switch which I'll install somewhere on that right rear pillar, running the wire up near the top corner of the hatch and bridging the gap to the hatch edge itself, where the LED strip will start. The strip will run roughly 13' around three sides of the hatch.
This clear coating is going to complicate my intended install, I'd intended to pinch the flat strip together to 'turn' the corners of hatch. Not sure I can do that now. Although the layer is pliable, it's pretty thick. However the hatch seal area does have a curved radius of sorts. But that would aim the LEDs out to the side rather than towards the ground. Just have to get out there and fiddle with things and find the method that works. The strip appears to be backed with a 3M pressure sensitive adhesive strip. Peel and press.
some quick light experiments, using my battery charger as a power source, set at 2amps
here's a closeup of the strip. The LEDs are the small white square modules on the strip. They each have 3? emission points. That nimbus of yellowish light you see on the strip around each square is the the light immediately reflected back on teh strip by the inner face of the clear layer over the strip. It seems to help with the reflectance / diffusion of the light from the point sources on the strip...
Couple diffusion / light-casting tests. I didn't have a large piece of blank white material to use right at hand. The first is a 4" drainpipe piece held close and it doesn't show any points or 'hotspots' from the LEDs. The second is a box top help further away to show the overall lighting. I think this will work nice as low-level red-light illumination method for various uses.
These are the ones I got, fulfilled by Amazon, counted towards the 'free shipping' tally.
http://www.amazon.com/gp/product/B00N4JBEEU?psc=1&redirect=true&ref_=oh_aui_detailpage_o01_s00
There are even more inexpensive variants available, but they ship direct from China, 2-3 weeks instead of 2-3 days.
-----
So I kinda got my LED light strip installed. Bit of a hack job. I failed to take any in-progress shots. Pulled some of the rear cargo area trim to get the passenger side panel free enough to install a switch in it near the factory 'power port' 12v receptacle. Piggy-backed on its power as that circuit has a 20A and includes the power port on the back of the center console and the 2 in the dash adjacent to the cig lighter. The latter is on its own circuit, which is also always hot. Had a bit of a fiddly mess there, using spade type crimp on connectors and the guillotine-type splice connectors.
I used some speaker wire that was similar to the thin size of the LED strip and it was a bit too thin for the guillotine connector and had some power failures I had to diagnose. And since I was working 'hot' I of course shorted some loose connectors and burned the fuse. Got that all fixed and then set about mounting the lights and hit another obstruction. I'd intended to affix the lights to the inner face of the hatch on the vinyl paneling. But even wiped with acetone the vinyl was too 'greasy' for the 3M PSA to stick properly. And upon further inspection the only other place to attach the strip in the area I'd planned so it would light the rear under the open hatch turned out to me the metal of the hatch itself but right where the main gasket seals. It's now 'sealing' right over the LED strip.
Like most of my fiddling around, this turns out to be a 'Mk1' install. I already see better ways to affix things that won't interfere with the weather seal. And put the switch on the rear pillar where I really wanted it. I was pressed for time and in the middle of the install when I found there wasn't room to put the switch where I wanted, so I improvised. Later I'll make preps to pierce the void of that pillar so there is room to both route the wiring inside it and have the switch where I'd like to have it. But that's another day.
And either location for mounting the strip led to some corner turns that were too tight of a radius, compromising how the strip is mounted. So it's puckered / bunched up as it turns those corners. But when the hatch is closed these areas are being pressed firmly so they ought to stay stuck. And too the relocation of the strip to the metal base of the hatch puts it very close to striking the locking hoops of the hatch. But it works, it's been opened and closed many times without impairment (so far). And it seems ot work real nice so far.
The circumference of the hatch edge is just over 15', so I went all around in a continuous run, cutting less than a foot off the end of the roll.
-----
Doing some rough math on the light strip. The offering pages says 5m, 300 LEDs, 12v, 60 watt. So that's a total power use of 5Amps. But I seemingly drove the whole spool with the 2Amp setting on my battery charger.
5m = 16.4' = ~197". 300 LEDs, that's 1.5 LEDs per linear inch. Or (18) LEDs per foot. Using the 5A figure, a foot worth of this strip would use about a third of an amp. Using the 2A, the value would be about 1/8 of an Amp, which is negligible. If I had a 12V battery bank I'd attach a segment of these and leave it running all the time as emergency lighting. Just let it run, lighting your backup power controls.
For a pumphouse etc, if you've already got 115V power run, a simple 12v wall wart converter would do the job handily, for a few bucks. Or wired to a 12v cig lighter adapter plug, a handy light source for a vehicle.
Have to see if I can dredge up the lumen rating and equivalents and figure the comparative light output of the things.
-----
Here's a good precis on the difference between the two different offerings.
http://www.flexfireleds.com/pages/Comparison-between-3528-LEDs-and-5050-LEDs.html
As offered on Amazon, the 3528 type has the same number of LEDs on the same length reel as the 5050, so the 5050 is brighter per foot.
The 3528 strips on Amazon list 82 lumens / 1.5 watts per foot. That comes to 1/8 Amp per foot, as i calculated for the other type. Good enough for a ballpark consumption estimate.
As for lumens, a 60watt incandescent bulb puts out about 800-1000 lumens' worth of light. So a full 5 meter strand of the 3528 LEDs has an output of about 1300 lumens. between a 75 and 100w bulb.
************ETA: My install partially failed, came unstuck - http://www.expeditionportal.com/for...lighting-on-the-vehicle?p=1933674#post1933674 ************
Last edited: