Project- Suburban HD

'05TJLWBRUBY

Adventurer
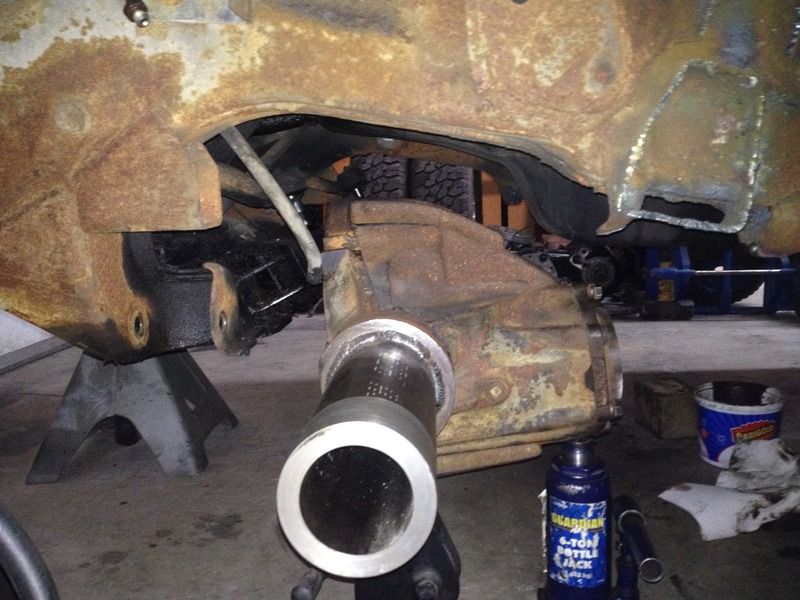
So I finally got the trans adapter modified a bit and got the crossmember removed for now then got the NWF Ecobox and 205 set in place hooked up to back of the 4L80. Wanted to get that in and done so I could measure t-case angles at the outputs on the flanges so I could get a better idea of where I wanted the pinion. Hoping to fit the C's this weekend if all goes well.

I couldn't resist tossing this under there. Unfortunately with axle at my intended ride height, it don't fit! Lots to remove still and modify- this is lowered a few inches just to get better idea of things:


If you look real close, you can just see the nut on the flange of the 205 output. Looks like my tube lengths are going to work out OK- I can see the nut right through the pinion support bearing inside the housing:


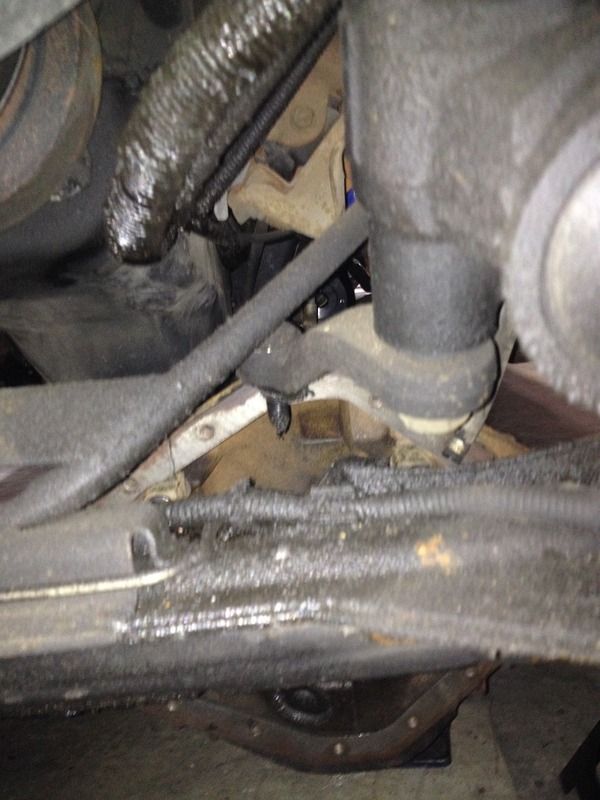
Things are going to get interesting real quick- I did not want to lift this thing if I can at all avoid it. The axle is currently a few inches lower than intended ride height as the housing itself was hitting all the existing IFS crap and front crossmember still. Oil pan clearance will be tight as well. Part of the IFS stuff is tied to the engine mount on driver side so looking like I'm gonna have to think on things a bit for the next few steps in fitment. Part of the plan is fitting a minimum Warn 12K up front so may end up working on a winch cradle and crossmember/bumper base first in order to remove the main existing crossmember without tweaking the frame too far out of whack. We'll see how it goes...


More to come...

Best of Luck,

Mike
 

'05TJLWBRUBY

Adventurer
Well not a lot of progress as of late, too much other stuff going on. Started working on the truss for the front 14 then while making room, I just couldn't stand it anymore- had to know how wide that dually rear 14 was going to be under the rig. Decided to toss it under and check a few things.

So here it is- this is a 2011 model dually rear 14 bolt 74" WMS. The original 14 under the Suburban was only about 64" so this one is 10" wider at the wheel mount surface. I'm currently planning on running the factory spaced 12 bolt H1s with 37" rubber for now until something better finds it's way in my shop. I did snag a second set of H2 17" aluminum rims with the deep back spacing also, but no tires for them yet. Figured the deal was good so better jump on it for the 17" option at some point in the future. Anyway, couldn't be happier with the width setup this way- I have always hated the way Chevy has done the rear axles all these years- way skinny in the rear, like a dog with it's tail tucked between it's legs. No more skinny butt here- the dually width with H1 spacing is about perfect- a few inches wider overall, but not too wide to get in trouble. The H2's with a couple inches less will move them out a bit more, but still not too much to cause problems. Very happy with how this is working out so far:


And here we have side view- this is factory back spaced 12 bolt H1, fits up width wise on the dually 14 just about perfect with the factory flares. Axle is moved to the 1" forward hole position simply because the center pin hole wouldn't fit with the 37" tire- the rear part of the flare/fender was jammed into the tire so tight I couldn't' get the wheel on and seated fully. Planning on moving it back to the 1" rear most hole at some point but just messing around, happy to see overall fitment width wise is exactly what I was after. This is on the factory Suburban leaf pack-stock position, factory shackles, no lift what so ever. I'll work on clearance later, just getting ideas for now. Was hoping to run a 14" travel shock back here with 50/50 split. Will certainly make things interesting with regards to up travel that's for sure....


More to come...

Best of Luck,

Mike
 

'05TJLWBRUBY

Adventurer
Found a deal so for options, got 4 of these guys, looking for spare now...


And here's when I got the REID C's on the front 14- pinion set at 80.5 degrees with C's at 6 degrees, currently working on the truss/link bridge- main beam piece is at 0-level. Getting the C's on was fun- baked them in the oven in the house, then in 46 degree outside temps, had to race across the drive over into the shop. Thankfully I had welder, digital level and everything ready to go- first only literally only had a couple seconds before it started to bite. Burned it in full then wrapped up in heavy moving blankets. Cooked the second one for about 2.5 hours and that bought another several seconds of time setting up before it bit. Once burned, wrapped up in blankets, slow cooled, still warm the next morning so happy about that. Came out strait as an arrow.


More to come...

Best of Luck,

Mike
 

'05TJLWBRUBY

Adventurer
wow that t-case is a neat setup and I wished I had known about it when building my burb....low low is very nice to have.

Yes indeed! I have a 4.3 Atlas in my Jeep and LOVE the low range crawl it has. As big and heavy as the Suburban will be, it needed gearing options. Can't afford an Atlas then stumbled on the Eco box- it's an excellent solution to suit my needs and budget. Very excited to have that in the Suburban- there is absolutely no replacement for a good low range crawl ratio. The driving finesse you gain and control is remarkable. Depending on terrain, is a big safety improvement also in the steep stuff. Can't wait to get this thing rolling on it's own again to test it out.

Best of Luck,

Mike
 

'05TJLWBRUBY

Adventurer
So not a huge amount of progress but slowly working on things. This finally showed up- now to determine if it's worth investing in EFI Live and going back to school or just farming the tuning out to someone who already knows what's up. This is an 0411 out of an 01/02 Chev Express with 4l80e trans. Will be working on re-pinning my 5 harness black box into the 2 on this thing- lots of studying to do here but should be worth it in the end:


And gotta give a huge shout out to Scott at Dark Horse Customs- Dark Horse is a bad *** custom shop out in Bozeman MT- Scott, Teola and the crew do all kinds of cool builds with all custom work. Everything from Jeeps to Camaro's, trucks new and old and everything in between. I'm not a car guy but do love the Camaro's- they did an awesome job on a new Camaro for the Pike's Peak challenge last year, then my favorite out of box so far has been their "pizza truck" build with a real wood fired pizza oven on the flatbed of a modernized new/old truck. Bad ***. Can't wait to see the new projects coming out of their brand new huge shop going through grand opening now. Anyway, Scott called up and asked how my Suburban project was coming and how I was doing on the front 14. He said he had something he thought I could use and sent these out:


Stoked to get these- they are the Crane 14 bolt inner axle seals. New machined side adjusters that incorporate a normal off the shelf D60 inner axle seal. I have been working on my front 14 a bit but had yet to determine what and how I was going to seal the thing. Scott called at just the right time and thank goodness had just the right part I needed. Thanks Scott, You Da Man!!! These will be great addition to seal off the front 14 on this project Suburban HD. Can't wait to get back to work...

Speaking of the front 14- have a tiny bit more progress there- called up Ruffstuff and ordered another rear pinion guard and bridge kit. I went with this on my rear dually 14 and wanted everything to match. Ruffstuff builds great parts, everybody knows that, but the bridge kit is designed to suit their truss specifically. Good thing about fresh steel is it's easy to modify. I cut the bridge, removed some material then welded back together. My truss is low profile, with main overhead beam just a hair over the top of the diff. Clearance on a low slung rig is tough to find and I need every bit I can get. I modified the rear the same way which came out great so did the same on the front. Not done yet, but it's a start anyway...


I keep scratching my head on how to stuff a front 14 under a Suburban with no lift. I'm thinking my next step is building a winch cradle for the big Warn M12000 to fit somewhere between front frame rails. My real hang up is the massive front crossmember for the IFS stuff. That's the main crossmember and is HUGE under the front end. I can't get the 14 anywhere near where it needs to be with that in the way, yet can't cut it out just yet as the entire front frame section will spring soon as it's cut. Thinking if I build a front winch cradle some how and burn in a temporary crossmember, I can remove that beast of an IFS support then get some room to play with. Picked up some steel today- bunch of 1/4" and 3/8" plate. Hoping to draw something up this weekend and see what happens. No CAD skills so it's all silver pencil and grinder/cut off from here on out with that stuff.

More to come...

Best of Luck,

Mike
 

'05TJLWBRUBY

Adventurer
Well it's been neglected for a while now. Had a few minutes tonight to mess with the winch mount again. Not done by any means but at least solid enough to fit up for mockup and rough fitment. Probably end up doing side pieces off this out to the fenders of some sort to fashion up something resembling a bumper at some point but for now this will allow me to get that damn monster crossmember out and start to get an idea of where the 14 needs to be.

I hate side loading shackles so I did lowers horizontal to the ground, then the normal verticals up the sides like everyone does for strait pulls. Thought I had a safety thimble to fit, but guess I don't so for now it's just sitting with cable end junk hanging out. The Warn M12000 is about as high and tight as it's going to get without relocating a bunch of crap I didn't want to mess with. I trimmed and massaged enough as it is just to get this far. Hope this works, we'll see.


Likely be another couple weeks before I can tackle that crossmember but it's at least stripped down now and ready to be cut. Be nice to get some room to work under there.

Best of Luck,

Mike
 

chilliwak

Expedition Leader
Mike, everytime I see an awesome build like this it just makes my mouth water!:drool: When you take a 14 bolt axel and make it into a steering front axel like you have done it is just pure magic!:Wow1::Wow1: I enjoy watching the play by play of what you have done with your great pictures and descriptions. Nice build. Cheers, Chilli....:):)
 

'05TJLWBRUBY

Adventurer
Mike, everytime I see an awesome build like this it just makes my mouth water!:drool: When you take a 14 bolt axel and make it into a steering front axel like you have done it is just pure magic!:Wow1::Wow1: I enjoy watching the play by play of what you have done with your great pictures and descriptions. Nice build. Cheers, Chilli....:):)

Thank You Sir! :)
 

'05TJLWBRUBY

Adventurer
So it seems I only get an hour or two a month to mess with this thing which is really disappointing. At this rate, I'll have it a roller in another 30 years... :(

I gotta say it felt really good getting this massive pile of junk out of there:


And hours and hours later with the grinder, I had both frame rails mostly cleaned up inside and out and underneath as well with all prior brackets removed. The front 14 isn't in exact location it needs to be, but pretty close.


At this point there's a lot of head scratching trying to figure out how to keep this thing relatively low with moderate up travel. If I had have kept the original plan of the 60 up front, it wouldn't be all that bad to pull off, but with the sheer size of the 14 all the way around in every dimension that added size takes up a lot more space thus making things quite difficult to fit.

Steering has been on my mind for a while now which brings the question- does anyone know if I can swap a reverse rotation worm drive into my saginaw steering box? If so, which one? I'm thinking at this point of going to a forward facing pitman arm and with a full box swap, I can use a Chevy Astro box, a Toyota box of some sort but unsure which exactly- can't remember if it's 60 series or 80 series that would be needed, and I think the JK box would also work. The key is it must be inside the frame mount and forward facing pitman. I'm curious if I can swap the reverse rotation worm drive into my box with rebuild. Another idea is to run an old manual box like CJ or Scout style then get creative with the fluid layout. We'll see...

Best of Luck,

Mike
 

'05TJLWBRUBY

Adventurer
Ha ha- Thank you Sir!

So messed around a bit in between other odd jobs like moving snow. Ugh... Anyway, pulled the pitman arm so I could get the axle in position. This is roughly where it wants to sit and roughly where I want it to stay overall. It's certainly tight and getting the up travel I want is going to be a challenge to say the least.


So at a standstill yet again, figured I'd go press some wheel studs to think on things a bit. The dually studs are a bit longer with longer shank to account for the dual wheel and the lock ring, and won't work with a normal single wheel setup. I pulled the ones from my original 14 bolt hubs and will try to re-use them if I can. Not sure they'll work yet, but going to try and save a few bucks if I can, we'll see.


So I did come up with a few ideas-none of which will be quick or easy but we'll see. Time to hit the google machine and do a little homework.

Best of Luck,

Mike
 

underdrive

jackwagon
Regarding steering boxes - 1980-1996 F-series and E-series Steering boxes bolt to the inside of the frame rail and have the pitman arm pointed forward. Ford fullsize passenger cars of the same model years got a steering box tha looks exactly the same, bolts to the frame rail in exactly the same manner in the same bolt pattern with same diameter bolts, and takes the same exact steering shaft coupler, but has the pitman arm pointed towards the rear. Those boxes are IIRC made for Ford by Saginaw. So if that's done from the factory, maybe you can do it as well? Or just use a truck box as is, they are quite strong actually, used on everything from Broncos to commerical F-Superduties (old F450) with 15k GVW.
 

Forum statistics

Threads
185,783
Messages
2,878,188
Members
225,329
Latest member
FranklinDufresne
Top