Dreaming of a Perentie Turning an ex ADF 6x6 into an expedition vehicle

The Rover Shop

Explorer
G'day... We are also building our 130 camper for extreme use also (also doing a build thread here....again..lol..)...thinking when we head back home that we will ship into WA, would be great to hook up and head out into the desert..:)..
Shayne and Sandra..
 

sydneyman

Observer
excellent updates! most of the fun is getting things done the way you want them in the first place. even when you are "done", i imagine you will always be perfecting!
 

carts

Adventurer
G'day... We are also building our 130 camper for extreme use also (also doing a build thread here....again..lol..)...thinking when we head back home that we will ship into WA, would be great to hook up and head out into the desert..:)..
Shayne and Sandra..

Hi Shayne and Sandra
if you are shipping to Perth let me know, I am sure we can put you up for a few days while the truck clears AQIS, customs is easier ( for the law abiding) than the AQIS people and more power to them I say.
would be happy to spend some time out in the bush as well.

Shayne I am envious of your fleet have coveted your camel trophy vehicle for a long time in fact that's how I came to subscribe to expedition portal. I have subscribed to two of your builds.

cheers and good luck
best regards
Carts
 

carts

Adventurer
excellent updates! most of the fun is getting things done the way you want them in the first place. even when you are "done", i imagine you will always be perfecting!

thanks mate I do believe you are correct we have changed our disco so meany times its not funny pore old girl has personality problems.
regards
Carts from WA
 

carts

Adventurer
The inner walls

I have read a lot of build stories for expedition vehicles and for that matter a lot of travel blogs for overlanding. One thing has struck me is how those of us who build our vehicles past experience dictates the build process.

Take for example our build, the lining between the 1.6 mm Al outer skin and 1.0 mm Al inner skin is 25 mm ultra-high density polystyrene. Why? Simple because of its thermal properties and the heat in WA can become extreme. We read northern hemisphere builds that talk about the cold and heating and discount it. We talk about the sun to the point were our plans are to paint the roof white across the whole vehicle to lower the absorption, in addition we will be adding ridged solar panels with a significant gap to act as a shade roof. even though we like the flexible for the wind profile.

This is not to say that we are not aware of the cold we have spent more than a few nights camped in the snow in tents and even worse in one expedition on dog sleds into the lower Tartra mountains in Slovakia. It’s just that I think every day experience defines some decisions that we make.

So we have polystyrene inners, there will be a bit of heat transfer through the frame but considering all things such as not having double glazed window it will be something to put up with. The polystyrene is adhered to the skins using industrial adhesive it is also cut to be a push fit within the panel spaces.

The 1 mm Al inner skin is held in place using rivets and industrial adhesive. The choice of 1 mm Al was based around the weigh and lower strength requirements than the outer skin.

Oh the gap in the inner skin you can see showing the insulation on one side is meant to be there. We will have to cut vents into the wall to allow the fridge to vent hot air out. The thought is to cut these when we have received the stainless steel vents from the marine supplies.

To be continued as time and adult supervision allows
 

Attachments

  • front wall.jpg
    front wall.jpg
    208.2 KB · Views: 45
  • paseng insul.jpg
    paseng insul.jpg
    240.4 KB · Views: 42
  • paseng ins 2.jpg
    paseng ins 2.jpg
    243.9 KB · Views: 44
  • Pansgn skin.jpg
    Pansgn skin.jpg
    218.5 KB · Views: 43
  • drives skin.jpg
    drives skin.jpg
    181.9 KB · Views: 40

carts

Adventurer
Open sesame! The door to the world

So far the most difficult part of our build project has been the door. We spent many hours talking to caravan manufactures trying to get a door that looked the business and was constructed well enough to match the general construction of our 6x6.

We even discussed having a door built by some of the yacht builders, most of the problem were that the construction material was limited and that just about all had single point latches.

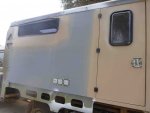
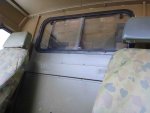
Our preference was for double point if not triple point latching and sturdy construction. We felt if any one tried to break into our truck living area it would be through the door. We had purposely made long skinny windows high up or small windows so that they offered limited access. So we wanted a door that would deter people. Basically we want someone else to be easier to break into than us knowing full well that determination will concur engineering every time, but if we are harder than next door, well easy is best when breaking in I guess.

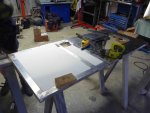
The options that we had came down to build it our self. Thankfully my step father is a master craftsman and made it for us. Whilst it was not simple he did make it look easy. All I can say is thanks mate you are truly skilled.

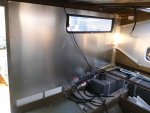
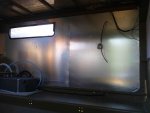
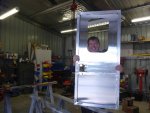
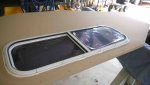
We used a recessed handle so as not to have a major component that could be dragged off in the bush, now whilst this may mean that some knob could push it back whilst we are in it, we positioned a decent size window so you can reach out and open it just in case of knobs. Well also so you can see what you are opening the door onto, have to be careful in case the zombie apocalypse actually happens.

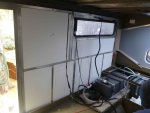
The locking mechanism is double acting both top and bottom. The window opens so that the seam facing the front of the vehicle is the hinge point. It is made of high impact resistant plastic and is held in place by a number of screws.

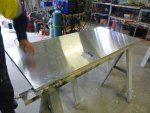
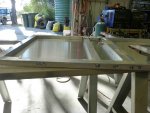
The door has 3 hinges that are pop riveted on, the rivets had to be turned down on the lath so as to fit the hinge recess. The rivets themselves are so large that we had to purchase a special gun to put them in, as the air rivet gun wouldn’t do them. Actually inserting the top rivets saw me struggling so much with the hand rivet gun to pop them off that I fell off the ladder. Thankfully all those years of martial arts came in handy and it was a good fall.

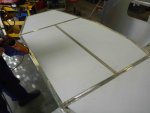
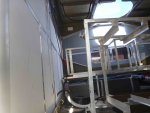
So the door is made of 1.6 mm Al with a lot of inner frame work. It is lined with the 25 mm poly and 1.6 mm Al inner skin. It has a 2 point locking system it fits perfectly and we are yet to fit the door seal but that will be added when it’s time to do the finishing touches.

to be continued as time and adult supervision allows
regards
Carts from WA
 

Attachments

  • door 1.jpg
    door 1.jpg
    263.9 KB · Views: 51
  • door 2.jpg
    door 2.jpg
    255.5 KB · Views: 48
  • door 3.jpg
    door 3.jpg
    302.6 KB · Views: 42
  • door 4.jpg
    door 4.jpg
    238.7 KB · Views: 44
  • door 5.jpg
    door 5.jpg
    205.2 KB · Views: 56

carts

Adventurer
The western front or all hands to the wall

Apologies in advance English is not English and if I was smart like my wife I would be multi lingual
but I stick with the spelling that I was taught this through no "isims" its just what my word processor is set to and what is expected for work so please forgive me.

Ok so the door was difficult but so was the front wall, it like all of the walls is 1.6 mm Al using 25 mm box tube, the cavity is filled with the high density polystyrene and the inner skin being 1 mm Al. The difficulty was in the shape and the fact that we wanted to have a window that matched the back window in the cab of the perentie.

Why we wanted the window from the perentie to match is not so that we can communicate between the cabs, we don’t see ourselves driving with someone in the back there are no seats that are rated for travel in the back. It was to allow air to pass through.

Our thoughts have centred on the ability to use a roof top air conditioner on the cab of the perentie and have this air pass through to the living space. We have put in a large exhaust fan to suck air through as well as a circulating fan to help develop vortex action from the front of the living space to the back.

So it may not work all that well but for the sake of a window it just might make that 1 degree difference that assists with getting to sleep. With this in mind we wanted to dust proof (about as dust proof as the rest of the vehicle) the gap between the two windows but still leave it flexible so that the cab and the living space can flex semi independently as they have different mountings.

What we needed to do is build a foam tunnel between the cab and the wall adhere it to the cab of the perentie and then shove the back wall into place with adhesive there by sandwiching the construction foam.

As we couldn’t work from between the front wall and the rear of the cab this was seen as the only way of having the foam held in place. The front wall also needed to be as tight a fit within the shape of the front ROP as the windblown water and debris will be significantly more than at any other place on the vehicle. So Tight fit rapidly setting contact adhesive and distorting construction foam and no way of resetting it made for a fun day.

We also had to decide on what colour we were going to paint the finished vehicle as we needed to pre paint the back of the cab and front wall as it will not be possible to paint them as well once they are together as getting a spray gun between them is impossible.

Those of you with a sharp eye will have seen that a number of the photos have small splashes of colour on them. I would prefer to discuss the colour when I show the finished product. But will briefly mention it here, as Shayne discussed in his 130 build thread the colour is important in an around the world trip as different receptions can await in different countries depending on who the colour of a vehicle is associated with. I wanted the camel trophy yellow but was over ruled by the adult supervision. The colour we are using is a semi mat sand colour that we hope is not quite a military colour. The roof will be white and we will put big black go fast stripes down the sides that have Kangaroos on it.

As can be seen from my passport a lot of people are interested in what a kangaroo really looks like. I was once 2 hours getting through customs entering Bulgaria not because of any problems it was just that I was the first Australian the immigration people had ever meet and our passports have pictures of our wildlife in them and they were fascinated by the experience. I will admit that the person picking me up from the airport was less impressed than I was but hay it's sometimes nice to be the centre of attention.

We have it in! It works and well the story will be further told as I can.
To be continued as time and adult supervision allows
cheers Carts from WA
 

Attachments

  • front wall 1a.jpg
    front wall 1a.jpg
    203.9 KB · Views: 33
  • front wall 1 b.jpg
    front wall 1 b.jpg
    194.7 KB · Views: 30
  • front wall 2a.jpg
    front wall 2a.jpg
    69.4 KB · Views: 28
  • front wall 3.jpg
    front wall 3.jpg
    202.9 KB · Views: 28

Kgh

Let’s go already!
Damn!

Wow, just wow.

Great build. Fantastic rig. And your skill and craftsmanship shine!

I really dig the Army seat covers, too! I have a pair of Aussie army pants my buddy gave to me.

He also had an anatomically correct inflatable 'roo in his hooch in Afghanistan, but that is a different story...
 

neonasty

New member
This is an awesome build and I look forward to seeing it completed.

I can see you've put a LOT of thought into what you want in the vehicle. I'm sure there will be changes you make after your first trip, but with so many different components coming together perfection on the first try is unlikely.

I'll probably steal some of your ideas for my own car.

I'll keep an eye on this thread.

-Shaun
 

Ozrockrat

Expedition Leader
It's probably too late but the doors on my Ambulances are all full length stainless piano hinge. Apart from the load capacity it has the benefit of hiding the rivets inside the door jam and also it is nearly impossible to knock the pin out making it much more secure. The price is not for the faint hearted though.
 

Jitterbug

Adventurer
great to see someone else doing a 6x6 land rover build. They are great trucks, slow and heavy but a lot of grip, it has shocked my some of the stuff it climbs up without trouble.
Not sure if you have seen our build, it was one of the civilian models sold at the time the perentie project kicked off.

Dave
 

The Rover Shop

Explorer
Dave.. If you add the build thread to your signature line it makes it easier to find.. Actually if everyone did this it would be great..
 

VanIsle_Greg

I think I need a bigger truck!
I love these Ex Military 6 x 6 Landies that you guys have access to down there. I have never even seen one before a way up here in Canada (sadly). I also really dig build threads that go fro zero to 100 in 3 pages! This is looking like a very capable and fun project. I like that you are putting your past experiences into the design and making smart decisions like isolated tanks, gaps between the panels and roof for shade (they also work better when not overly hot), white roof, sensible materials.

Nice build and you have another subscriber!

Door looks nice too, so props to Dad as well.
 

carts

Adventurer
It's probably too late but the doors on my Ambulances are all full length stainless piano hinge. Apart from the load capacity it has the benefit of hiding the rivets inside the door jam and also it is nearly impossible to knock the pin out making it much more secure. The price is not for the faint hearted though.

Thanks bit late but if I change any thing I will keep it in mind we did buy the so called ant theft ones but only time will tell
cheers Carts from WA
 

Forum statistics

Threads
185,815
Messages
2,878,493
Members
225,378
Latest member
norcalmaier
Top