JeepN95YJ
Adventurer
I have been fourwheeling and exploring the outdoors since 1988. Prior to that I enjoyed two and three-wheeled offroading as a kid. The woods behind my house were my playground and I loved it.
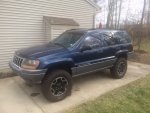
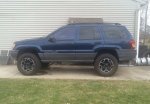
Over the years I have owned several offroad vehicles, a 1988.5 Suzuki Samurai, a 1995 Jeep YJ, a 2001 Jeep TJ, a 1999 Jeep Grand Cherokee, a 1981 Wagoneer and now the latest 2002 WJ.
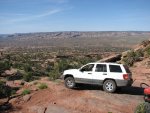
My previous Jeeps were all modified. Some much more than others. The 1999 Grand was my wife’s daily driver and other than a 2.5” budget boost and slightly larger tires it was completely stock. I sold it with over 280,000 miles on the ticker and have felt like I had made a mistake ever since. In 2007 I drove it from Batavia, OH, to Moab, UT, and my favorite, the White Rim trail.
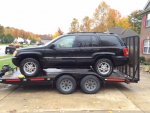
At that time my kids were babies. In fact, my son was 3 and my wife was 7 months pregnant with my daughter. Now they are 12 and 8 and I have been feeling the pressure that time is slipping away. I want them to experience that epic Moab-style road trip as a family. I hope that as they get older they will want to continue to take these types of trips with my wife and I and their families. The Grand Cherokee proved itself as an awesome family platform. The 1999 WJ was a Laredo package. It had the full-time NV247 tcase, 3.73 gears, 4.7 V8, leather and the sunroof. I always liked this setup but wanted the Limited cladding and quadradrive axles. I searched locally for quite a while and finally found a 2002 WJ Limited with a few issues that would make a great starting point
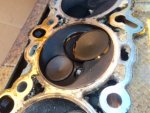
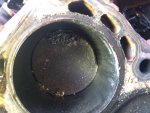
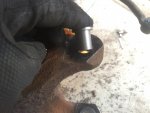
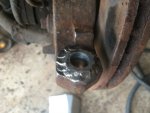
I bought the 2000 as a non-runner for CHEAP. I had previously torn into a 4.7 when my work truck spun a rod bearing a few years ago. I found two parts engines back then and still have quite a stock of spares. The WJ engine would start without too much noise. It smoked badly, however. I tried replacing spark plugs as I have solved several “miss” situations with this obvious solution. Same miss and smoke. I decided to tear it down to find the problem. Under the valve cover on the drivers side I found a rocker arm laying loose. I suspected a dropped valve seat to be the culprit as the rocker wouldn’t reseat. Further investigation revealed it was indeed a dropped seat but that wasn’t the end of the story. The number one piston is melted. It looks like I will be swapping out the entire engine.
Clues to what may have happened were prevalent. When I bought the jeep the owner told me it had been run low on oil and started knocking. I checked the oil and though old and dirty it wasn’t contaminated and the level was decent. My test start sounded like a top end problem instead. I noticed that there were two big jugs of kitty litter in the back but didn’t think anything of it. Turns out they were full of water, not kitty litter. The radiator overflow reservoir was also full of water…no antifreeze to be seen. As I removed the radiator I found a crack that explained all the water. Another problem was a powersteering system full of oil instead of powersteering fluid. I definitely have my work cut out for me. I hope to be driving it by Christmas.
While I tear in to all this I will leave you with a few plans for the future. The parts are already in the garage and will be installed as it all comes together.
3” Iron Rock Offroad Suspension
Bilstein 5125 Shocks
All new spring isolators front and rear
¾” Spacer up front to accommodate the weight of winch
Warn 9.5xp Winch
HK Offroad Hidden Winch Plate (This is a very nice piece. I will be making a few modifications)
2015 Rubicon Takeoff Rims and 255/75/17 Tires
Spidertrax 1.25" Wheel Spacers
Home Built Control arms using Currie Johnny Joints
High Clearance IRO Transmission Crossmember
Addco Rear Swaybar
JKS Disconnects (adapted from my old TJ)
ARB 50QT Fridge
1500W Power Inverter
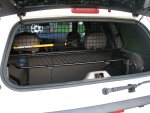
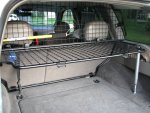
Cargo Barrier Rear Storage system.
Dash Mounted CB/Ham Radio
Dash mounted Tablet with GPS Maps
Onboard Shower Using Homemade Heat Exchanger
Specialized Tool Kit and Spare parts List.
Swap NP 247 for NP 242 Transfer Case (no longer needed as I had to use my donor vehicle instead)***
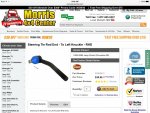
Kolak 2.5" Exhaust (I took advantage of his Christmas Special)
ARB CKMA12 Air Compressor
Future plans that are on the table but not in the garage
Great Lakes Offroad Transfer Case Clocking Ring
Custom fabbed 2x6 Rocker Panel Rock Rails
Custom built On-board Air (I bought the ARB CKMA12 compressor instead)***
Secondary House Battery Mounted in spare tire well
Slide out tray for Cargo Barrier and Fridge
Roof Rack Storage
Back up Camera
Headlight and interior lighting upgrades
Offroad Trailer
Pics to Follow:
Over the years I have owned several offroad vehicles, a 1988.5 Suzuki Samurai, a 1995 Jeep YJ, a 2001 Jeep TJ, a 1999 Jeep Grand Cherokee, a 1981 Wagoneer and now the latest 2002 WJ.
My previous Jeeps were all modified. Some much more than others. The 1999 Grand was my wife’s daily driver and other than a 2.5” budget boost and slightly larger tires it was completely stock. I sold it with over 280,000 miles on the ticker and have felt like I had made a mistake ever since. In 2007 I drove it from Batavia, OH, to Moab, UT, and my favorite, the White Rim trail.
At that time my kids were babies. In fact, my son was 3 and my wife was 7 months pregnant with my daughter. Now they are 12 and 8 and I have been feeling the pressure that time is slipping away. I want them to experience that epic Moab-style road trip as a family. I hope that as they get older they will want to continue to take these types of trips with my wife and I and their families. The Grand Cherokee proved itself as an awesome family platform. The 1999 WJ was a Laredo package. It had the full-time NV247 tcase, 3.73 gears, 4.7 V8, leather and the sunroof. I always liked this setup but wanted the Limited cladding and quadradrive axles. I searched locally for quite a while and finally found a 2002 WJ Limited with a few issues that would make a great starting point
I bought the 2000 as a non-runner for CHEAP. I had previously torn into a 4.7 when my work truck spun a rod bearing a few years ago. I found two parts engines back then and still have quite a stock of spares. The WJ engine would start without too much noise. It smoked badly, however. I tried replacing spark plugs as I have solved several “miss” situations with this obvious solution. Same miss and smoke. I decided to tear it down to find the problem. Under the valve cover on the drivers side I found a rocker arm laying loose. I suspected a dropped valve seat to be the culprit as the rocker wouldn’t reseat. Further investigation revealed it was indeed a dropped seat but that wasn’t the end of the story. The number one piston is melted. It looks like I will be swapping out the entire engine.
Clues to what may have happened were prevalent. When I bought the jeep the owner told me it had been run low on oil and started knocking. I checked the oil and though old and dirty it wasn’t contaminated and the level was decent. My test start sounded like a top end problem instead. I noticed that there were two big jugs of kitty litter in the back but didn’t think anything of it. Turns out they were full of water, not kitty litter. The radiator overflow reservoir was also full of water…no antifreeze to be seen. As I removed the radiator I found a crack that explained all the water. Another problem was a powersteering system full of oil instead of powersteering fluid. I definitely have my work cut out for me. I hope to be driving it by Christmas.
While I tear in to all this I will leave you with a few plans for the future. The parts are already in the garage and will be installed as it all comes together.
3” Iron Rock Offroad Suspension
Bilstein 5125 Shocks
All new spring isolators front and rear
¾” Spacer up front to accommodate the weight of winch
Warn 9.5xp Winch
HK Offroad Hidden Winch Plate (This is a very nice piece. I will be making a few modifications)
2015 Rubicon Takeoff Rims and 255/75/17 Tires
Spidertrax 1.25" Wheel Spacers
Home Built Control arms using Currie Johnny Joints
High Clearance IRO Transmission Crossmember
Addco Rear Swaybar
JKS Disconnects (adapted from my old TJ)
ARB 50QT Fridge
1500W Power Inverter
Cargo Barrier Rear Storage system.
Dash Mounted CB/Ham Radio
Dash mounted Tablet with GPS Maps
Onboard Shower Using Homemade Heat Exchanger
Specialized Tool Kit and Spare parts List.
Swap NP 247 for NP 242 Transfer Case (no longer needed as I had to use my donor vehicle instead)***
Kolak 2.5" Exhaust (I took advantage of his Christmas Special)
ARB CKMA12 Air Compressor
Future plans that are on the table but not in the garage
Great Lakes Offroad Transfer Case Clocking Ring
Custom fabbed 2x6 Rocker Panel Rock Rails
Custom built On-board Air (I bought the ARB CKMA12 compressor instead)***
Secondary House Battery Mounted in spare tire well
Slide out tray for Cargo Barrier and Fridge
Roof Rack Storage
Back up Camera
Headlight and interior lighting upgrades
Offroad Trailer
Pics to Follow:
Last edited: