2002 Jeep Grand Cherokee Build Thread

Jeepinaaron

Adventurer
I have a very similar winch set up, except my winch mount was custom because I thought of the idea before I saw HK's winch mount. I cut my bumper straight off, you can see it in my build.

Also, if you can find a limited bumper, it will fit your winch plate without trimming. I love the wheels. Good work.
 

JeepN95YJ

Adventurer
The Hydraulic Fan Solenoid just went bad in my 03 WJ Laredo, took it into my local Jeep dealer and they want $1750 to replace the entire Hydraulic fan assembly. Which isn't gonna happen haha. How did you swap that hydraulic system out? Is there a write up on that? I'm just starting to look for the same mechanical/electric combo as a cheaper option and would love to hear your thoughts!!! Thanks
- Kaden

I didn't have a write up. I might be able to put one together sometime. Luckily I had a complete donor vehicle available. I also added the mechanical fan at the same time.

The swap parts needed from donor:

1. Electric Fan and Shroud assembly.
2. Power steering pump, cooler (if equipped) and hoses
3. Mechanical Fan

Other parts needed:

1. Electric fan controller---I used a controller from a Flexalite Fan I had in the garage. Any Electric Fan Controller should work.

Current issues with this swap:

Everything works as it should. However, I do have a check engine light on because of the hydraulic fan solenoid. Eventually I will figure out how best to fix this. I have a spare PCM that I will be getting programmed for this Jeep. It originally had the electric fan and I might be able to use this PCM to control the fan through the factory setup. As of right now, everything works as needed so I am not pressed to do this any time soon.
 

JeepN95YJ

Adventurer
I have a very similar winch set up, except my winch mount was custom because I thought of the idea before I saw HK's winch mount. I cut my bumper straight off, you can see it in my build.

Also, if you can find a limited bumper, it will fit your winch plate without trimming. I love the wheels. Good work.


Thanks! I have watched your build from the beginning and love your Jeep. In fact, I had planned to use your fabricator for my winch mount before I decided on the HK Offroad Mount. I see your mount is slightly more compact than mine. I have a Limited bumper cover that also requires a little trimming. I believe that once I get the mount and bumper cover painted (or plasti-dipped) it will look well-integrated.

I know you eventually trimmed the bottom of the bumper cover off. I am thinking I will do the same thing. Maybe have one trimmed and one not. I have separated my bumper cover from the grill and am working on making removing the cover a 5 minute process.
 

JeepN95YJ

Adventurer
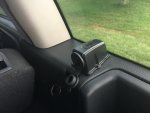
I went out of town a few weeks ago and when I got home the passenger rear window was down on the Jeep. My first thought was that someone had smashed the window. Luckily that was not the case. It was a classic WJ window regulator failure.

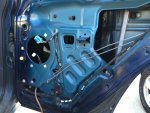
The regulator uses plastic pulleys and stops to hold the wire that runs the window up and down the track. Over time the window track gets sticky and the plastic gets brittle and eventually something fails. This time it was the stop that had broken and the window simply dropped open.

My wife didn't like the repair I made the evening we had gotten home. She said something about garbage bags looking bad, neighborhood redneck, depreciating property values.....soooo. I decided to simply swap the one from my parts Jeep. They are pretty easy to repair and there a ton of videos on you tube. I 'd say the repair could be done in 30-45 minutes if you were swapping new parts.

I found that my 2000 parts Jeep uses a different regulator than my 2002. They look nearly identical but the motor assembly is different. The bolt holes do not line up so I couldn't use the older regulator without some work.


Photo Oct 16, 2 41 19 PM.jpg

The tape didn't hold. The garbage bag was voted down. More like veto'd!


Photo Oct 16, 2 30 27 PM.jpg


Photo Oct 16, 2 30 24 PM.jpg

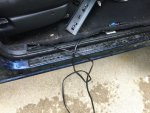
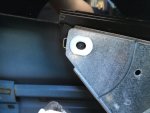
Removing these two screws is all it takes before popping the press pins.

Photo Oct 16, 2 42 44 PM.jpg

I started at the bottom using the plastic scraper and a door panel tool.
 

Attachments

  • Photo Oct 16, 2 53 51 PM (1).jpg
    Photo Oct 16, 2 53 51 PM (1).jpg
    519.1 KB · Views: 25
  • Photo Oct 16, 2 52 51 PM.jpg
    Photo Oct 16, 2 52 51 PM.jpg
    544.3 KB · Views: 25
Last edited:

JeepN95YJ

Adventurer
Photo Oct 16, 4 21 04 PM.jpg

You can see the window motors have different mounting patterns. The one on the left is from my 2002. The one on the right is from the 2000.

Photo Oct 16, 4 20 44 PM (1).jpg

Looking at the motors from the other side it appears as if the cable pulleys are about the same size. Unfortunately, the housings, again, have different bolt patterns. Again, 2002 on left, 2000 on right. I can't easily swap the housing, but maybe I swap the pulleys.

Photo Oct 16, 4 25 07 PM.jpgPhoto Oct 16, 4 25 04 PM.jpg

More problems. The pulley from the 2000 has course splines in the pulley. The 2002 has fine splines. Maybe I can rewind the cable.

Photo Oct 16, 4 27 49 PM.jpg

This is what it is supposed to look like when the cables are properly wound. It took a little while but I finally got it.

Photo Oct 16, 5 24 56 PM.jpg

Success. Window goes up and down as it should and it didn't cost me anything but time. I used goof off to remove the dried tape residue.
 
Last edited:

xwazmtb

Lost and Found at the same time.
I had that go out on the driver side rear window. Boy What a surprise. I too taped it up with gorilla tape and interesting on my 02 limited I just scrapped the tape residue off with a razor. The rear windows are actually tinted glass on mine and not a film. I scrapped both sides without any tint or scratch issues. I replaced mine with a $30 internet replacement and it is a lot better than the factory, with much better materials.
 

JeepN95YJ

Adventurer
Do it right the first time.

So, I work on this thing a little at a time as time allows.

This Jeep has been a project for quite some time and it was not a runner when I got it. I initially tore down the engine to replace a head with a dropped valve. It was obvious when pulling the valve covers that the drivers side head had a dropped valve seat. I used one of those cheap boroscope cameras from amazon to check the cylinders on the passenger side and couldn't see anything. I took a shortcut and put the engine back together without pulling the passenger side head. STUPID.

After putting it back together I still had a terrible miss that could only mean trouble. I ended up tearing the engine apart again and sure enough, the passenger head also had a partially dropped seat. The good news is that I have the new head on and torqued. I should have it buttoned up again this week and take it for a drive this weekend. I plan to take it camping Memorial Day weekend. Should a nice shakedown.

Public Service Announcement!

ANCHOR Replacement Engine Mounts are TERRIBLE! Part of my plan with this build is to replace all the worn parts that 180,000+ miles will cause. Worn engine and transmission mounts are the cause of lots of NVH noise and a general rough feeling on these Jeeps with high mileage.

I bought replacements from Anchor. These are made in China and the casting is so large that they did not fit flush on the engine. I had to grind almost an eighth inch off the top right side on the passenger mount just to get 3 of the bolt holes to line up. After nearly an hour of messing with it I still could not get the last hole to line up. I will be ordering a factory Mopar mount to replace it.
 
Last edited:

ReconZJ

Observer
I used replacement Mopar mounts on mine, and didn't have too much trouble installing them with help from a friend. All the holes aligned.
 

JeepN95YJ

Adventurer
Big trip coming up I will be running the KAT (Kentucky Adventure Tour) over the course of about 5 days in July. The family and I will be spending a little time in Gatlinburg, TN, then working our way north east up the KAT beginning in Jellico, TN, and finishing up in Slade, KY.


2017-06-29 14.27.51.jpg

Out on a little shakedown run at the farm.
 

JeepN95YJ

Adventurer
@ JeepN95YJ
please could you give us more pics with the tie-rod and drag-link installed? Have you had any problem when you turn all right and all left with new configuration?
Thanks!!

Having driven this for a out 300 miles, now, I am very happy. The drag link comes very close to the passenger side sway bar link but does not touch. Steering is a tad bit twitchy (mild bump steer) on the street. The drag link has been raised 2-1/4" with the flip. The track bar is in the stock location. I will be lowering the drivers side by 2-1/4" with a custom mount. I had replaced my stock track bar with an Iron Rock Offroad unit. I will switching back to a stock bar to get the additional clearance I need over the diff. I will post up pics about what I am talking about when I get them off.

I am not running a steering stabilizer right now and after correcting a couple of minor problems I have eliminated a case of death wobble. First was making sure the tow-in was set correctly. I set it at 1/8" at 31.5 inches. I used the MrBlaine method from Jeep Forum. (photo from JeepForum)
 

Attachments

  • DSC_1334.jpg
    DSC_1334.jpg
    164.1 KB · Views: 32

JeepN95YJ

Adventurer
The second issue contributing to death wobble was brakes. This jeep had sat for over 2 years before I got it. The brakes were new all around but there was a lot of rust. I was able to clean it up nice but the passenger front brake caliper wouldn't release once I started driving it. The stuck caliper caused the front tires to work against other. I addition to hot, smelly brakes I got death wobble. A replacement from the parts jeep fixed it right up!

That was the end of the death wobble but not the end of my brake woes. A day after the fix the rear hard brake line broke when I applied the brakes in a parking lot. Again, rust was the issue. I replaced the line with a new stainless line from Classic Tube. I bought the complete set and will eventually swap most of them out. They are pre-bent for the Grand Cherokee. I am happy with all the lines except the ones from the master cylinder to the ABS pump. They use a large, bulky tube assembly that isnt as nice as the factory lines. All others are super nice.
 
Last edited:

JeepN95YJ

Adventurer
I wanted to take the ARB Fridge on our upcoming trip but this jeep didn't come equipped with the rear power outlet. I purchased the ARB power supply kit when I got the fridge. Installation went pretty easy.

There was plenty of room in the factory wire guides to run the new power cables.
 

Attachments

  • IMG_3526.jpg
    IMG_3526.jpg
    564.6 KB · Views: 25
  • IMG_3528.jpg
    IMG_3528.jpg
    576.8 KB · Views: 29
  • IMG_3533.jpg
    IMG_3533.jpg
    519.6 KB · Views: 28
  • IMG_3534.jpg
    IMG_3534.jpg
    525.9 KB · Views: 27

K2ZJ

Explorer
I wanted to take the ARB Fridge on our upcoming trip but this jeep didn't come equipped with the rear power outlet. I purchased the ARB power supply kit when I got the fridge. Installation went pretty easy.

There was plenty of room in the factory wire guides to run the new power cables.

I have the rear power outlet and it wasn't enough to keep my Waeco running. I also added a separate power connection that is fused right to the battery so it is on all the time.
 

Forum statistics

Threads
185,822
Messages
2,878,587
Members
225,378
Latest member
norcalmaier
Top