40 Guy builds a 100 Series

Rezarf <><

Explorer
I finally had the stars align and got a day off, a warm day, and a friend who could help and got to mount up my ARB Sahara Bumper. I got it off of eBay from a fella who had it sitting for the past 15 years or so. It is an older part number than what ARB is offering now so please don't think the new bars and mounts are the same as this one. Everything went pretty smooth sans winch installation and I had a dead IPF fog light bulb that isn't lighting up.

First up, remove the old bumper, and grill for access, then you remove the actual steel bumper and foam spacer. This took about 15 minutes tops. There is really very few things holding it together.

Before.
img_0510-jpg.1207853


Remove the grill and plastic bumper cover.
img_0517-jpg.1207854


Steel bumper removed and pulling the shipping container tie down points. I will likely add beefy tie down points to the front as the ones I previously installed are not compatible with this ARB bumper. For now I will move the front tow point to the rear and figure out an option for the front. I picked up a manual mill recently and new recovery points may very well be my first project.
img_0518-jpg.1207855


img_0520-jpg.1207856


The approach angle looks amazing without anything hanging off the front! :D I know the ARB sticks way out, more than most rock crawling bumpers but the front end protection (buffer for the cooling system) against animal strikes and the ease of fitting a winch in the bumper were two things high on my priority list. Reality set in for me when I thought we had moved all our tools closer to the front when installing the bumper as we ran out of room between the front of the truck and the tools scattered on the driveway. It was then I realized just how far the ARB sticks out. I don't mind it but if you have a tight garage space it's something to consider.
img_0521-jpg.1207857
 

Rezarf <><

Explorer
Everything came so well packaged from ARB, my Sahara Bar Kit came with everything, the hoop, fog lights, winch cradle, turn signals, rubber trim, hardware, wiring harness with relay and switches, everything down to zip ties. I was impressed that 15 years after it left Australia it was in perfect shape with nearly zero corrosion and zero damage of any kind.

What is it about opening new gear? Man, it is like Christmas in February for me!
img_0514-jpg.1207865


img_0515-jpg.1207866


First order of business was to remove the winch cradle from the bumper, it was held in with a couple of bolts and it separates easily.
img_0526-jpg.1207867


The winch cradle serves a foundation for the bumper to fasten to and a place to hold the winch. It slips over the frame rails of the 100 with various bolts, spacers and channels but it is really straight forward. The winch cradle was angled backwards which is fine but it proved to make things a bit more difficult for my hopes of installing the big Warn m12000 onto it. Everything is nicely powder coated and the hardware is high quality with nice coatings.
img_0527-jpg.1207868
 

Rezarf <><

Explorer
So it came time to drag the heavy pig of a winch over to the mount. I had read in a few other places about folks who have successfully stuffed the Warn m12000 into the Sahara bumper and they have the pics and threads to prove it. I believe my Sahara bar to be an early version (for one the grey color verses black and the old part number in the catalog) and without major reconstruction the cradle wont play nicely with the big m12000. Seeing how the m12000 is designed for a feet forward application and the fact that I'd have to tear into a well designed, strong and perfectly good mount, I have decided I'll swap winches before chopping this bumper up.

Here is what it looked like when we tossed it into place. Only the m12000 can make a 100 look small ;)
img_0534-jpg.1207871


The actual winch physically fits in the space with just enough room to spare. Maybe a little trimming here and there might be required but there is enough "room" to make it work.
img_0535-jpg.1207872


This pic is with the winch pressed up against the radiator support and I'd still need to add over an inch of new base, and rotate the winch a bit, and mount it feet down... three strikes and you're out.
img_0536-jpg.1207873


Again, the winch does fit. I am going to sleep on it for a week and see if I can get motivated to do the work it needs and or find someone who wants to upgrade to a m12000 and trade me their m9000 and synthetic line. Any takers?
img_0539-jpg.1207875
 

Rezarf <><

Explorer
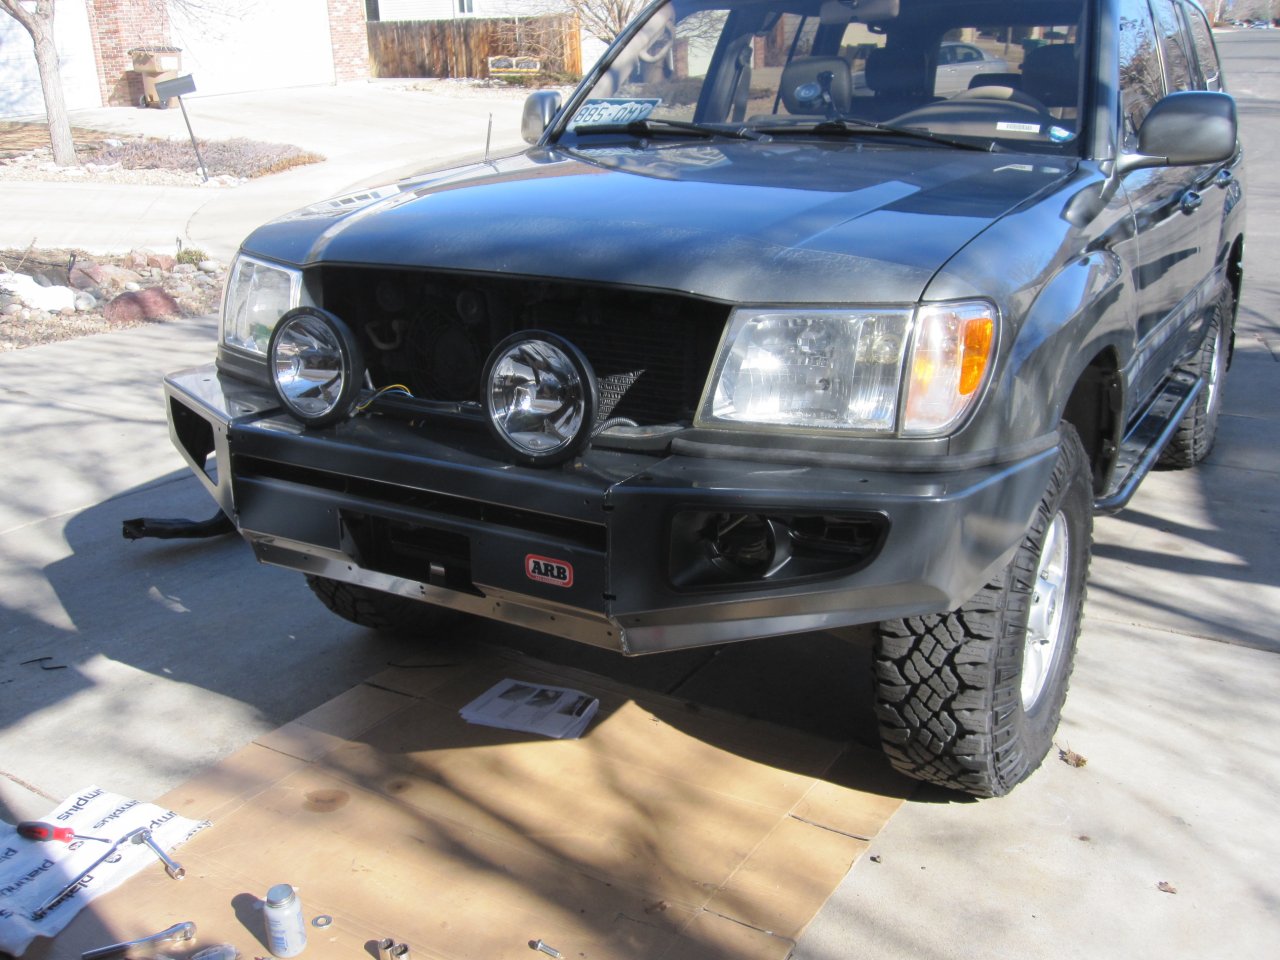
The rest of the install was really easy. The hardest part for us was fitting the rubber trim that takes up the gap between the lower sheet metal and the bumper. It just took a little time and we kept installing the bumper without accounting for a sheet metal lip (seen in the pic above just below the seam of the headlight and turn signal below the sheet metal) that prevented leveling the bumper at the wings to the wheel well opening. Once we figured that out it was smooth sailing. Three main mounting bolts per side then a fitting of the rubber trim, and the chrome hoop to finish it off.

I picked up three Hella Rally 4000's over the past few months since the bumper has been waiting installation. I have used a set of Hella 4000 Euro beams on my FJ40 for almost 10 years and I LOVE them! The beam pattern is so nice and useful for spotting elk and deer in Colorado, and the flood pattern is awesome off road when working technical trails as well. I know that LED light bars are all the rage right now, but these lights are proven to me and since the LED bars have become so popular the Hellas have plunged in price and increased in availability on the secondary market. For this build I decided on 2 Hella 4000 Euro beams with free form refectors, and one center Cornering beam for wide angle light up front.
img_0540-jpg.1207881


I have to give a shout out to my friend Leal (one_if_by_land here on ExPo) for taking some time on a day off to help me install this. He is a fan of vehicle based travel and wheeled an AWD Sienna harder than anyone else I've known. He's got plan for a Toyota build himself once the timing is right. Thanks again bud.

We got the hoop installed along with the fog lights and turn signals. This was pretty straight forward and I was impressed with the quality of the IPF fog light kit and harness. I went ahead and installed the roller fairlead onto the bumper as it helps the overall look of the ARB imho.
img_0543-jpg.1207882


And here is the after. It took us about 4 hours of actual work to get this done. Just a little bit of head scratching and having to undo something to redo another but that is how any first time installation goes. Props to ARB for such a high quality part, instructions with pics, and customer service even after the discontinuation of this bumper. I must have said a dozen times, "man! this is high quality stuff!" or "Wow, the details they thought through are awesome!" Keep on being awesome ARB.
img_0545-jpg.1207883


img_0546-jpg.1207884


NOTE: Also, in the end I think the center corning light clutters the front end a little too much for me. I will have to decide if I want to run it or not when I build the harness for the Hellas but for now, I have deleted it and will focus on the fog light angles for slow trail work and the Euro beams for spotting game on the roadsides.
img_0547-jpg.1207885


All that is left is to finish the wiring for the lights, figure out my winch dilemma, adding recovery points and enjoying it!
 
Looks great! I've got (2) rallye 4000 euros mounted to the front of my TJM T13 and they are great. The third you had thought about mounting may restrict airflow through the radiator.
 

redthies

Renaissance Redneck
Looks great! I'm thinking on an ARB deluxe bar for my 100. The M9000 and synthetic rope will be nicer to your front end than the 12,000 and wire rope (weight). Awesome detail in all your posts. Love it. I got in on the name badges too and "Rabbit" (my 100) and "Blanca" my 3500 both got their ID badges.
 
Last edited:

Rezarf <><

Explorer
I had a half hour of free time so I thought I would trouble shoot why one of my IPF fog lights wasn't lighting up. Figured out it was a bulb AFTER dropping the lamp on the ground... about a 6" drop off the creeper. Cracked the brand new lens! ARGH! This is the stuff that drive me nuts. ARB is helping me source a new one, but man, one step forwards three steps back today.
 

Rezarf <><

Explorer
So, I had an ARB rep checking into getting me a new IPF Fog light part number 9249FC if anyone has a spare laying around from an upgrade I'll pay good money for one. ARB needs $137 for one of them... :Wow1: YIKES! I got the whole bumper for $700, I won't be spending that much on a light unless I have to.

So, in my defense and since I have zero hours on this lamp otherwise, I invested heavily in a glass repair kit called GLASS GLUE from Loktite at the tune of $2.89 this is the way a true 40 owner builds a Cruiser! :D I picked up a spare bulb to see if I could get the darn thing working (I did it flickered, it is likely a loose connection but the new bulb seemed to fire up fine).

IPF Band-aid Kit
img_0631-jpg.1209704


And here is the spider crack at 4 O'Clock. I pulled the lamp and taped the light off and smeared the GLASS GLUE over the top of all the cracks, it flowed like super glue. I wasn't trying to be surgical, just seal it back up as best I could and hope for the best. I'll upgrade to LED's before dropping big $$$ on a replacement.
img_0629-jpg.1209705


Now that the glue has dried, I'll see how long this stuff lasts, the glue flowed down into the glass which was impressive to see, I just globbed it all over the cracks then spent a few minutes with a new razor blade scraping off any excess on the lens. It seems like it is sealed up but only some time, rough roads, and abuse will tell. For now, I consider it "fixed" and I'll keep the $140 in the gas tank for my next exploring trip.
 
Last edited:

Adventurous

Explorer
Nice work! I'm going to have to bookmark this to check out the HAM radio stuffs, I already have a CB but have quickly come to realize its limitations.

I'm not sure if it will work with your LC, but from what I can find the following ARB fog lights seem to fit most of the bull bars with that style cut out.

http://www.amazon.com/gp/product/B004P9FFAM?psc=1&redirect=true&ref_=oh_aui_search_detailpage

If you are interested I have a spare set NIB that are just hanging around in my garage. That and I live in Westminster; PM me if that's of any interest to you.
 

Rezarf <><

Explorer
I got a few little jobs done. I popped on new gas hood struts I got of Amazon, Strong Arm I think was the name. They went in without a hitch. This may be the best $30 I have spent on the Cruiser to date. I am now thinking of retro fitting a set to my 40.
img_0640-jpg.1211245


I have had some corrosion issues and have chased some gremlins with my battery. In preparation for the sub fuse panel and audio system I decided to upgrade my battery terminals to audio ones. They are nickle plated, and have set screws to clamp down different large/small gauge wires.
img_0641-jpg.1211246
 

Rezarf <><

Explorer
We had a warm day in Colorado yesterday so I grabbed some time to work on the cruiser, I was all set to cut the snorkel and bolt it up, but in the end decided to work on a few paint related things, maybe I got scared, maybe I didn't ;)

One thing I wanted done before the new wheeling season kicks off was to add two more cross bars to the factory rack to support a little more weight. With a family of five, a Thule box, hi-lift, axe/shovel etc. I like to put as much as I reasonably (and safely) can on the roof to keep the rear free of as much clutter as possible. The box gets our wet and or soft gear, camp chairs etc. but a few more supports won't hurt it either.

My factory cross bars were showing their age with the paint/coating coming off in sections. Last fall a friend Andy (AimCOTaco) gave me his old bars in response to a request on our local board, thanks again Andy!

Before: faded, peeling coating on the cross bars.
img_0657-jpg.1211252


Tim owner of GAMIVITI lives around the corner from me, since he has perhaps the most experience of any Cruiser head removing 100 series factory racks I asked for a few tips in doing this painlessly. I ended up following his advice and I used an interior trim pry bar to get the caps to start moving. Then pull and wiggle straight up. Got all 4 off without an issue, so I was grateful for the help, THANKS TIM!
img_0658-jpg.1211253


Next I slid out the rubberized insert.
img_0659-jpg.1211254


Disassembled Rack. On a note the front and rear cross bars have a different profile. I would assume this is to reduce wind noise and drag, but I am just guessing. Good news is you can't mix them up when reinstalling them as they are labeled well and "keyed" and will only fit the corresponding track mounts.
img_0660-jpg.1211255


Taped up so I don't make it tough to fit the end caps or the rubber extrusions.
img_0664-jpg.1211256
 

Rezarf <><

Explorer
Close up of what I am dealing with, there is paint, then a rubbery covering over the top of the paint. I decided to try out Rustoleum's version of Plasti-Dip. It seems to be all the rage and I thought this would be a good test bed for it. I was just trying to do a scuff and squirt, I was not looking for a showroom finish.
img_0665-jpg.1211257


After coating with the flexi spray stuff.
img_0666-jpg.1211258


All done, 4 factory fresh cross bars. This is a temporary solution to get me through this wheeling season, I need to save my beans for a suspension lift before a roof rack... but the GAMIVITI and Prinsu Design rack are both looking GOOD as options when I get that far.
img_0669-jpg.1211259
 

Forum statistics

Threads
185,423
Messages
2,874,283
Members
224,720
Latest member
Bad Taste
Top