I got the bug to do an expedition trailer and purchased a 2005 Raytheon M1102. Picked the trailer up in July from Fort Hood.


I wanted to use the wiring that was already on the trailer so I removed the MIL plug and replaced it with a standard 7 pin trailer plug. The removal of the MIL plug was real simple


I replaced all the 24v lights with LED lights and repacked the bearings with a high quality marine grade grease, as the trailer will see beach time. I checked the brakes and discovered that the pads were brand new.

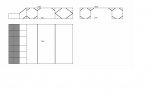
Then I had to come up with a design that I think should work for what I want the trailer to do. I am not planning on replacing the MIL tires on the trailer at the moment, they are brand new tires. I wanted a design that was simple and easy to build and allowed for a roof top tent plus fishing platform with rod holders for Surf rods. The size of the trailer, 7 feet across, allows for an RTT and 3' about of space. I was planning on making the frame that covers the trailer 20-22" tall, which with the current height of the trailer would give 72-74" to the top of the trailer. The sides and rear walls of the trailer would be vertical and the from would have a storage area and sloped wall.
I am planning on having doors on both sides that are ~36", this is to span the 4 bolts in the center of the rails that I used to holed the top down. There would also be a rear door that would span the entire tailgate.
A PDF drawing is attached
The frame is going to be 1x2" 14ga steel for the sides and rear. The front is going to be a mix of 1x2" and 1x1" 14ga steel. Two of the top support spans will only be supported on the ends and I will use 1x2" 11ga steel mounted with the 2" dimension being vertical.
The first step was to make the base of the top that mounts to the trailer. This required that ALL the preexisting bolt holes be found and drilled in the steel. I just did not want to drill a hole and feed a bolt though as the steel would compress and deform. So I made sleeves that I welded in to the holes then drilled the sleeves out to 7/16" to allow for 3/8" bolts to have some wiggle room. I am planning on using 22ga sheet metal for the sides and possibly 20ga for the top.

Of the 24 bolt holes I only missed 2 that I could not get the bolt to align with hole on the trail. I don;t think that will be an issue.


My next step is to do some type of roll on bed-liner to protect the inside of the trailer. I need to do this before I get too far along on the frame for the top.
Open to comments, suggestion and additions to the design.
I wanted to use the wiring that was already on the trailer so I removed the MIL plug and replaced it with a standard 7 pin trailer plug. The removal of the MIL plug was real simple
I replaced all the 24v lights with LED lights and repacked the bearings with a high quality marine grade grease, as the trailer will see beach time. I checked the brakes and discovered that the pads were brand new.
Then I had to come up with a design that I think should work for what I want the trailer to do. I am not planning on replacing the MIL tires on the trailer at the moment, they are brand new tires. I wanted a design that was simple and easy to build and allowed for a roof top tent plus fishing platform with rod holders for Surf rods. The size of the trailer, 7 feet across, allows for an RTT and 3' about of space. I was planning on making the frame that covers the trailer 20-22" tall, which with the current height of the trailer would give 72-74" to the top of the trailer. The sides and rear walls of the trailer would be vertical and the from would have a storage area and sloped wall.
I am planning on having doors on both sides that are ~36", this is to span the 4 bolts in the center of the rails that I used to holed the top down. There would also be a rear door that would span the entire tailgate.
A PDF drawing is attached
The frame is going to be 1x2" 14ga steel for the sides and rear. The front is going to be a mix of 1x2" and 1x1" 14ga steel. Two of the top support spans will only be supported on the ends and I will use 1x2" 11ga steel mounted with the 2" dimension being vertical.
The first step was to make the base of the top that mounts to the trailer. This required that ALL the preexisting bolt holes be found and drilled in the steel. I just did not want to drill a hole and feed a bolt though as the steel would compress and deform. So I made sleeves that I welded in to the holes then drilled the sleeves out to 7/16" to allow for 3/8" bolts to have some wiggle room. I am planning on using 22ga sheet metal for the sides and possibly 20ga for the top.
Of the 24 bolt holes I only missed 2 that I could not get the bolt to align with hole on the trail. I don;t think that will be an issue.
My next step is to do some type of roll on bed-liner to protect the inside of the trailer. I need to do this before I get too far along on the frame for the top.
Open to comments, suggestion and additions to the design.