You are using an out of date browser. It may not display this or other websites correctly.
You should upgrade or use an alternative browser.
You should upgrade or use an alternative browser.
Sawtooth XL Build
- Thread starter DanCooper
- Start date
Yeah, Jess, I think it would probably be okay once the inner wall is laminated on. But I think I will try it with the smaller windows for now. If, after I get the walls on and the ceiling in place it seems rigid enough, I may try one side and see how it feels. I'm going to dry fit (with screws) everything before I start gluing it. I will see.
Meanwhile, I couldn't help myself, I had to take this photo for you:

Actually, I have a wastebasket "full" of them, as layout is hard on a pencil!
Meanwhile, I couldn't help myself, I had to take this photo for you:
Actually, I have a wastebasket "full" of them, as layout is hard on a pencil!
thethePete
Explorer
Looks great! I love these little trailer builds. I wish I had space for a project like this. I don't even have a spot to build a chuck box at the moment.
stomperxj
Explorer
Yeah, Jess, I think it would probably be okay once the inner wall is laminated on. But I think I will try it with the smaller windows for now. If, after I get the walls on and the ceiling in place it seems rigid enough, I may try one side and see how it feels. I'm going to dry fit (with screws) everything before I start gluing it. I will see.
Meanwhile, I couldn't help myself, I had to take this photo for you:
View attachment 348899
Actually, I have a wastebasket "full" of them, as layout is hard on a pencil!
Cool pic Dan
")
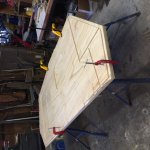
Side panels
One side is completely done, as well as the companion inner panel. The other side is cut out, awaiting only the rabbets for the galley and edges.
The process I have been using is straightforward: Rough cut with a saber or skill saw, then finish with a router. Once the first side was cut, I used it as a template to cut the other side, and then the inner panel.

But first, I had to patch the mistake I made when I cut a dado too far.


Then it is drill a hole, rough cut with the jigsaw, and trim with the router.


One side is completely done, as well as the companion inner panel. The other side is cut out, awaiting only the rabbets for the galley and edges.
The process I have been using is straightforward: Rough cut with a saber or skill saw, then finish with a router. Once the first side was cut, I used it as a template to cut the other side, and then the inner panel.
But first, I had to patch the mistake I made when I cut a dado too far.
Then it is drill a hole, rough cut with the jigsaw, and trim with the router.
Attachments
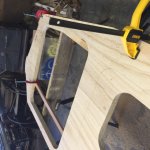
The window and the door openings were easy to duplicate because the openings were already cut and trued up in the first side. All I needed to do was drill the starter hole, Pop the router bit through the hole, turn on the machine and use the opening edge as a template/guide. I left the wheel wells until last so there would be strength in the panel longer.
After rough cutting the wheel wells, I used the dado jig I made to get straight and true lines cut in the upper side. After all three edges were cut that way, I used a flush trimming router bit to cut through the remainder of the bottom side.


End product. Two identical sides (including any mistakes!).

After rough cutting the wheel wells, I used the dado jig I made to get straight and true lines cut in the upper side. After all three edges were cut that way, I used a flush trimming router bit to cut through the remainder of the bottom side.
End product. Two identical sides (including any mistakes!).
The rest of today was taken up with:
Cutting the inner panel for the first side using that side as the template.

Then we (my brother came up to help in the late morning) cut all the galley, front, rear, and roof panels to length, as well as cutting to dimension all but four of those pieces. I will have a good start on finishing the second side and the front, rear, roof, and galley.
At the end of the day, I set up the second side for tomorrow when I will finish it and the inner panel for it.

And this was the sawdust for today.

We had to knock off for the day at about 2:00, as it was 80 degrees outside and hotter in the shop. I will start earlier in the morning tomorrow. Besides, it is chicken on the grill night, and I have to butterfly the chicken (and I've never done that before).
Cutting the inner panel for the first side using that side as the template.
Then we (my brother came up to help in the late morning) cut all the galley, front, rear, and roof panels to length, as well as cutting to dimension all but four of those pieces. I will have a good start on finishing the second side and the front, rear, roof, and galley.
At the end of the day, I set up the second side for tomorrow when I will finish it and the inner panel for it.
And this was the sawdust for today.
We had to knock off for the day at about 2:00, as it was 80 degrees outside and hotter in the shop. I will start earlier in the morning tomorrow. Besides, it is chicken on the grill night, and I have to butterfly the chicken (and I've never done that before).
All roof, front, and galley panels are cut, notched for the braces, and have the penetrations finished.


This what a Sawtooth XL looks like before you put it together.

And the braces for the curves in the outer skin.

Tomorrow I will cut the races for the wiring, and start filling all the holes in the floor. I also need to make a jig for drilling the braces, and some jigs to hold the walls perpendicular for assembly. Next up will be the application of the CPES, then epoxy on the outside of the floor, followed by Monstaliner. I may need a weather break to start applying the sealers.
Once the floor is sealed on the bottom, I can start assembly.
This what a Sawtooth XL looks like before you put it together.
And the braces for the curves in the outer skin.
Tomorrow I will cut the races for the wiring, and start filling all the holes in the floor. I also need to make a jig for drilling the braces, and some jigs to hold the walls perpendicular for assembly. Next up will be the application of the CPES, then epoxy on the outside of the floor, followed by Monstaliner. I may need a weather break to start applying the sealers.
Once the floor is sealed on the bottom, I can start assembly.
Should be able to pick up the trailer frame on Sunday and bring it back for painting and wiring. That's the good news. The bad news (which is not all that bad in the scheme of things) is that out of seven hours spent on the project today, two hours were spent working on machinery to get it to work, another hour was spent chasing down saw blades and sanding discs and belts, and the balance produced one template for the door sills. Of course, that included a do-over because after carefully setting up index marks, I failed to use one of them and the pattern I took off was bad. So, four hours for one template. But cutting the 6 pieces that make up the sills will now take about 5 - 10 minutes each. It all averages out.
Kayak 15, opp and indiedog, thank you for the words of encouragement. I'm sorry I didn't acknowledge them sooner.
I drove up to Port Townsend yesterday to visit Admiral Ship Supply to pick up some epoxy for the intermediate sealing coat, and to visit a friend from Alaska. If you have read all of this thread, you know I was bemoaning my inability to find supplies locally for this build. I was pretty sure I should be able to find everything I needed in Port Townsend, as it is a major wood boatbuilding center in the USA. Moreover, it is home port for a significant population of wooden fishing vessels. Admiral Ship Supply is located in the heart of the port area, and it is, in my view, the place to go for general supplies and a significant number of tools. http://admiralshipsupply.com
I was able to find Sika products, as well as the 3M 5200 and 4000 line of adhesives, plus a few different epoxy systems, including WEST and System Three (I decided on the WEST System because of its ubiquity).
Another supplier I found in Poulsbo is Longboat Marine. This shop is worth a destination type visit if you have plenty of free time. The owner has what amounts to a used marine supply store going on. Tools, scuppers, air vents, electrical parts, blocks, hinges, dinghies, etc. It is a small place, but fascinating in its array of offerings. And the owner will order anything you may think you want and get you fast delivery at very competitive prices. I can't get out of there without spending money. Plus Sluy's Bakery is just down the street and you can get tasty treats. The Poulsbohemian Coffee Shop up the street just past the Sons of Norway Hall also makes the best vanilla lattes I have found in North Kitsap County. Central Kitsap County too for that matter.
But the find of the day was Edensaw Woods. http://www.edensaw.com/MainSite/Store1/Content/SiteContent/1/Home/Main.aspx I met my friend from Alaska at Admiral Ship Supply, and he brought along his brother-in-law, George. George is a fisherman and fishing vessel owner, and as we were having lunch, he offered to take me up to Edensaw Woods so I could browse the lumber and tool selection (I had mentioned I might try to find some teak to make sea rails for the table I have in mind). George is a great guy, fantastic guy, the guy when you meet him you say to yourself, "I wish I could be like that guy." So we went to Edensaw Woods, and I was stunned. Turns out they are a major supplier throughout the US of specialty woods. They supply my vendor in Anchorage with the Baltic Birch that is in my drawer system in my Subaru. I was talking with the owner, and it turns out that he has the 3/4 " Baltic Birch in marine grade that I was looking for to build the Sawtooth. In fact, I could have bought the entire package from him and they would deliver it for free. Holy Buckets! A week or two of aggravation gone if I had but known! I knew such a place must have existed around here, but I just couldn't get vectored in until I met a vessel owner who had to constantly upgrade and maintain his vessel for the Alaska fishing industry. The lumber warehouse (not the lumber showroom, which is stunning in and of itself) just blew me away. From tree trunks sawed into 6-inch planks, to 14"x16"x15 ft purpleheart beams, to the latest Columbia Forest Products formaldehyde free plywoods, and so much more. It was like nothing I've ever seen before.
I closed out the day by driving to Harbor Freight in Port Angeles and picking up a few things, including a tongue box. I dropped them off at Wayne's place, and it turns out the angles on the tongue box almost match the angles on the Sawtooth XL frame. I will be able to give you a better idea when I get everything painted and bolted together.
Finally, for your input, I am faced with whether I should treat the plywood with CPES BEFORE I assemble the shell, or wait until after I assemble the shell. I am following IDASho's method of CPES, epoxy, final waterproof coating. I would appreciate hearing from those of you with experience in treating wooden trailers/vessels.
twiisted71
Adventurer
If you have the option, always treat the mating surfaces before assy. If I read correctly you were going to glue and screw, wood glue probably won't adhere well after coating, BUT 5200 is legendary. It will 'stick' to nearly everything and once it sets, its there for life. Removal will require a grinder and chisel and it will take a layer of whatever it has bonded to as well.
I grew up on the water and have built boats and assorted marine components since I could hold a hammer. So I say again, treat the mating surfaces before assy to keep moisture intrusion at bay as long as possible. Wood 'wicks' moisture in from its end grains and plywood has end grains on all edges due to its construction. Marine grade (aka pressure treated) plywood helps to fight rot but you can improve its chances greatly by sealing its ends as best you can. Rain, snow, ice, and road grime will always drain down the sides and hang on edges giving them prolonged opportunity to be drawn into end grain fibers. Joints multiply this by giving more surface area for the moisture to hold onto. I'd give all the edges an extra 2-3 coats before, as well as all the joints after assy. Don't forget edges include window, door, hatch, vent, light, plumbing, and wiring cut-outs. When you mount things like door knobs, running lights, etc to the wood, try to seal it along the top and sides and leave a tiny gap at the bottom to allow any moisture that gets behind said item to have an escape route so it doesn't remain trapped. Remember, water made the Grand Canyon, causes frost heaves in seemingly solid roadways and other amazing feats. It never gives up trying to reach a lower or drier place than where it is, and it almost always succeeds in finding a way despite man's best efforts.
This is just how I do anything made of wood that I want to last, if exposed to the elements.
Last edited: