You are using an out of date browser. It may not display this or other websites correctly.
You should upgrade or use an alternative browser.
You should upgrade or use an alternative browser.
Converting a factory JK/JKU hardtop to modular
- Thread starter jscherb
- Start date

jscherb
Expedition Leader
I meant to post on here and show you this Jeff. A guy down here chopped up a jku hardtop he said and posted these pics. Had to screen shot it as it would not allow me to save the pics. Thought it was cool.
Interesting - you say he chopped a JKU top for his 2-door? Too bad there isn't a top view so we could see what he did with the roof length difference. It does look cool though, thanks for posting it.
Needs b-pillars to support roll-up soft sides though
") . I guess he didn't read this thread .
. I guess he didn't read this thread .rubicon91
Explorer
Yeah everything he has posted says jku about the hardtop. I'll see if I can find out more about it.Interesting - you say he chopped a JKU top for his 2-door? Too bad there isn't a top view so we could see what he did with the roof length difference. It does look cool though, thanks for posting it.
Needs b-pillars to support roll-up soft sides though
Sent from my SAMSUNG-SM-G890A using Tapatalk
jscherb
Expedition Leader
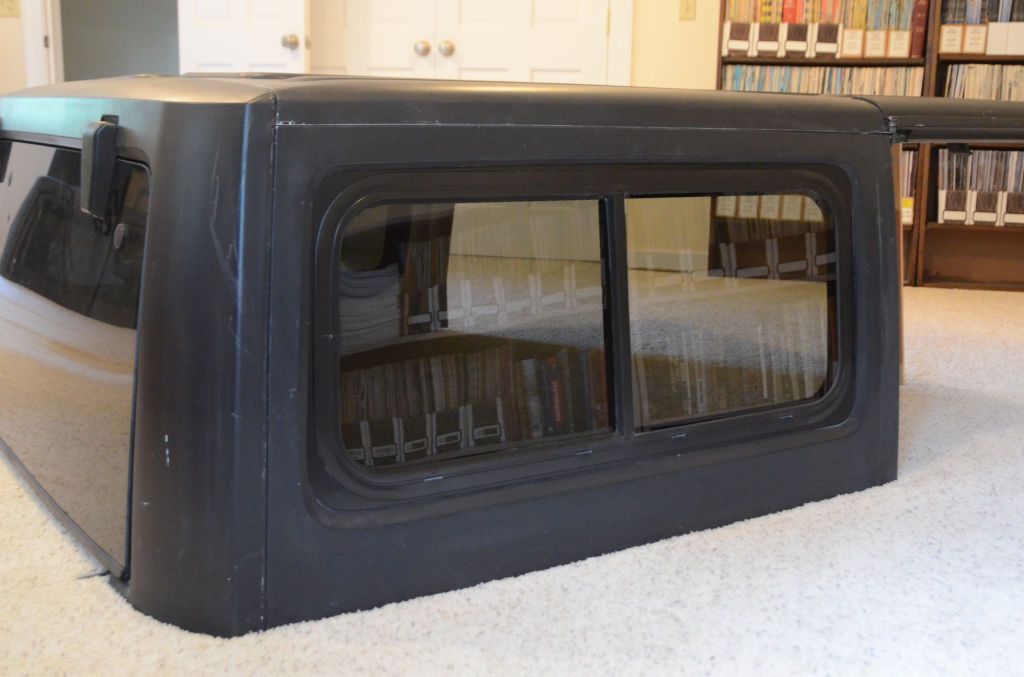
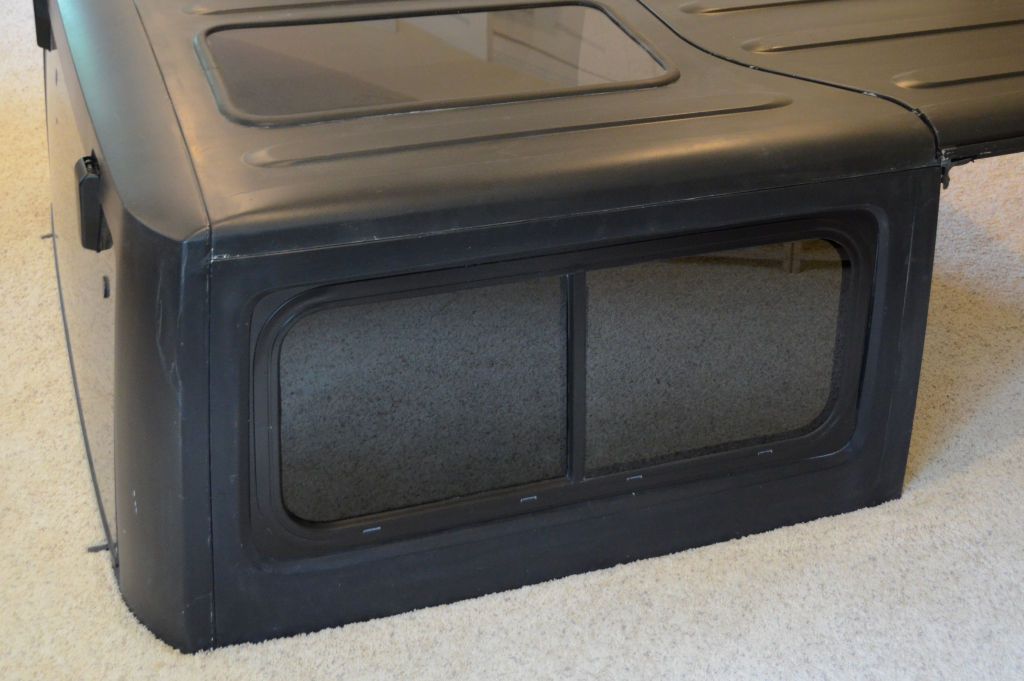
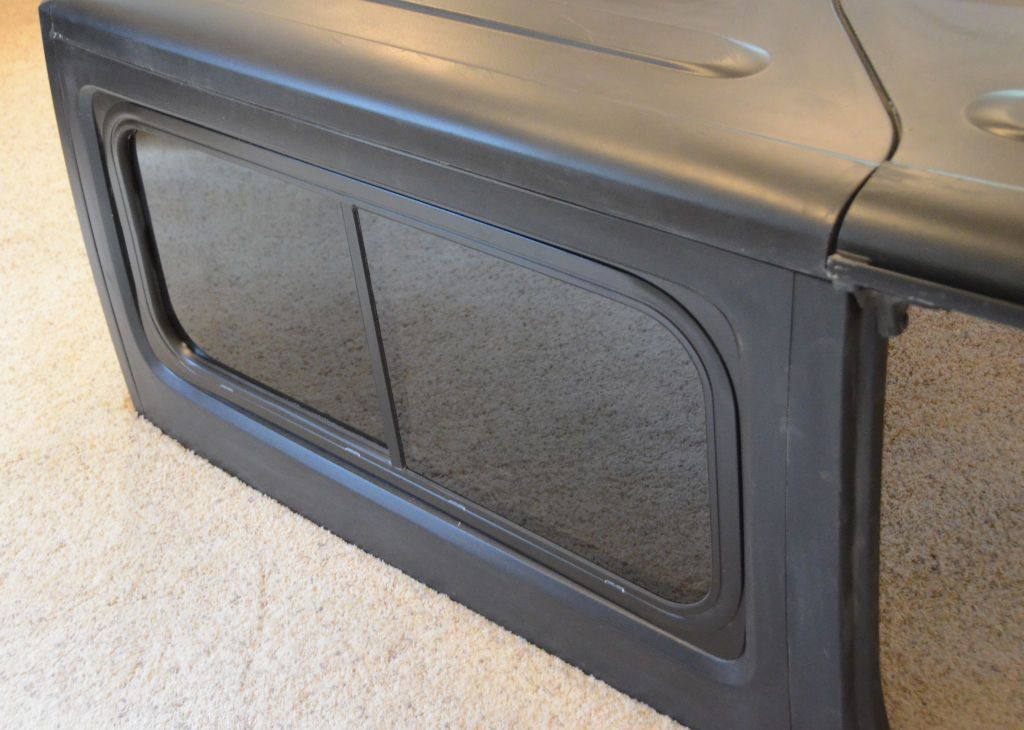
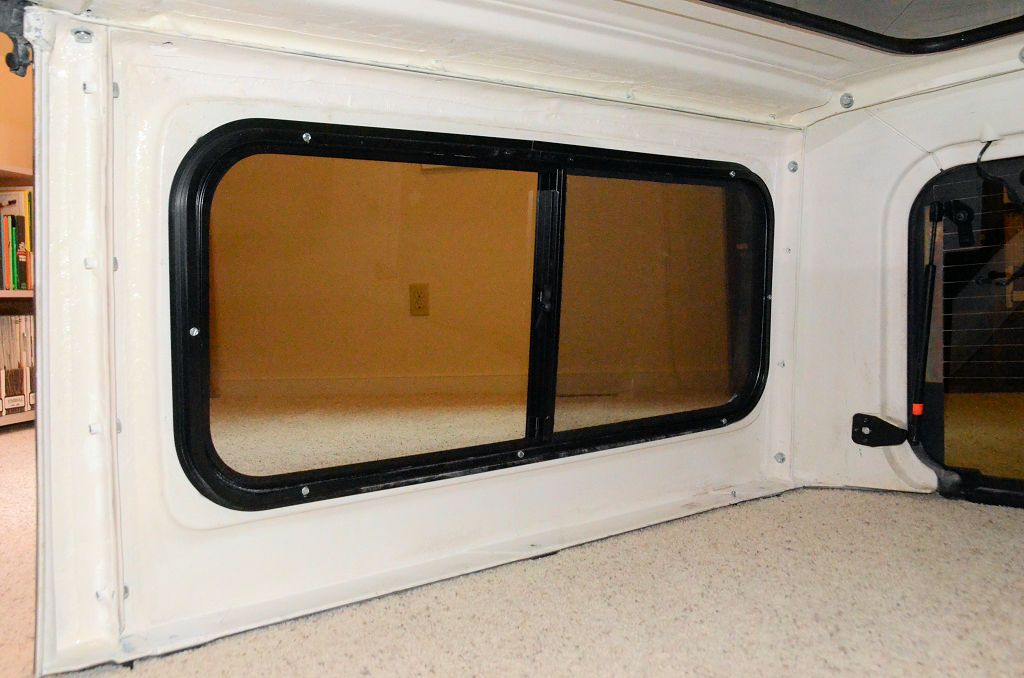
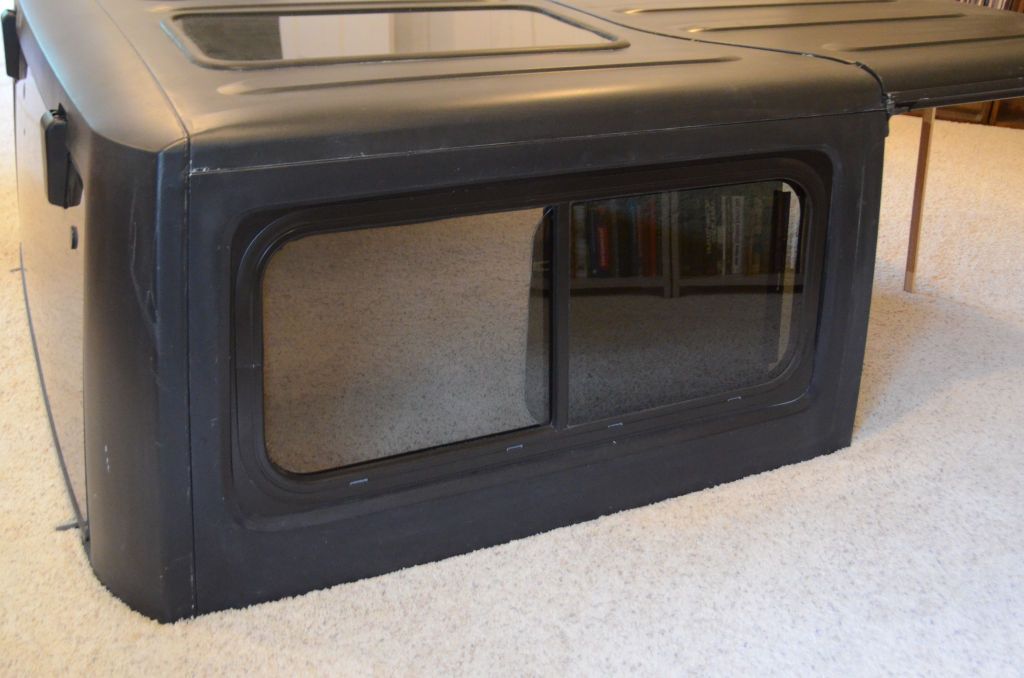
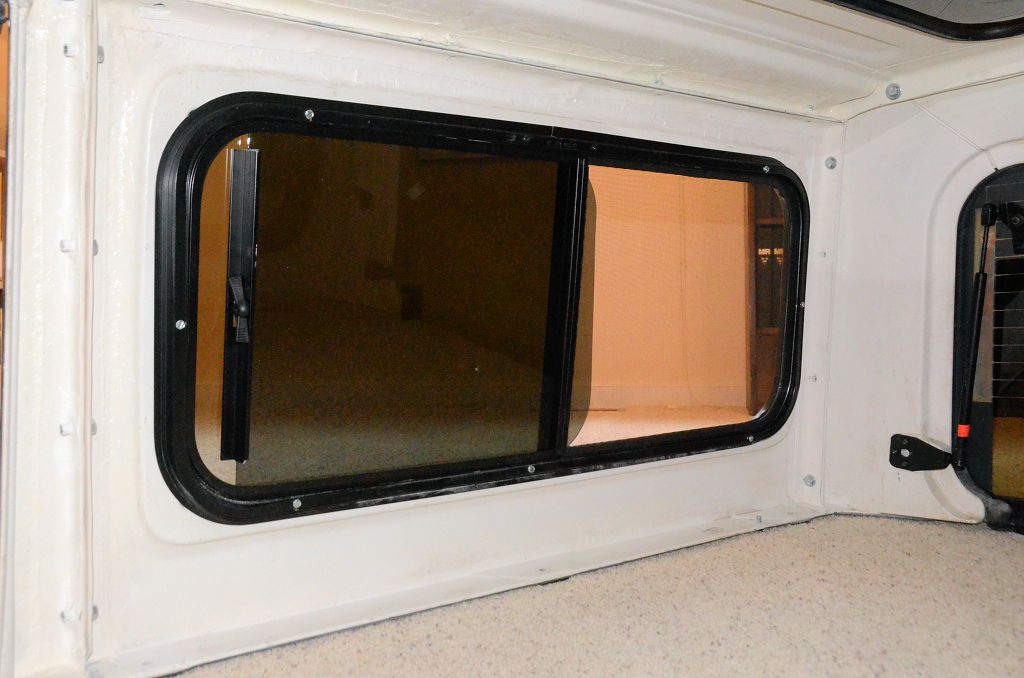
Today a pair of preproduction 2dr slider windows were delivered for me to approve. I installed one in the modular test hardtop right away to verify that everything is correct. These are now ready for production. I expect the company will place the first production orders for the windows and the retrofit kit right away, so they should be available shortly.
Update on the 2-door factory hardtop slider window kit, the company says:
The 2 door hardtop slider kits for 2011-2017 have taken a bit longer than expected. They are complete and awaiting packaging. We hope to have them available to order by the week of October 16th.
More detail: everything has been manufactured for the first production run, the windows are made and the retrofit (installation) kits are made but the window company is waiting on the boxes to package each kit in so they can ship them to the company, apparently there's been a delay in them receiving the boxes.
jscherb
Expedition Leader
I've been asked to show how to install a fixed skylight in a hardtop roof, so here are the steps.
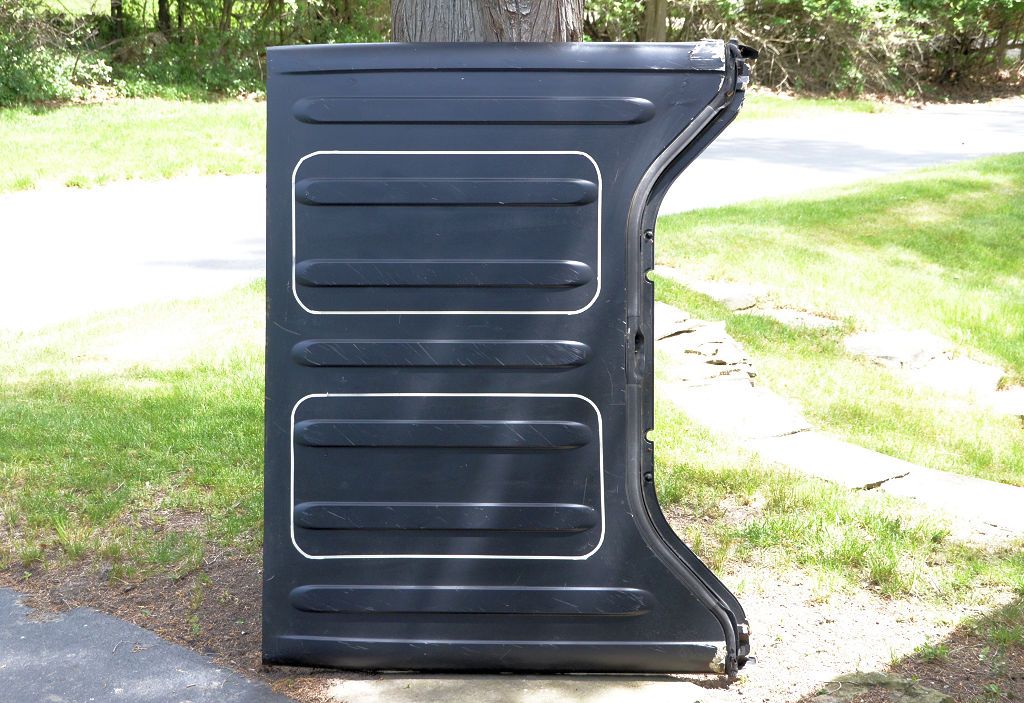
1. Decide on the size and position of the skylight. You'll need a flat area, so on the JK hardtop roof you'll have to work around the raised ribs in the roof. The photo below shows where I put the skylights on a 2-door hardtop.
You can mark the outline of the skylight with 1/4" masking tape as shown in the photo below. Lay out the corners with a 1.5" radius - that's a radius that the weatherstrip bends around well.
2. You'll need a glass weatherstrip, here's one that I use for applications like this: http://www.crlaurence.com/crlapps/s...History=30587:19748:19783:20855&ModelID=20878. This is a two-piece weatherstrip that includes a "lock strip" that locks the glass into the mounting surface. There are one-piece weatherstrips available but I find that the two-piece type seals much more reliably, which is especially important in a skylight application. You'll need enough to go all the way around the hole(s) you've marked, plus a little bit.
3. Get glass cut to match the hole you marked. You have three choices:
- Tempered glass. You'll have the best choice of tints going this route because you use ordinary 1/4" glass and it gets tempered after it's cut. You'll need to find a glass place that can do tempering (or can send it out to a specialty tempering place).
- Automotive laminated safety glass. This is the material that windshields are made of, it's two layers of glass with plastic sandwiched in between. You may not find as good a selection of tints in this type of glass, mostly because it's used for windshields, which aren't tinted. A glass place can easily cut it to size and it doesn't need any post-cutting tempering - once it's cut it's ready to install.
- Plastic (lexan, plexiglass, etc.). I'm not a fan of this because it scratches so easily and it's subject to clouding and degradation due to UV light exposure. It can be cut at home so you won't need a glass shop, but in many cases it's even more expensive than real glass. I often use plastic for prototypes - I cut the plastic, get everything fitted, then I remove the plastic and take it to the glass shop for them to use as a template to cut the glass. I've never used plastic for anything but prototypes though, I always use real glass.
My choice for the skylight is tempered glass because you'll find the best choice of tints/colors, and it's safe - if it breaks it'll break in a million pieces like an automotive side window.
Continued...
jscherb
Expedition Leader
4. Use the glass as a template for marking the hole that needs to be cut. You'll need to allow 5/16" all around the glass for the weatherstrip, so as you trace the glass, add 5/16 on all sides. A better way than tracing to ensure accuracy is to lay the glass on the hardtop and run a new line of 1/4" tape around the glass.
5. Cut the hole on the line you drew in the previous step. It's best to cut fiberglass with an abrasive cutting disk, such as a 1/16" thick cutoff wheel in a 4 1/2" angle grinder. You can use a fine-toothed blade in a jigsaw, but the impacts of the teeth can create micro-fractures in the fiberglass which may turn into cracks over time. If you do use a jigsaw, cut a bit inside the line and then sand the fiberglass to the line, this will eliminate any fractures.
If you use a 1/16" cutting disk and you've put the tape outline on the hardtop as in step 4, you can cut at the outer edge of the 1/4" tape - the 1/4" tape width plus the 1/16" cutting disk thickness will result in the hole being 5/16" larger than the glass, which is exactly what's needed for the weatherstrip.
6. Fit the weatherstrip into the hole. Since rubber will shrink over time, the butt joint where the two ends meet should be cut at least 1/4" long and force-fit. It's best to use silicone sealant at the butt joint.
7. Fit the glass into the weatherstrip, and install the lock strip to seal and lock the glass into place. The easiest way to install the lock strip is with a lock strip tool: https://www.amazon.com/Lisle-47000-Windshield-Locking-Strip/dp/B000COA1CQ.
A search will turn up lots of videos on YouTube showing how to install the weatherstrip and the lock strip: https://www.google.com/search?q=lock+strip+video&ie=utf-8&oe=utf-8
To make things go together a bit easier, I spray Windex or similar window cleaner on the rubber as I'm working to provide lubrication. In addition to the lock strip tool, I find that a plastic trim tool helps to get the glass initially into the weatherstrip, they're available at most auto stores.
jscherb
Expedition Leader
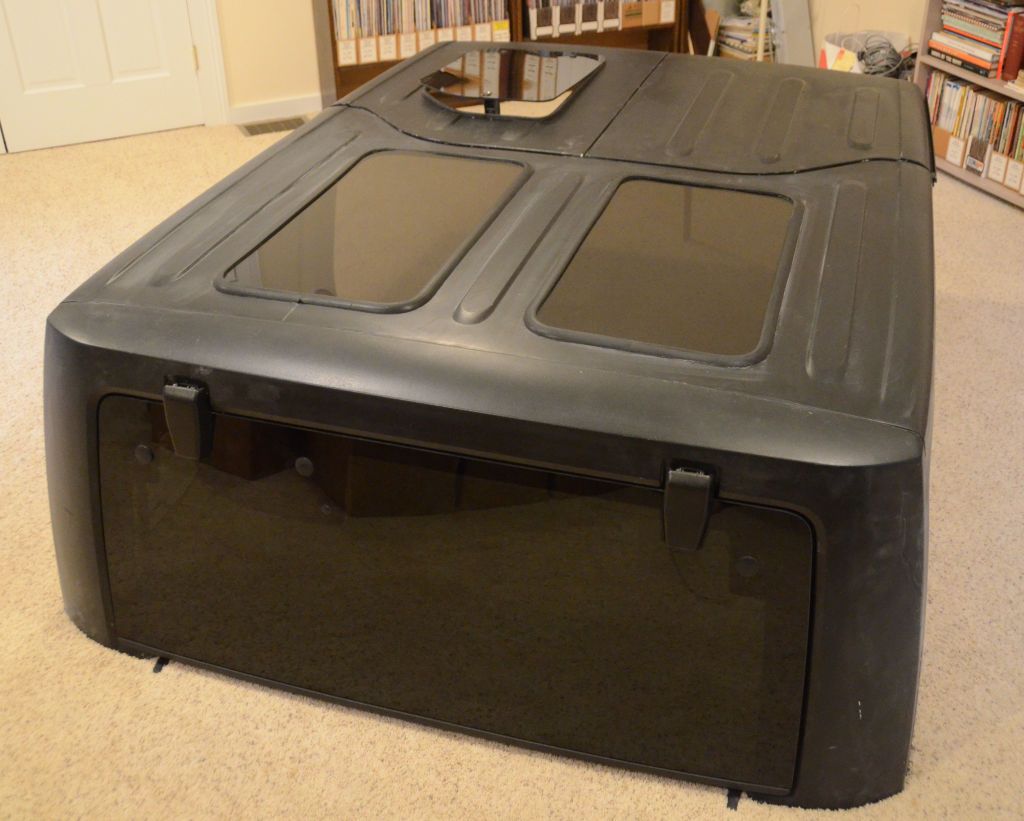
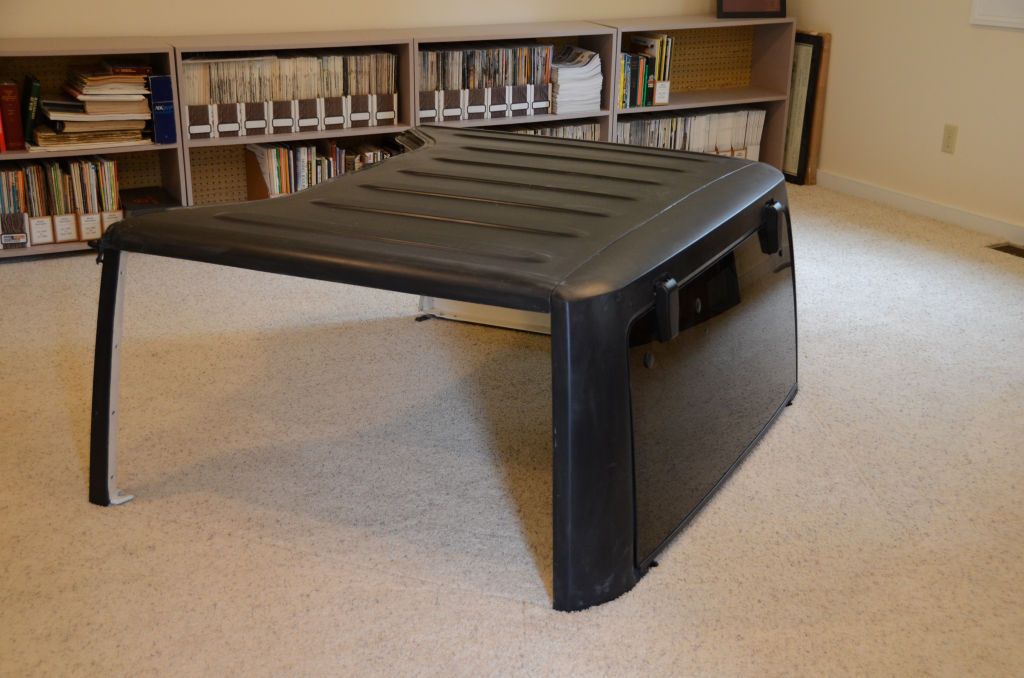
A view of the installed skylights from the inside, the hardtop has been converted to modular so this photo is just the roof panel:
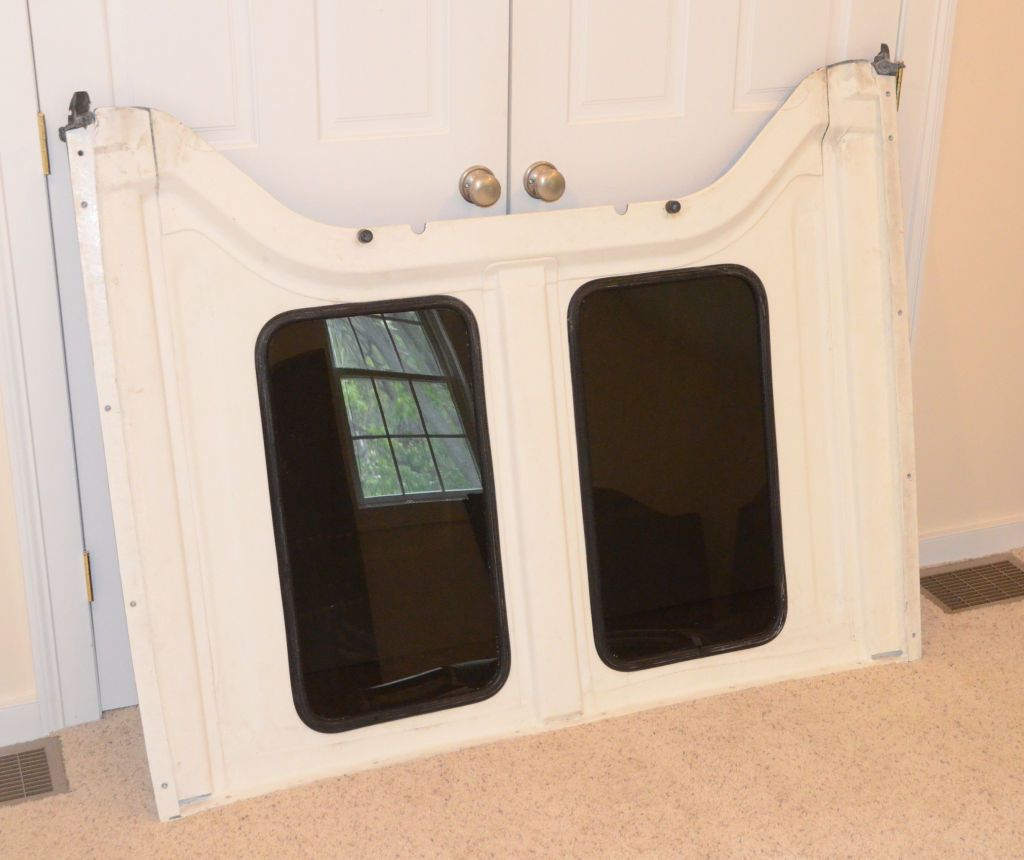
And outside:

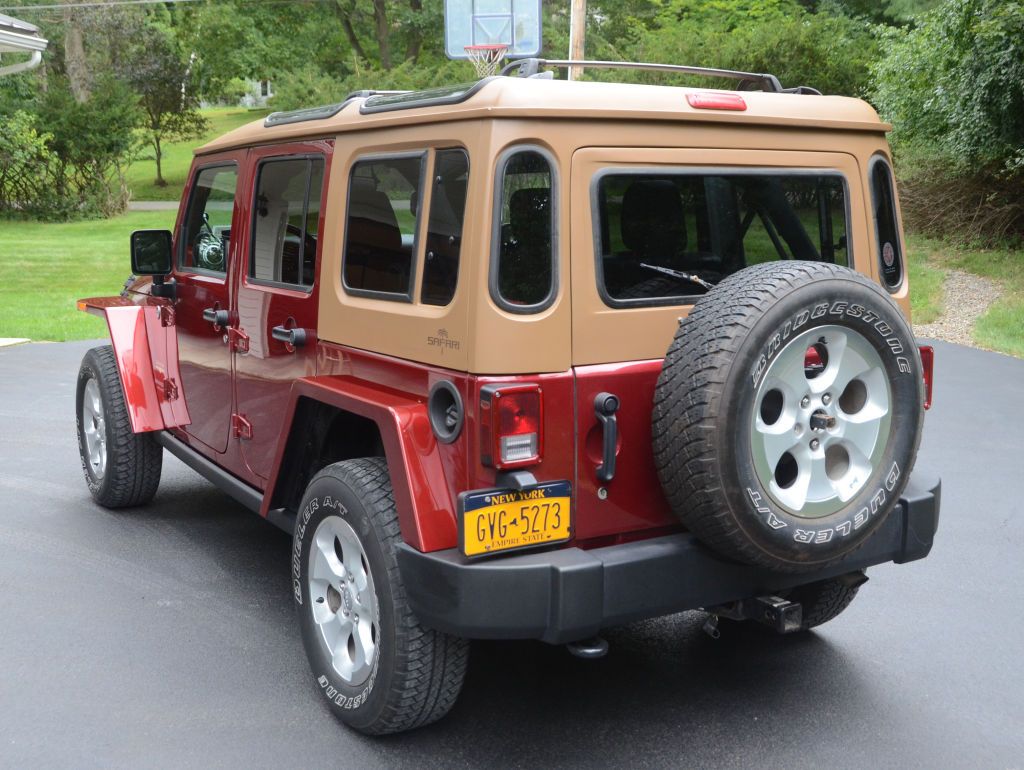
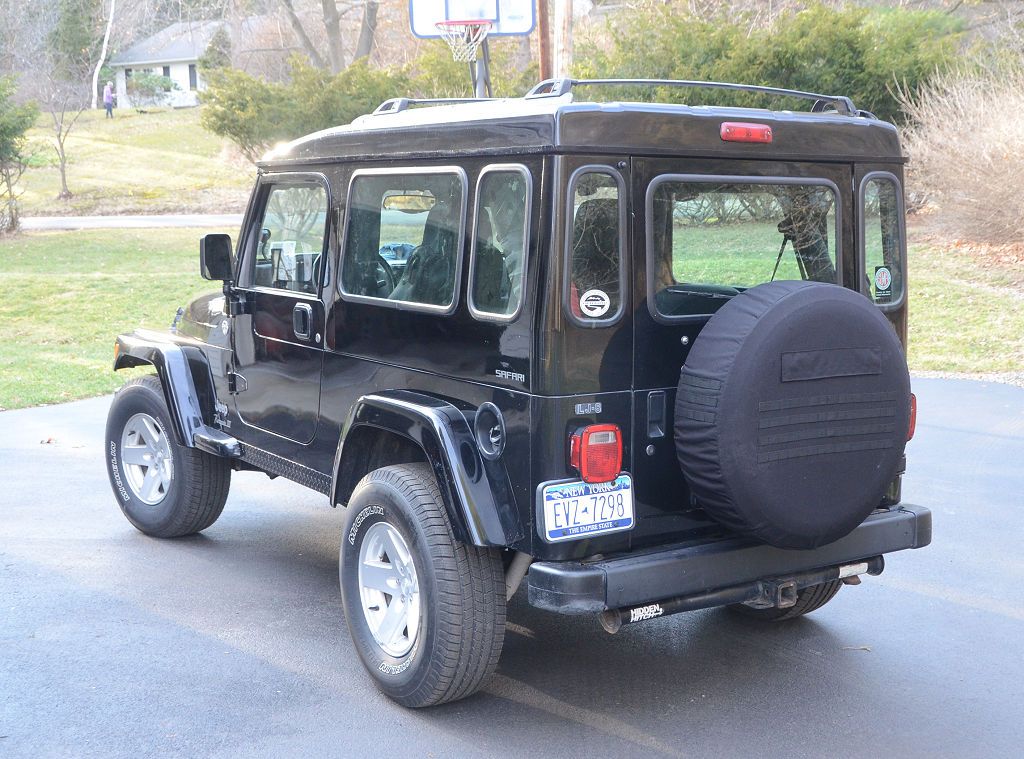
All of the above is also how I've done the windows in both of my Safari Cab hardtops. The windows in the JK Safari are tinted tempered glass, and the windows in the LJ Safari are laminated safety glass.
And outside:
All of the above is also how I've done the windows in both of my Safari Cab hardtops. The windows in the JK Safari are tinted tempered glass, and the windows in the LJ Safari are laminated safety glass.
jscherb
Expedition Leader
Retrofit Offroad posted this just now in another place so I'll repeat it here:
2 door Hardtop Slider kits are now available to order here -
Comanche Scott
Expedition Leader
Congratulations on another great marketed product! :beer:
jscherb
Expedition Leader
Congratulations on another great marketed product! :beer:
Thank you. The slider project was a lot of fun and a very interesting creative challenge - the problem was to find a way to fit an RV window that could be inexpensively produced with standard tooling into a window opening that's curved in both directions and has tighter radius corners than RV windows can be bent to and have the end result be affordable and attractive. I'm very happy with the functionality, ease of installation and aesthetics of the result and I hope Jeep owners find the product useful.
jscherb
Expedition Leader
Today's Craigslist find - a complete 2012 2dr soft top. Has tinted windows. In good shape except for a "mouse hole", apparently chewed by a rodent while it was off the Jeep in the seller's garage. Paid $25 for it, bought it mostly as "raw materials".
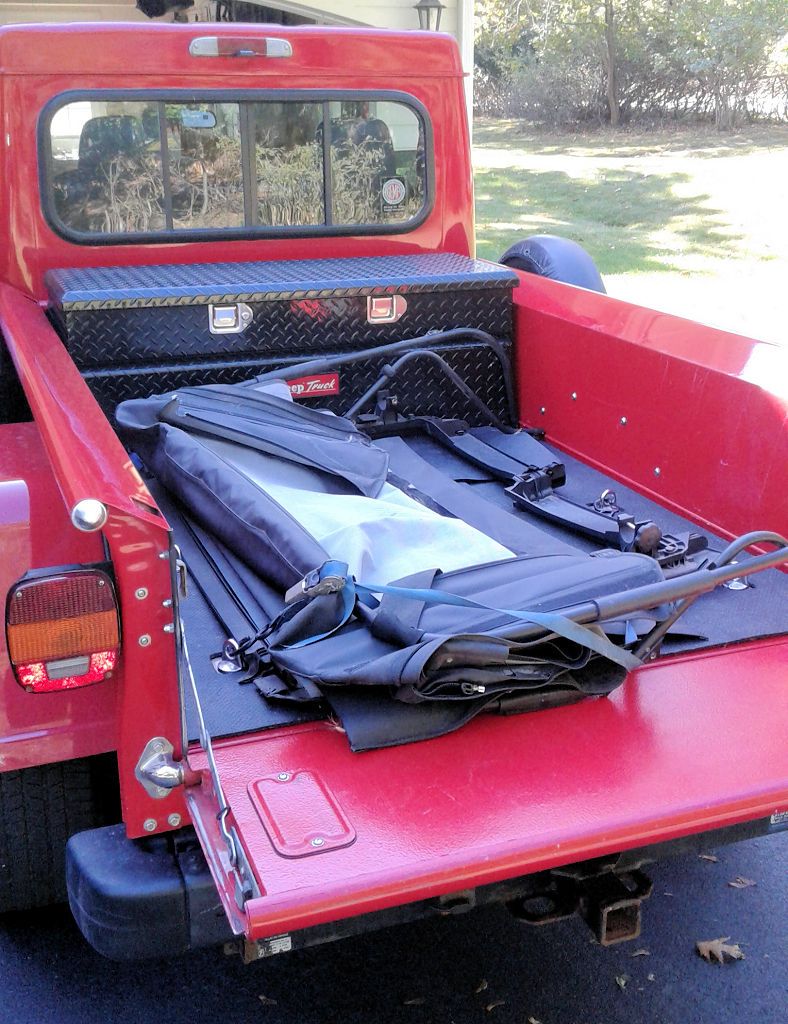
Not sure what I'll do with it, maybe I'll use the materials to make roll-up soft sides for the modular hardtop project...
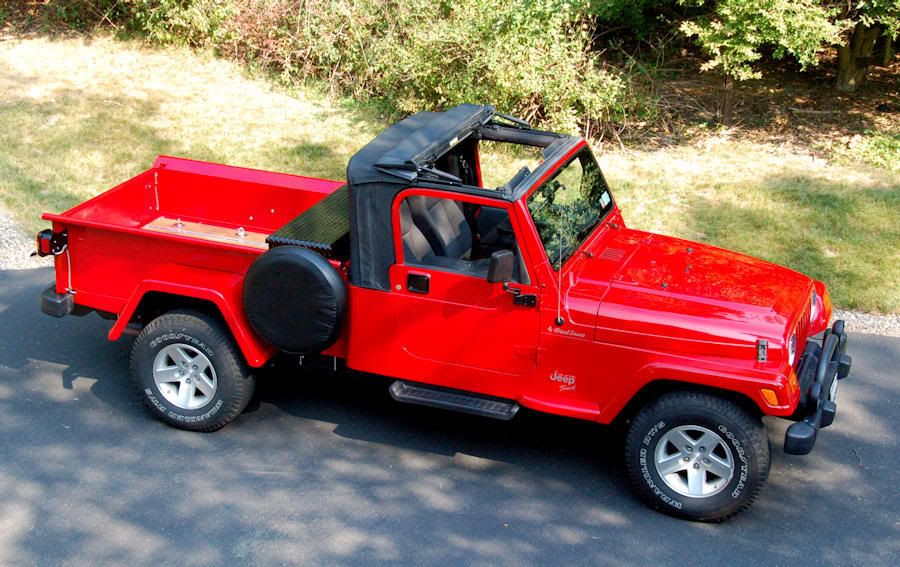
Or maybe I should use it to make a pickup cab soft top, I made one out of the factory LJ top when I converted that LJ to a pickup, I could modify the soft top to be a half cab...
For the time being though, I have to find a place to store it. These things are so dang awkward to store.
Not sure what I'll do with it, maybe I'll use the materials to make roll-up soft sides for the modular hardtop project...
Or maybe I should use it to make a pickup cab soft top, I made one out of the factory LJ top when I converted that LJ to a pickup, I could modify the soft top to be a half cab...
For the time being though, I have to find a place to store it. These things are so dang awkward to store.
Comanche Scott
Expedition Leader
Top bag & tote
Smittybilt has a real nice top bag, which will hold the whole top, plus a lot more.
It's almost three times the cost of your top, but it sure makes storing the top, and carrying around an easy thing.
https://smile.amazon.com/Smittybilt-596001-Soft-Storage-4-Door/dp/B004K25GMQ/ref=smi_www_rco2_go_smi_g2609328962?_encoding=UTF8&%2AVersion%2A=1&%2Aentries%2A=0&ie=UTF8
The only downside is, it's made in China.
That wrote, the one I received was very well crafted with quality stitching and material.
Of course someone with your technical prowess on a sewing machine could definitely duplicate this.
Hello Jeff, greetings from good ol' Germany. Following Your thread from the beginning, it encouraged me to think about an own conversion. Finally i am getting hands on a not too much damaged hardtop w/o windows for a small budget (150€).
Now the hard thing starts: what and how and why... ;-) I do want it all...
Just a few ideas which are in my mind:
- modularise the HT
- make roof with windows
- add the pillar and make it more convertible
- and on top get the barn door conversion done
- compose the conversion with a bestow sunrider for hardtop which i already own.
Maybe my skills with fibreglass aren't enough, so i might adopt some of Your ideas in aluminium and/or wood.
Thank You so much for the inspiration.
Keep on going Your ideas, they do influence my thinking about jeep conversion very much.
regards
Helmut
Forum statistics
Members online
- ToTheMoon
- fieldsy32
- Todd n Natalie
- fisher205
- Ronkoe
- Hopson
- Jpherbalist
- ROA-OFFROAD
- Jackem
- Fenderfour
- 1HaytchZed
- Long Rifle
- Jabroni
- matttahoe53
- Skinhyfish
- mangymarmot
- DickM
- dragonbyu
- velonut
- 84-4runner
- OVRLND
- marvjmoto
- YukonMontanaTannerTrapper
- Hegear
- jtolle777
- LuckyHenriksen
- Alwaysstranded
- motosickle
- SkiWill
- ben4244
- LordExplorer
- Somecallmetimm
- ExPo4Runner
- Scooooooooop
- Roambler
- JaSAn
- lugueto
- mark5280
- extremer
- kmacafee
- JohnIndenver
- RealTruck
- nwoodworth1390
- Dweller Feller
- S_Whit
- Dosamigos
- Leftcoast
- BajaRunner
- HardRockJeepTn
- highwest
Total: 558 (members: 56, guests: 502)