Small Off-Road Build

rodrage

Adventurer
Like many, I couldn't find the trailer I wanted here in the States. I spent some time in Australia years back and off-road trailers were common place. To get what I want, I would have to import the right unit and that is cost-prohibitive for my budget. Decided I would just have to find the time and build my own. I'm very computer illiterate, so the picture thing is a bit daunting. Also, I'm pretty thick skinned, so if you have any suggestions, I will welcome them- however, I've camped in many trailers and pretty much know what I want.

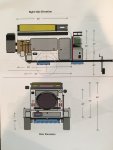
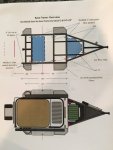
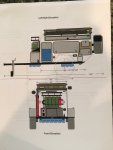
To start- I will post some bad excel drawing once I get them loaded, but many of the parts, I've already collected. The drawings will give a better idea of my goal. Getting the welding work finished is a huge hurdle, as I have a 4 year old who wants to help with everything I do, and welding doesn't need to be one of them.

The Timbren axles came in a while back and before I could weld up the base, and my shoulder finally gave out in need of surgery. Picked up the steel for the trailer base, and my welder started to give me issues. SO you know- Murphy (of Murphy's Law) is my guardian angel. He follows me everywhere. Steel Sticks.jpg

More Soon,
Rod
 
Last edited:

rodrage

Adventurer
Lay out (home version)

I used to have a good steel layout deck in a shop, but most of what I do now is at home. The best way I found to make a foot print before a build is to actually lay a "footprint" in tape on a level floor to size up your project. Here, I've taped down the pattern of the original frame and once I had a good idea of the accessories I wanted on it, a modified the tape and used the pattern to template my weld. After you're done, you can pull up the tape and scrub any weld burns from the floor. I've found that shims help with uneven floors, but I always check and recheck measurements before and after tacking.
IMG_0127.jpgIMG_4518.jpgIMG_4520.jpg
 

rodrage

Adventurer
Drawings/Plans Want list

Thought it might be in my best interest to make a drawing(s) of what I wanted. I wish I had some CAD knowledge, but that dream has passed. I put a few lines in MS Excel and this is what I came up with. I wanted it long enough that I could add a trail bike or small 4 wheeler in the front if I wanted to build a ramp or mount. I wanted enough hatches to make packing modular. I wanted a quick deployed unit with very little prep work for a weekend trip. I really wanted something small with lots of cargo area to fit n a corner of the garage and match my budget so an RTT set-up was best for my personal needs. Please forgive the crude drawings:
 

Attachments

  • IMG_5546.jpg
    IMG_5546.jpg
    509 KB · Views: 347
  • IMG_5547.jpg
    IMG_5547.jpg
    523.2 KB · Views: 347
  • IMG_5548.jpg
    IMG_5548.jpg
    502.6 KB · Views: 313
Last edited:

rodrage

Adventurer
Before shoulder surgery, I was told that I had no options in moving anything heavy, so I thought that I could work on the lighter things for the build. WOOD. One piece of wood is light, several together with hardware is a much different story. I've never been of much use to wood. The only saving grace for the little "talent" I have in the area is filler and paint. Unfortunately, I really wanted a natural look to the kitchen and pantry area. Knowing the environments I find myself in when camping, I needed to find some marine grade plywood. This is easier said-than-done if you're not on the coast.
The plan was a drawer-type pull out cook top/sink unit from the rear hatch of the trailer, and a mounted pantry on the interior of the rear hatch door. I believe that work surface is critical in camp, so I wanted as much counter as possible. Needs.want list included: Propane stove, draining sink, knife block, secure crockery, paper towel dispenser- AND lots of counter space. I sourced most of the parts before the build so I use space to its full potential. The pull out ended up as a folding box a had storage in the upper fold for the small table top that clips to the sing counter for added counter space. I added a cover over the stove in case load-out after a cook was quick (rain) and had no time to clean up. I ended up putting the crockery in the pantry (afterthought) and had to cut some foam to hold it in place, but the space was utilized better and I'm better with the outcome. Eventually, the pull out will end up in a timber box within the trailer, that also houses a shelf/drawers that hold cookware and dry food above the pull out kitchen. Although the trailer will be somewhat subdued, the counters were covered in Hazard Orange Formica. Again, I'm really bad with wood, and marine plywood is harder to work with than most anything else (routing, splitting, smoothness, etc.). Here are some of the end results.
FullSizeRender (9).jpg
FullSizeRender (10).jpg
FullSizeRender (11).jpg
FullSizeRender (12).jpg
FullSizeRender (6).jpg
FullSizeRender (5).jpg
FullSizeRender (13).jpg
FullSizeRender (7).jpg
 
Last edited:

rodrage

Adventurer
Trailer frame all welded up. I used 1/4" 2x3" tubing for the unit. I believe in overkill-so the thing is VERY heavy. I wanted enough room for big water tanks and the Timbren axle-less spindles need a good torsion rigid built chassis. Several more additions will be added to the frame once I get it back on the ground and the cargo box frame set.
Finished BaseFrame.JPG
 

rodrage

Adventurer
I laid out the tape template for the trailer box sides. I'm using 11ga., 1" steel. Not sure if it will be strong enough not to flex with the tent up top, but I have a box of gussets that have been sitting on my bench for years, to try to make it a little more rigid. Got the steel cut and cleaned for both sides and got out the welder. Gloves and helmet on and - NO gas in the tank. Funny- I always trade my argon when it gets down to @25%.... Either way, I feel like I got SOMETHING done (which has been rare lately).
IMG_5524.jpg
IMG_5520.jpg
IMG_5521.jpg
IMG_5522.jpg
IMG_5523.jpg
 

Mushin_Noshin

Adventurer
Definitely following this build, looks like it's gonna be sweet.
Some advise, and I'm no pro so take it for what it's worth....your frame is beefy which is good, but if I were you I would gusset the frame, circled in yellow below, and run the tongue , in blue below to the second crossmember. It will be alot of weight on those 2 connection points, in yellow, alot of stress applied that I personally would not be happy with, no matter how great the welds are.
Just my 2 cents, would hate to see all the hard work put into it, just to have an issue later.
e067d98cee793ba7573e906dbb780e54.jpg


Sent from my SM-G920V using Tapatalk
 

rodrage

Adventurer
Thanks Mushin, the gussets and the sub supports to the rear pending the tanks and some other gear. The "tongue V"
will also be sandwiched in steels plate before it goes to powder-coating.

-Rod
 

rodrage

Adventurer
Switch went bad in the MIG gun last week. Ordered new assembly and working better than ever. Murphy made another visit after I stared to get my rhythm back and ran out of wire. All said and done, I got the thing started and made some progress on the box today....
IMG_5595.jpg
IMG_5596.jpg
 

rodrage

Adventurer
Put the cage together to get it off the floor to roll around. (Space is getting very limited in the garage). If I can make it roll, its much less stress on me. Took an hour to square the box by myself before I started tacking. If you take the time to perfectly square the unit in the beginning, it will keep you from lengthy problems later.
IMG_5615.jpg
IMG_5616.jpg
IMG_5617.jpg
 

Sb_Moto

Adventurer
Looks good!

Quick question.. I assume your floor is like mine and not perfectly flat. How did you keep it level and square?
 

rodrage

Adventurer
The center of the 3 bays in the garage is pretty flat. I poured it myself when I built the house and had to run it almost 4 feet under the lift. It's close but still had 2 pieces of wood shim and a couple of carpenter levels before I tacked it.
 

rodrage

Adventurer
Another good idea is NOT to rely on the welder's corner magnets (especially the cheap ones). They tend to slide and they will separate if you drop one. Use good clamps and a large carpenter square -18" or more if you have one. Pick up a couple of cheap ones at Harbor Freight for $2 when they're on sale. Use GOOD levels- longer the better. Keep checking corners.
I built the box sides first so I could square them out separately. Even so, one of my lower angles is off because impending rain got me in a hurry and it was smooth and strong before I realized it. It's hard to cut on it for 1/4", but I'll always know it's there if I don't fix it now. Still, it was better to get the two long sides true before adding the width. Many more have much more talent than me and can probably give a better guide to build the box, but this was best for me and my limitations.
 

SamM

Adventurer
rodrage,
Great build! Your design is one of the best that I have seen. I like it a lot and will be watching it closely.

SamM
 

Forum statistics

Threads
185,795
Messages
2,878,257
Members
225,352
Latest member
ritabooke
Top