You are using an out of date browser. It may not display this or other websites correctly.
You should upgrade or use an alternative browser.
You should upgrade or use an alternative browser.
Bed rack fabrication for RTT -- 06 Dodge Ram 3500
- Thread starter Scoutman
- Start date


Scoutman
Explorer
Lately I've been giving some thought to enclosing this structure. I'm really falling for the aluminum canopies like AluCab (and other AUS companies) make but the availability of a unit for a long bed truck is about nil. There are some US aluminum contractor canopies available but I'd like something that didn't look/feel like a 'contractor's truck'. Enclosing the cage would mean more protection from the elements and added security. It also means that there would be less operating out of boxes with lids all the time.
I've also given some thought to selling this tent and going to a hard shell but this means the kids/dog would have to go to a ground tent. In some ways that would be easier.
We'll see.
I've also given some thought to selling this tent and going to a hard shell but this means the kids/dog would have to go to a ground tent. In some ways that would be easier.
We'll see.
Explorerinil
Observer
Nice truck! Your set up looks perfect! Looks like you had a good time camping!
Kingsize24
Well-known member
IMO your setup is simple and well thought out. I see the desire to enclose for more protection, but everything else looks perfect.
Maybe a simple soft topper would fit the bill, and work with your existing setup?

Maybe a simple soft topper would fit the bill, and work with your existing setup?
Scoutman
Explorer
Nice truck! Your set up looks perfect! Looks like you had a good time camping!
Thanks. Like everyone else, we get out when we can, as much as we can. Even on weekends where it's planned to rain, just getting out and away is better than sitting at home.
Scoutman
Explorer
Phase 2 of the electrical system has been in work over the past few weeks. It consists of a Group 31 AGM Deep Cycle battery mounted on the inside frame rail in a custom fabricated battery tray. It will lay on its side with terminals safely pointing inward. Feeding the battery from the truck charging system is a Blue Sea ML-ACR smart relay with manual over ride switch on the dash. 2/0 cables will feed all the primary lines.
Tied into the relay is a Victron 10A AC/DC charger for when we're in shaded campgrounds and have access to shore power or post camping trip to top things back to 100% SOC. If I want to primarily charge the aux battery then I would manually disconnect the ACR with the switch but if in auto or connected mode it would charge all batteries.
To monitor this auxiliary battery I have a Victron BMV-712 battery monitor. It has a 2" round readout in the dash so I can have at-a-glance knowledge of what's going in or out of the aux battery, voltage, SOC, etc. The shunt will be mounted under the hood but will be in a weather resistant enclosure.
All of the Victron products are Bluetooth enabled to work with the VictronConnect app and will all be compatible with phase 3 which would be solar using a Victron MPPT controller and a 100w panel. Phase 3 only comes if it's needed and that will be determined by how often the SOC gets back to 100% by daily driving and during weekend trips.
The aux battery will be feeding a Blue Sea 12 circuit fuse panel with ground buss which will branch out power for...
-fridge
-bed rack main power
-usb plugs in the cab
-cb in the cab
-other circuits as needed
The power inverter that has been under my drivers seat for a long time will remain but will get a proper circuit breaker instead of the fuse I've had. Since I was re-doing all the battery connections it was a good time to clean things up a bit there.
Another side project is I mounted a second Ram mount ball to the dash for a ham radio mount and just general wiring and dash cleanup. Over the years things had gotten a bit cluttered and it was beginning to bug me.
Pictures coming soon.
Scoutman
Explorer
IMO your setup is simple and well thought out. I see the desire to enclose for more protection, but everything else looks perfect.
Maybe a simple soft topper would fit the bill, and work with your existing setup?
Thank you. I had considered a soft top at one point but while it would provide some weather protection it wouldn't offer any real security. I've decided to just leave it be for the time being. We have a pretty good system of water resistant lockable bins that would keep most folks honest. We are constantly culling things that we don't use or find kit that fits better or just works better with our setup. It's pretty dialed in but it never hurts to think of other options.
jgaz
Adventurer
I’d be interested in where you’ve got the Ram ball mounted if you get a chance to post a picturePhase 2 of the electrical system has been in work over the past few weeks. It consists of a Group 31 AGM Deep Cycle battery mounted on the inside frame rail in a custom fabricated battery tray. It will lay on its side with terminals safely pointing inward. Feeding the battery from the truck charging system is a Blue Sea ML-ACR smart relay with manual over ride switch on the dash. 2/0 cables will feed all the primary lines.
Tied into the relay is a Victron 10A AC/DC charger for when we're in shaded campgrounds and have access to shore power or post camping trip to top things back to 100% SOC. If I want to primarily charge the aux battery then I would manually disconnect the ACR with the switch but if in auto or connected mode it would charge all batteries.
To monitor this auxiliary battery I have a Victron BMV-712 battery monitor. It has a 2" round readout in the dash so I can have at-a-glance knowledge of what's going in or out of the aux battery, voltage, SOC, etc. The shunt will be mounted under the hood but will be in a weather resistant enclosure.
All of the Victron products are Bluetooth enabled to work with the VictronConnect app and will all be compatible with phase 3 which would be solar using a Victron MPPT controller and a 100w panel. Phase 3 only comes if it's needed and that will be determined by how often the SOC gets back to 100% by daily driving and during weekend trips.
The aux battery will be feeding a Blue Sea 12 circuit fuse panel with ground buss which will branch out power for...
-fridge
-bed rack main power
-usb plugs in the cab
-cb in the cab
-other circuits as needed
The power inverter that has been under my drivers seat for a long time will remain but will get a proper circuit breaker instead of the fuse I've had. Since I was re-doing all the battery connections it was a good time to clean things up a bit there.
Another side project is I mounted a second Ram mount ball to the dash for a ham radio mount and just general wiring and dash cleanup. Over the years things had gotten a bit cluttered and it was beginning to bug me.
Pictures coming soon.
Boz
Observer
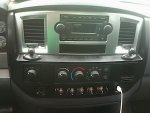
I’d be interested in where you’ve got the Ram ball mounted if you get a chance to post a picture
This is where I have mine in my 06 Ram. Sorry for the horrible picture quality.
Attachments
Scoutman
Explorer
Here are the 2 ram bases. They have a rectangular base that is 1.5"x3" which fits on that ledge pretty well. I had to get creative on hardware placement though. I chose these because I figured the larger surface area and additional hardware would make them more stable. They're in line with the dead space between the vent and radio so I can still see and operate the radio but still have air. The left mount gets an 3" arm and an X grip for my phone with a 6" cable going down to that 4.8A Blue Sea USB port. The right mount I'm trying out having my ham radio mounted with a 2" arm and a 1/4" threaded ball into a mount that a portal member makesI’d be interested in where you’ve got the Ram ball mounted if you get a chance to post a picture
This is where I have mine in my 06 Ram. Sorry for the horrible picture quality.


Sent from my XT1585 using Tapatalk
Last edited:

Scoutman
Explorer
Thanks for the mounting ideas.
Nice job on the battery tray!
Thanks. I'm slowly working through a mount for the fuse panel and circuit breaker. This weekend ended up being spent on overhauling the yard drainage at home so hopefully back on this project soon.
Scoutman
Explorer
I got some work done on the battery tray this weekend. Drilled 4 holes in the frame and installed 3/8" rivnuts. I also cleaned things up with a sanding disc and wire wheel then applied 2 coats of self etching primer and 2 coats of paint.
Getting closer to having power again. Still need to decide where to mount the shunt.


Sent from my XT1585 using Tapatalk
Getting closer to having power again. Still need to decide where to mount the shunt.


Sent from my XT1585 using Tapatalk
Last edited:
Scoutman
Explorer
Got a lot done this weekend and am starting to see the end of this project.
-Battery tray painted, mounted, and battery secured.
-I found a suitable place for the shunt that is out of the weather and way under the back seat.
-I pulled out most of the drivers side interior to run cables.
-Ran new power lines for everyone in the truck to have high current usb ports for charging devices
-Ran the comms cable for the battery monitor from shunt to display
-General cleaning up of wiring
-Clean the interior in all the hard to get to places
-Wired up the ml-acr control switch.
This evening is head to a buddy's house to make up the 2/0 cables so I can finish this project up this weekend.


Sent from my XT1585 using Tapatalk
Forum statistics
Members online
- Channelmarker
- VJ95
- yfarm
- Cascadia
- tmacc
- pugslyyy
- Tharnacle
- No Ma
- dpspc9
- TouringSedan
- tkiesling
- Cayenne-958-TDI
- enve77
- Parks
- LivinAnAdvntr
- terrymo
- Rileydaily
- 4x4runner2002
- Jpfan
- Iain_U1250
- Loober
- Kingsize24
- BajaSurfRig
- Bigc3031
- flydream
- Ozarkrambler
- Banzai Jimmy
- LordExplorer
- In The Dog House
- Dosruedas
- austastar
- DieselDaddy
- mike5
- rparker017
- kwhitham
- Ole Chipper
- MCrockett
- rdrop
- Dougnuts
- mark5280
- Rockymountainhunter
- wparkinson97
Total: 709 (members: 47, guests: 662)