You are using an out of date browser. It may not display this or other websites correctly.
You should upgrade or use an alternative browser.
You should upgrade or use an alternative browser.
I got here as fast as I could - '04 Suburban Z71
- Thread starter tbisaacs
- Start date


Martinjmpr
Wiffleball Batter
Spent the whole day loading, arranging, and loading again.
Heading to the Olympic NP. See you in a few days

.
We have that exact same table. It's amazing how convenient it can be to have a simple folding table like that. And it takes up very little room when folded since you can put it on the floor and stack stuff on top of it. Being a $40 wal mart special it's not "expo" but hey, it works! :sombrero:
.
.
Well, I know where the dog's sleeping. How about you?

tbisaacs
Adventurer
Spent the weekend up on WA NF-2530 under the shadow of Mount Jupiter:


The purpose of the trip was do a shakedown run before dragging out my wife and daughters. I had a blast and learned many lessons for next time:
1. The hitch is ridiculously low. I had to cross many road washouts that articulated the suburban to the max at both ends. I smacked the hitch hard 3 or 4 times to the point of relocating the wiring puck. Despite that, I really don't feel the pressure to do any sort of lift/leveling right now. I drive on the highway 99% of the time.
2. My 33" cooper AT3s + Bilstein 5100s are so great offload. I did notice at full compression (I mean, stuffed), the inside of the coopers rubbed the wheel liners.

3. My Goal Zero Yeti + ARB 50L fridge are a great combo. The fridge barely made a dent in the Yeti on the first day. Happily powered all of day 2, and was down to 20% by day 3. Noted that these are "ideal" conditions (read: cold outside). I plan on augmenting this set up with a 100w Renology panel on my roof this summer.
4. I've read about it happening and didn't think it would to me—I kicked the ARB plug out of the socket when I was rummaging around in the back. I lost all of the cold food. Lucky it was that last day. Lesson learned: Check the fridge before bed, and have some icepacks inside just in case.
5. All the work to convert to LED was worth it.

The purpose of the trip was do a shakedown run before dragging out my wife and daughters. I had a blast and learned many lessons for next time:
1. The hitch is ridiculously low. I had to cross many road washouts that articulated the suburban to the max at both ends. I smacked the hitch hard 3 or 4 times to the point of relocating the wiring puck. Despite that, I really don't feel the pressure to do any sort of lift/leveling right now. I drive on the highway 99% of the time.
2. My 33" cooper AT3s + Bilstein 5100s are so great offload. I did notice at full compression (I mean, stuffed), the inside of the coopers rubbed the wheel liners.
3. My Goal Zero Yeti + ARB 50L fridge are a great combo. The fridge barely made a dent in the Yeti on the first day. Happily powered all of day 2, and was down to 20% by day 3. Noted that these are "ideal" conditions (read: cold outside). I plan on augmenting this set up with a 100w Renology panel on my roof this summer.
4. I've read about it happening and didn't think it would to me—I kicked the ARB plug out of the socket when I was rummaging around in the back. I lost all of the cold food. Lucky it was that last day. Lesson learned: Check the fridge before bed, and have some icepacks inside just in case.
5. All the work to convert to LED was worth it.
Last edited:
rayra
Expedition Leader
Cool pix, especially the lighting.
I just had my front end all apart last week, replacing most of my steering components, and also dismounted and lubed my sway bar along the way and looking at your pics again I think you might have your sway bar bushings backwards. Not sure if it really matters, they're trapped in by the brackets, but if I understand it correctly much of the force of the sway bar - besides the rotation - is pushing the sway bar in the direction where you've placed the gap in the bushing. It might be better to flip them the other way. But I don't have any definitive documentation / link for that.
I also haven't yet done the hatch latch investigation yet. I've been waiting on some LED strip lighting that was initially due on the 6th. I was going to do all the messing around with the hatch at the same time. And have been busy with the aforementioned steering / suspension / alignment and a front brake upgrade kit install. But I'm still intending to find a solution for unlatching the glass and entire hatch from inside and I intend to find an e-brake handle / mount from some model of vehicle which can be fitted into the interior trim like factory equipment.
tbisaacs
Adventurer
Cool pix, especially the lighting.
I just had my front end all apart last week, replacing most of my steering components, and also dismounted and lubed my sway bar along the way and looking at your pics again I think you might have your sway bar bushings backwards. Not sure if it really matters, they're trapped in by the brackets, but if I understand it correctly much of the force of the sway bar - besides the rotation - is pushing the sway bar in the direction where you've placed the gap in the bushing. It might be better to flip them the other way. But I don't have any definitive documentation / link for that.
Let me know if you find anything definitive. I double checked "before" pictures on my phone and the stock links were bolt-side down. I remember thinking about this when putting the moogs in because the bolts are longer. If I would have put bolt-side up—I think they'd interfere with the UCA.
tbisaacs
Adventurer
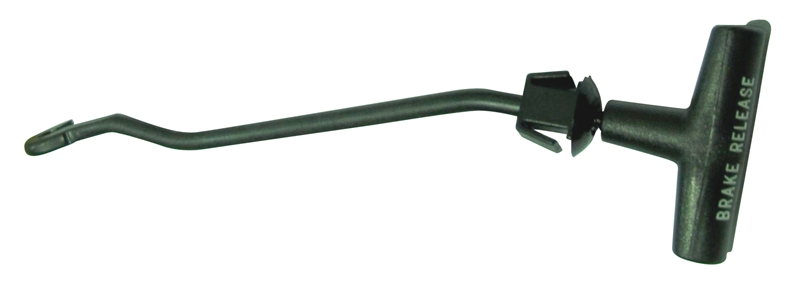
Also, rayra—pretty sure I'll once again follow your advice. I think I might ditch my hitch.
rayra
Expedition Leader
I'm referring to the saddle brackets that hold the sway bar to the frame, not the end links, flipping the bushings in them so the gap / openings are towards the rear of the vehicle. But again it probably doesn't matter.
The end links, I found my factory links with the bolt heads to the bottom so put the new ones together that way. It also made it easy to use an impact gun to drive things together. Can't do that if the bolt head is up. And also the upper control arm is in the way for using a ratchet / deep socket, too.
Cool on the hitch. Just take your time cutting the hole in the bumper. And a lot of tape to protect the finish around the area. Then all you have to do is dress the cut edges.
I also haven't yet done the hatch latch investigation yet. I've been waiting on some LED strip lighting that was initially due on the 6th. I was going to do all the messing around with the hatch at the same time. And have been busy with the aforementioned steering / suspension / alignment and a front brake upgrade kit install. But I'm still intending to find a solution for unlatching the glass and entire hatch from inside and I intend to find an e-brake handle / mount from some model of vehicle which can be fitted into the interior trim like factory equipment.
Lat year, I took a look at this and did it. I don't have pictures of the internals, but for the door latch I simply tied a string around one of the cables and drilled a small hole. You simply pull to the drives side and it undoes the latch if the truck is unlocked. For the window, same thing, just pull up. I got some nice handles to install, but didn't have time to install them before my Yellowstone trip last year, and the strings worked so well on the trip, I just never installed the handles. Figured, better to do as little cutting as possible....


https://www.amazon.com/Recliner-Rep...rd_wg=DOhZ1&psc=1&refRID=P1C5FWD74TV8FWKK7FVF
.
We have that exact same table. It's amazing how convenient it can be to have a simple folding table like that. And it takes up very little room when folded since you can put it on the floor and stack stuff on top of it. Being a $40 wal mart special it's not "expo" but hey, it works! :sombrero:
.
.
Well, I know where the dog's sleeping. How about you?
Walmart is 100% expo in my books! ha ha....my.......almost everything comes from Walmart. ha ha! There or Canadian Tire!
rayra
Expedition Leader
Rear glass and Liftgate interior latch releases, Mk1
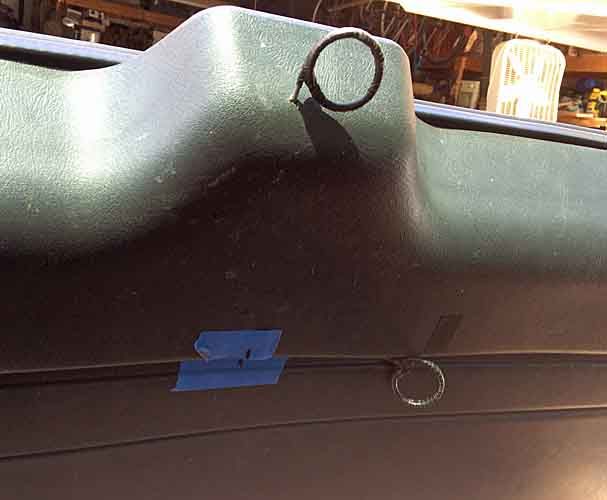
Used thicker / stiff wire coat hanger, interior end looped and crimped on suitable parts of the latch mechanism linkages. Pull up on the ring by the glass to release the glass. Pull horizontally towards the driver side to release the entire hatch.
I clamped the other end of the wire (deliberately left long) to the end of a dowel and twisted / wrapped the wire around the dowel, then taped up the resulting wire loops. I intend to find some sort of ready made pull ring molded on to a wire or cable.
Only vehicle modification was a 1/8" hole drilled in the trim plastic, where the top wire passes thru. It MIGHT be possible to use a thicker stiffer metal rod with some intricate bending and make a version of this that passes around the trim and still stands off from the glass.
The Liftgate release wire just passes thru an existing seam between the upper and lower halves of the interior trim plastic. There's a sort of shiplap overlap between the pieces, the wire is between them. It might work better if the underlying piece is trimmed back some. Then again if there's clearance the wire would probably rattle going down the road.
And the height of the middle seam works very well with my drawer platform, it falls about 1-1/2" above it. Immediately to head / hand if sleeping in the back.
I have more pictures of the interior latch mechanisms and attachment points, to follow later.
I'd rather have a more finished and fitted latch mechanism a la a dash-mounted emergency brake release handle. But this works well enough for now.
I might pull the wires tonight and dip the rings in red tool handle dip / liquid electrical tape, let them dry overnight. Or do something silly like stripe them black and yellow like ejection handles.
Forum statistics
Members online
- Cummins_expo
- luthj
- JdubyaConcepts
- Jpherbalist
- Stuartg1943
- Kspencer
- JamesReddish
- whomisi
- YukonMontanaTannerTrapper
- AlwaysEntropy
- FAV
- matttahoe53
- chaosinwest
- TKM101
- carleton
- Jabroni
- AI Shooter
- fisher205
- Willsfree
- Markal
- forty5thparallel
- ahab4000
- Mohopo3
- RVflyfish
- JCDriller
- webfoots
- greygizmo
- Bubblegoose1
- jp510
- ljb0904
- Skinhyfish
- bcats4life
- kmg65
- sunsetdragon
- rlava
- Oka 374
- 3Ospades
- dizzydom
- protohyp
- Wegettoadventure
- jjohnny350
- SDDiver5
- 4runnerteq
- neilsonwheels
- 79bj40
- Dans12
- TexasSixSeven
- sdwhip
Total: 922 (members: 53, guests: 869)