LR3 Sway Bar Bushings

GORM

Adventurer
I did both front and rear sway bar bushings this weekend. I had some suspension issues that somewhat cleared up after an alignment (see LR3 Suspension Help thread) but I still had other items to correct. Lots of knocks over bumps in the road and shimmying upon braking. I corrected most of my issues with the sway bar bushings replacement. The truck drives better than ever; I've owned for last 35k miles and it has 102k on it. Unknown whether this is the 2nd or 3rd set of bushings. I thought I would share some findings and stuff I've learned.

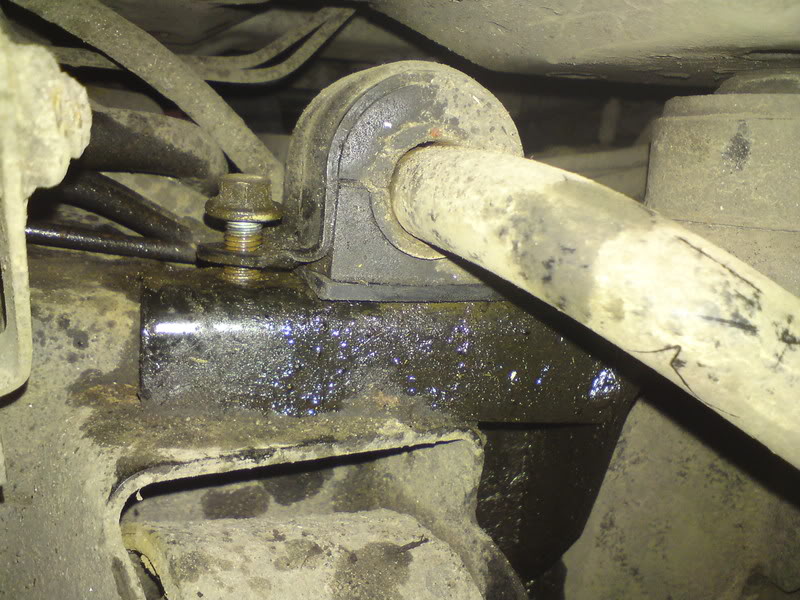
If your sway bar bushings look this this ... you have issues.


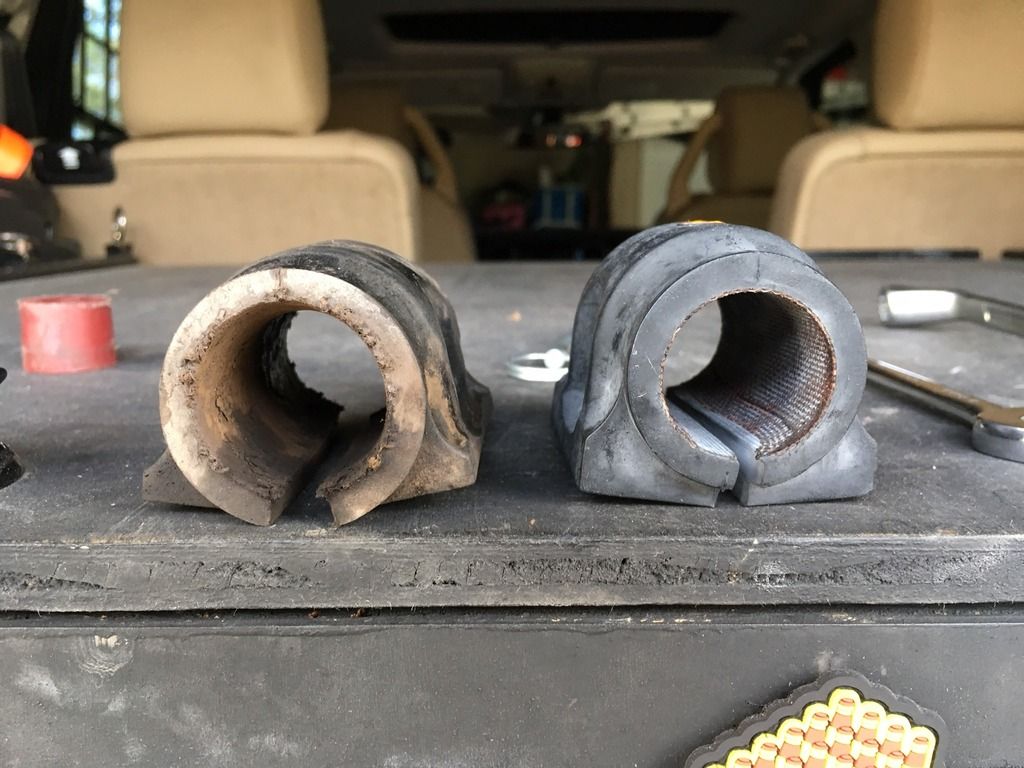
Here's what the fronts look like when removed next to new ones ... rears we're just as bad. Note the gap. The liquid was strong moly penetrant I used to prep bolts.


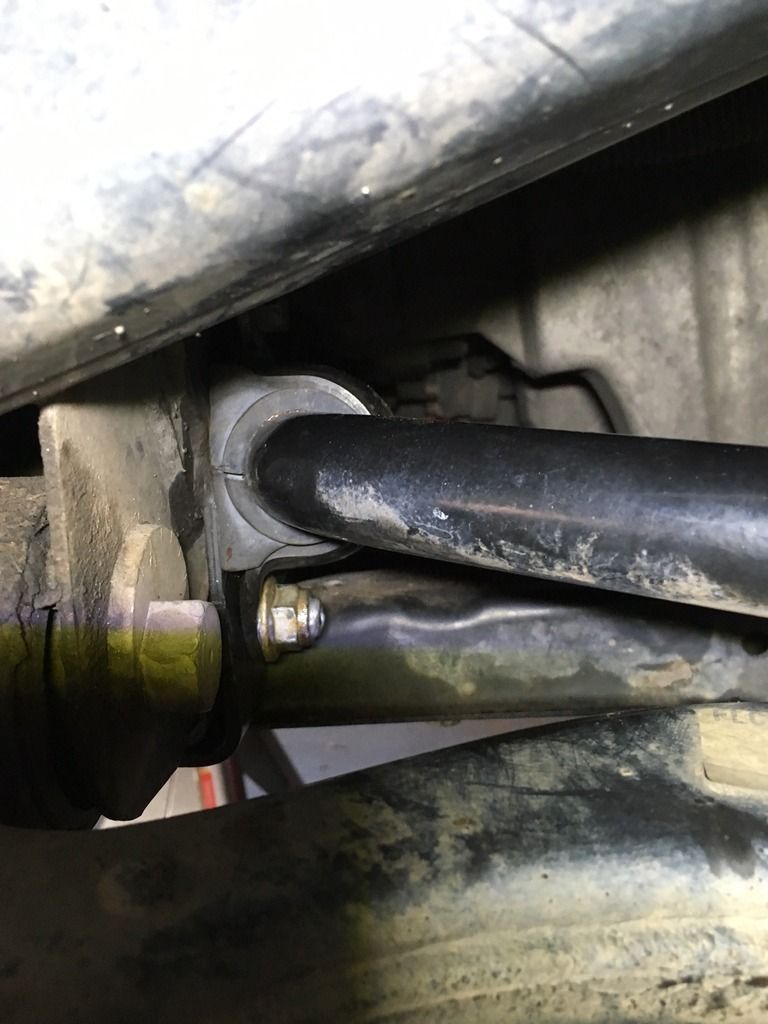
Here is what they look like once installed.


Will share tips on next post
 

ColoDisco

Explorer
I can say don't bother with the moog rears. Fine when warm, squeak when cold. Planning on swapping them out for OEM.
 

GORM

Adventurer
Findings continued ...

Btw: I used OEM "G" part numbers from Atlantic British

So you're going to need 13mm, 15mm, 18mm wrenches and your favorite prybar. You may be able to get by without a 13mm offset wrench (a Atlantic British video recommendation which I followed) but I'm not sure how you do this job without an 18mm offset wrench.

Rears: Each side is identical, 2 13mm head bolts on each side. I found that marking front and back on your bracket might help relineup bolts to the holes and moving the sway bar is easier than lining up the bracket.

Fronts: Passenger side was simple, 18mm nut on the bottom and an easy access 15mm nut on top. Now the driver side is another story. I think having a good 18mm offset wrench is a MUST have for the top bolt. I removed the skid plate to get better access but not 100% sure I needed to. I defitely scrapped up that top bolt even with an offset wrench. It was not a quality one so likely larger/thicker than a good one. I swapped top and bottom bolt to make it easier on me next time. Those might be nuts you just plan on replacing.

LR dealer wanted $450 estimate and I did for about $100 in parts. My research said no need to do alignment after this job. I think I could redo the job in 2.5 hours all-in with jacking up truck and removing wheels. It probably took me 5-6 hours including the jacking, wheels, etc.

This gave me some confidence to consider approaching control arm job when needed. As far as impact on my handing, this was a 10. Difficulty maybe a 5. I'd say I'm a novice though I have put a lift kit in a jeep and that took me 2 days.

Rover drives like a race car now ... :smiley_drive::smiley_drive::smiley_drive::smiley_drive::bike_rider:
 

RonaldoC

New member
So I just took off the driver read tire, then removed the bracket off the bushing, then spent two hours trying to get the bushing to budge. No joy at all. I had to reassemble it all back together so that I can make an appointment. Any suggestions to get a he bushing unstuck? Hammer drill? Sawzall?
 

nwoods

Expedition Leader
talking about this bushing? Once the bracket bolts are off, just tap it with a hammer and it should come out. Nothing holding it on other than stubbornness

dsc00802.jpg
 

DiscoDavis

Explorer
talking about this bushing? Once the bracket bolts are off, just tap it with a hammer and it should come out. Nothing holding it on other than stubbornness

dsc00802.jpg

Nope. Drivers side front. The one that the diff plate blocks. Back is, as you say easy.
 

DVD

Adventurer
I ran into that exact same problem for the front drivers side retaining nut. The left-side upper bolt for the arb bush collar is inaccessible. Well, I saw a forum post from one lucky person who had a ⅜ drive socket that fit next to the front diff arm. I tried 5 different ⅜-drive sockets. None fit. I read somebody who used a grinder to shave off the driver end of his socket - sort of a custom chamfer - to make it fit. Instead of this, I ended up following the other, surefire solution of removing a frame piece, removing the bolts that attach the front diff to the support arm (make sure to support the diff before removing), and then wedging the arm aside by a few mm in order to get a socket on a single nut for the arb bush. Three nuts were removed in 5 min, and I was thinking that this would be a quick job. Then that last stubborn one ends up taking a couple hours to remove one single stupid nut.
8velMomqKJrZw2IOynKafDWhHJMdAu7g051ZK7N1-DrniP-vMS0aGz_lkSLul36PRiJ5aCPK0Ia0yKJRMUUKDKYG-XaQVyPit2zOGt5e6SNouuGkBzecAG41pcIbKFUtbgEUeqtG2NhHiFZyRQceprMTExvVue6UmbfHyHPrH3oPJYkkkF6IKj4t7M6qy6eub9E4T3l74vI5qrd1EhgFt6jo12SGo7Cty_n_I0Xp5J6oryWfXbPAO6a9D93spekSxknOZPy-7wCdkcX1GEb4h5brqUCEjfaVx0qMXqeoyA8avdzIKpjn57jZLVGdam1uGySK0P5pi51DNCDosTIUjABc1NdmUqr_6WQUUEBPtLkXjSAFU-2lsL8DSmKS36n6ozbVyvEncztV1tVQGTt3lkI3Aih8cUpPZO6RP71xOZ_hdTsHC5tYCzJuJ0-fRI8h1m8NNP64keoeIyL5Nv6Y6M60PBzlmYGMrcpdHxG0YCbQWcP6-ZAzVAa-nBdNSx0z-bE-0t3gUjT93DsmYdS_dUs_rYMnshKGWZ4vTaaFFT_rE20PdRt7BC1apZhdeir3RiuI2z5xZr_OKAh21qWWzEia_vGKiLA99EM5Xyvi7dshcE8sEYyZ3Lb5UZCiF_kVhDYYtkeqUjDVHmnfpUJCajIBkbe5HcOB03jIPf7RBfM=w840-h630-no
 

RonaldoC

New member
talking about this bushing? Once the bracket bolts are off, just tap it with a hammer and it should come out. Nothing holding it on other than stubbornness


Yes! This is my nemises at the moment. It feels like it's wedged underneath the sway bar, should I try to pry the sway bar up a little?
 

Jwestpro

Explorer
Btw: I used OEM "G" part numbers from Atlantic British


Rover drives like a race car now ... :smiley_drive::smiley_drive::smiley_drive::smiley_drive::bike_rider:

I like the approach of doing this smaller item first to see how much it alone affects the handling feel. Then LCA and the sway bar links etc
 

RonaldoC

New member
Got the left rear sway bar bushings off, now I'm having a hell of a time getting the sway bar lifted up to get the new bushing back on. Any suggestions? I've got suspension set to high, should I put the tire back on and lower it?
 

RonaldoC

New member
I set it to normal, that sway bar still doesn't want to move easily. I can move it with crow bars, etc. But good Lord, I feel like I'm missing something really simple.
 
Got the left rear sway bar bushings off, now I'm having a hell of a time getting the sway bar lifted up to get the new bushing back on. Any suggestions? I've got suspension set to high, should I put the tire back on and lower it?

Nothing should be torqued or installed for final fit unless it's in the final drive position. FYI, the sway bars are under quite bit of load in the lifted position, hence why a few of us have broken sway bar links....hahaha.

On that note, I can't imagine it being that tight in normal. Have you tried to loosen everything up? Maybe you do have something out of whack?!?! The best way to do any sway bar (IMO only) is to tighten everything down in incriments. Loose in all areas, links, bushings, etc. and then slowly make your way around and tighten it up slowly. If its binding, you can blow a bushing or link out before you even get any miles on it. The links can go on and "I do not" torque the links all the way down until the weight is on the suspension.

I'm sure we all have our ways of doing it though!
 

Colin Hughes

Explorer
I've got a bit of shimmy sometimes when I brake. I'm going to look at these because the control arms are all nice and tight still.
 

Forum statistics

Threads
185,783
Messages
2,878,184
Members
225,329
Latest member
FranklinDufresne
Top