Building La Tortuga: 1983 Ford-Collins E350 4x4 ShortBus

KeyserSoSay

Adventurer
Thanks so much to all who've taken the time to post a kind word, especially coming from you all with such a great collective of super-rigs. I hope this truck, and my work on it, don't disappoint. Some of the broader strokes will have to be budgeted out and may take a while to get to, but I've got plans to fill the gaps with some smaller fun projects that may seem very much like I'm putting the cart before the horse.
'
For example, I've got to get rid of all that 1980's school bus mirror tubing apparati that make the front of the van look like a climbing gym for monkeys at the zoo. I was looking at some side mirrors off of a bus or kenworth, but they are just too expensive and don't fit my needs close enough. I'm working on building some custom break-away detent pivot hinges (that keep your mirrors locked in place, but allow the mirrors to fold in when you rub a tree) and custom mirror mounts. I've got lots of experience with fiberglass and carbon fiber, and plan to skin my mirror supports with a nice aestheticly flowing fiberglass form that will ultimately be raptor lined with the bus. Because of the bus door, the van also lends itself well to a passenger side intake snorkel I could build in the same fashion. These would be projects I'd want to get done before I coat this beast anyway, so the budget downtime works for me if I can stay on task with the piddly stuff.
'
Not to get ahead of myself, but just explaining in advance why I'm farting around with making and mounting mirrors and crap like that when there's so much more critical work to be done. Also, I'm looking for smaller projects I can pull and work on inside my shop - My house is on the side of a mountain and right now I lack even a close-to-level place to even park the truck. I dropped a roll of tape in my driveway the other day and it rolled 100 feet down and across the road, into the woods, never to be seen again. I've got a levelish spot that would work, but it will be a big project to get it prepared for the truck, so that's a few months out.
'
Sorry to ramble, feels like I should keep this thread updated, hard to do without something new to show.
 
Last edited:

tgreening

Expedition Leader
You know you've mentioned your mountain-side house a few times now, which just begs the pics of said mountain-side location so those of us so inclined can sigh and feel jealous. :)
 

KeyserSoSay

Adventurer
You know you've mentioned your mountain-side house a few times now, which just begs the pics of said mountain-side location so those of us so inclined can sigh and feel jealous. :)

I've been away on a hunting trip for the past several days- on that note, I'm much more sold on the idea of a snorkel intake for this van and my Tundra. It rained the entire time I was at my homestead and we had to ford the creek at 4 crossings to get out of the canyon- I had water rushing over the hood up onto the windshield.

Took a few pics of my driveway to explain my situation- It doesn't look that steep in the pics, but it's no place to work on a vehicle. I'm gonna relocate a fence and gate on the side of the house, pour front and back leveling slabs. And put in a temporary tarp roof to create an all-weather workshop.
 

Attachments

  • IMG_0044.jpg
    IMG_0044.jpg
    336.8 KB · Views: 54
  • IMG_0046.JPG
    IMG_0046.JPG
    353.8 KB · Views: 56

Bikersmurf

Expedition Leader
I've been away on a hunting trip for the past several days- on that note, I'm much more sold on the idea of a snorkel intake for this van and my Tundra. It rained the entire time I was at my homestead and we had to ford the creek at 4 crossings to get out of the canyon- I had water rushing over the hood up onto the windshield.

Took a few pics of my driveway to explain my situation- It doesn't look that steep in the pics, but it's no place to work on a vehicle. I'm gonna relocate a fence and gate on the side of the house, pour front and back leveling slabs. And put in a temporary tarp roof to create an all-weather workshop.

I built my Fj40 in a "Blue Room" created by hanging a very large tarp off the gutter. It'd be much nicer to be in a heated shop, but I've not had such luck. It's much better to have a concrete pad and be dry so I'll not complain. When I had a welder come out to weld in my motor mounts, he was much happier also.
 

KeyserSoSay

Adventurer
I built my Fj40 in a "Blue Room" created by hanging a very large tarp off the gutter. It'd be much nicer to be in a heated shop, but I've not had such luck. It's much better to have a concrete pad and be dry so I'll not complain. When I had a welder come out to weld in my motor mounts, he was much happier also.

This is about exactly what I have in mind- I have a 9ft retaining wall about 15ft away from the house and once I reorganize a bit- can stretch a tarp from the gutter to the retaining wall and sorta-almost-kinda keep an indoor environment.
 

Attachments

  • blueroom shop.jpg
    blueroom shop.jpg
    358.5 KB · Views: 56
Last edited:

Bikersmurf

Expedition Leader
With your arrangement I'd also hang a tarp at the front and back... perhaps you've already got that in mind. It's so much nicer than crawling around in a puddle and then having ice cold water run down the side of your face and into your ear while trying to reach something in an awkward place.
 

tgreening

Expedition Leader
You know Harbor freight sells those portable garages for cheap. Got to be better than stringing a tarp. Last time I did that it was laying over my back, in a thunderstorm atop a mountain, while swapping out a toasted electric fan in my Jeep so I could make the next mornings trail run. Not much fun.
 

KeyserSoSay

Adventurer
You know Harbor freight sells those portable garages for cheap. Got to be better than stringing a tarp. Last time I did that it was laying over my back, in a thunderstorm atop a mountain, while swapping out a toasted electric fan in my Jeep so I could make the next mornings trail run. Not much fun.

That same thought came to me last night while I was laying in bed thinking about how to pull off this project (as I do every night). I still have much work ahead just getting the bus back into that space, I'll have to remove a fence, a gate, tear down an outdoor shelving unit, install a new h-brace and gate, and poor a couple leveling pads front and back. I've got a lot of stuff back there that needs to be sold or relocated to my homestead.
`

Also, I just purchased a 5 HP, 60 gallon air compressor (my last compressor would of been of no help in this build), which I need to rig up with regulators, air filters, and a tool stand and mount for my hose reel and air tools. I'll be running a small tube through the wall that I can run my air hose out of the shop to the "Blue room" as Bikersmurf has accidentally named. As for my welders and other 220v tools, I think it smarter to just install a 220v fixture outside the wall- fortunate that my breaker box and exisiting 220V is on that wall.
`

these are some of the reasons that I said earlier that I didn't expect to get much progress in the Tortuga build until about March. There are some piddly little chores I can fool around with until then, but I've come to realize it would be much smarter to wait until I've got the truck in a good work space before I start some of the bigger projects (and I also have 4 paychecks between now and then :victory:)
 

Attachments

  • air compressor-01.jpg
    air compressor-01.jpg
    277.3 KB · Views: 35
Last edited:

KeyserSoSay

Adventurer
Speaking of piddling...

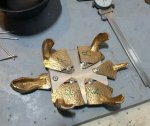
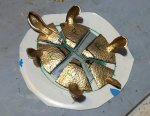
I couldn't help but get started with the most important element of this build...... The hood ornament.
`
Now I shouldn't even post this up until I get it finished, as it doesn't yet give any indication of the sort of care and quality I strive for when I build something, but it's kinda fun and I feel like I should be posting things to this thread as they happen.
`
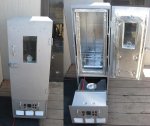
I am a silversmith/metalsmith and will be building an under plate for this that will hide some of the ugliness under there. I will be Cerekoting this as well. For those not familiar, Cerekote is a thermally cured epoxy finish that is typically used on firearms and is vastly better than (and not to be confused with) paint. I expect to coat many parts on this truck with Cerekote. attached is a pic of a PID controlled curing oven I built for Cerekoting that I made from a filing cabinet and a toaster oven.
 

Attachments

  • tortuga-01.jpg
    tortuga-01.jpg
    68.5 KB · Views: 43
  • tortuga-02.jpg
    tortuga-02.jpg
    31.3 KB · Views: 639
  • tortuga-03.jpg
    tortuga-03.jpg
    204.4 KB · Views: 46
  • tortuga-06.jpg
    tortuga-06.jpg
    403.4 KB · Views: 53
  • tortuga-05.jpg
    tortuga-05.jpg
    184.2 KB · Views: 47
  • tortuga-04.jpg
    tortuga-04.jpg
    196.3 KB · Views: 43
  • curing oven-01.JPG
    curing oven-01.JPG
    155.9 KB · Views: 52

KeyserSoSay

Adventurer
have ordered some 5/8 hardened shafts for my back bumper project, and have a buddy shearing me eighteen 7-1/2" x 7-1/2" (1/4" thick plates) for my back bumper. I'll be building this bumper a little backwards in that I'm going to build out the two side roller units (about 24" long) to be attached to the bumper when I build it out at a later date.
`
As continues to be the case for this build thread, I'm a little ahead of myself in posting this but wanted to post up what I've got so far in the hopes that some more experienced builders might be able to point out my mistakes BEFORE I make them.
`
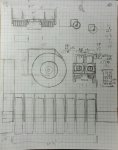
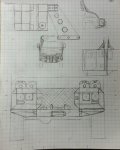
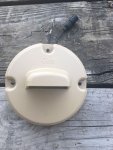
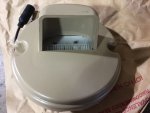
Luckily, I've got access to PaperCad-2D modeling program :D, so I did a little mockup of the bumpers for your assessment. front bumper will store 4 jerry cans, I'll move the headlights out in front of them, and I bought a couple of USGI-LED blackout lights that I'll also mount because I plan to have cut-off switches for all my external lights in case I want to be sneaky (I'm a game warden by profession and I've found that being able to sneak around in the dark can be a valuable asset)
 

Attachments

  • rear-bumper-papercad-01.jpg
    rear-bumper-papercad-01.jpg
    149.7 KB · Views: 40
  • front-bumper-papercad-01.jpg
    front-bumper-papercad-01.jpg
    148.5 KB · Views: 39
  • blackout lights-02.jpg
    blackout lights-02.jpg
    131.8 KB · Views: 37
  • blackout lights.jpg
    blackout lights.jpg
    157.5 KB · Views: 39

screwball48

Explorer
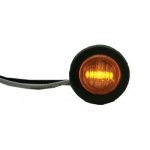
Couple of things I can think of on your front bumper design. Make sure and place some amber side marker/turn signal lights just behind your headlights. Also it looks like you are going to fabricate a new housing for your headlights. You could instead built a mount that would house snow plow lights. It could be made to look as good without as much fab work.


Sent from my iPhone using Tapatalk
 

KeyserSoSay

Adventurer
Couple of things I can think of on your front bumper design. Make sure and place some amber side marker/turn signal lights just behind your headlights. Also it looks like you are going to fabricate a new housing for your headlights. You could instead built a mount that would house snow plow lights. It could be made to look as good without as much fab work.

I had planned on mounting amber marker lights (turn signal lights) on the side and front. I had been googleing for universal headlight kits, and also looking for some simple (universal) headlight brackets from older model vehicles that I could get at the you-pull, but I had NOT thought to google "snow-plow-lights", so you did indeed just make my life a lot easier and cheaper- thanks so much for your input.
`
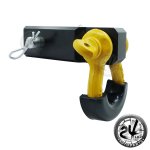
That front bumper design is just a quick glimpse of my earliest plan, and subject to change a bit contingent on those types of details. I've given some thought to removing or getting another 1980's Ford van grill and/or body panels and mounting it out in front of the bumper, but that seems a lot of work and the truck is not exactly a 57 chevy. I'll have receiver tubes mounted integral to the frame brackets for D-ring shackles and a potential tow bar. One thing that is not obvious from my PaperCad-2d drawing is that the middle of the bumper (the expanded metal) will be a fold-down gate. I don't want to have to remove the bumper to pull the engine, and it should also provide a nice step to stand on when I'm having to work in the engine compartment. there would actually be a good deal of storage space in the middle of the bumper for a yeti cooler or other large item- but I wouldn't run like that in the summer time.
`
 

Attachments

  • snow-plow-lights-main.jpg
    snow-plow-lights-main.jpg
    20.7 KB · Views: 29
  • d-ring-shackle.jpg
    d-ring-shackle.jpg
    143.8 KB · Views: 27
  • amber markers.jpg
    amber markers.jpg
    14.9 KB · Views: 525

Lunchbox2

Explorer
I love this thing man, and it's great to see how other people deal with working outside. I had to get pretty creative with my workspace too, at times connecting tarps to the shop doors of my buddy's place and stealing heat from inside! haha I think you're off to a great start, but I'd be keeping my eyes open for a front dana 60... That 44 might not last very long with how heavy that thing is, especially if you're pulling the rear-end off a ledge without the rear wheels touching. Good luck and I look forward to seeing how things transpire! I love the hood ornament btw....
 

KeyserSoSay

Adventurer
I love this thing man, and it's great to see how other people deal with working outside. I had to get pretty creative with my workspace too, at times connecting tarps to the shop doors of my buddy's place and stealing heat from inside! haha I think you're off to a great start, but I'd be keeping my eyes open for a front dana 60... That 44 might not last very long with how heavy that thing is, especially if you're pulling the rear-end off a ledge without the rear wheels touching. Good luck and I look forward to seeing how things transpire! I love the hood ornament btw....


So far the way I've dealt with working outside in the snow is just not to do it :ylsmoke: Much respect for your work converting the Lunchbox.
-
The HP 44 was part of the initial factory conversion, I thought the 4x4 conversion was done by Collins the bus building company, but on closer inspection it's a Pathfinder (springover radial arm) conversion that was also done shortly after birth, probably subcontracted. It's my understanding the TP44 was the standard used by Pathfinder and that modern outfits all use the Dana60 in a leaf-spring suspension now, and I have to assume there is a valid reasoning behind that change. Most here don't have a ton of positive things to say about Pathfinders and I get that, but I've found most discussion of the high-pinion 44 to be pretty positive (although my 8000# bus asks a lot of it)
-
I plan to run this truck like I have all my others- and my horses- (with love and care, but with high expectations). If and when the axles or suspension ever fail to do what I need them to, then I'll have to look hard at a Lunchbox makeover.:sombrero:

What you said is true though, I do have my eyes open for a front 60, I just bought an extra rear axle for my Toyota Tundra for $200. I actually have an ace in the hole, a factory lifted (another 4x4 school bus) 1972 IH travelall 4x4 1210 with Dana60 in front and Dana70 in the rear. I could buy the whole truck for $500 and it's not been offered for sale to anyone else in the past decade so doubt it's going anywhere soon. I'm not experienced enough to understand the issues between Ford/Chevy/Dodge/IH when it comes to these axles and making them work cross-species, which is one of the main reasons I'm digging into these forums trying to get better educated on this stuff.
 

Forum statistics

Threads
185,823
Messages
2,878,600
Members
225,378
Latest member
norcalmaier
Top