You are using an out of date browser. It may not display this or other websites correctly.
You should upgrade or use an alternative browser.
You should upgrade or use an alternative browser.
Halley - '17 WK2 Trailhawk Overland Build
- Thread starter 2180miles
- Start date
2180miles
Endurance Adventuring
I'm thinking about looking at a Trailhawk, but I think they be way too nice for me and my muddy dog.
Eh, replace the back storage deck with a wooden one like I did, add a cargo net to keep him from flying forwards, and you're good to go. It's just a car... a well equipped and capable car.
2180miles
Endurance Adventuring
WK2 Dual-Battery Pre-Production Write-Up
With the growing amount of auxiliary electrical components installed in the Jeep, it became rather clear to me that a second battery was necessary to support that equipment while leaving the starter battery to, well… start the Jeep.
While this process won’t be done in one simple day, I’ve officially placed my first order for gear for the installation. Everything was available from Amazon with two-day delivery, so for $167 I’ve now got the following gear being sent my way and will be looking forward to having some time to get to work on this project. I'll be placing the order for the rest of the stuff in a day or two.
Initial Supplies List:
• Wirthco 150A Intelligent Battery Isolator
• Blue Sea Systems 12-circuit fuse panel w/ negative posts
• ZooKoto 150A circuit breaker
• 10-feet of 4 AWG cable in red & black
• Crimp on cable ends w/ red & black heat-shrink
• Battery cable terminal ends
My plan will be to remove the factory spare tire from the wheel well in the back and create a fitted tray from 1/2” plywood to fit the space, alike the 3/4” tray overtop that the fridge and Pelican gear cases sit on. The battery, intelligent isolator, fuse block, and switch-panel relays will live towards the front of the board, with the wiring cleanly brought in through grommets or a brush-plate on the back of the OEM wheel well tray. For those that remember, I already have a 6-circuit fuse block in the existing auxiliary control box, but decided to upgrade that to the 12-circuit for the sake of future installations. If anyone local to Boston wants to buy the 6-circuit one, let me know. I’ll run the 4 AWG cabling to the battery isolator from the factory battery under the front passenger seat, and run the power cables from the UHF and CB radios to the rear fuse block alongside.
I’ve never set up a dual battery system before, so this will be fun. I’m hoping to do it cleanly, efficiently, and cost-effectively. I did opt for the intelligent battery isolator which will allow me to charge the second battery only once the starter battery is fully charged, and bypass the isolator to use the auxiliary battery to jump the primary battery in the event it ever dies. I think the biggest issue I’ll face is moving the existing system to the new location, but when I installed it I did my best to leave enough slack in the lines to move the wiring without issue.
Anyway, this is the intro. I’m out of town for a few more days, so sorry, no fun pictures yet. I should have some time next week to get the project underway which will be fun. In the meantime, open to any and all opinions or suggestions from those who have done this before or are planning their own.
jalbrecht55
Member
Instead of using the spare tire wheel tub have you considered or looked to see if there is space inside the driver side tub (under the driver seat) to install the second battery?
From what I've seen there is a plastic tub in there and then a harness and connector through the center, but it looks like the metal tub is just as big as the passenger side where the OEM battery is. Perhaps yours has more stuff in this location, I don't know.
The reason I mention it is that personally I havent liked the rear mounted tire carriers I've used. They add another level of hassle to accessing the back, they add weight and CG in the wrong place and hurt rear visibility and/or departure angle. Also the ones I have experience with even when tight and solid feeling add noise over washboard roads.
ultraclyde
Observer
Looking forward to seeing this process. I've thought about dual battery set ups for vehicles but never wired one in.
2180miles
Endurance Adventuring
Looking forward to seeing this process. I've thought about dual battery set ups for vehicles but never wired one in.
That makes two of us... I'm looking forward to it too haha! Lots of info to come, I suppose.
Instead of using the spare tire wheel tub have you considered or looked to see if there is space inside the driver side tub (under the driver seat) to install the second battery?
The reason I mention it is that personally I havent liked the rear mounted tire carriers I've used. They add another level of hassle to accessing the back, they add weight and CG in the wrong place and hurt rear visibility and/or departure angle. Also the ones I have experience with even when tight and solid feeling add noise over washboard roads.
I had thought about that, but I believe the one time I checked in there I had a bit more system than I'd be comfortable moving, altering, or working around. At the end of the day the Trailhawk has 6 more years of warranty on it. I'm really doing my best to make modifications that don't alter too much with the OEM system so that if I ever need help/service, there's no issue. By moving this to the trunk it allows me to keep it out-of-sight, out-of-mind if a Chrysler tech is ever in the Jeep working on it... kind of along the same lines as disabling a flash program in a chipped Euro car before taking it in for service.
I've got a swing-out tire carrier on my Wrangler that I built myself many many many years ago now. While I agree that sometimes on washboards it doesn't perform flawlessly, I don't think it's too big of a deal breaker for me. This Jeep won't ever really see many situations where departure angle is a huge concern, and I'll be going with the high-clearance Wilco which gains about 4" over the normal version, so there'd just be a little bit coming out of the trailer hitch - not much more than what is already there with the Factor55 HitchLink unit.
The swing out accomplishes a few things for me - moves the spare for a dual bat, carries said spare, high-lift mount, Rotopax carrier, higher place for another rear LED fixture, and potentially even a place to mount a fold-down table for campsite cooking and meal prep. They're not cheap, but with no sexy or slimline options for WK2 rear bumpers, I think it checks quite a few boxes off the list.
We shall see though... and I'll go take another look at the Driver's side storage compartment!
DallasJKU
Adventurer
Eh, replace the back storage deck with a wooden one like I did, add a cargo net to keep him from flying forwards, and you're good to go. It's just a car... a well equipped and capable car.
No need for a wooden deck for me, but yours looks awesome. I plan on using the Canvasback on the floor, sides and now they make them for the rear doors which is a big deal for me since my dog likes to put his feet on the doors in my JK and those are just plastic. I would need to find a net to prevent him from jumping into the front seats. I'm possibly looking at one with rock rails tomorrow or sometime this week.
The ride quality of the GC over the Wrangler is what I'm looking for. Many hiking adventures to come with my dog and I will do more of them if I have something capable and comfortable.
BTW, your build is very inspiring and your photography is amazing.
Last edited:
2180miles
Endurance Adventuring
The ride quality of the GC over the Wrangler is what I'm looking for. Many hiking adventures to come with my dog and I will do more of them if I have something capable and comfortable.
BTW, your build is very inspiring and your photography is amazing.
I've heard good things about those canvas decks... sounds like a solid plan. The GC ride quality is nothing shy of amazing, and that's to be said for any terrain I've thrown it at.
I really appreciate your comments at the end there. It's always nice to hear that the both helping and entertaining other people, and that the imagery I work so hard to capture is enjoyed by those who see it.
2180miles
Endurance Adventuring
WK2 Dual Battery Installation: Part 1
It’s time for another picture-heavy Trailhawk write-up!
As discussed prior, I’ve wanted to move the WK2 to a dual-battery setup for quite a while now. The goal will be to move all the auxiliary electrical units (HAM and CB radios, fridge, lighting, device charging, etc.) to the deep cycle battery – hereinafter referred to as the House battery – and get them off the starting battery. By alleviating their power draw from the starting battery, we’ll be lowering the chances of a dead car in the middle of nowhere.
I knew the spare tire was going to be moved to a swing-out tire carrier, which opened up the possibility of mounting the new House battery underneath the rear deck I built last summer. Once the majority of parts were ordered (every single one of them available on Amazon with 2-day delivery) I got to work laying out how this project would go along. The full parts list will be updated once the project is done, but currently is as follows:
- Universal Battery sealed 100ah AGM
- Wirthco 150A Intelligent Battery Isolator
- Blue Sea Systems 12-post fuse block w/ negative bus
- 8”x5” ABS plastic project box
- 2x InstallGear 150A in-line fuses
- 2x 10-foot sections of 4AWG wire in red & black
- Crimp-on 4AWG cable ends
- Battery terminal ends
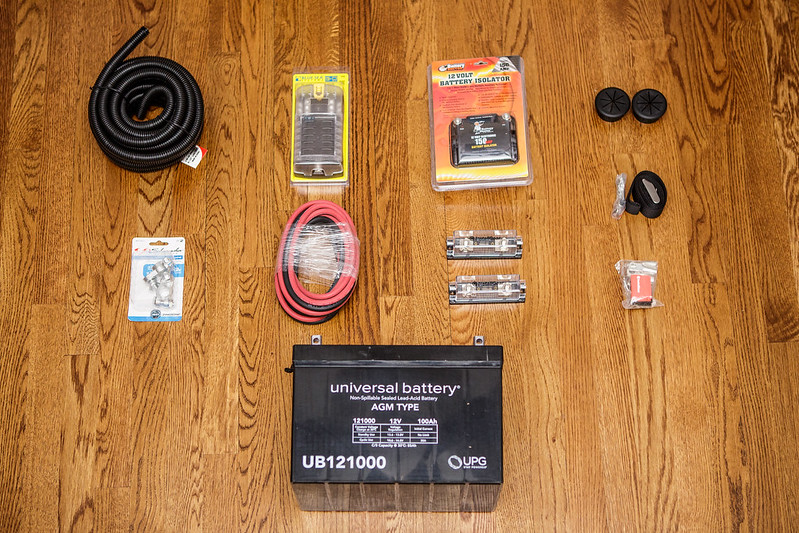
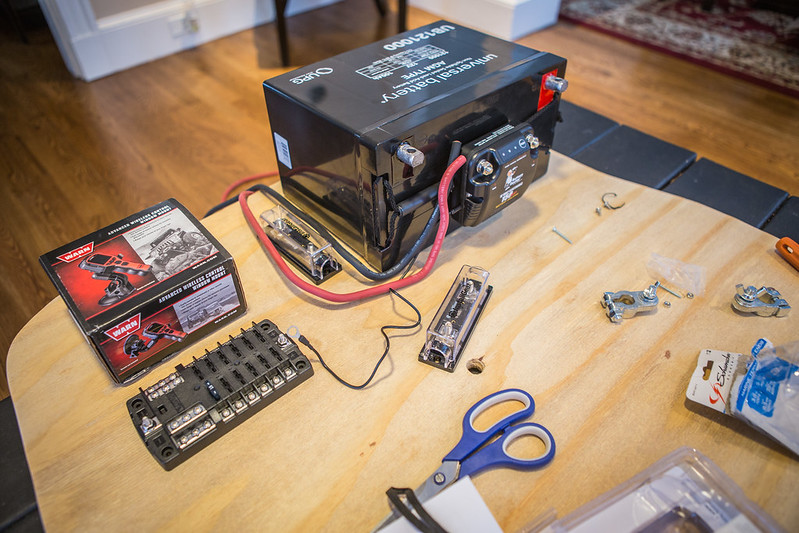
Dual-Battery Initial Supplies by 2180miles

Dual-Battery Initial Supplies by 2180miles
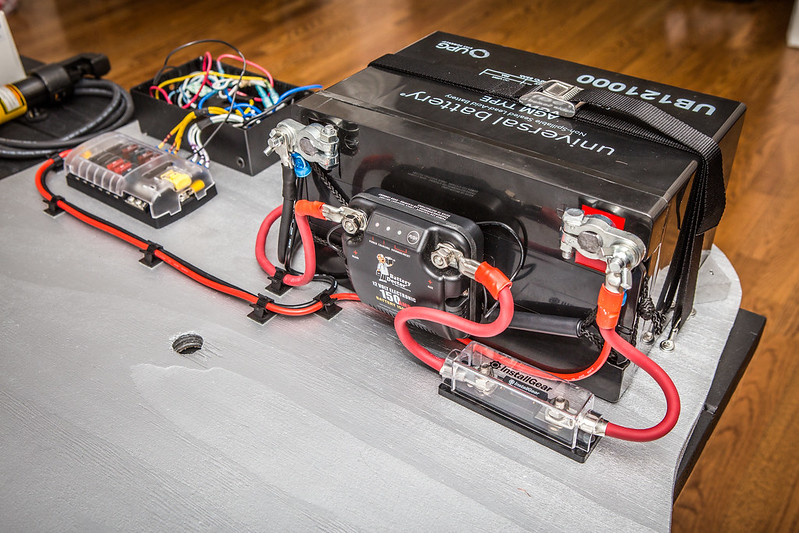
**The scale in this photo makes the battery seem small. It actually measures in at 12x6x9" and 62lbs.
So the first step here was to remove all my gear from the back of the Jeep. This included my Pelican case of recovery and some winter camping gear, kept in there in case of an emergency while New England is getting pummeled with adverse weather. Luckily that time of year is almost over. I then pulled the fridge out and removed the rear deck I had built last year. Next up came removing the OEM included gear, the spare tire, jack, and plastic storage cubbies that fit around the wheel. This left me with the open wheel well, from which I removed the plastic surround trim piece.
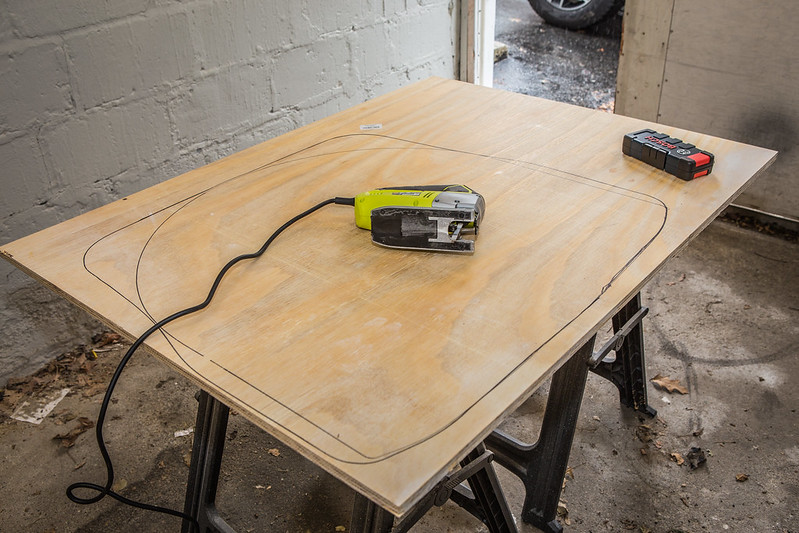
I purchased a 4’x4’ piece of 3/4" plywood from Home Depot from this project, and had it set up on two sawhorses in the garage. A quick trace with a Sharpie and I had a template to fit inside the wheel well. The Jigsaw made quick work of this and within a few minutes I had a fitted piece of decking to use as a base for the electronics.
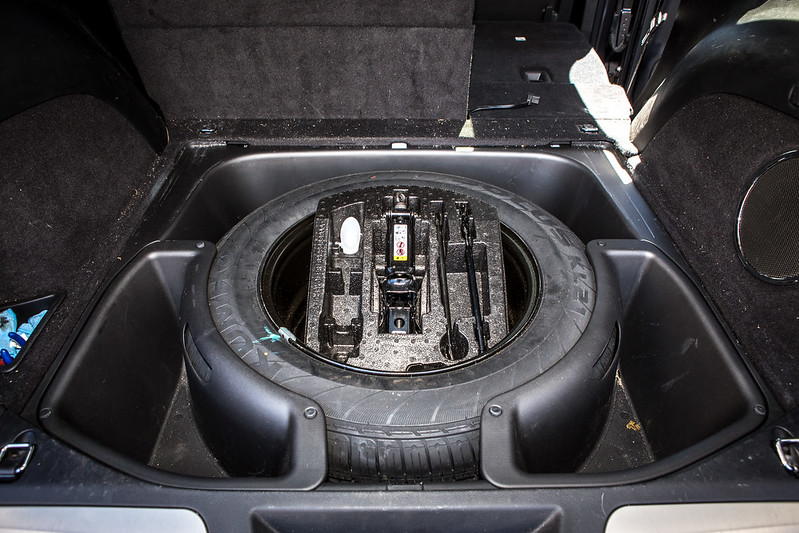
OEM Wheel Well by 2180miles
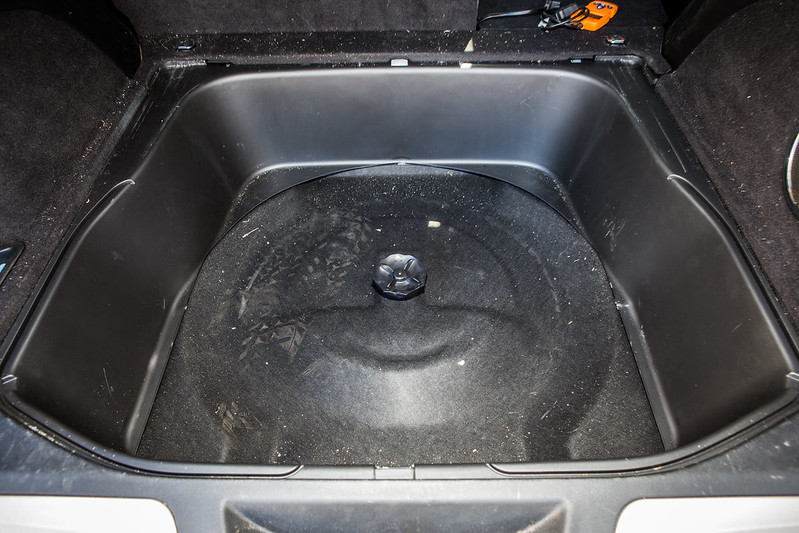
OEM Wheel Well Empty by 2180miles

Wheel Well Trim Removed by 2180miles
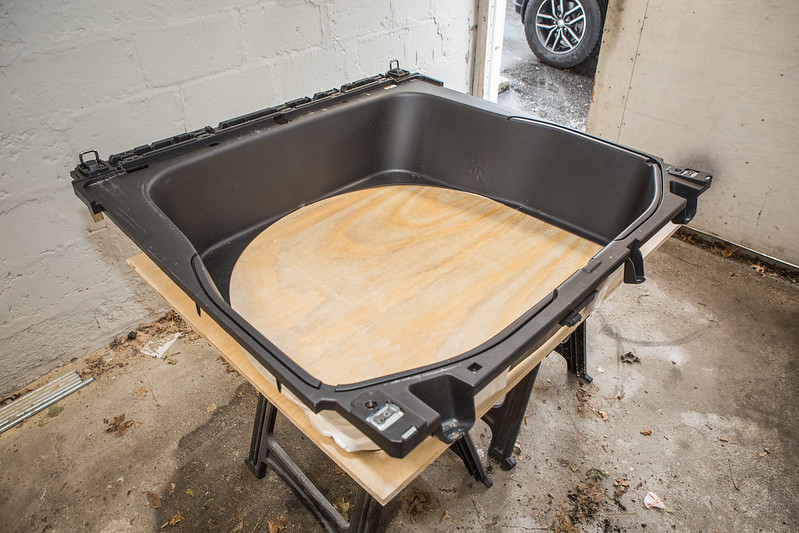
Tracing Wheel Well Liner by 2180miles
Plywood Stenciled by 2180miles

Wheel Well Floor Test-Fit by 2180miles
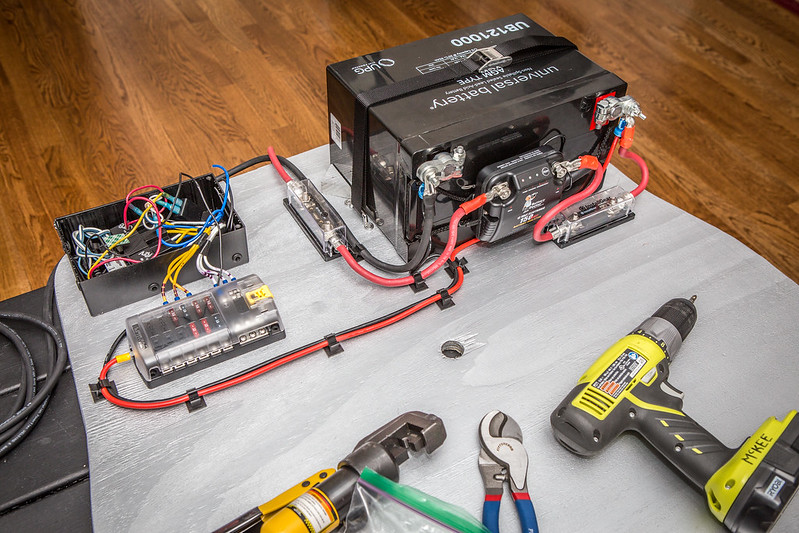
Once the deck was sanded, Dani asked what color I was going to paint it. While my initial thought was just to do it black, she asked for silver… so it’s metallic silver. This actually will work to my benefit, as it will push me even more to keep the wire routing clean, even though it’ll never really be seen. With paint dry, I moved the deck into the house and turned the living room into my mad science laboratory getting the fun part of the project underway.
I unfortunately spent an hour or so cutting up the existing wiring system in the Jeep, pulling out the control box and re-routing the existing auxiliary lighting and radio harnesses to the rear trunk area for use in a few days time. The relay control box was pretty tired after months of working with it and moving it to a resting spot, so I went ahead and ordered a new ABS project box to be installed in the new spot in the back. I chose one that’s a bit larger to allow for future expansion, after measuring and ensuring that it will fit on the deck.
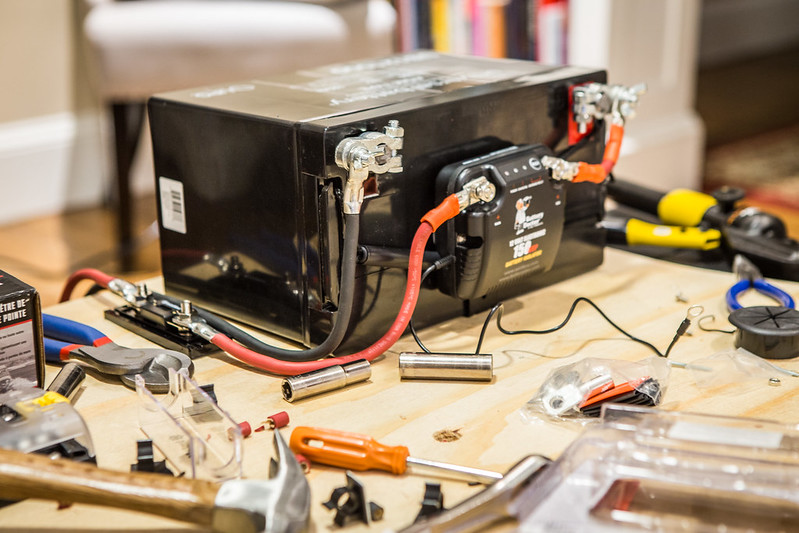
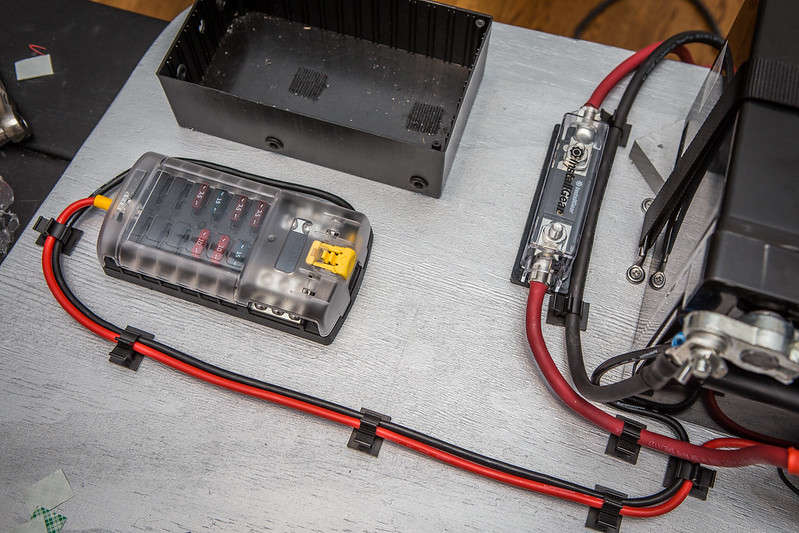
I played around with the parts on the deck once it was in the living room and figured out a clean layout for the equipment. Battery will be on the passenger side, with the Wirthco Intelligent Isolator mounted on a bracket in front of it. In-line fuses to the side and again in front of the (+) post of the House battery. The Blue Sea Systems fuse panel and relay control box will live on the driver’s side of the compartment, and wiring will be routed between the two without needing much distance at all.
It took a quick trip to Harbor Freight to buy a handheld hydraulic crimper to tackle the 4AWG connections, but it seems like a good tool to have for the future. As of now the basic wiring is set, and I’ve pretty much gotten as far as I can before the last bit of parts arrive and I move this set-up into the back of the Jeep.
Lots of photos, and plenty more to come… I’m always open to hearing ideas, suggestions, etc. if you’ve got any!
Layout Experimentation by 2180miles
Initial Wire Fitting by 2180miles
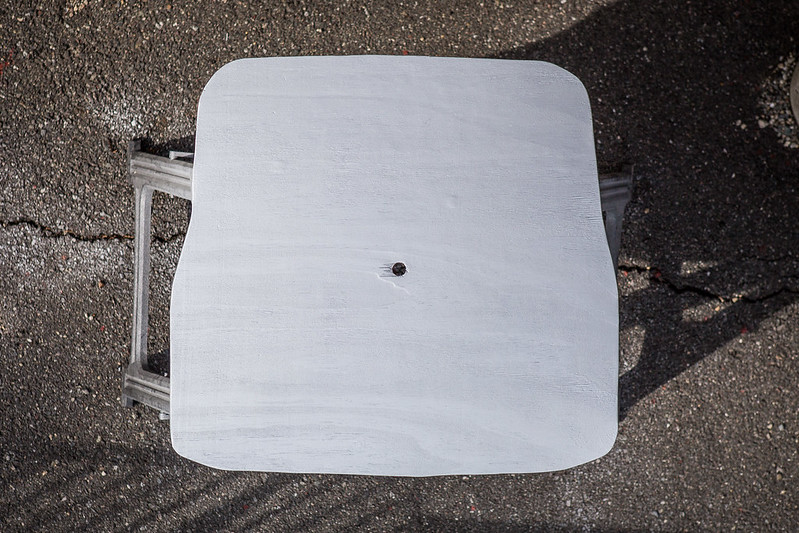
Painted Rear Deck by 2180miles

Hydraulic Hand Crimper by 2180miles
Blue Sea Systems Wiring by 2180miles
Initial Battery System Wiring by 2180miles
Initial Battery System Wiring by 2180miles
It’s time for another picture-heavy Trailhawk write-up!
As discussed prior, I’ve wanted to move the WK2 to a dual-battery setup for quite a while now. The goal will be to move all the auxiliary electrical units (HAM and CB radios, fridge, lighting, device charging, etc.) to the deep cycle battery – hereinafter referred to as the House battery – and get them off the starting battery. By alleviating their power draw from the starting battery, we’ll be lowering the chances of a dead car in the middle of nowhere.
I knew the spare tire was going to be moved to a swing-out tire carrier, which opened up the possibility of mounting the new House battery underneath the rear deck I built last summer. Once the majority of parts were ordered (every single one of them available on Amazon with 2-day delivery) I got to work laying out how this project would go along. The full parts list will be updated once the project is done, but currently is as follows:
- Universal Battery sealed 100ah AGM
- Wirthco 150A Intelligent Battery Isolator
- Blue Sea Systems 12-post fuse block w/ negative bus
- 8”x5” ABS plastic project box
- 2x InstallGear 150A in-line fuses
- 2x 10-foot sections of 4AWG wire in red & black
- Crimp-on 4AWG cable ends
- Battery terminal ends
Dual-Battery Initial Supplies by 2180miles
Dual-Battery Initial Supplies by 2180miles
**The scale in this photo makes the battery seem small. It actually measures in at 12x6x9" and 62lbs.
So the first step here was to remove all my gear from the back of the Jeep. This included my Pelican case of recovery and some winter camping gear, kept in there in case of an emergency while New England is getting pummeled with adverse weather. Luckily that time of year is almost over. I then pulled the fridge out and removed the rear deck I had built last year. Next up came removing the OEM included gear, the spare tire, jack, and plastic storage cubbies that fit around the wheel. This left me with the open wheel well, from which I removed the plastic surround trim piece.
I purchased a 4’x4’ piece of 3/4" plywood from Home Depot from this project, and had it set up on two sawhorses in the garage. A quick trace with a Sharpie and I had a template to fit inside the wheel well. The Jigsaw made quick work of this and within a few minutes I had a fitted piece of decking to use as a base for the electronics.
OEM Wheel Well by 2180miles
OEM Wheel Well Empty by 2180miles
Wheel Well Trim Removed by 2180miles
Tracing Wheel Well Liner by 2180miles
Plywood Stenciled by 2180miles
Wheel Well Floor Test-Fit by 2180miles
Once the deck was sanded, Dani asked what color I was going to paint it. While my initial thought was just to do it black, she asked for silver… so it’s metallic silver. This actually will work to my benefit, as it will push me even more to keep the wire routing clean, even though it’ll never really be seen. With paint dry, I moved the deck into the house and turned the living room into my mad science laboratory getting the fun part of the project underway.
I unfortunately spent an hour or so cutting up the existing wiring system in the Jeep, pulling out the control box and re-routing the existing auxiliary lighting and radio harnesses to the rear trunk area for use in a few days time. The relay control box was pretty tired after months of working with it and moving it to a resting spot, so I went ahead and ordered a new ABS project box to be installed in the new spot in the back. I chose one that’s a bit larger to allow for future expansion, after measuring and ensuring that it will fit on the deck.
I played around with the parts on the deck once it was in the living room and figured out a clean layout for the equipment. Battery will be on the passenger side, with the Wirthco Intelligent Isolator mounted on a bracket in front of it. In-line fuses to the side and again in front of the (+) post of the House battery. The Blue Sea Systems fuse panel and relay control box will live on the driver’s side of the compartment, and wiring will be routed between the two without needing much distance at all.
It took a quick trip to Harbor Freight to buy a handheld hydraulic crimper to tackle the 4AWG connections, but it seems like a good tool to have for the future. As of now the basic wiring is set, and I’ve pretty much gotten as far as I can before the last bit of parts arrive and I move this set-up into the back of the Jeep.
Lots of photos, and plenty more to come… I’m always open to hearing ideas, suggestions, etc. if you’ve got any!
Layout Experimentation by 2180miles
Initial Wire Fitting by 2180miles
Painted Rear Deck by 2180miles
Hydraulic Hand Crimper by 2180miles
Blue Sea Systems Wiring by 2180miles
Initial Battery System Wiring by 2180miles
Initial Battery System Wiring by 2180miles
Last edited:
Great information, thank you. Your mods are inspiring and I hope to steal some of your ideas.
I have a WK2 Overland with Quadra-Track II, I have about $3k into recovery gear, undercarriage protection plates, roof rack, side rails etc... Before I start to go hog wild and start to spend alot more on overland build (hidden winch will be close to $3k installed) I am taking a two day 4wd class to make sure that me and the Quadra-Track II can get me where I want to go and back with confidence, I have Quadra Lift air suspension as well.
Since this is DD I am looking at some sort of trailer as opposed to roof top assec/tent.
Mid-Winter Updates
So I didn't have a chance while I was home last weekend to add rivets, but it'll be done next weekend once I get back. It's been weird to not have lots of mods for the WK2 lately, post-radio install, but there's been a lot of groundwork being done for some good mods in the near future.
The current Excel spreadsheet has things like:
1) Hard-shell RTT... This may be happening sooner than later. There's a group-buy on TacomaWorld.com where a guy has been importing container loads of RTTs for members on there. They're from the same factory as the majority of US-based companies tents, just unbranded. I put my name on the list for a black shell with grey fabric for $1,700 delivered, about a grand less than competitors. The guy has delivered nearly 40 so far between two other group buys, and has been having the manufacturer make adjustments according to owner feedback. After 30 nights in the Jeep last summer on the Trans-Canada trip, I really wished we had a RTT so that I wasn't pitching our ground tent every night... in the rain, on uneven terrain, in the dark... while I'm used to ground tents, this will have a better appeal for us on long trips and in different regions.
Dani and I weighed out the options on the market, and decided this was a great option for us versus a larger but less sexy soft-sided RTT. This Jeep has always been about functionality, with sex appeal and OEM+ looks trailing in importance, so the hard-sided tent was the only option in my book.
Teaser shot on a Taco:
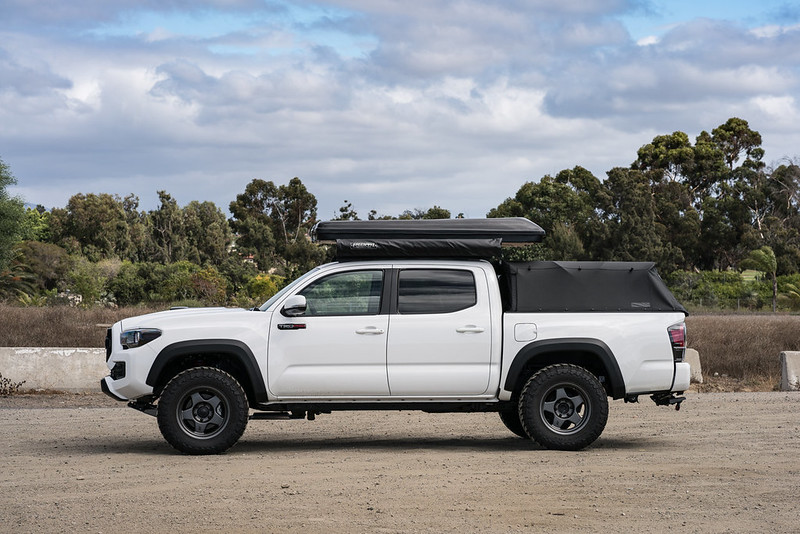
TacomaWorld RTT Group Buy by 2180miles
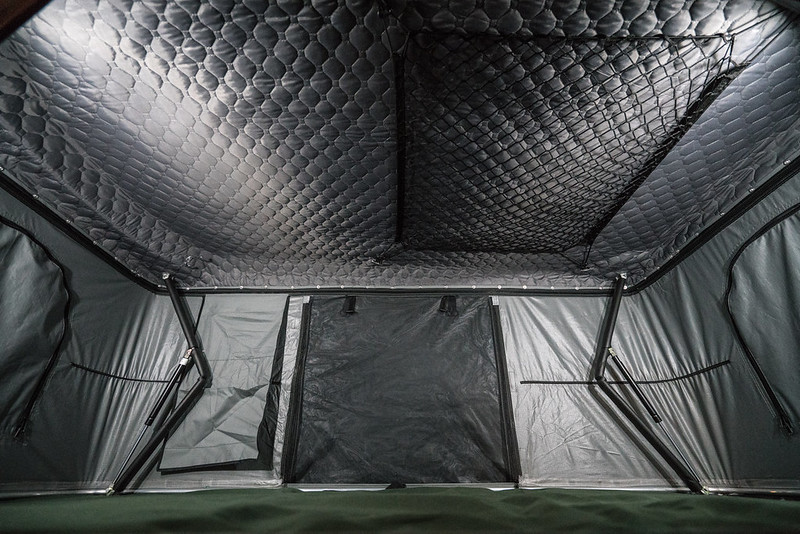
RTT Interior Photo by 2180miles
2) Chief Products Lower Fascia Guard & Tow Hooks - I've been talking with Chief's owner Bill about getting the Lower Fascia guard on the WK2 for some front end protection. Not only will it add an aggressive look to the Jeep, but will also take some pucker-factor out of the approach angle in the Jeep. Winter wheeling and being unable to always see what was in front of me, I wanted to get some kind of skid plate up front to protect the front end and electronics. Bill sold all his US stock to a supplier in Cali, but we're going to look into how/when he could get me the set-up. Because of the winch install, I'll need to also install Chief's tow hooks, but they're sexy as heck and really will change the look of the front end in a great way.
3) Full size spare - A month ago I sold my spare set of 35" BFG A/Ts from the Wrangler. The money went towards a full size spare set-up on the WK2, and the first step of that was to purchase an OEM rim. After my local dealership quoted $400 for the aluminum Trailhawk rim, I did some googling and found one for $270 delivered (brand new) from an ATL based dealership supply warehouse. It's currently sitting in my garage in a box with a new TMPS sensor awaiting #4
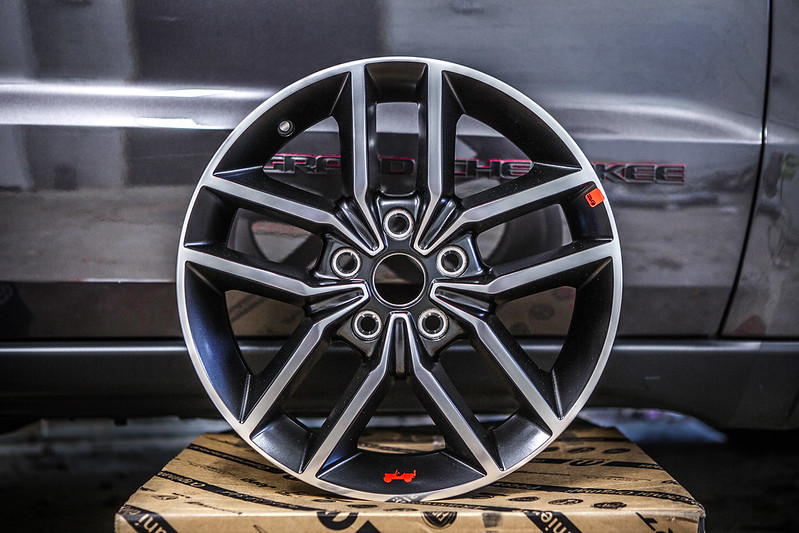
OEM Trailhawk Rim by 2180miles
4) TIRES - I've been having a huge internal debate regarding tires. For just under $300 I can buy/mount a 5th Goodyear Adventure A/T Kevlar tire, to match the ones on the other 4 corners of the Jeep. The ones it currently has have 14,000 miles on them from last year's adventures. The tire is good in my book, great with fuel economy, good with tread wear, and relatively capable. The only time it has let me down is on deep snow with ice underneath up in the NH mountains in January. They weren't too sexy from the factory, but with the 1.25" wheel spacers, the Jeep's stance improved and it's now tolerable.
The other option would be to spend $1,300, slap on some BFG A/Ts in a 265/65 R18 variety - one size smaller than the largest I can fit, 275/85 R18, but I would like to avoid any possibility of rubbing. It's basically a 31.5" tire versus a 32.1", and I'm ok running a smaller tire with that negligible of a difference.
Basically if I do buy new ones, I could probably sell my factory-fitted Goodyear A/Ts for a few hundred and offset the cost even more. New tires instead of just a new 5th tire is probably the way to go, but I'm going to hang on for a little longer to make a decision.
5) Spare Tire Storage - Technically that 265 tire will still fit in the spare cubby in the back, but I'd like to get it out from under the fridge and our gear. Since nobody makes tire carriers for WK2s, this will likely become a job for the Wilco Hitchgate Solo. A hitch-mounted swing out carrier, it holds up to a 35" spare, jerry can, and hi-lift jack. Price delivered is about $600. It will block a parking sensor or two on the rear bumper, but I'm OK with that. It's a great look and option for an otherwise untouched platform's tire storage.
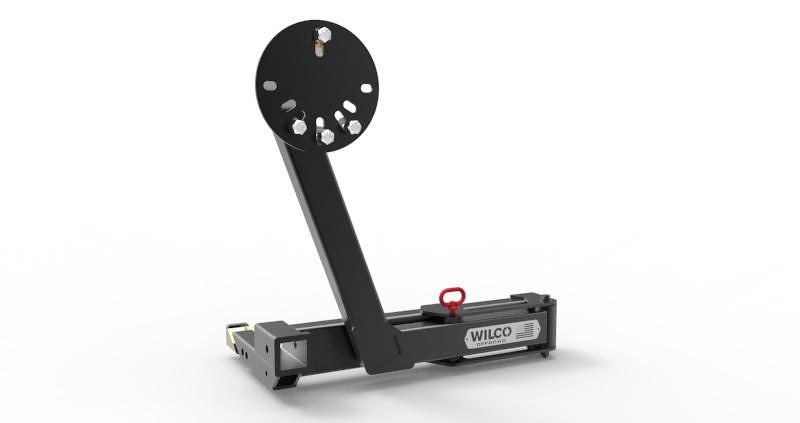
Wilco Hitchgate Solo by 2180miles
6) Dual Battery - As soon as the spare is out, dual battery is going in the old spare tire space. It'll power all the radios, aux lighting, fridge, etc. I'm not interested in running it all off the factory battery much longer. Plus I love electrical challenges, so this would/will be very fun for me.
--------
So that's the "short" list for before OverlandExpo next fall, but ideally before any summer adventures. It's a lot, and it's a tiny bit more difficult to warrant it when the fiscally responsible side of me would love to pay it off instead, but there will come a time when it's as good as it's going to be and I will be happy and know it can go almost anywhere and have what we need to be capable and comfortable. Might as well be at that point sooner than later
Ideally some of these will spring into action shortly and we can have more fun with mods and exciting photos... but until then, I'd love to hear any thoughts or suggestions...
")
Hey, haven’t had a chance to read through everything, but Uneek4x4 do a rear bar for the GC. I believe Bill sells some of his products through them. They may be able to package it all up and send it over at once to cut down shipping costs.
ultraclyde
Observer
Really sano install so far. Any chance you've got a wiring diagram drawn up? Also, what kind of use time do you expect out of that battery before it needs a charge?
2180miles
Endurance Adventuring
Great information, thank you. Your mods are inspiring and I hope to steal some of your ideas... I am taking a two day 4wd class to make sure that me and the Quadra-Track II can get me where I want to go and back with confidence..I am looking at some sort of trailer as opposed to roof top assec/tent.
Glad it's helpful! Feel free to steal any of the mods/ideas, and absolutely ask any questions you might have, I'm always happy to help. The class sounds like a great idea! I've got a decade+ of wheeling my overbuilt Wrangler so I've got a great respect for what the Trailhawk can, and cannot, do. After thorough review before purchase I decided it would be the perfect amount of "can" for my needs, with the "cannots" reminding me that this vehicle is for the long haul expedition and not the day-trip wheeling where I can go hog wild. I think you'll find it plenty capable to get you nearly wherever you want to go.
I hear ya on the RTT vs. Trailer. Dani and I had that debate in this household and both decided that having everything on board was better for our needs. I've got a buddy with a built up M416 military trailer and he loves it, but has recently been saying he wants to move the RTT to the top of the Jeep instead of the trailer.
Hey, haven’t had a chance to read through everything, but Uneek4x4 do a rear bar for the GC. I believe Bill sells some of his products through them. They may be able to package it all up and send it over at once to cut down shipping costs.
I've seen theirs, but have zero interest in it. I love the clean OEM+ look of my build so far, and the bulbous piece of metal that is Uneek's rear carrier does nothing for me - I appreciate the thought though! My eyes are still set on the Wilco unit.
Really sano install so far. Any chance you've got a wiring diagram drawn up? Also, what kind of use time do you expect out of that battery before it needs a charge?
Thanks Clyde. I don't have one yet, but I'd be happy to make one up. By my experience and Dometic's information, the fridge draws about 0.77 amps per hour. Over the 20-hour battery rating time period, that's about 16 Ah. Double it for safety and un-ideal conditions, add in low-amperage LED lighting and very occasional comms radio use when the vehicle is off, I should be around 40Ah over 20 hours. I'd be hard pressed to find a time where we've left the Jeep sitting for over 20 hours with all that stuff simultaneously running, so this shouldn't be a problem at all, as we're usually on the move for at least a few hours a day during our trips.. if we ever needed to idle it for a little while to charge the battery back up that'd be OK by me. Technically we could leave the fridge running for 3 days (with nothing else on) and still be at only 50% of the battery's drain.
The Kenwood D710G is the highest drawing piece of equipment on board at 13A when broadcasting at 50W, and the 30" LED bar being second at 10A. Neither of those units will be on at any length of time while we're camped, so I'm not factoring them too much into the math. I've got a few handheld 2m/440 units which I could turn on at camp if we still had friends in our convoy out and about... So the main concerns are the fridge and "camp lighting" which isn't installed yet but will be minimally invasive on power. Sorry if this was longwinded, I'm just talking it out as I've technically never written this thought process down beyond my own initial notes!
ultraclyde
Observer
That's helpful info, and I found a wiring diagram online for the isolater, so no need to do one unless you just feel like it. I'm actually thinking about implementing this kind of setup on my '73 Chaparral tri-hull before the Jeep. I actually used the same Blue Sea fuse panel to rewire the boat when I first got it but I've learned a few things and would love to redo the install now and add a house battery. I've got to dig into the specs on my vintage outboard and see if it actually has the charging capacity to handle a 2-batt setup.
I am understanding correctly that the isolater allows you to charge both batteries but keeps the accessories from drawing power from the starting battery, right? And there's a switch to bypass the isolater in case you want to use the house battery to start the vehicle? Pretty sure that's the idea, just double checking myself.
I am understanding correctly that the isolater allows you to charge both batteries but keeps the accessories from drawing power from the starting battery, right? And there's a switch to bypass the isolater in case you want to use the house battery to start the vehicle? Pretty sure that's the idea, just double checking myself.
2180miles
Endurance Adventuring
I am understanding correctly that the isolater allows you to charge both batteries but keeps the accessories from drawing power from the starting battery, right? And there's a switch to bypass the isolater in case you want to use the house battery to start the vehicle? Pretty sure that's the idea, just double checking myself.
You're exactly right. The isolator waits until the starting battery is at ~13.4v before allowing juice to pass through to the House battery. It separates them (like a back flow preventer in a plumbing system) when the starting battery drops into the high ~12v range (aka off) to keep the House battery from drawing voltage from the starter battery when the vehicle is off. In the event that the starting battery is dead or weakened, I can push a bypass button on the Wirthco isolator to allow voltage to flow from the House battery back to the starting battery to aid it in turning over.
There are less "intelligent" models, but I liked the features of this one. For just over $60, it seems like a pretty great deal. I'll definitely be reporting back with how it is functioning.
Forum statistics
Members online
- troopy37
- Jeff_DML
- matttahoe53
- Deleted Member 183
- jeffb321
- bsl
- speedy gonzales
- Westy
- bexpedition13
- osukj04
- camperthingy
- Willsfree
- Dosruedas
- stephenL
- AI Shooter
- caryt
- Kretch
- ATL_SAILOR_1USN
- JayOtheMountains
- Walter Wheeler
- bstock1
- brogo
- BeardedVermonter
- extremer
- SDDiver5
- abowen9
- blacklbzbeauty
- ocjk
- Rebuilder
- Todd n Natalie
- ace944gs
- bri
- dragonbyu
- al415
- Montero_cruz
- Bri91
- CJD
- cyclesomatic
- AZvanman
Total: 640 (members: 42, guests: 598)