Pro-Rig V2.0 - Home Built Compact Composite Pop-up

CoyoteThistle

Adventurer
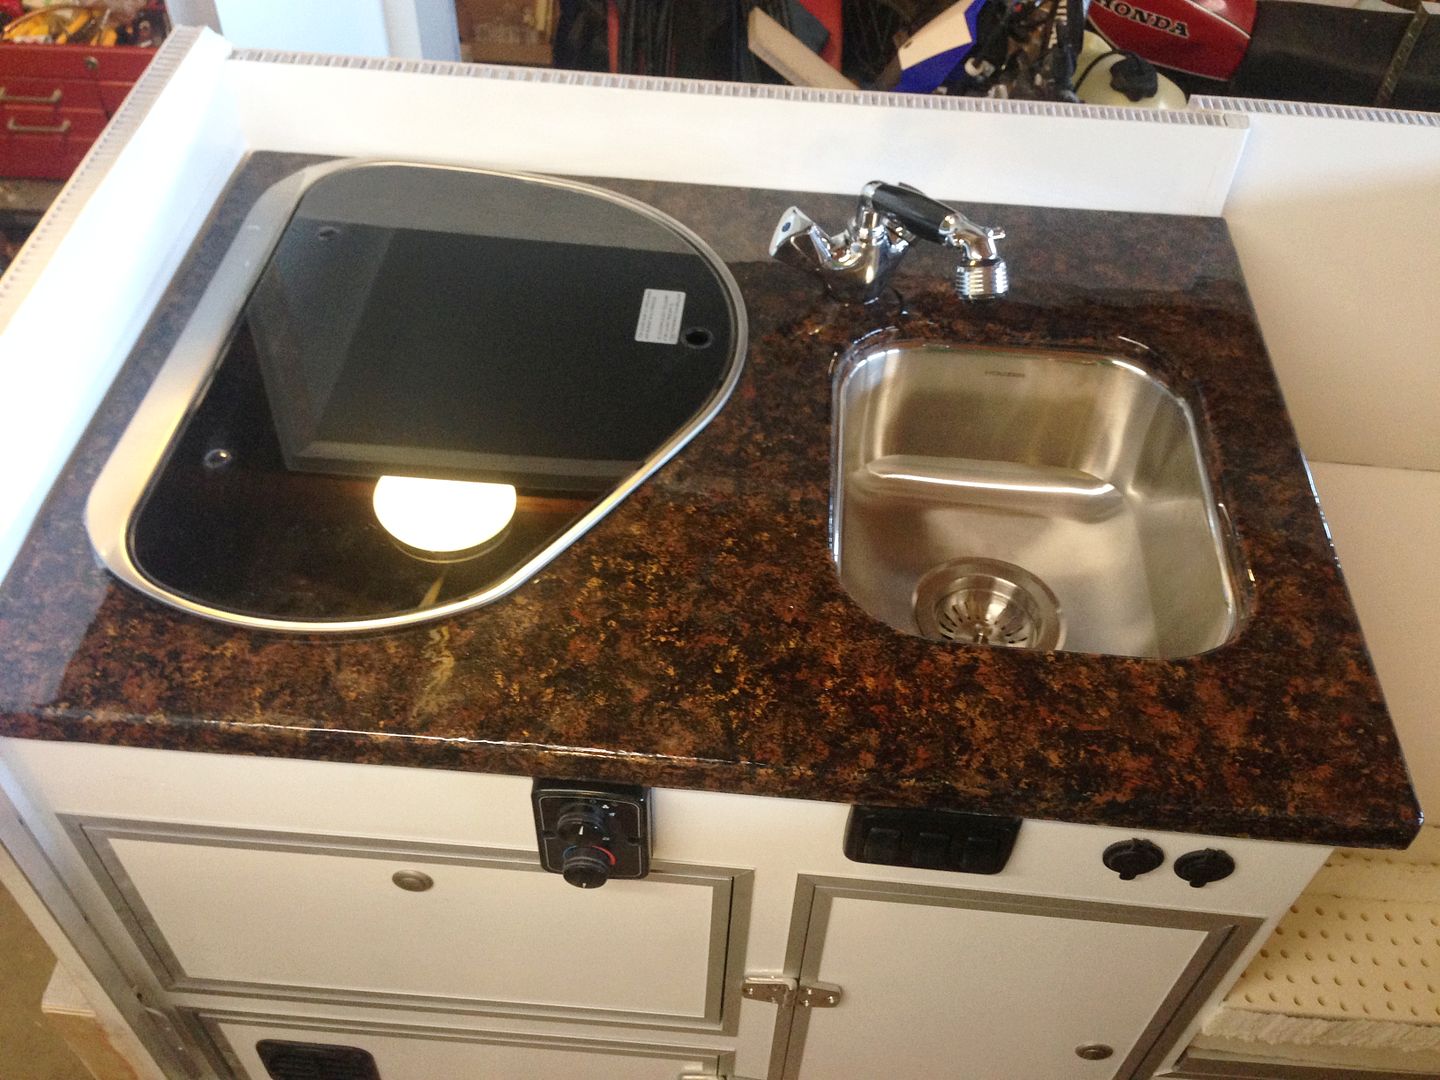
Mocked up the kitchen now that I'm done with the counter top. The faucet is a hose type and will double as the shower.


Little trimming to do and I won't actually install it yet. Little more work to do inside the cabinet (backing plate for one of the camper anchoring points) that will be easier without all that in the way. Fun to finally see it all together though. I'm pretty happy with the way it turned out :sombrero:

Also got after the door again today. The upper part is essentially done. The outer side got a chunk of aluminum angle (sealing surface for the slide-up) and a couple strap hinges.


Inside gets a handle, a couple spring loaded latches and a gas spring.


Not done with the camper-side mount for the gas spring yet. Need to get that done before I kill myself by dropping the door on my head/finger/back/etc.

Here's a closer look at the latch. Push the button to release.


Need to get after the lower half of the door next...
 

scott7022

Nobody
You commented about Lithium. If you are going that way I would suggest the Sterling-Power BBW12180 DC to DC,it isn't cheap but it is marine grade waterproof. It will take 180amps of power and controls the voltage precisely for the chemistry, taking it up or down (most important for lithium) as modern alternators can toss some high voltages. Stick a 180 amp circuit breaker between it and the battery lead, you got to fuse it anyway, protects it and allows you to manually trip it if your alternator is getting hot. Lithium love amps and will put a huge strain on a stock alternator. You don't run into the same issues bulk charging Lipro so long run times aren't required in the same way. This was the route I was going until I dumped the Lipro for the FireFly. Expensive but...so is 200 Amp/hrs of Lipro and mixing automotive industry stuff... This is like pushing the easy button.
 

CoyoteThistle

Adventurer
You commented about Lithium. If you are going that way I would suggest the Sterling-Power BBW12180 DC to DC,it isn't cheap but it is marine grade waterproof. It will take 180amps of power and controls the voltage precisely for the chemistry, taking it up or down (most important for lithium) as modern alternators can toss some high voltages. Stick a 180 amp circuit breaker between it and the battery lead, you got to fuse it anyway, protects it and allows you to manually trip it if your alternator is getting hot. Lithium love amps and will put a huge strain on a stock alternator. You don't run into the same issues bulk charging Lipro so long run times aren't required in the same way. This was the route I was going until I dumped the Lipro for the FireFly. Expensive but...so is 200 Amp/hrs of Lipro and mixing automotive industry stuff... This is like pushing the easy button.

Yeah, that Sterling is a nice unit - but even the 60 amp version costs way more than my battery! Good choice if money is no object or you're protecting a big $$ bank - I'm looking towards a simpler yet effective approach. We'll see how it goes...

FireFly is interesting, but is the charging profile of your alternator correct for that chemistry? I know that it is in the lead-acid family, but not all lead-acid variants want to charge alike - gel batteries need a different charging profile than the common flooded lead acid (FLA) for instance or they can be damaged. FireFly info says bulk charge at 14.4v - that's lower than many modern alternators put out (as you noted). The impressive data they tout seems to all be from bench chargers (I assume programmed to the optimal voltages). How will they perform in the real world of alternators with bulk/absorption/float voltages engineered for FLA will be interesting to follow. I hope early adopters like yourself will track and post their experiences!
 

scott7022

Nobody
Yeah, that Sterling is a nice unit - but even the 60 amp version costs way more than my battery! Good choice if money is no object or you're protecting a big $$ bank - I'm looking towards a simpler yet effective approach. We'll see how it goes...

FireFly is interesting, but is the charging profile of your alternator correct for that chemistry? I know that it is in the lead-acid family, but not all lead-acid variants want to charge alike - gel batteries need a different charging profile than the common flooded lead acid (FLA) for instance or they can be damaged. FireFly info says bulk charge at 14.4v - that's lower than many modern alternators put out (as you noted). The impressive data they tout seems to all be from bench chargers (I assume programmed to the optimal voltages). How will they perform in the real world of alternators with bulk/absorption/float voltages engineered for FLA will be interesting to follow. I hope early adopters like yourself will track and post their experiences!

I will post up how they do when I have some real data. Early adopters... Yeah that was me and lithium watching technomedia do their gig. I seemed to have come full circle. Yes the Fireflys are like some lithium profiles 14.4 no float. On another thread someone posted a video, I had seen, done by boating magazine about a year long real world application. It seemed to hold up. We shall see. For me it's not so much "money no object" it is just redundant and easy. I am a sucker for convenance. I will probably use Sterling for the fireflys as well. I forgot you built your own battery, had to back and read again. Well done and I would say you are an early adopter, early at doing it correctly!
 

CoyoteThistle

Adventurer
Okay, spent the last few days fighting the laws of physics and geometry and trying to get the doors and gas springs working together. Can't say I understand it but through trial and error, muddled through the process.

First attempt at the upper door came out okay, just beyond 90 degrees.


After smacking my head on it at least half a dozen times :mad:, I decided it needed to open more. Had to re-drill some holes but I'm much happier with this angle.


The strut is holding it up at this angle, but just barely. Need to get the same length in a heavier weight rating, which I think is possible.

Bottom door took a few attempts due to my incompetence and the odd shape. There's a few extra holes involved here too, but I think I have it working. Strut in this case is to keep the door from slamming open.


Final part of the mock up is to get the support cables on the bottom half. Then I'll pull it all off and fill holes, sand, re-paint, etc.

Here's a look in the closed up position (need to do a little alignment on the bottom door in the final install).


This picture reminds me, I still need to drill the hole in the upper for the dead bolt too.

The door is one of the few aspects of the project that I didn't give a lot of thought to before hand, thinking, I'll just figure something out. Kind of a relief that this approach seems to be working. So, on the the next thing...
 

The Artisan

Adventurer
The door is one of the few aspects of the project that I didn't give a lot of thought to before hand, thinking, I'll just figure something out. Kind of a relief that this approach seems to be working. So, on the the next thing...
I know, in the same boat with my counter sunk locks and knob. Design is there just need to build it.
Kevin
 

CoyoteThistle

Adventurer
I know, in the same boat with my counter sunk locks and knob. Design is there just need to build it.
Kevin

You're gonna have to give an update soon on your build - I'm sure I'm not the only one patiently looking forward to more details on what you've been up to :coffee:

Looks great from over here.:sombrero::sombrero:

Thanks! Hiding or showing the imperfections is all about the angle of the photo! lol.

Now then, funnest part of the progress today was, for the first time, putting the roof on to the slide-up. Would it line up and fit??


:wings: It fits! Gaps around the edges are real even too. Pretty stoked. Now as long as the whole thing fits on the main part of the camper, we're in business. Held off on installing the hinges, figure I might as well paint first. Test fit the solar panel - looks like I can get 300w up there if I want. Will probably go with 200w on the roof and maybe have some portable wattage too for when we want to camp in the shade.

While I had it all out, I tested these guys


Known as a Breha canopy lifter - straight from Oz. My idea was one on each end but I don't think they have enough lifting strength so I just ordered two more. They are rated at 30Kg of force but I think now that might be for a pair. Two of them just support the slide up (without the roof) which I estimate is in the 50-60lbs range (little less than 30Kg). Not happy about spending another $300 but I think the lifting capacity of four will be pretty perfect (roof weighs about the same as the slide-up alone).

Finally bit the bullet and started in on exterior paint. Did some prep and did a coat of spar varnish on all the wood that didn't get a layer of fiberglass. I'll let that dry overnight and then, if all goes as planned, get a coat of primer on tomorrow - exciting stuff!
 

The Artisan

Adventurer
Thanks Coyote working on customer projects, just took in a full custom sprinter for limo service. I will make time to work on it though.
I have a few more designs as well for truck beds, simple shells with angled folding canvas/poly sides.
Kevin
 

CoyoteThistle

Adventurer
Got after the the next step in the painting process - primer. Only got to the roof and the bottom of the camper itself. The latter was fun, laying on my back, trusting the jacks, getting paint spreckled all over me and inhaling fumes despite a mask. Here's the selfie laying underneath :sombrero:


I think I'll leave the bottom in just primer, can't think of a good reason to do a top coat?

Got back to work on the table - which has been the bane of my existence. Don't know why exactly, just a lot more work than expected I guess. Got about four layers of tung oil on. Then lots of clamping and gluing to get the edges on. Little work filling of gaps and re-staining around the edges. Few layers of shellac. Main part of the table is looking pretty neat though.


Edges of the leafs are still getting glued up. They're turning out okay. Final coat will be something called "salad bowl finish" - non toxic varnish type thing (I think?).
 

Forum statistics

Threads
185,815
Messages
2,878,494
Members
225,378
Latest member
norcalmaier
Top