ImNoSaint's 2.5 Thread

Imnosaint

Gone Microcamping
Will you share what brand replacements parts you put on the front end? My Montero needs the same.

Thanks for sharing. The build thread and photos are excellent.

Thanks. I went Moog all around, though I can't remember exactly what wheel bearings went in.
 

jaccox23

Adventurer
Thanks. I went Moog all around, though I can't remember exactly what wheel bearings went in.

I went moog all around as well and went with timekin on the wheel bearings. Happy as can be. My lower balljoints grease zirk is kinda off center but it still works. Except idler and I went with the adventure driven design complete kit and my steering is right where I feel it would habe been 18 years ago from the factory.
 

jms_brns

Observer
Very cool roof rack, thanks for the tips. My only concern, is I thought I read that the stock roof rack is only rated by Mitsu for 75lbs so you might want to be careful about overloading it past that point. I think that's why most guys are taking the stock rails off, and adding perpendicular rails from the gutter mount.

The Pro Line brand is a popular choice among guys in the FB group, I plan on getting them soon as well and can provide more details then.

http://www.prolineracks.com/proline-gmr165-rain-gutter-racks.html

Sorry to veer off topic, but @SONICMASD do you know if the rating (165 lbs capacity) on the Proline Racks website is correct? Or do you know what types of loads the guys on FB are using them with? That capacity would keep them from being usable with a roof top tent... Price is awesome though.
 

Imnosaint

Gone Microcamping
Rear Door Mod Redux

Attachment-1.jpeg


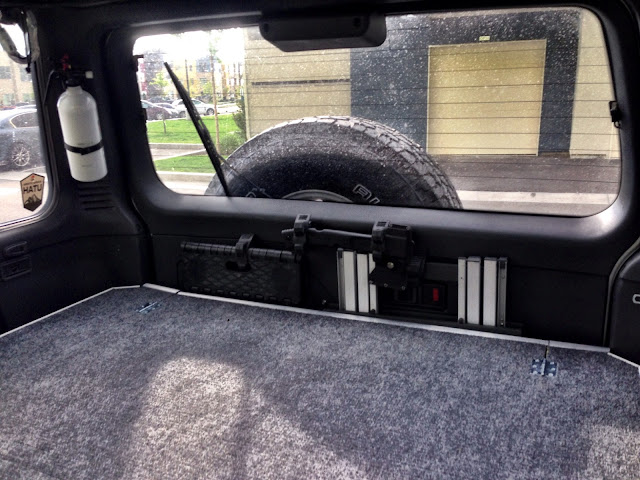
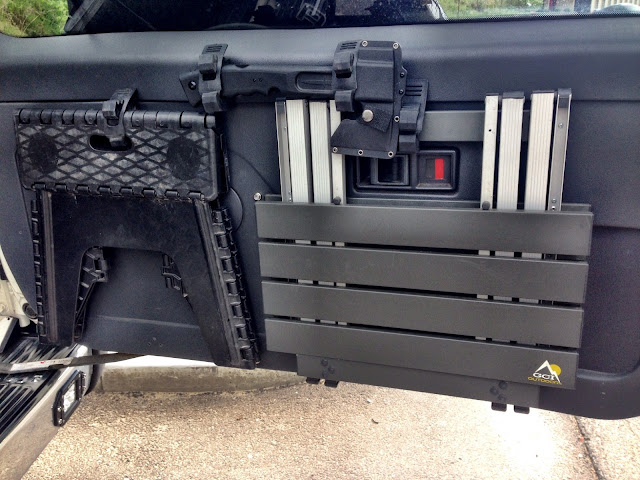
With the platform insert there aren't many ways to stow flat rigid items and yet there are two that are indispensable to our travels, a folding step and a folding table. The step is used around the rig when packing the roof rack and it gives my dog a literal leg up in hopping into the back.

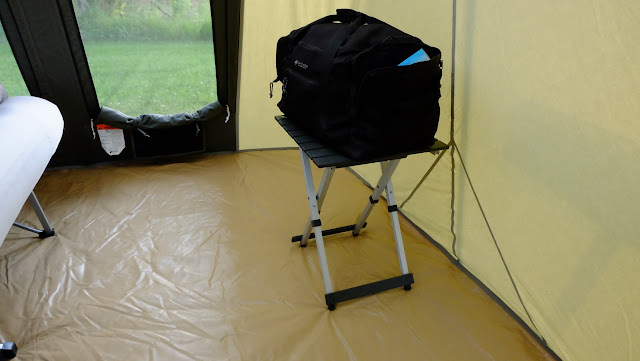
The table is an 18X20" GCI compact camp table that's just right for dining for two of us or to get gear off the tent floor.

DSCF2198.jpg


With the previous mod of the utility shelf eliminated it opened some real estate on the rear door where these items could be stowed. It all works around the Camillus hatchet/door handle well and the placement still kept a window to access the interior door lever. Quick Fists are the greatest kit out there for this kind of arrangement.

Attachment-3.jpeg
 

Imnosaint

Gone Microcamping
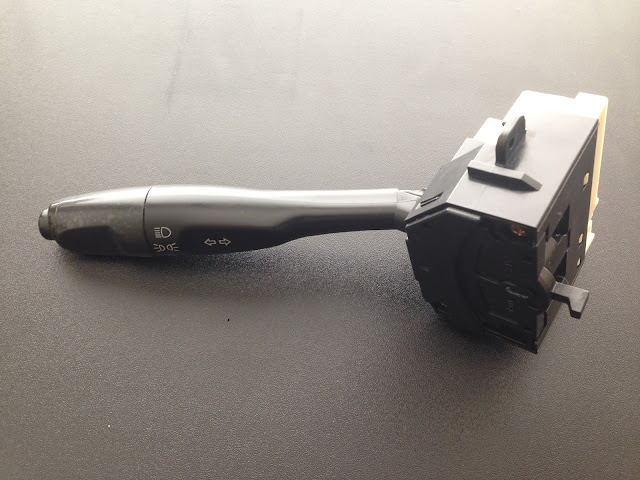
Noncancelling Turn Indicator Fix

Turn%2BSignal%2BCluster.jpg


Out of the blue the left turn indicator won't cancel, so I pulled the fuse and made my way home illegally. Don't tell anyone.

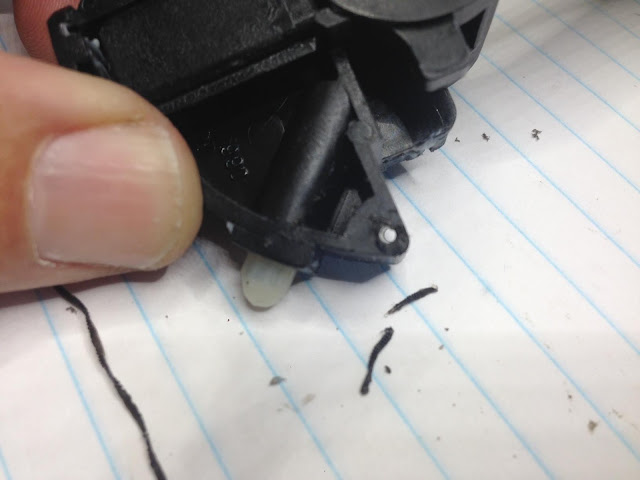
I disassembled the assembly and here's what I found.

cancel%2Bassembly.JPG


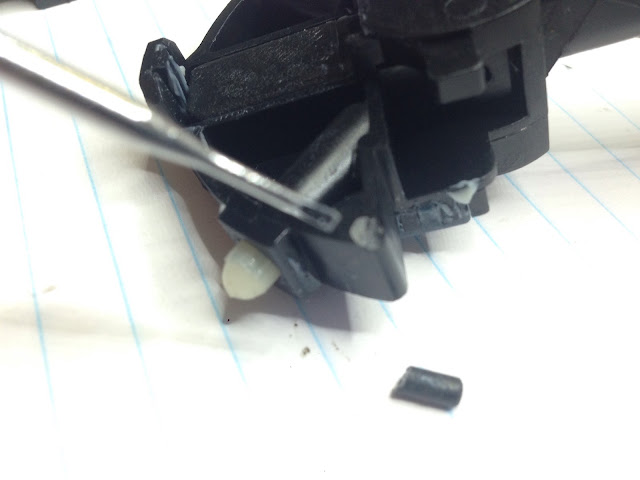
After removing the stalk subassembly, inside the case I found what was left of a small black plastic pin stuck inside the white slider that makes and disconnects the circuit when the slider is moved mechanically by the stalk subassembly.

Turn%2BSignal%2Bpin.JPG


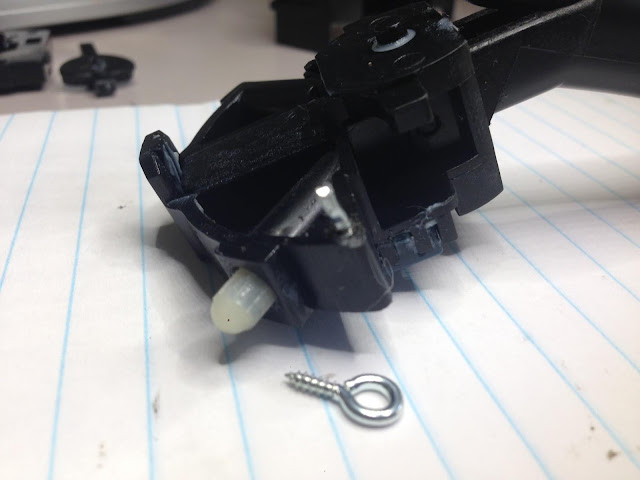
I removed the piece and located its original position on the stalk subassembly.

TurnSignalBrokenPin.jpeg


I drilled a 1/16th inch pilot hole,

IndicatorHole.jpg


and then straightened a 1/16th inch eyelet and cut it to the approximate length of the plastic pin and screwed it into the pilot hole.

Indicator%2Bfix.jpg


Works perfectly.
 

Imnosaint

Gone Microcamping
ARB 2000 Awning and Room

IrishEstMontDirver.JPG


Completing the sleeping platform and rear ARB awning is a second ARB awning, this one the 2000 (6ft.) along with ARB's awning room. The room has two large mesh windows with zippered flaps and grommets for poles to provide additional shade while open. The main door is also mesh with a sturdy zippered flap. Inside is an additional door to access the vehicle's passenger door.

IrishIntTent.JPG


This room is 79" x 98" and has ample space for a dining area, a changing room, provides protection from the elements and a spot for our dogs to sleep while we sleep in the truck.

InrishIntMontPlat2.JPG


The awning and tent deploy in just a few minutes.

IrishEstMontPass.JPG


During our first week of ownership we were camping at Valley of the Gods when we were hit by a violent microburst that took out one of the rafters of the 2000 awning. I emailed ARB to order a new part and they replaced it under warranty and had it delivered within three days so we could continue our tour. Great product, outstanding customer service.

The awnings tuck into a heavy duty nylon reinforced PVC bag with a double zipper system, the tabs of which disappear into a pouch to keep them from flapping around.

BuhlTroutEst.jpg


The tent room rolls up small enough to fit in an Outdoor Products 40 liter dry bag stowed on the rack.

StarbuckStart.jpg
 

Imnosaint

Gone Microcamping
Can you enter the ARB tent room using the second row door or only through the outside?

You can enter the room from the vehicle through the second row door. The tent door is wide enough to allow the vehicle door to open fully. That's how we get onto the sleeping platform when we're hitting the sack.
 
Last edited:

SONICMASD

Adventurer
Sorry to veer off topic, but @SONICMASD do you know if the rating (165 lbs capacity) on the Proline Racks website is correct? Or do you know what types of loads the guys on FB are using them with? That capacity would keep them from being usable with a roof top tent... Price is awesome though.

Sorry for the long delay in getting back to you, just saw this now! I don’t know how people are using them but my feeing is that Proline’s ratings are probably right and I plan to go with 4 bars to overcome this (if i end up going this route afterall, I think it will be 1” too tall to fit in the garage and am now leaning towards having a custom rack built instead).
 

SONICMASD

Adventurer
Imnosaint- an absolutely amazing thread just like your others, thank you for documenting these mods in so much detail!

Regarding the Awning and Rack set up, what kind of noise and mpg impact have you noticed? I’m very temped to do the same thing!
 

Imnosaint

Gone Microcamping
Imnosaint- an absolutely amazing thread just like your others, thank you for documenting these mods in so much detail!

Regarding the Awning and Rack set up, what kind of noise and mpg impact have you noticed? I'm very temped to do the same thing!

Thanks. I've been a fan of yours since the III. To my surprise there's little noise impact all buttoned up. We travel a lot with the sunroof open and there's a bit of a whistle at speed, but it's never been bothersome. I've since lowered the rack (coming up on the next post) hoping to shave some drag and it seems to have worked by a mile and a half in fuel efficiency. That means I'm getting 13.8 MPG loaded now versus 12.3 before. However, we did hit 17MPG in Oregon, fully loaded, sans O/D. Go figure.
 

Imnosaint

Gone Microcamping
IMG_1516.jpg


The Apex Roof Rack has served our adventures well, stowing cargo and being a platform upon which to mount two ARB awnings.

StarbuckStart.jpg


But the drag knocks a mile-per-gallon off the Monty's mileage. I drive 700 miles a week traversing the great State of Utah for my commute and need every MPG I can get.

And I've always had an issue with how high the rack rides on the stock roof rails (though I should note stability was never an issue) and with how tall the rack itself is. So on my last commute back to the Wasatch I came up with a plan. It's that damn tinker gene.

I started by reducing the height of the Apex Rack, knocking it down by and inch and a quarter.

IMG_1502.jpg


I cut that much off each vertical upright keeping the necessary mounting dimensions I needs for both ARB awnings. I used a brass pipe cutter that worked as precisely as I needed.

IMG_1503.jpg


Once cut, I deburred each upright, reassembled them with the stock Apex hardware and installed.

IMG_1504.jpg


This gave me a platform to work with in mocking up a gutter mount versus using the stock roof rack rails.

As with anyone who's ever tried to remove the stock rails, I had two screws that wouldn't budge - passenger side front and driver side rear. I found that a quick and strong twist on the initial turn of each screw was enough to break it free of its weathered mount, but that was not the case with these two. The passenger side just rotated in the thread bucket so I leveraged a large flat screwdriver from the sunroof side under the rack foot. This gave me enough tension to keep the bucket from rotating while I broke the screw free. My efforts did pop the bucket up about an eighth of an inch.

The rear one wouldn't budge so I drilled out the top of the screw with a 5/8ths bit until I reached the rack foot material and pulled the assembly right off. I ground down the rest of the screw head.

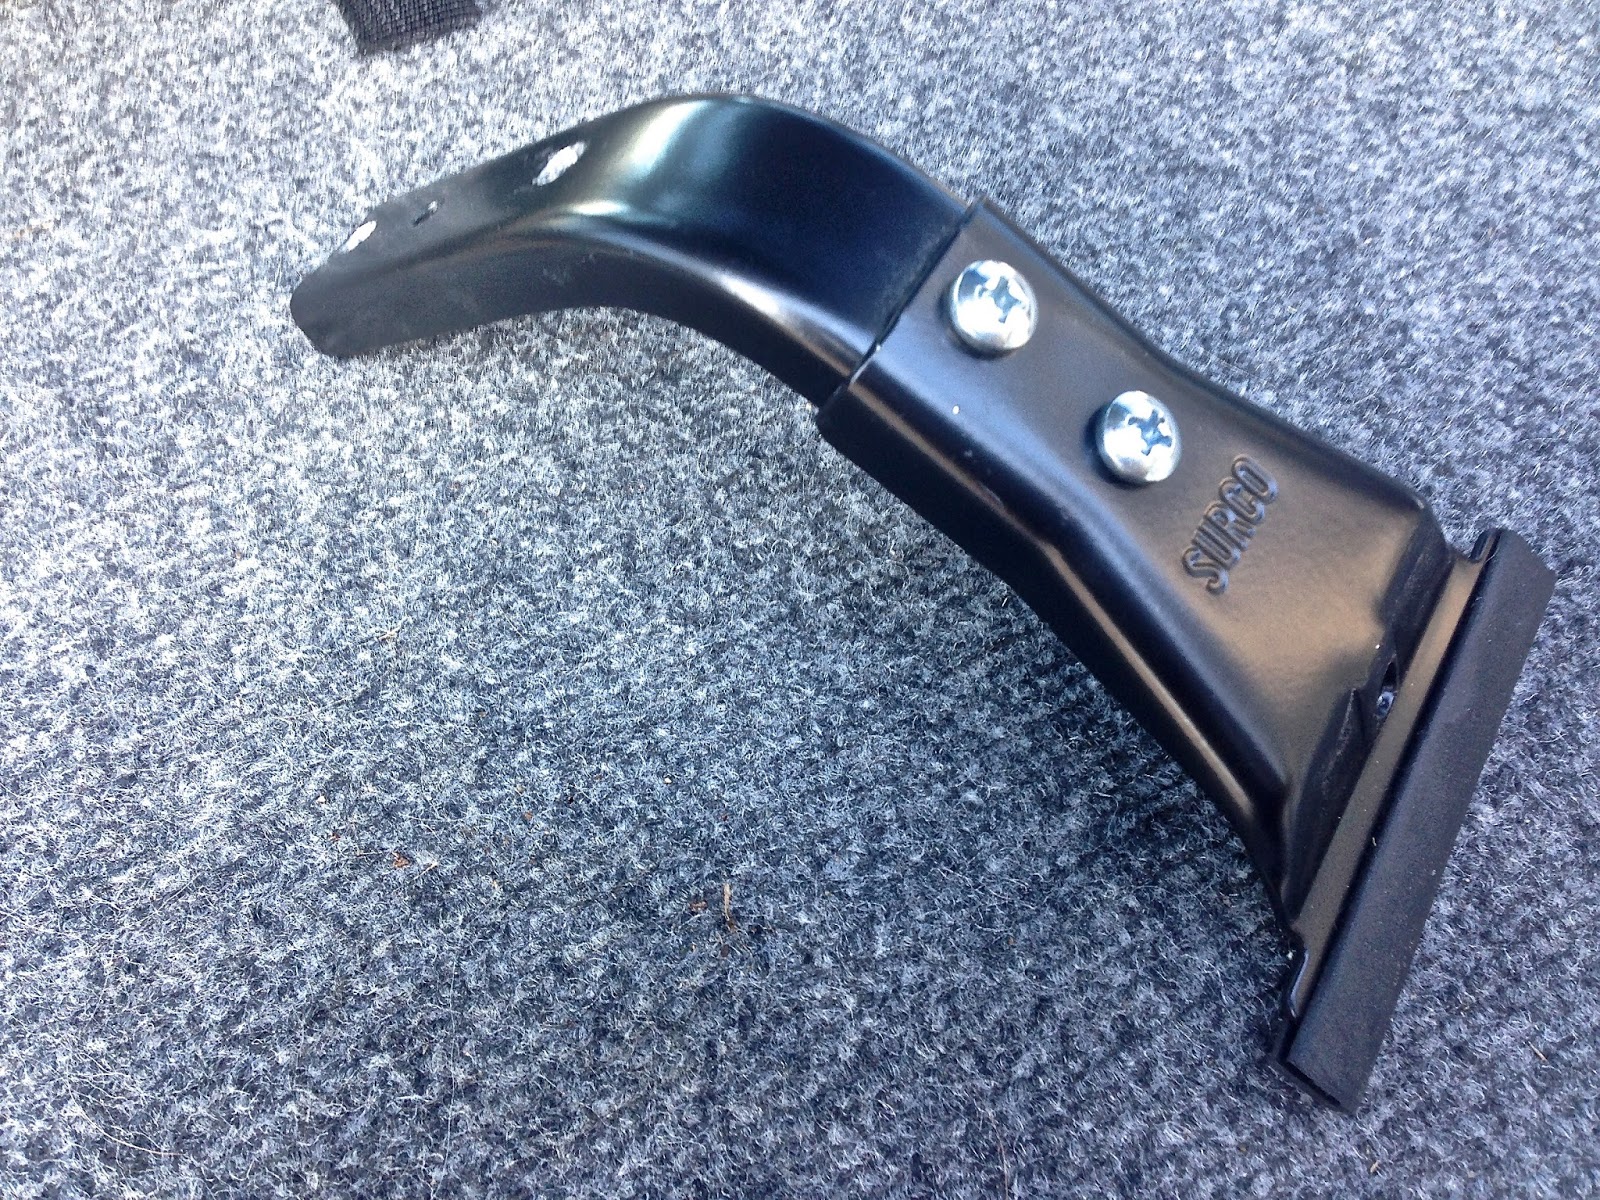
I picked up a pack of four Surco 5 1/2 GM-100 roof rack gutter mount adapters. The 90 degree upright has two lengths, assembled in the pic below at it lowest height, creating a longer length on its horizontal throw.

IMG_1510.jpg


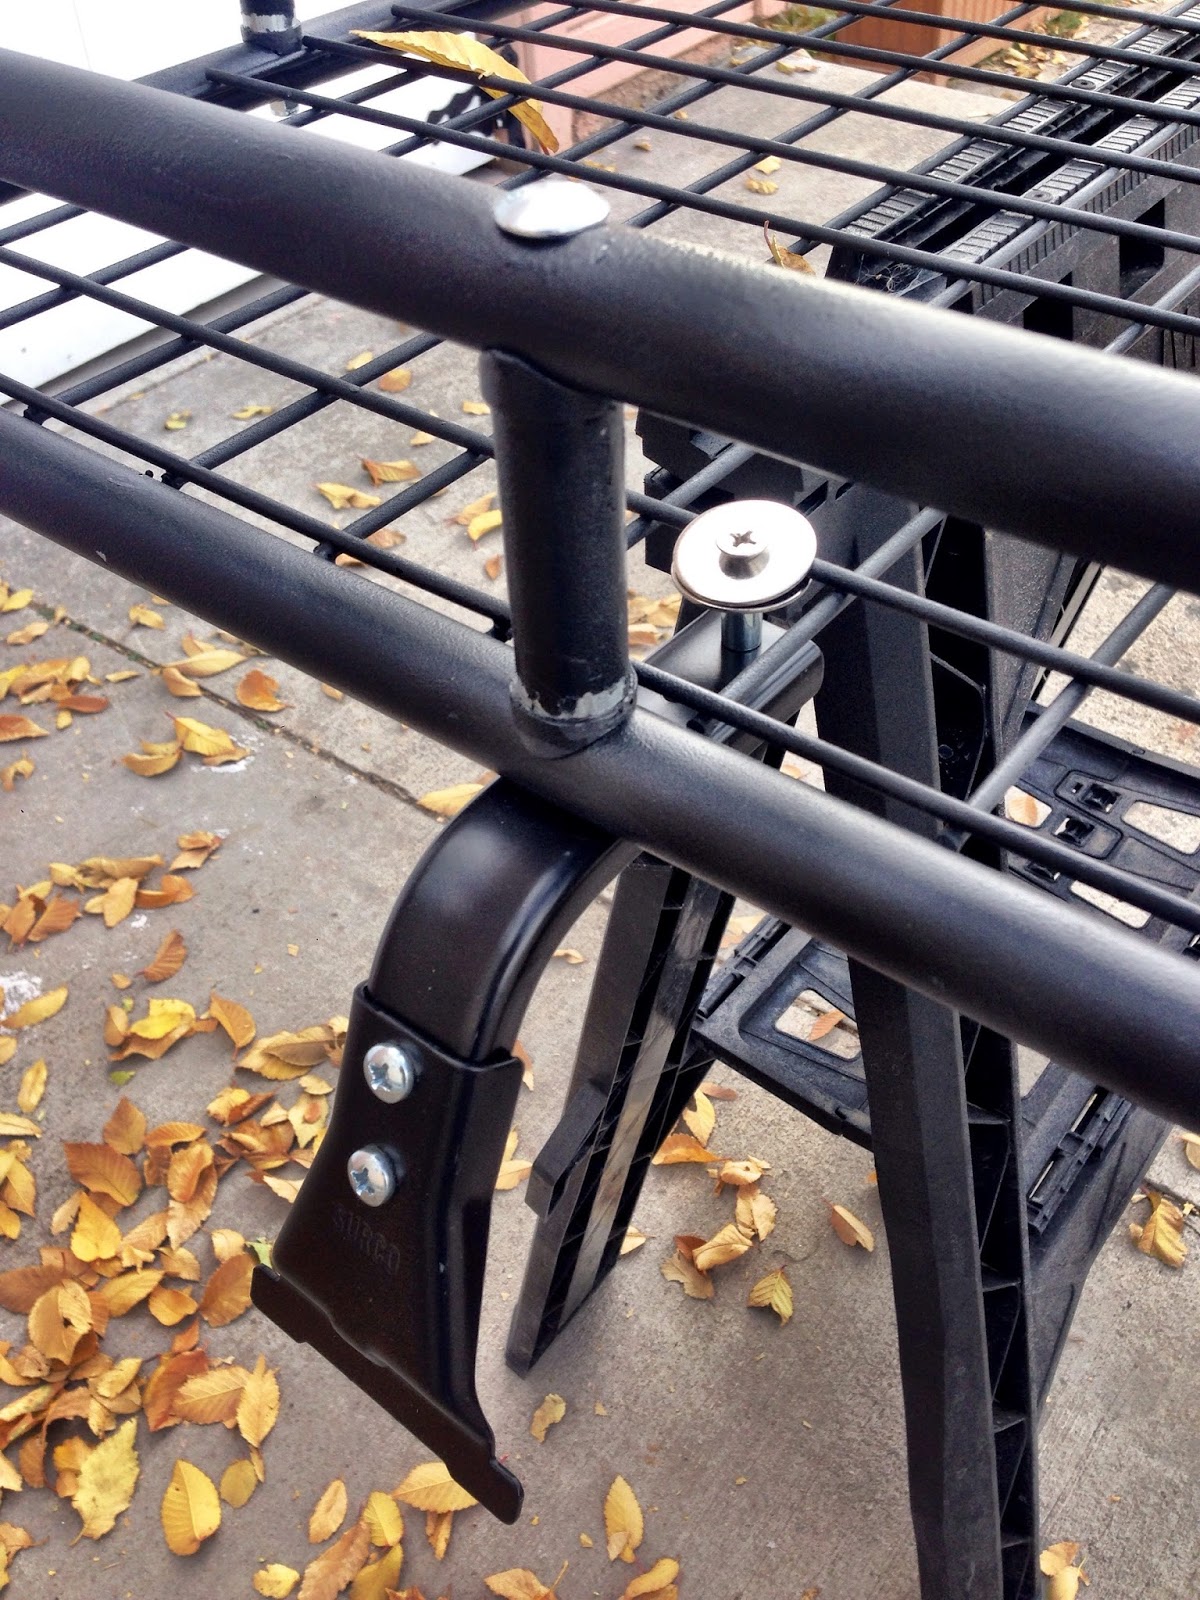
With the stock roof rack still on, I placed the Apex rack on the rails and did a test fit with the gutter clamps. I measured and drilled a third hole on the top of each stanchion (above) to accommodate a mounting point on the Apex rack using its vertical hardware.

IMG_1514.jpg


I mounted the gutter clamps to the Apex rack at each of the uprights and added a stabilizing mount with stainless washers and hardware. I'm not a fabricator and this was the best I could do with off-the-shelf pieces.

I did a test fit and it mounted perfectly.

IMG_1511.jpg


I was a little concerned about load stability and rack rigidity, but once it was up there the center of the rack rests on the parallel rubber strips from the stock rack and when I tested it with my own body weight (MUCH more than what I'd ever stow or attach to the rack), I was satisfied. Solid, no give, no sag.

I removed the rack and shot it and all the hardware with three coats of bed liner and then added two 5-inch, flood/spot combo LED Osram lamps with a Lamphus Cruiser mounting kit.

IMG_1513.jpg


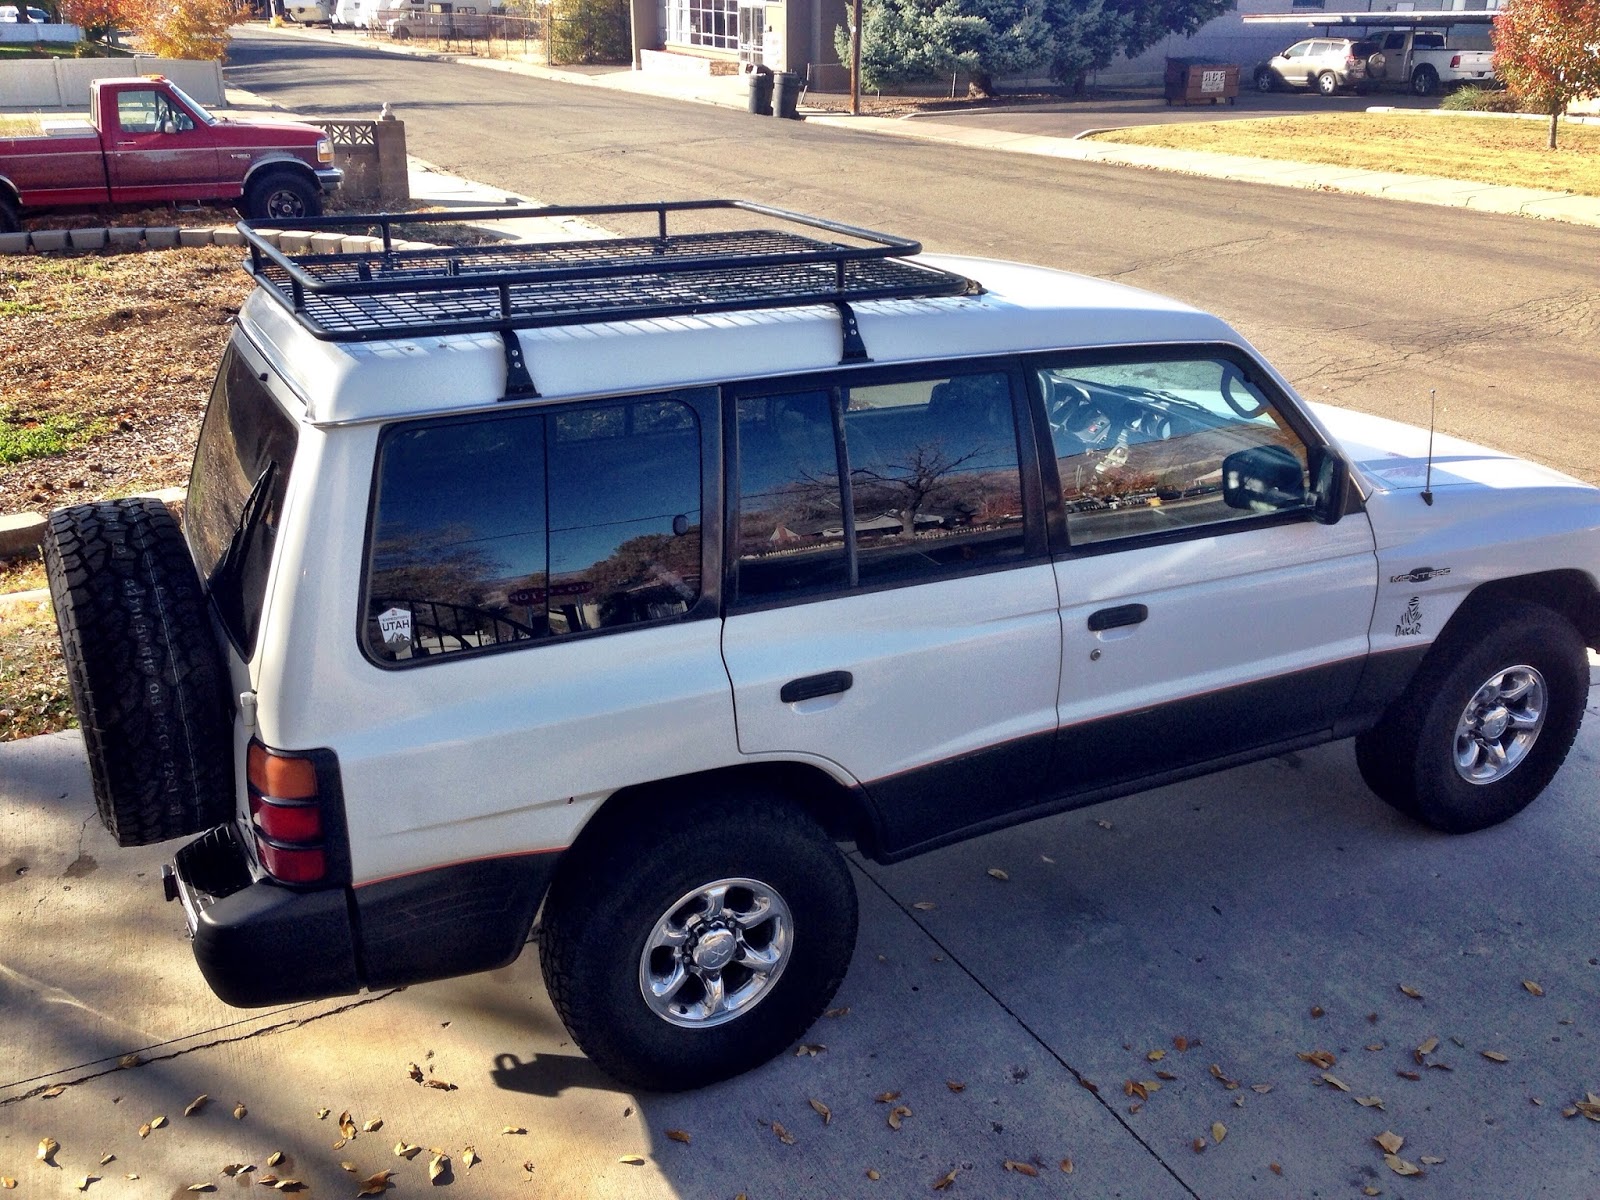
With all the mods complete, I mounted the rack.

IMG_1518.jpg


The gutter mounts come with locking nut hardware which works great on assembling the mounts to the stanchions, but not-so-great in combining the gutter clamp to the mount. Since there's very little clearance behind the clamp on the forward mount, it's impossible to get a nut behind it and thread the bolt through to secure it, so I reversed the bolts, feeding each one through at all four points and used standard nuts with lock washers to secure the clamp. The locking nuts would just spin the bolt when I tried to torque them down. The standard nuts brought the bolt to clamp forward and seat behind the stanchion allowing me to torque the lock washers and secure the mount.

IMG_1519.jpg


I drove it up Bountiful Mountain for a shake test and pics. I haven't wired the lamps yet since I'm installing a Blue Sea Blade fuse block like in other builds to handle all my accessory loads.

No rattles, but I'm a little concerned with the clearance of the Lamphus mounts above the sunroof. I'll fabricate a foot I can squeeze in between the rack and the roof on either side to the sun roof, since I'll be mounting my Hi-Lift jack just behind the lamps. Overall, I'm pretty happy with the outcome. We'll see what the mileage does on next week's commute.

IMG_1517.jpg
 

SONICMASD

Adventurer
************, great job on the roof rack modifications!

I scored a Garvin Wilderness Rack on Craigslist this week, it's for a Jeep Liberty but should work no problem. I went ahead and bought the same Surco mounts you recommended and will paint it with bedliner and install this weekend. Last night I too ran into the stock roof rail nut inserts that wouldn't come out. 3 our of 8 would just spin. 1 of those I was able to get out with the screwdriver tension method you mentioned, the other 2 had to be drilled and then cut off.
 
Would love to see how the MPG's are affected.

I bought the same rack and I too, wanted to lower it. There are some garages (including my own) that my montero doesn't fit in anymore.
 

Imnosaint

Gone Microcamping
************, great job on the roof rack modifications!

I scored a Garvin Wilderness Rack on Craigslist this week, it's for a Jeep Liberty but should work no problem. I went ahead and bought the same Surco mounts you recommended and will paint it with bedliner and install this weekend. Last night I too ran into the stock roof rail nut inserts that wouldn't come out. 3 our of 8 would just spin. 1 of those I was able to get out with the screwdriver tension method you mentioned, the other 2 had to be drilled and then cut off.

I really liked my Garvin rack on the H3. Smart design with the diagonal stanchions that reduce noise, and lightweight. ARB awnings mount up to it just fine, as well. Looking forward to seeing it on your rig. Love the trailer, by the way. Note what I had to do on the Surco mounts with the clamp nut. Might save you some frustration in mounting.
 

Forum statistics

Threads
188,390
Messages
2,906,515
Members
230,176
Latest member
Arcadia1415
Top