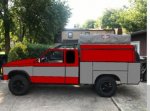
S10 Build getting started

Meili

Adventurer
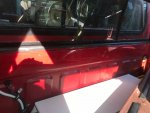
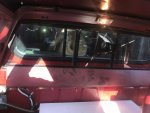
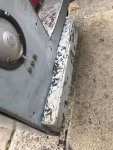
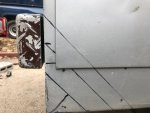
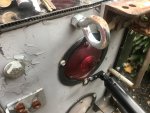
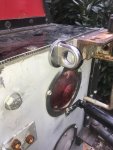
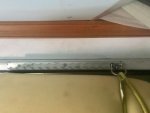
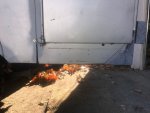
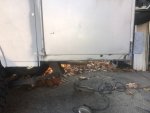
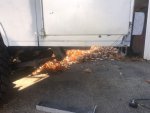
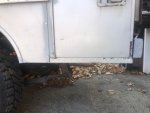
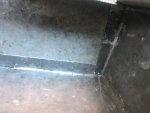
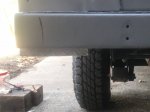
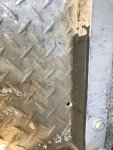
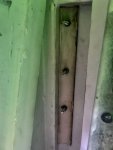
Another thing I found was the sealing I did on the rear of the bed worked well. It worked so well that it holds a large quanity 40 degree water while camping.

I found this out one am while getting out of the warm camper when I sat on the ledge. Talk about a shock, instant cold-wet ********!

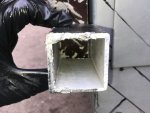
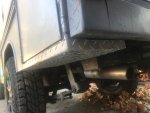
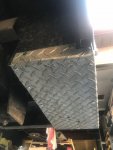
The hi-tech solution was to drill 3 drain holes.

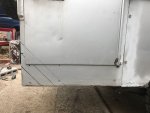
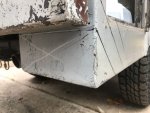
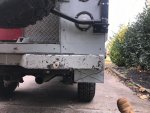
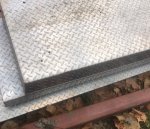
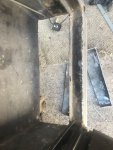
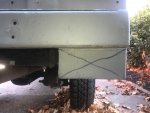
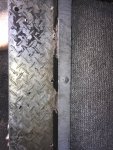
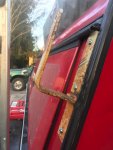
Also will be removing the seal from the bottom sill and putting it on the door out of harms way. Seems someones hiking boots like to tear it up. Doh!

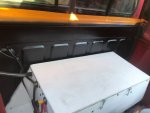
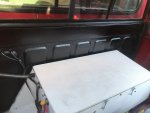
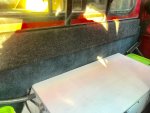
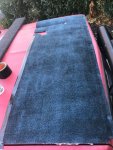
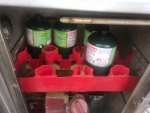
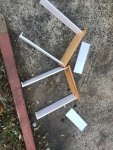
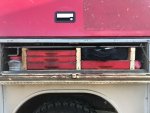
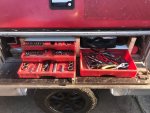
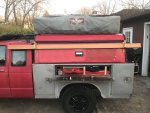
Last was to create a better way to carry some tools. I have one of those Craftsman tool box that are made from plastic with 4 drawers that have a molded spot for each tool.

I love it, holds the tools in place even when bouncing around in my old trucks bed as long as there is a bungee around it keeping it closed. Problem is it does not fit in any cabinet.

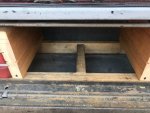
I used guts from some old drawers and a piece of wood from my old water bed frame to make the rack. When the door is closed, it locks the drawers in place.

Worked out pretty well, the shelves still need to be glued but I am going to hold off until I see how the wood reacts varied weather conditions.

Don't want it swelling up ,locking everything in place.

24,601
 

Attachments

  • s10 drip.jpg
    s10 drip.jpg
    94.6 KB · Views: 17
  • s10 drip 1.jpg
    s10 drip 1.jpg
    117.6 KB · Views: 17
  • s10 tool.jpg
    s10 tool.jpg
    114.9 KB · Views: 17
  • s10 tool 1.jpg
    s10 tool 1.jpg
    122.6 KB · Views: 17
  • s10 tool 2.JPG
    s10 tool 2.JPG
    102 KB · Views: 17
  • s10 tool 4.jpg
    s10 tool 4.jpg
    139.8 KB · Views: 17

Meili

Adventurer
Added some hooks/branch catchers to carry wood, pipe, whatever. Trying to put the utility back in the utility bed.

Not sure of what thier original use was, extension cord spool/rack?

Anyway, on the inside there is a curved piece of metal that jams into the corner to reinforce them from the inside.

It's hard to see, but also drilled a hole in the in the top of the outside fork. Never can have enough attaching points.

They stick out less then the side of the utility bed, that is a 6 foot level on the leftside of the photo that is against the bed.

The board in the picture is 9 foot and it does not extend past the spare tire on the back.

Only used 1/4" hardware, swagging that if the catch something the hardware will break loose before ripping the cap.

Hope never to test my theory!

24376
 

Attachments

  • s10 hook 7.jpg
    s10 hook 7.jpg
    294.9 KB · Views: 18
  • s10 hook 8.jpg
    s10 hook 8.jpg
    56.6 KB · Views: 18
  • s10 hook 9.jpg
    s10 hook 9.jpg
    42.3 KB · Views: 25
  • s10 hook 10.JPG
    s10 hook 10.JPG
    132.2 KB · Views: 27

FBJR

Adventurer
I always thought about getting a truck with a service bed. I seem to carry so much that I need it and really loose no bed space.
 

chilliwak

Expedition Leader
Looks like you have a really functional truck there Meili. always good to see the cool updates that you are up to. Cheers, chilli..:)
 

Meili

Adventurer
The problem with all the space is you fill it, gets heavy!

The truck is like driving down the road in a tin can since the back 1/2 of the cab is bare metal.

I coated the lower back wall area with rubber bedliner first.

My 88 has carpet back there, so it donated it to the project.

The carpet back is heavy rubber. Also glued jute to it and taped the bottom so ease sliding it behind by the battery box.

Should provide both thermal and acoustic insulation.

There is a bare metal finish cap that goes across the back and helps clamp the carpet in place. It got covered too.

I forgot to take pictures of covering the metal cap with leftover speaker material. Oh well.

They dont quite match,though it looks much worse in the pictures.

It helped alot. Still have to do the cap sides around the windows.

Going to repurpose some speakers I have gathered over the years to make a nice sound system.

I have started looking for a cheap head unit that includes a back up camera.

24424
 

Attachments

  • s10 carpet.jpg
    s10 carpet.jpg
    93 KB · Views: 15
  • s10 carpet 1.JPG
    s10 carpet 1.JPG
    75.7 KB · Views: 15
  • s10 carpet 2.jpg
    s10 carpet 2.jpg
    118 KB · Views: 15
  • s10 carpet 3.jpg
    s10 carpet 3.jpg
    241.5 KB · Views: 15
  • s10 carpet 5.jpg
    s10 carpet 5.jpg
    86.5 KB · Views: 15
  • s10 carpet 6.jpg
    s10 carpet 6.jpg
    160.4 KB · Views: 15
  • s10 carpet 7.jpg
    s10 carpet 7.jpg
    88.2 KB · Views: 14
  • s10 carpet 4.jpg
    s10 carpet 4.jpg
    345.6 KB · Views: 15

Meili

Adventurer
"Have you thought of lizard skin or the matting?" What and spend money, sometimes I think you don't even know me!

Kidding aside, I do have a few pieces of FatMat leftover from my resto days that will be going in the cap. Also I "like" to hear what the truck is doing, helps making sure small problems dont become big

problems.

Decided to install the rear bumper today. It's actually more of a ""bumperette" since it only sticks out a couple of inches.

It took about an hour of beating it with a 5 then 15 lb hammer to straightened it out somewhat. Finished straightening it the rest of way during the install using screws to pull and tug while hammering

method.

It's hard to see in the picture of my cut lines, quite a puzzle. It fit with only minor addition trimming.

It is spaced away from the back enough for a layer of diamond plate anticipating the rear notch. When final install is done there will be 8 inch 2x2 aluminum backers thru bolted.

In the one picture you see why I had to relocate the rear plate. It's tucked back as far as it can be now.

At some point would like to find some of the D shape rubber bumper material to add to it.

Next.
 

Attachments

  • s10 bump.jpg
    s10 bump.jpg
    135.2 KB · Views: 24
  • s10 bump 1.jpg
    s10 bump 1.jpg
    83.8 KB · Views: 24
  • s10 bump 2.jpg
    s10 bump 2.jpg
    84.2 KB · Views: 23
  • s10 bump 3.jpg
    s10 bump 3.jpg
    152.8 KB · Views: 21
  • s10 bump 4.jpg
    s10 bump 4.jpg
    87.6 KB · Views: 22
  • s10 bump 5.jpg
    s10 bump 5.jpg
    95.3 KB · Views: 20
  • s10 bump 6.jpg
    s10 bump 6.jpg
    109.2 KB · Views: 21
  • s10 bump 7.jpg
    s10 bump 7.jpg
    133 KB · Views: 22
  • s10 bump 8.jpg
    s10 bump 8.jpg
    74.1 KB · Views: 24
  • s10 bump 9.jpg
    s10 bump 9.jpg
    139.4 KB · Views: 24
Last edited:

Meili

Adventurer
Repurposed a old screen door closer to work on the swing out spare.

Added an extension so it can open close to 90 degrees. It now can be locked open in place

Before I would attach a bungee to keep it from swinging around in the wind. It could close locking me on the camper. That could be embarrassing.

Acually I did test if it closed with me in it before the side were enclosed. I could just reach around to get it open but don't feel like testing my luck.

Anyway, since it is well balanced, undo the the stop and it will slowly close with a nice click all by it's self!

Last hit the bumperette with some primer so it blends in a little more.

24566
 

Attachments

  • s10 spare.jpg
    s10 spare.jpg
    109 KB · Views: 16
  • s10 spare 1.jpg
    s10 spare 1.jpg
    127.7 KB · Views: 17
  • s10 spare 2.jpg
    s10 spare 2.jpg
    104.1 KB · Views: 18
Last edited:

Meili

Adventurer
I love when people call thier $70k+ truck "my jonk". In my case, it is litterally true!

Had some time yesterday since I am NOT watching the NFL.

I was never thrilled about the red color so drew up a few options for color combos to "de"red it.

The gray used would be an enamel type paint. Think tractor paint, no flake, no clear etc etc..

Be nice I am using the paint program that comes on the computer.

Anyway, feel free to share opinions either way.
 

Attachments

  • s10 side now.JPG
    s10 side now.JPG
    165.9 KB · Views: 24
  • s10 side red with gray.jpg
    s10 side red with gray.jpg
    20.8 KB · Views: 55
  • s10 side gray with red.jpg
    s10 side gray with red.jpg
    20.4 KB · Views: 21
  • s10 side gray.jpg
    s10 side gray.jpg
    20.7 KB · Views: 22
  • s10 side gray with black.jpg
    s10 side gray with black.jpg
    20.4 KB · Views: 22

Meili

Adventurer
Well, a not so quick update.

Did a bunch of little stuff.

Added 2 small sections of track, made out of the cut offs, to the P/S of the bed.

They are not really going to see any "load", just more anchoring spots for the tarp. May put the metal blade in my chop saw and put nice bevels on them.

Also mounted another cut off near the roof line inside the camper as another anchoring spot.

Put hooks on the P/S to match the set on the D/S.

Made metal brackets and installed my Back Seat Heat Plus in the camper. I have had it for 20 years. It first served under the 3rd row seating in my old Suburban for the kids.

Before going to the trouble of installing it, I did a test, left it on for 4 hours to see how it would work in such a small space. It got HOT inside, not warm.

It does suck 25 amps so it will not be used as a primary heat source, even though I do have 600 ah availible.

My plan is to use it to prewarm the camper while traveling with the alternator charging, think thermal mass. It could set the thermostat to low overnight just to take the edge off in a pinch.

Between it and a Little Buddy propane heater, I should be able to stay warm.

Might as well keep all your explosives together, thus a 1# propane tank holder made for a old coke rack.

Removed the eye hooks for the tail end and replaced them with hooks from my old truck box.

The guys where my shop is doing some welding so I asked them to do a little welding for me.

Behold , DIY flanging tool made of angle and a old vise grip.

Old truck box, flanging tool, where can this be headed?
 

Attachments

  • s10 little.jpg
    s10 little.jpg
    100.8 KB · Views: 13
  • s10 little 1.jpg
    s10 little 1.jpg
    120.8 KB · Views: 14
  • s10 little 2.jpg
    s10 little 2.jpg
    85.2 KB · Views: 14
  • s10 little 3.jpg
    s10 little 3.jpg
    240.8 KB · Views: 14
  • s10 little 4.jpg
    s10 little 4.jpg
    196.2 KB · Views: 15
  • s10 little 5.jpg
    s10 little 5.jpg
    92.9 KB · Views: 15
  • s10 little 6.jpg
    s10 little 6.jpg
    61.9 KB · Views: 15
  • s10 little 7.jpg
    s10 little 7.jpg
    88.9 KB · Views: 13
  • s10 cut 5.jpg
    s10 cut 5.jpg
    180 KB · Views: 13
Last edited:

Meili

Adventurer
So I came to a final design on the rear notch/cut of the back of the utility bed for clearance.

At first was going to be a long angled cut. That would make for some interesting angle work and leave me with an odd shaped space.

Next was a 45 degree notch but again would make challenging project but would save some usable space.

Finally decided to lop it off level and cap it using the nice, welded diamond plate corners of my old, beat-up truck box.

First cut off the bottom of the utility bed, leaving about 1 inch excess.

Now comes the DIY flanging tool, folded the edges in making a mounting surface for the diamond plate and hopefully add some strength.

A corner of the truck box was cut and fitted with self-tapping screws for now.

The little rear fender section was cut level to the bottom of the diamond plate to make look like it as suppoosed to be this way.

Excess diamond plate was left in the wheel well area which I marked and bent up inside for a nice tight fit.

Once I do the other side, they will be removed, then resecured with Quad adhesive to both glue and seal them up.

It gained about 3 1/2 inches of ground clearance and it is very solid already.

I may double skin the front corners of the utility box the same way.

I do have some turn down tips for the exhaust, so the exhaust will be cut back and turn downs installed for more clearance.

The hitch is going to take the abuse now.

I may get crazy and move the hitch forward an inch or 2 and trim the frame. We will see after I do more "testing" offroad.

25100
 

Attachments

  • s10 cut 1.jpg
    s10 cut 1.jpg
    98.6 KB · Views: 12
  • s10 cut 2.jpg
    s10 cut 2.jpg
    233.6 KB · Views: 12
  • s10 cut 3.jpg
    s10 cut 3.jpg
    93.6 KB · Views: 12
  • s10 cut 4.jpg
    s10 cut 4.jpg
    112.3 KB · Views: 12
  • s10 cut 6.jpg
    s10 cut 6.jpg
    109.9 KB · Views: 15
  • s10 cut 7.jpg
    s10 cut 7.jpg
    98.7 KB · Views: 15
  • s10 cut 8.jpg
    s10 cut 8.jpg
    88.8 KB · Views: 15
  • s10 cut 9.jpg
    s10 cut 9.jpg
    144.9 KB · Views: 15
  • s10 cut 10.jpg
    s10 cut 10.jpg
    83.8 KB · Views: 15
  • s10 cut 13.jpg
    s10 cut 13.jpg
    97.9 KB · Views: 15

Forum statistics

Threads
185,887
Messages
2,879,203
Members
225,450
Latest member
Rinzlerz
Top