S10 Build getting started

Meili

Adventurer
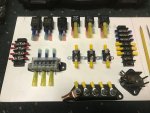
Spent the am digging threw my old electrical stuff, gathering it up for my under-hood panel.

Got old relays, terminal blocks, unused breakers and misc crap. Put it all in a box to take home.

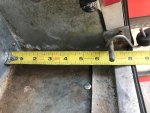
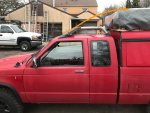
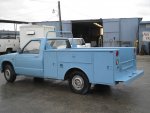
Decided after lunch to finish bolting down the roof rack and fabbed a mount for a grab handle inside above D/S door to match factory P/S handle.

The weather was nice so decided to do a mini tune up to address a slight miss.

When I called about buying the truck, the owner said he could not fix a carb fuel leak and had a little fire. I looked at the truck before buying,

I spotted the problem and kept my mouth shout.

When I picked it up, first thing I did was install the missing gaskets on the rear bowl screws. Owner was not happy as I drove it around

before hooking up to tow it home.

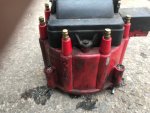
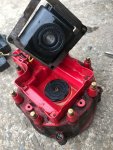
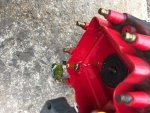
The distributor cap was a little crunchy on the firewall side from the fire, to say the least.

Also the coil had sprung a leak and was low on fluid, all the voltage drained out! ;)

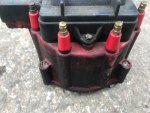
New Pertronix HEI kit was installed and helped a bunch. Still need to do wires, plugs, time,and to fix/replace some crunchy wires,

like the speaker wire used for the tach drive!

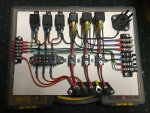
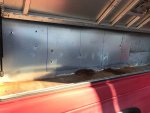
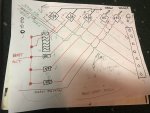
Watching all the car shows on TV tonight, drew up my layout for the under-hood panel and laid it out.

It will control, fog lights, drive lights, air horn, 2 engine cooling fans and 1 extra.

Don't look to close at the diagram, it is not 100% electrically correct and just sketched out for a basic layout.

Time for bed.

1459
 

Attachments

  • s10 hei 1.JPG
    s10 hei 1.JPG
    81.3 KB · Views: 30
  • s10 hei 2.JPG
    s10 hei 2.JPG
    76.6 KB · Views: 29
  • s10 hei 3.JPG
    s10 hei 3.JPG
    158.5 KB · Views: 30
  • s10 hei 4.JPG
    s10 hei 4.JPG
    106.2 KB · Views: 32
  • s10 panel 2.JPG
    s10 panel 2.JPG
    73.4 KB · Views: 34
  • s10 panel 1.JPG
    s10 panel 1.JPG
    173.6 KB · Views: 37
Last edited:

chilliwak

Expedition Leader
Wow:Wow1:now I know what you mean by crunchy! That cap and other parts looked so brittle that they could fall apart in your hands. Just shows how solid the GM ignition is that it still ran. Good thing you replaced those components. The new wiring harness you are making should do the job quite nicely. Looking good. Cheers, Chilli..:)
 

Meili

Adventurer
Was home today so did a "little' wiring.

I tend to get carried away.

1575
 

Attachments

  • s10 panel 3.JPG
    s10 panel 3.JPG
    87.2 KB · Views: 43

Meili

Adventurer
Borrowed a buddy's belt sander and knocked down the edges inside the tent mount. I'll spare you pictures.

One thing I have wanted to do was narrow the d/s tool box.

First was to increase interior room, this is a small 6 foot bed so every square inch matters.

Narrowing it also makes getting in and out easier, especially after I make the p/s rear door permanently closed. This is important for old knees!

Made a quick jig so I could cut a semi-straight line. Got it to fit tighter then the stock one.

The pictures show the approximately 5 1/2 inches removed for comparison.

The d/s is now flush with the d/s rear door opening.

The plan is install a slider window from a truck cap in the d/s box for a pass threw (need a cold beer?) ,ventilation and light.

Look at the blue lines for a general idea of window size.

Also planning on lighting,car speakers and maybe a flat screen (I can dream cant I). May do a drop down shelf for my Coleman stove.

The idea is to able to close the side hatch keeping everything safe and dry when not in use.

All the rust will be taken care of and the area insulated/sealed.

1671
 

Attachments

  • s10 side 1.JPG
    s10 side 1.JPG
    213.8 KB · Views: 45
  • s10 side 2.JPG
    s10 side 2.JPG
    126.7 KB · Views: 46
  • s10 side 3.JPG
    s10 side 3.JPG
    99.8 KB · Views: 42
  • s10 side 4.JPG
    s10 side 4.JPG
    103.2 KB · Views: 44
  • s10 side 5.JPG
    s10 side 5.JPG
    99.6 KB · Views: 47
  • s10 side 6.JPG
    s10 side 6.JPG
    63.7 KB · Views: 42
Last edited:

chilliwak

Expedition Leader
Cool mods Meili. I like the idea of a slider window. Does come in handy when you need a quick beer! I use a rust paint on those sections that are constantly rusting. That way I can just touch it up when there comes more rust. For sheet metal repairs I use galvinised siding that gets glued and riveted in place. It might work for you. Cheers, Chilli...:)
 

Meili

Adventurer
The rust will be sanded down, hit with Permatex rust treatment and then paint. Eventually it will be buried never to see the light of day again.

I am having bad thoughts.

Always wanted to do what I am doing to the cap but on a utility bed. Good, light weight,used utility beds for small trucks are rare,

if not impossible, to find.

The few I have seen are steel, need fiberglass or aluminum. Can't afford the weight penalty.

Well, of course, one popped up on Craigslist about an 1 1/2 hours away. Yes, it's aluminum and very reasonably priced.

Bad thoughts, fighting the urge!
 
Last edited:

Meili

Adventurer
My middle child is back from college so I spent the day with her.

There was this fluffy white stuff all over the truck when we went out.

I decided what better way to do some aero testing.

I only cleared the windshield/hood leaving all the snow on the roof and tent.

Here is how it looks after a 20 minute drive at 50mph.

The 3 inch area between the windshield and air dam slide down when we stopped.

Looks like the snow behind the air dam remained undisturbed.

The snow on the top of the tent formed a nice bulge from the leading edge back. It looks like very little was hitting the front of the tent.

It did what I hoped it would do, see orange line.

Will it help MPGs at highway speeds, who knows but I "Looks" like it will.
 

Attachments

  • s10 snow 1.jpg
    s10 snow 1.jpg
    59.7 KB · Views: 32
  • s10 snow 2.jpg
    s10 snow 2.jpg
    57.7 KB · Views: 38
  • s10 snow 3.jpg
    s10 snow 3.jpg
    84.4 KB · Views: 36
Last edited:

chilliwak

Expedition Leader
I like the idea of the home made:wings: wind tunnel Meili. I would not worry to much about the aerodynamics of your little rig. Everything looks good. You should try moving a big box like mine through the wind. Also there is always something out there that is bigger and better. I would resist the urge to get the new aluminum canopy unless you really want to start all over again. Its your decision but I think what you got is looking pretty good so far. Cheers, Chilli..:)
 

Meili

Adventurer
"I would not worry to much about the aerodynamics of your little rig." Hey, it's not the size of your rig, it's how you use it! ;)

You are definitely driving a brick, aerodynamics be damned!

What I am looking at is not a canopy, its the base/box, like this. This is a Google pic, not the actual bed.

It is only 2 inches wider per side then the stock bed,but utilizes the space much better.

I could transfer my cap/tent combo on to it, only having to rework the rear doors.

Gonna swap on my winter tires in hope that the Nor'easter they are predicting pans out and I can play in some deep snow.
 

Attachments

  • s10 utility bed.JPG
    s10 utility bed.JPG
    38.6 KB · Views: 28

chilliwak

Expedition Leader
"I would not worry to much about the aerodynamics of your little rig." Hey, it's not the size of your rig, it's how you use it! ;)

You are definitely driving a brick, aerodynamics be damned!

What I am looking at is not a canopy, its the base/box, like this. This is a Google pic, not the actual bed.

It is only 2 inches wider per side then the stock bed,but utilizes the space much better.

I could transfer my cap/tent combo on to it, only having to rework the rear doors.

Gonna swap on my winter tires in hope that the Nor'easter they are predicting pans out and I can play in some deep snow.

Wow:Wow1:that could be slick! If you are up to it then I would be very interested in seeing your build!:drool:
 

Buddha.

Finally in expo white.
"I would not worry to much about the aerodynamics of your little rig." Hey, it's not the size of your rig, it's how you use it! ;)

You are definitely driving a brick, aerodynamics be damned!

What I am looking at is not a canopy, its the base/box, like this. This is a Google pic, not the actual bed.

It is only 2 inches wider per side then the stock bed,but utilizes the space much better.

I could transfer my cap/tent combo on to it, only having to rework the rear doors.

Gonna swap on my winter tires in hope that the Nor'easter they are predicting pans out and I can play in some deep snow.

Even if that utility bed is fiberglass I'd be concerned with all the weight you could pack in it.

I've had a few s trucks as well, all second gen. Some easy upgrades are the two pot calipers and disks from a blazer, and the alternator off a fullsize(requires a 1" longer belt, tell them you have a 4.3 1500)
 

Meili

Adventurer
The great blizzard of 17 was a bust, 7 inches. Still went out and played, no problems at all on steepest grade I could find. Did have a little wheel hop but

when I redo the rear springs that should take care of that.

The utility box would add about 300 lbs after you account for removing the steel bed. Not to bad but, yes, all those empty spaces to fill!

I have and am beefing the suspension so I feel I will be fine. Brakes are fresh with manual wheel cylinders (larger bore) on the rear.

Will upgrade as needed when I find total weight etc.

Nice tip on the alternator. My plan is to run a second alt using the unused air pump bracket. Plow guys do this a lot.

My last week has been, child back from and to college in Tennessee,other child to Harrisburg 5 day conference then DC where the bus broke down,

oldest is in New Orleans, father in-law admitted to hospital the night before the storm,played chauffeur to mother in-law,

wife and I pitched an idea in Philly to Blue Cross for a grant.

This weekend looks bad weather wise since I am working mostly outside. Hope to start making progress again next week!
 
Last edited:

HARDTRAILZ

Certified
"Front diff, rebuilt with custom posi, no more Snap=Lock, I mean Gov-lock ,"

Can you tell me more? I thought the only option for these front diffs was the lockright that is not is stock anywhere these days.
 

Meili

Adventurer
I found the guy doing these threw my Pontiac contacts. His "handle" is PontiacJeff.

Send him yours and it comes back like pic below.

I had parted a blazer so I had him do that one. When I got it back, rebuilt my spare front diff making it a easy swap.

It was fine at highway speeds and a well in slow turns, no change in handling. I have the p/s axle locked (welded) like a all-wheel drive Bravada.

http://www.engineered.net/

It put a Tru-Trac in the rear. The idea is both are "invisible" until they are needed!
 

Attachments

  • s10 front posi.jpg
    s10 front posi.jpg
    64.9 KB · Views: 29
Last edited:

Forum statistics

Threads
185,821
Messages
2,878,590
Members
225,378
Latest member
norcalmaier
Top