S10 Build getting started

Meili

Adventurer
More of my goodies arrived so on they went.

Got a handle on a few things today, literally!

Although I hate the red color of the vehicle, I have no choice to embrace it, so ordered 2 pair(4) of red playground handles for a total of $18 shipped.

These are to help old knees and such when getting in and out of the "camper"(guess I can call it that?). Should help those impaired by Bourbon also.

Holes were drilled,wood backer cut to fit, aluminum plates made to spread the load, etc etc.

Before mounting I covered the holes with 3M strip caulk to seal it all up. It gets forced in everywhere and then just cut the excess off outside. No leaks.

The inside handle is held by 2 3" lag bolts that go threw the cap frame , about 1 3/4" into the 2x6 RTT frame. Solid!

I still have 2 shorter ones coming that will be mounted on the outside of the RTT base.

The latch for the door looks like someone could poke themselves on it so gave it a coat of Sunburst Yellow. Safety first and all.

Stopped early do to a pending monsoon.

10530
 

Attachments

  • s10 handle 1.JPG
    s10 handle 1.JPG
    118.4 KB · Views: 24
  • s10 handle 2.JPG
    s10 handle 2.JPG
    74.7 KB · Views: 23
  • s10 handle 3.JPG
    s10 handle 3.JPG
    66 KB · Views: 22
  • s10 handle 4.JPG
    s10 handle 4.JPG
    163.4 KB · Views: 24
  • s10 handle 5.JPG
    s10 handle 5.JPG
    62 KB · Views: 22
  • s10 handle 6.JPG
    s10 handle 6.JPG
    64.8 KB · Views: 22
  • s10 handle 7.JPG
    s10 handle 7.JPG
    69.3 KB · Views: 23
  • s10 handle 8.jpg
    s10 handle 8.jpg
    102.9 KB · Views: 23
Last edited:

chilliwak

Expedition Leader
Looking good Meili. Good to see you have a `handle´on things. I am still thinking the flat spots just behind the canopy on each side of the door would be excellent for jerry can transport. Your thoughts? Cheers, chilli..:)
 

Meili

Adventurer
Nah, my penchant for handling will no let me. Not happy with how high and far back the spare is. Don't want the tail wagging the dog!

I also don't want to block the door anymore then it is with the spare carrier for quick access.

One area I do have a plan for is behind the spare. A waterbrick will fit almost like it is designed to go there.
 

Attachments

  • waterbrick.jpg
    waterbrick.jpg
    51.8 KB · Views: 11

chilliwak

Expedition Leader
Nah, my penchant for handling will no let me. Not happy with how high and far back the spare is. Don't want the tail wagging the dog!

I also don't want to block the door anymore then it is with the spare carrier for quick access.

One area I do have a plan for is behind the spare. A waterbrick will fit almost like it is designed to go there.

Good idea. got a link to the site?
 

Meili

Adventurer
Believe it or not, they sell them at Sam's Club. https://www.samsclub.com/sams/filte...50416&wl13=&wl15=45157180962&wl17=1o4&veh=sem

The kit has a brown brick to collect water from a creek, then you pump/filter it into a blue brick for use. Kit should have a spigot with it but they can be

bought for $18 a pair.

Did some tedious work today, nothing really note worthy.

Changed all the wood frame screws that were put in from the inside to pan head screws installed from the outside. This way I could seal them

with bedliner in the wheel wells. Since I had to take the D/S quarter off to get to them, decided to finally install both quarters when done.

I had never installed the P/S one.

Oh, almost burnt myself on the floor. The exhaust really heats a 1 foot area on the r/s floor above the axle. A piece of the old cap roof was cut

to make a heatshield.

It worked great, was barely warm to the touch when I got home. No, it's not touching the pipe, just an illusion from the angle I had to take the picture.

The handles are my favorite mods so far. I was in and out 20 times today and never hit my head. I would just grab the inside handle with both hands and

swing out like big kid. Knees and back feel much better.

10750
 

Attachments

  • waterbrick 2.jpg
    waterbrick 2.jpg
    26.3 KB · Views: 227
  • s10 quarter 1.JPG
    s10 quarter 1.JPG
    80.1 KB · Views: 19
  • s10 heat 1.JPG
    s10 heat 1.JPG
    203.9 KB · Views: 18
  • s10 heat 2.jpg
    s10 heat 2.jpg
    545.8 KB · Views: 16
Last edited:

chilliwak

Expedition Leader
Well I still think there is some cool stuff going on. The water filtration system looks like a winner when you really need some H2O. Thanks for posting up. Cheers, Chilli..:)
 

Meili

Adventurer
One of axles is delayed so no front end work today.

Decided to do the rear anyway.

I removed my diy AAL and installed the one from Rough Country. Even though I already have extended shackles, I figured why not install

the RC ones instead since they came in the kit. They are beefier.

Last was the shocks. Looks like plenty of droop! Left the pretty stickers off for now.

Did a bunch of measuring before taking it a part.

The truck has a driver side bias of about 3/4" and the frame was dead nuts level front to back.

After the install, the bias reduced to 3/8" and the rear went up 1 1/8". Perfect, hope to just level the front and call it good when rebuilding the front end.

It still "looks" like it is tail down. I think it is the rear wheel well opening are causing the illusion. The actual arches are 3" lower then the front.

May have to unscrew the quarters and lop off an inch or 2.

Also knocked around some ideas for sway bars. Re-purposed and custom of course.

11007
 

Attachments

  • s10 r lift 2.JPG
    s10 r lift 2.JPG
    138.4 KB · Views: 22
  • s10 r lift 3.JPG
    s10 r lift 3.JPG
    91.8 KB · Views: 23
  • s10 r lift 1.JPG
    s10 r lift 1.JPG
    111.9 KB · Views: 21
Last edited:

Meili

Adventurer
Decided to work inside today.

I had some left over poly blue insulation from when I replaced my garage door years ago, so in it went. It was cut and pressed into place.

Next using some left over foil tape, sealed all the edges/wood.

Next, you guessed, put a layer of leftover Prego underlayment foam on with staples.

May have gotten carried away insulating being it has a tent up top. Although, it is a old design tent that used heavy canvas which

insulates better. I should be toasty.

I had noticed paneling Home Depot with what looks like a durable finish in a cool design.

So I spent $20 for a sheet and had them rip it for me.

The paneling went on the sides and leftover, (getting boring isnt it?), peg board was used on the end.

Nothing is square on this thing so trim will have to be used to cover some sins!

Looks like my delayed axle should be here Tuesday!

11197
 

Attachments

  • s10 int 9.JPG
    s10 int 9.JPG
    91.4 KB · Views: 24
  • s10 int 10.JPG
    s10 int 10.JPG
    118 KB · Views: 25
  • s10 int 11.JPG
    s10 int 11.JPG
    77.4 KB · Views: 24
  • s10 int 12.JPG
    s10 int 12.JPG
    105.2 KB · Views: 25
  • s10 int 13.JPG
    s10 int 13.JPG
    136.3 KB · Views: 24
  • s10 int 14.JPG
    s10 int 14.JPG
    193.7 KB · Views: 23
  • s10 int 15.JPG
    s10 int 15.JPG
    47.1 KB · Views: 24
  • s10 int 16.JPG
    s10 int 16.JPG
    164 KB · Views: 24
  • s10 int 17.JPG
    s10 int 17.JPG
    142.3 KB · Views: 25
Last edited:

Meili

Adventurer
Ever hear the saying, "sometimes you eat the bear and sometimes the bear eats you"? Well ,my *** is raw, will get to that in a bit.

I already have a bunch of baseline info on my front suspension, but wanted more before tearing it down.

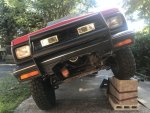
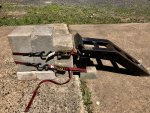
I broke out my trusty flex rig, straps and all. The high point plateaus at 19 1/4 inches.

First test was driven up as is, there was a 17" difference between the D/S and P/S bumper ends which puts it at a 18 degree angle (first truck

picture). At the rear receiver it was 17 degrees (1 degree of frame twist), with the D/S rear tire was 2 1/2" in the air. It rocked a bit while I

was getting in and out. NOT GOOD!

Next removed the front sway-bar, it was under so much load the last few threads of the mounting screws came out on an angle while on flat

ground!

Drove up, now there is a 15" difference up front, reduced the angle to only 17 degrees. Rear angle dropped 2 degrees to 15 (2 degrees twist)

and the D/S rear tire was now only 1 1/4" off the ground. Still NOT GOOD.

Did one more, still without the swaybar at the 16" level, top of the ramp. Now there is 12 1/2" difference, angle dropped to 14 degrees front,

13 degrees back (back to 1 degree twist) and now the D/S rear tire was finally back on the ground. At least its not a 3 wheeler anymore!

It's obvious that any obstacle over 16", the suspension is so tight the truck pivots/balances on the D/S front and P/S rear tire.

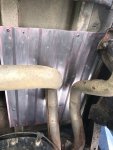
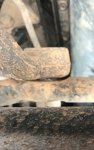
The culprit is the torsion bars, they were cranked within 2 threads of full to raise the front (not my work).

Now I know where I am, lets see where it ends up when done.

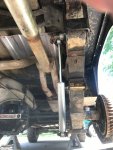
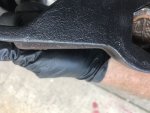
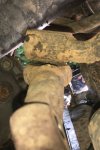
Started the teardown and this is where the bear enters. Used my balljoint press to compress the torsion bars, removed the adjusters and

released the pressure, not a problem. The keys were seized to the torsion bars. Ended up having to remove the cross brace with bars and all.

Chomp.

One side came out with the 5 pounder's 2nd blow, the other side not so much. Beat it with a 10 pounder about 30 times before it let go, only

hitting my hand once. My left thumb looks like a sausage. Chomp.

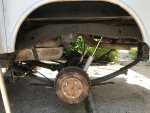
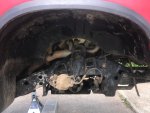
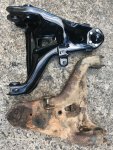
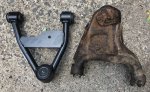
Started pulling a part the P/S suspension per Rough Country's instructions. Every cotter pin was rusted, broke etc. Chomp.

All the nuts and bolts seemed to have rusted to 1/2 mm or 1/64 to the nearest size. Some old worn sockets were hammered on to get them

off. Chomp.

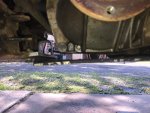
One lower control arm bolt had to be put on before the front axle was installed at the factory. It came out so far and hit the axle flange. I

turned it so the flat was parallel to the flange and used a big bar to get some play out of the diff bushings WHILE driving it out. Fun stuff.

Chomp.

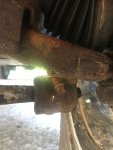
It was at this point I realized, I screwed up. I never took off the 35mm axle nut! Now I have a 100 lb blob of suspension parts that I cant get

leverage on to loosen the nut. Ripped off and put the whole mess in a vice, then using a ratchet strap,big plumber wrench, 4 foot pole and a

impact gun finally got it off. Chomp.

Everything pretty much fought me all day. Chomp.

Looking forward to doing the other side tomorrow, bringing bear spray!

11430
 

Attachments

  • s10 front 1.JPG
    s10 front 1.JPG
    104 KB · Views: 23
  • s10 front 2.JPG
    s10 front 2.JPG
    72.3 KB · Views: 22
  • s10 front 3.JPG
    s10 front 3.JPG
    71.4 KB · Views: 23
  • s10 front 4.JPG
    s10 front 4.JPG
    117.2 KB · Views: 25
  • s10 front 5.jpg
    s10 front 5.jpg
    167.8 KB · Views: 22

Meili

Adventurer
Promise, no whining this post!

Attacked the axle nut first thing. It put up a fight like other side. Remembered the axle hub is being replaced during the rebuild so out came the

hot wrench. Still took over an hour but all the sudden it came off like it was hand tight!?

Did D/S tear down and finished up the tear down of the P/S parts.

I'm glad I decided to do the whole suspension, both the idler arm and pitman arm were near failure with over 1/4" of play!

As I was finishing up the tear down, first a thunder clap and the sky went black. Got all my tool gathered up just in time. 15 minute downpour,

then bright sun. I did leave the old parts out and they got a good rinse.

So one thing led to another, cleaned,wire brushed, rust converter etc then paint.

Could not have those rusty things connected to the nice pretty new parts!

The knuckle/spindle got leftover textured black and the packing plates got leftover "old cast iron".

Notice I got "late" lower control arms (see the extra tab) because they have a traditional mount for the sway bar which will make my custom set up easy to

make.

Don't think I have enough clearance for the front diff drop, need an inch so more fab on work the skid plates coming.

Going to pressure wash whats left of the chassis and all the clay off the driveway tomorrow. Then out comes the front diff.

11363
 

Attachments

  • s10 front 6.jpg
    s10 front 6.jpg
    119 KB · Views: 14
  • s10 front 7.JPG
    s10 front 7.JPG
    282.9 KB · Views: 14
  • s10 front 8.JPG
    s10 front 8.JPG
    94.8 KB · Views: 14
  • s10 front 9.jpg
    s10 front 9.jpg
    123.2 KB · Views: 16
  • s10 front 10.jpg
    s10 front 10.jpg
    142.8 KB · Views: 16
  • s10 front 11.jpg
    s10 front 11.jpg
    162.9 KB · Views: 16

chilliwak

Expedition Leader
Great progress as I see you have some new lower control arms going in. I am likeing the rig as it seems liike it is getting closer to being able to make some trips in comfort. Keep up the good work Meili and lets hope you are out hitting the trail soon. Cheers, chilli...:)
 

Forum statistics

Threads
185,909
Messages
2,879,456
Members
225,497
Latest member
WonaWarrior
Top