S10 Build getting started

Meili

Adventurer
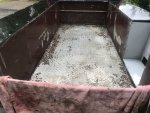
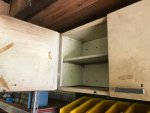
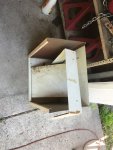
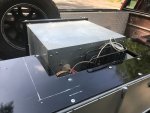
Thank you paint supply cabinet for your sacrifice!

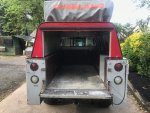
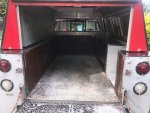
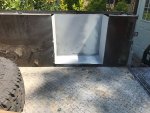
Turns out the ID was almost perfect for the frig nook. Beats fabricating a box from scratch.

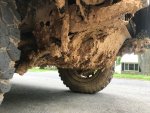
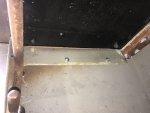
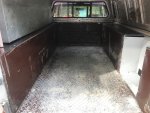
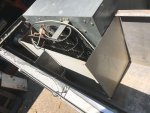
Once cut down and fitted, I concentrated on the area that bumped into the wheel well area. There will be no tire clearance issues, even at full flex.

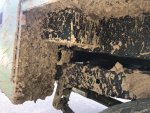
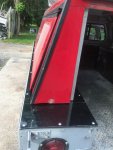
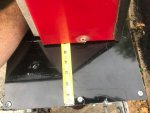
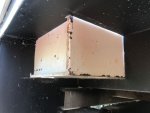
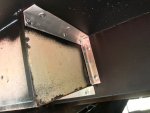
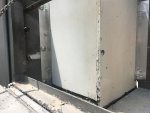
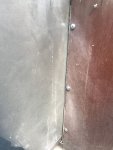
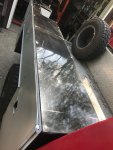
First put a thick coat of bed liner on the joints , then fit aluminum angle for support. The supports sunk into the bed liner when screwed tight.

They almost are sealed but the plan is to hit the inside with seam sealer and then a final coat of bed liner to lock it in.

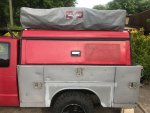
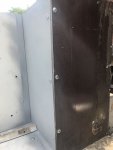
Still have to do secure the rear section but the test fit is good.

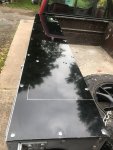
Next to finish it, then the tops can go on.

Maybe next week the shell and RTT can find their way home.

7146
 

Attachments

  • s10 frig 4.JPG
    s10 frig 4.JPG
    59.8 KB · Views: 21
  • s10 frig 5.JPG
    s10 frig 5.JPG
    168.7 KB · Views: 22
  • s10 frig 6.JPG
    s10 frig 6.JPG
    77.4 KB · Views: 23
  • s10 frig 7.JPG
    s10 frig 7.JPG
    56.8 KB · Views: 22
  • s10 frig 9.JPG
    s10 frig 9.JPG
    66.7 KB · Views: 23
  • s10 frig 10.JPG
    s10 frig 10.JPG
    100 KB · Views: 24
Last edited:

Meili

Adventurer
More "nook" work today.

Hard to describe but the nook overlaps 2 of the exterior compartments. The remains of the wall were sandwiched between 2 pieces of aluminium angle

(see screws heads). The box was then screwed to them from the inside making it very strong. The front edge and back top also got the angle treatment.

Everything was sealed from the inside and the wheel well section got 2 coats of bed-liner.

It fits really well if I do say so myself!

Added the P/S top with a notch cut for the frig.

7265
 

Attachments

  • s10 frig 11.JPG
    s10 frig 11.JPG
    54.2 KB · Views: 18
  • s10 frig 12.JPG
    s10 frig 12.JPG
    83 KB · Views: 19
  • s10 frig 13.JPG
    s10 frig 13.JPG
    148.7 KB · Views: 20
  • s10 frig 14.JPG
    s10 frig 14.JPG
    70 KB · Views: 23
  • s10 frig 15.JPG
    s10 frig 15.JPG
    148.5 KB · Views: 23
Last edited:

chilliwak

Expedition Leader
Wow:Wow1:I dont look for a couple of days and then you get all this done Meili! You are a busy man. Looks good. Cheers, Chilli..:)
 

Meili

Adventurer
You know the saying" all work and no play....."

A local farm had a Jeep Day yesterday and Open 4x4 day today.

Went over and ran the obstacle course and threw the mud pit, all in the name of testing. ;)

After a few runs, temped fate and stopped in the middle of the mud pit to see if I could pull out.

Got the wheels churning and pulled threw. Custom front posi and rear tru trac for the win!!

My daughter told me every time I came up to the mud pit, everyone started recording. Maybe because I was one of the lowest, non-Jeeps there and they

expected me to get stuck?

Also answered a lot of questions.

If I can download it, talked my daughter into making a run that I recorded from the passenger seat.

She did well for here first time off road.

All in all, a good day.

7440
 

Attachments

  • s10 off 7.JPG
    s10 off 7.JPG
    135.8 KB · Views: 24
  • s10 off 8.JPG
    s10 off 8.JPG
    147.9 KB · Views: 19
  • s10 off 9.JPG
    s10 off 9.JPG
    102.9 KB · Views: 19
  • s10 off 10.JPG
    s10 off 10.JPG
    117.3 KB · Views: 20
Last edited:

Buddha.

Finally in expo white.
I just re read your first post, I didn't realize it was a v8. With the 4.11's ans posi's front and rear I'm not surprised it did well.
 

Buddha.

Finally in expo white.
I just re read your first post, I didn't realize it was a v8. With the 4.11's ans posi's front and rear I'm not surprised it did well.

Also you mentioned upgrading to silverstars. I'm a bit of a lighting snob myself. In fact the first mod on my Subie was changing out the perfectly good bulbs for replacements that offered almost twice the lumens, you have to be sure what you're getting though.
Some light reading if you have nothing better to do.

Wait a Minute, Earlier You Said Silver Star Bulbs Have Blue Glass!

It's a name game: Osram, the well-established German lampmaker, sells a line of automotive bulbs they call "Silver Star". These are Osram's top-of-the-range headlamp bulbs, equivalent to Narva RangePower+50, GE Night Hawk, Philips VisionPlus, and Tungsram Megalight Premium. They produce the maximum legal amount of light while staying within legal power consumption limits. They have colorless clear glass.

Osram bought the well-established American lampmaker Sylvania in the early 1990s, so Osram is now Sylvania's parent company. Sylvania also sells a line of automotive bulbs they call "Silver Star", but it's not the same product. The Sylvania Silver Stars have blue glass. Light output is of legal levels, but as with all blue-filtered bulbs, you do not get more light from them. The Sylvania SilverStar bulbs have a very short lifetime, because the filament is overdriven to get a legal amount of light despite the blue glass.

To get the best possible seeing performance at night, don't choose extra-white bulbs.
https://www.danielsternlighting.com/tech/bulbs/blue/good/good.html
 

Meili

Adventurer
I actually have been to that site. I bought Narva bulbs for my drive/fog lights based on info there.

All I can tell you is these are significantly brighter/cleaner then the bulbs that were in. Not sure that the old ones were even Halogens.

Remember these are sealed beams, not "H" bulbs.
 

Meili

Adventurer
Had one causality, headers, from this weekends fun. They already were startling to form cracks but I had high centered on the log pile over the weekend.

Looks like some welding in my future.

Put the top on the D/S box today. From the factory the removed shelves floated, were just attached around he edges. I decided to add a couple

cross braces to each side.

If you looks close you can see the extra screws in the middle.

Also started to prep the cap/RTT to be mounted.

May be able to mount it up as early as tomorrow.

7729
 

Attachments

  • s10 ute 40.JPG
    s10 ute 40.JPG
    54.5 KB · Views: 19
  • s10 ute 41.JPG
    s10 ute 41.JPG
    130.5 KB · Views: 18
  • s10 ute 42.JPG
    s10 ute 42.JPG
    109.1 KB · Views: 19
Last edited:

Meili

Adventurer
Started the day by moving the cap forward on the stock bed. That gave me enough room to remove the doors and then cut the hangover so

it will fit on the utility box.

Redid the seal/angle on the front. Hit some spots with seam sealer. Finally used a razor blade to remove all the old bed tape. Scrubbed the whole end

since once it is mounted there will be no access. Also scrubbed and hosed out the inside of the utility bed while it was exposed.

Since I got all the "prep" done and my help was not coming for a couple hours decided to remount the d/s quarter.

Used pieces of the frame (aluminum square tube) that came with the utility bed to make an inter-structure to mount the quarter.

Ended up not perfectly centered but I can live with it. I have a plan to cover the seam, more on that later.

Well, the moment for truth came, we lifted the cap/RTT off the bed and set it on the utility bed.

All the planning paid off, it fits great. The flat inside sides of the utility box and removing the P/S tool box/shelf really makes it seem huge inside.

Still lots to do but very happy and very tired!

7826
 

Attachments

  • s10 ute 43.JPG
    s10 ute 43.JPG
    77.4 KB · Views: 28
  • s10 ute 44.JPG
    s10 ute 44.JPG
    95.1 KB · Views: 28
  • s10 ute 45.JPG
    s10 ute 45.JPG
    106 KB · Views: 29
  • s10 ute 46.JPG
    s10 ute 46.JPG
    113.7 KB · Views: 33
  • s10 ute 47.JPG
    s10 ute 47.JPG
    77.6 KB · Views: 28
  • s10 ute 48.JPG
    s10 ute 48.JPG
    107 KB · Views: 31
  • s10 ute 49.JPG
    s10 ute 49.JPG
    84.3 KB · Views: 29
  • s10 ute 50.JPG
    s10 ute 50.JPG
    115.9 KB · Views: 28
  • s10 ute 51.JPG
    s10 ute 51.JPG
    86.8 KB · Views: 28
  • s10 ute 52.JPG
    s10 ute 52.JPG
    61.1 KB · Views: 27
Last edited:

FBJR

Adventurer
Nice work there Meili. Just read the whole thing.

I had an S10 in my early years and built a couple Blazers for dad and a 2.8-4.3 swap to boot.

Always wanted a utility on my pickup (drive a Dmax now) as I always carry so much extra stuff.

With all you have done would having someone Tig the fenders be worth it?

Following now, hey Chilli.
 

Meili

Adventurer
Thanks.

No welding for now. In the back of my mind is cutting the quarter section out of the stock bed and grafting them to the utility bed to match the front.

That is WAY down the road.

Today did some crude mock up. Looks like I can patch it together using mostly the old parts.

Next is to permanently mount the cap, its bolted down without seal/tape right now.

Using the 2x2 aluminum from the rack that the came with the utility bed, a frame will made that the door hinge will be attached to and

possible start of the tire rack.

Looks like tomorrow the weather will be better, today was a rainy,short day.
 

Attachments

  • s10 ute 53.JPG
    s10 ute 53.JPG
    76.4 KB · Views: 19
Last edited:

chilliwak

Expedition Leader
Wow:Wow1:Meili the whole set-up is looking great now. It must feel great when everything comes together. The rear ledge at the back you could use for mounting jerry cans for long distance trips. Nice work! Cheers, Chilli..:)
 

Meili

Adventurer
Started off the day by lifting the cap. Being a one man show started with furring stripes, then 2x4s, finally 4x4 for some working height. Scuffed the tape

surface with 100 grit and hit it with wax/greaser. Installed 1/4" thick bed tape, no water getting in here!

Secured the cap to the bed with 5 screws and 8 bolts. The screws went in the end between the bed and the cab. With some interesting contortions

I was able to put screw in the middle using the window openings. 2 of the bolts hit the cross braces I installed earlier and the other 2 have big flat

washers to spread the load. There will be another bolt installed at the end but wanted to wait until the door is fabbed.

Started on the door. Used a piece of the overhead rack that came with the utility bed. I wanted it to be beefing since it may also support the tire rack.

From years of abuse the floor was not flat. Used a 4x4 and a floor jack to lift it from below using its own weight to straighten it out.

Ended up within about 1/8" to square. I left a small foot on frame for added strength, it helped pull the floor up.

Worked out pretty well, can't wait to be able to close it up and get back to working on the RTT.

8040

Will post pictures in a bit, computer is being cranky!
 
Last edited:

Forum statistics

Threads
185,828
Messages
2,878,634
Members
225,393
Latest member
jgrillz94
Top