S10 Build getting started

coastalcop

Active member
Ok, brother. I just gotta say that is an awesome build, I love pick and pull builds because that's where the original ideas come from. Keep it up!...... oh and get the other box, you will kick yourself if it isn't sitting there to get your mind working on the possibilities;)
 

chilliwak

Expedition Leader
Remember you asked:

Destroked 455 = 440 cu in so I could rev it, 7200 rpm shift point
Filled block to freeze plugs
2 bolt block converted to billet 4 bolt splayed caps
Moldex billet crank
Oliver rods
Custom SRP pistons
Ported Edelbrock Rpm aluminum heads
Hyd roller 271/281 .666 lift on 104 LSA , nicknamed the devils cam!
1.72 roller rockers, braced
Victor intake with 2" HVH spacer
Holley Dominator, 2 circuit
Custom TCI 8" converter
Th400, 210 first to "soften" launch to be consistant bracket car
12 bolt 4.11 spool with 30x9 inch radial slicks

Leaving with wheels 6 inches in the air,would run 10 flat @ 131 mph in 3450# Gbody.

No bottle ,all throttle!

It was fun spanking race cars with my "street" car!

That is just beyond awesome! So cool. Cheers, Chilli..:wings:
 

Meili

Adventurer
Thanks for the checking in. Hoping someone else besides me (and chilliwak) were enjoying the build!

With the family all back in their proper states, literally, I can get back to work.

Decided to swap the hitch off my other S10. By the looks of it ,it may have been designed for another application.

It hung low and none of the holes lined up. Maybe they did that to clear the roll pan. Both of the trucks have roll pans.

Anyway, removed the roll pan on the 85 and jacked,then clamped the hitch in place snug against the frame. Gained 2" of clearance compared to how it

was mounted on the other truck.

I also added a bolt threw the frame/hitch so now it is supported on both planes.

The exhaust was run downhill, I am assuming, to clear the roll pan on the 85. I am not a fan of the exhaust, but it stays for now. I reworked the mounts

and got the closer to level. As a bonus picked up almost 2" of ground clearance. Got the tips closer to level from behind, r/s had hung a lot lower.

It looks more industrial now. Since I am not sure if bed is staying, the roll pan will remain off "for now".

3568
 

Attachments

  • s10 exhaust side 1.jpg
    s10 exhaust side 1.jpg
    82.5 KB · Views: 28
  • s10 exhaust side 2.JPG
    s10 exhaust side 2.JPG
    74.7 KB · Views: 29
  • s10 exhaust side 3.JPG
    s10 exhaust side 3.JPG
    87.5 KB · Views: 25
  • s10 hitch mount 1.JPG
    s10 hitch mount 1.JPG
    114.1 KB · Views: 25
  • s10 hitch mount 2.JPG
    s10 hitch mount 2.JPG
    107.3 KB · Views: 28
  • s10 hitch mount 3.JPG
    s10 hitch mount 3.JPG
    103.9 KB · Views: 28
  • s10 hitch rear 1.JPG
    s10 hitch rear 1.JPG
    67.2 KB · Views: 27
  • s10 hitch rear 2.JPG
    s10 hitch rear 2.JPG
    74.4 KB · Views: 27
  • s10 hitch rear 3.JPG
    s10 hitch rear 3.JPG
    78.8 KB · Views: 27
Last edited:

borison

Adventurer
Enjoying your thread and looking forward to your progress. I have a soft spot for these early GM S trucks. Keep us posted.
 

AGD

New member
I have an 85 as well, this has given me the motivation to do something with it. Keep up the build.
 

Meili

Adventurer
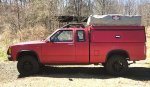
"I have a soft spot for these early GM S trucks." My family thinks the soft spot I have is in between my ears!

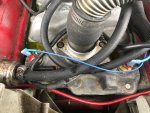
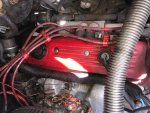
Addressed some wiring today. Both cooling fans are run by a single rocker switch on the dash. No indicator light, thermal switch and no working

temperature gauge. A perfect setup to overheat the engine.

Since I recently got in running and it has been cold, no issues. I would just turn the heat on, once I felt heat, hit the switch.

Now that it is getting warm, had to fix it.

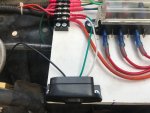
Basically what I did was split the fans and wired each to my under-hood panel. The relays are wired to close when ground is applied.

Who ever wired the fans originally used red for - ground and black for + hot. Threw me for a couple of minutes.

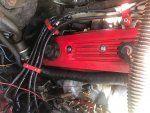
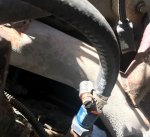
Since running new wires from the fans would make me pull the push bar, grill etc, the wires are marked using the appropriate color heat shrink.

Still looks weird having red wires going to my ground block!

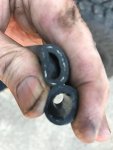
The 2 thermal switches I installed are about 20 degrees apart so they come on and go off in stages.

I nervously let the truck idle, fan 1 came on after about 5 minutes, then 3 minutes later fan 2 kicked on. They turned off automatically, fan 2, then fan 1.

Success!

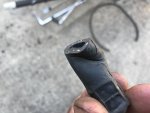
Also pulled about 50 feet of excess wire from under the hood and more to go. It is a nightmare with bad splices, wrong type of wire, etc etc.

Always fun having to undo before you can redo!

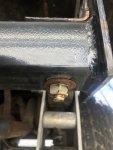
The coolant is from when I installed the them, they dont leak!

3695
 

Attachments

  • s10 fan 1.jpg
    s10 fan 1.jpg
    99.4 KB · Views: 21
Last edited:

Buddha.

Finally in expo white.
I tried using one of those sensors that ground through the threads but it couldnt get a good ground.
 

Meili

Adventurer
Nothing today, heavy rain, but I uncharacteristically spent some money!

I had noticed my RPMs at highway speeds were higher then I thought they should be. Soon realized the lock-up function on the converter did not work.

Crawled underneath the truck, no wiring. So I ordered a stand alone lock-up module from B&M. The plan is to wire it in and add a micro switch so

it will unlock at WOT/downshift.

Got a couple rocker switches, terminal strip, etc etc on the way.
 
Last edited:

chilliwak

Expedition Leader
I am liking the new crossmember/trailer hitch set-up you installed in the rear Meili. Looks beefy. Cheers, Chilli...:)
 

Meili

Adventurer
It was a beautiful day today so I played carpenter.

I know the l/r corner was soft but, like an iceberg, you only see 10%.

You can see by the pictures, the more I dug......

Anyway, made a patch panel (approx 12"x12") out of the piece I had cut out of the floor, so it matches.

I may have gone overboard with the screws but she is rock solid now.

Hard to explain but the aluminum supports were remounted 90 degree from their original position. They were mounted so they were loaded on the short

side/horizontal. One of them had a slight "oil can" type bend in it. They(4) are now straight and mounted firmly, vertically.

Earlier I has drilled and put a over-sized bolt in the main pivot for the tent because it was very sloppy. Today I replaced the 4 other metric bolts with

slightly larger standard bolts. They are secured with nylock nuts so they can be tight but no play.

All this little stuff is adding up to a tighter, smoother operating tent!

4206
 

Attachments

  • s10 repair 1.JPG
    s10 repair 1.JPG
    111.5 KB · Views: 29
  • s10 repair 2.jpg
    s10 repair 2.jpg
    82.3 KB · Views: 26
  • s10 repair 3.JPG
    s10 repair 3.JPG
    186.7 KB · Views: 27
  • s10 repair 4.JPG
    s10 repair 4.JPG
    90.2 KB · Views: 28
  • s10 support 1.JPG
    s10 support 1.JPG
    46.5 KB · Views: 27
  • s10 support 2.JPG
    s10 support 2.JPG
    71 KB · Views: 30
Last edited:

Meili

Adventurer
Attacked with a plan today and that lasted until noon!

I finally got new spark plug wires and had a set of unused NGKs.

The plan was:
remove and paint the roof rack while the engine cools
install plugs and wires
test frame rub with 1/2 spacers
reinstall headliner

Roof rack and plugs/wires went fine. Even can add oil without having to relocate the wires now.

Removed the l/f tire and noticed the fuel line was severely kinked. Could explain way I had trouble reading the plugs, they looked both rich

(idle is rich) and lean (cruise).

Well, had to drop the skid plate and found the fitting where the line attaches to the fuel pump was also bent/kinked almost closed.

It took some creative tool usage to straighten the metal fitting with zero clearance to work! The line was also almost worn threw in about 5 spots.

The new HD line is now clamped in place with no chance of rubbing or kinking. New fuel filter also.

While doing the line I noticed the block ground had a 90 degree bend right into the lower rad hose! Were they TRYING to cause a leak?

The ground was seized to the bolt in the block and I had to rip it out. Ended up making a new ground with a terminal type battery clamp

and redid some more wiring.

While digging for cable ends I found a crappy little push on/push off switch. I wired it inline for the underhood light. I can now turn it off when the hood is

open during the day.

Looks like wheel spacer test and headliner install will happen at a later date.

Stopped for some poser pics on the way home.

4377
 

Attachments

  • s10 rack 11.JPG
    s10 rack 11.JPG
    72.7 KB · Views: 21
  • s10 rack 12.JPG
    s10 rack 12.JPG
    72.5 KB · Views: 25
  • s10 hei 5.JPG
    s10 hei 5.JPG
    100.8 KB · Views: 24
  • s10 hei 6.JPG
    s10 hei 6.JPG
    90.9 KB · Views: 22
  • s10 hei 7.JPG
    s10 hei 7.JPG
    84 KB · Views: 22
  • s10 fuel 1.JPG
    s10 fuel 1.JPG
    42.7 KB · Views: 20
  • s10 fuel 2.JPG
    s10 fuel 2.JPG
    67.5 KB · Views: 20
  • s10 fuel 3.jpg
    s10 fuel 3.jpg
    75.9 KB · Views: 20
  • s10 panel 6.JPG
    s10 panel 6.JPG
    65.5 KB · Views: 22
Last edited:

Meili

Adventurer
Opps, forgot poser pics!
 

Attachments

  • s10 v8 11.jpg
    s10 v8 11.jpg
    104.6 KB · Views: 29
  • s10 v8 10.jpg
    s10 v8 10.jpg
    129.4 KB · Views: 28
  • s10 v8 12.jpg
    s10 v8 12.jpg
    115.7 KB · Views: 29

Forum statistics

Threads
185,911
Messages
2,879,538
Members
225,497
Latest member
WonaWarrior
Top