S10 Build getting started

Meili

Adventurer
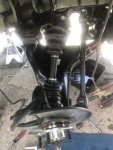
After suspension, the trans is next. After that I can get adventurous as I feel it will be reliable!

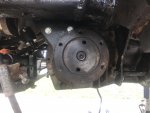
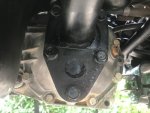
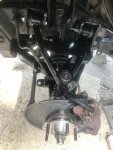
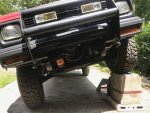
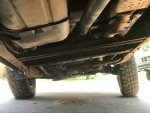
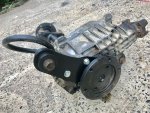
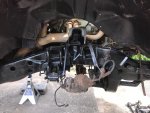
Today, dropped the front diff. One bracket was adjusted with a sawzall.

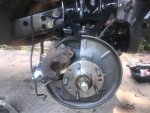
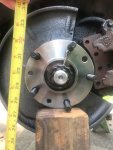
Once it was out, hit the front and as much of the chassis I could with a pressure washer. Hit the greasy spots with uncut Simple Green first.

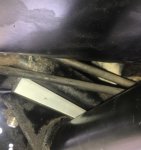
While blasting, knocked 1/4" sludge off the various skid plates, center link and finally the driveway.

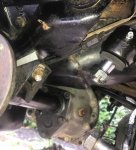
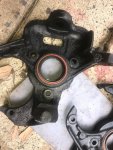
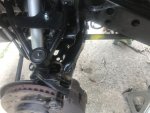
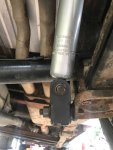
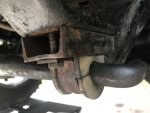
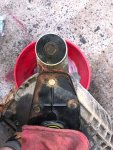
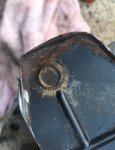
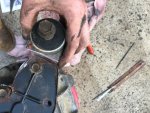
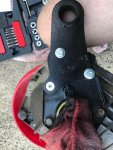
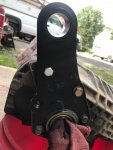
While all was drying , modded the front diff and installed the drop bracket.

The instruction were not that good and the template did not line up. So I went with the trim, test fit method since putting cast aluminum back on can be a

little "tricky". There were complaints online about the countersunk allen bolt being too long and bottoming out. I chased all the holes and it was fine so a

couple drops of Loctite and together it went.

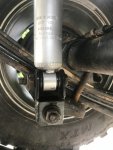
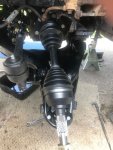
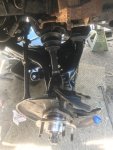
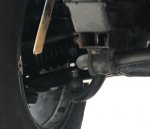
The now clean/dry chassis was spray bombed from every angle possible to retard rust with semi gloss black.

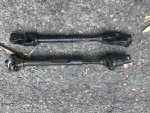
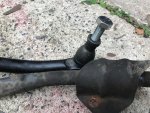
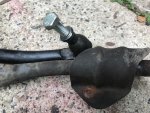
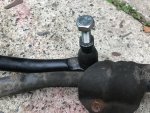
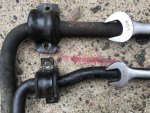
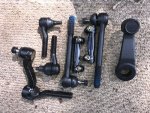
Also used the last of the textured paint on the remaining new steering components since they were uncoated.

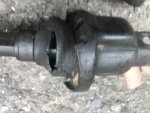
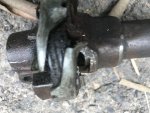
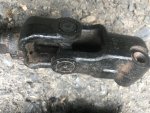
Going to drop the pitman arm and install a Jeep steering shaft tomorrow, then the rebuild begins.

11688
 

Attachments

  • s10 diff 1.JPG
    s10 diff 1.JPG
    176.7 KB · Views: 15
  • s10 diff 2.jpg
    s10 diff 2.jpg
    125.3 KB · Views: 15
  • s10 diff 3.JPG
    s10 diff 3.JPG
    86.3 KB · Views: 15
  • s10 diff 4.jpg
    s10 diff 4.jpg
    157.9 KB · Views: 17
  • s10 diff 5.JPG
    s10 diff 5.JPG
    115.6 KB · Views: 15
  • s10 diff 6.jpg
    s10 diff 6.jpg
    132.4 KB · Views: 16
  • s10 front 12.JPG
    s10 front 12.JPG
    150.8 KB · Views: 16
  • s10 front 13.JPG
    s10 front 13.JPG
    90.5 KB · Views: 16

Meili

Adventurer
With the pending Holiday, figured I'd post a few pics of my buddy's GTO we just got out of paint jail. (I did the mechanicals)

Nothing says Mercia like 463 cubic inches of thumping muscle car!

Wishing everyone a happy Independence day!
 

Attachments

  • gto 1.JPG
    gto 1.JPG
    101.3 KB · Views: 13
  • gto 2.jpg
    gto 2.jpg
    117.1 KB · Views: 12
  • gto 3.jpg
    gto 3.jpg
    116.8 KB · Views: 12

chilliwak

Expedition Leader
With the pending Holiday, figured I'd post a few pics of my buddy's GTO we just got out of paint jail. (I did the mechanicals)

Nothing says Mercia like 463 cubic inches of thumping muscle car!

Wishing everyone a happy Independence day!

Wow!:drool: What a sweet ride! Cheers, Chilli..:)
 

Meili

Adventurer
The lack of flex out back was bothering so I looked over my pictures and had an idea. Made a call to Rough Country and they confirmed my thoughts.

The rear shocks have 10.5 inches of travel. The combo of the AAL and shackles only gives me 2 inches of droop, 2" extension, 8.5 " compression.

Should be closer to 50/50. Dug threw my vast reservoir of semi useless stuff and found a set of shock extenders.

They added about 2 1/4", now 4 1/4 extension and 6 1/4" compression. Better. I also like it turned the bottom mount 90 degrees,

looks like it will be easier for the shock to rotate threw its travel.

I am swagging that the rear will drop about an inch with the additional weight of the build which will get me close to 50/50 extension/compression ratio.

Dropped the steering box and installed new pitman arm and swapped Jeep steering shaft in. Adjusted the box 1/16 turn tighter,

at an 1/8 of a turn it would bind.

The Jeep shaft has universal type joints compared to the rag-joint/bellow mess on the shock shaft. Also installed the new, beefier idler arm.

Last was the original spray bombed center link (non-serviceable).

Next did some bench pressing, installed the front diff. It is only about 70-80# but benching it while lining it up and installing the mounting bolts/nuts was

challenging.

Feel the burn!

Notice the welded area of the diff, that where the troublesome vacuum actuates axle contact was!

12204
 

Attachments

  • s10 rear 1.jpg
    s10 rear 1.jpg
    536.9 KB · Views: 14
  • s10 front 17.jpg
    s10 front 17.jpg
    511.1 KB · Views: 14
  • s10 front 16.jpg
    s10 front 16.jpg
    523.4 KB · Views: 14
  • s10 front 15.jpg
    s10 front 15.jpg
    551.5 KB · Views: 14
  • s10 front 14.jpg
    s10 front 14.jpg
    608 KB · Views: 15
  • s10 diff 8.jpg
    s10 diff 8.jpg
    113.9 KB · Views: 15
  • s10 diff 9.jpg
    s10 diff 9.jpg
    479.5 KB · Views: 15
  • s10 diff 7.jpg
    s10 diff 7.jpg
    521.9 KB · Views: 15
  • s10 diff 12.JPG
    s10 diff 12.JPG
    65.9 KB · Views: 15
Last edited:

FBJR

Adventurer
Doing the jeep shaft on my burb, good upgrade. Looks like you are thinking it through pretty well.

50/50 is OK, but normally you want more droop than compression. Of course that will depend on the bump stops and travel.

You should try my front 9.5 diff.
 

Meili

Adventurer
More droop would be good but going to stay where it is right now. Also keeping an eye on my shackle angle.
Really don't like making changes to suspension until the vehicle is in "as to be used" condition but felt the shock issue had to be addressed now before any damage to them occurred.
 

chilliwak

Expedition Leader
Nice progress once again Meili. It is always a pleasure to see what you are up to. Cheers, Chilli...:)
 

Meili

Adventurer
Presently stuck in waiting for parts hell.

Don't buy anything from 3rd party vendors on Amazon, they cant help if there is an issue.

Vendor says damage is by shipper, shipper says was not packaged properly, Amazon says can't help since it is not shipped from them.

Customer = human ping pong ball.

After jumping threw all the sellers hoops, now all the sudden it is out of stock. Argh!
 
Last edited:

Meili

Adventurer
It was just too hot and humid yesterday to turn wrenches so I did a little prep, wire wheeled bolts, dug up clean(er) hardware etc. etc.

Today had at it and got the front pretty well bolted up. Plenty of grease,anti seize and Loctite depending on the location.

Since the axle were new, hit the bare metal with some paint avoiding the press to fit surfaces..

While they baked in the sun, fixed a oil leak on the remote filter and installed the inner/outer tie rods. Held my breath as I installed

the lower control arms, I got "late" arms since they have a better sway bar mount. I "assumed" they would fit since all the other parts are the same.

They fit.

Also put new seals in the knuckle/spindles. Finally the Rough Country upper control arms went on.

The truck was just about at max extension with the way the t-bars were cranked. The RC upper arms are said to give some droop/extension back

and improve geometry by using full size upper ball joint.

Since the torsion bars are not connected yet, did some static testing and trimmed/adjusted the bump stops for more travel.

Got about 8 inches of total travel. Not sure of the split, but anything will be better then it was, the front road like a brick!

Could have got 3/4" to 1" more in each direction but that would put the ball joints within 1/4" of death. Went conservative since this is

more of an overlander then hard core off roader.

CVs should be happier now with the dropped transfer case.

Cant wait to see how it does on my high tech flex ramps.

12929
 

Attachments

  • s10 front 20.JPG
    s10 front 20.JPG
    146.5 KB · Views: 20
  • s10 front 21.JPG
    s10 front 21.JPG
    212.2 KB · Views: 20
  • s10 front 23.JPG
    s10 front 23.JPG
    147.5 KB · Views: 19
  • s10 front 24.JPG
    s10 front 24.JPG
    144.9 KB · Views: 18
  • s10 front 25.jpg
    s10 front 25.jpg
    170.9 KB · Views: 19
  • s10 front 26.JPG
    s10 front 26.JPG
    82.9 KB · Views: 18
  • s10 front 27.JPG
    s10 front 27.JPG
    119.9 KB · Views: 19
  • s10 front 28.JPG
    s10 front 28.JPG
    110.6 KB · Views: 18
Last edited:

Meili

Adventurer
Another hot, sticky day.

She's on the ground.

Installed the shocks, sorry RC, no pretty stickers until I see how they work.

Since I had put new pads on my 88 and it has sexy drilled rotors, they were swapped onto the truck.

The torsion bars put up a fight, but got them in.

3 issues I see right away:

The D/S sits about an inch higher then the P/S, hopefully torsion bar adjustment will take care of that.

Alignment is way off, both tires lean to the right, will get them better with my angle finder, then to a pro for alignment.

Turning radius is bad, only 1 revolution in each direction. Not sure what to do here. The rims are hitting the upper a-arms.

I have 16 inch rim as opposed to stock 15 inch? Gonna call RC tomorrow.

At least it can roll forward and backward!

Sure I will figure it out, tomorrow is another day.

13097
 

Attachments

  • s10 front 29.JPG
    s10 front 29.JPG
    131.9 KB · Views: 16
  • s10 front 30.JPG
    s10 front 30.JPG
    131.3 KB · Views: 16
  • s10 front 31.JPG
    s10 front 31.JPG
    81.4 KB · Views: 16
Last edited:

Meili

Adventurer
Went over today since this was really bothering me.

I think it is all interrelated.

The UCA cam adjusters I got were the larger range possible +or- 2.5 DEGREES. Played with them a bit and started to get my full range

of steering back without rub.

Don't know how I could have done it but I think I got the D/S torsion key off one spline/facet. Everything was marked when it was taken apart,

note the yellow paint on the torsion bar is the pictures above??

After that, the ride height should drop to where it was and the UCA cam adjusters are set, I think it will be fine.

Not looking forward to pulling them out again, but you gotta do what ya gotta do.

I gotta do it......... tomorrow!
 
Last edited:

Meili

Adventurer
The warden had given me a week off for good behavior, but got back at it today.

The torsion bar thing was driving be nuts, new keys were too tall for D/S but short for the P/S and visa versa.

I know the bar are rated different per side but this did not make sense.

The keys are six sided so each facet is 60 degrees, so clocking them was no help as I guesstimated it was off 20 to 30 degrees.

Finally said the heck with it and tried stock key on the D/S and RC key on the P/S. On mock up they seemed to "start" with in

10 degrees of each other so in they went.

I am a big fan of thing being symmetrical/balanced so they were adjusted to the same point.

Dropped the jack, drove it around the block and got out a tape measure.

It is within a +-1/2" , with the D/S being taller. Not sure how much it drops when the 250# meat sack sits in the driver seat but I bet it's close to perfect.

Was able to get the eyeball alignment closer and my turning radius is back.

I have given up on the "hows and whys" just happy it seems fixed.

Tomorrow am going to get it aligned, whew!

13,572
 

Attachments

  • s10 lift 2.JPG
    s10 lift 2.JPG
    87.5 KB · Views: 13
Last edited:

Meili

Adventurer
Got it from the alignment and went right over and put my ramp up.

At the full height (19 1/4 ramp) without sway bar compared to before:

The front and rear frames are closer to level by 2 degrees. ********EDIT looked at my notes from before, the front is closer to level by 2 inches now.

The D/S rear tire is on the ground, was 1 1/2" in the air before! *********EDIT also the frame is no longer twisting, was out 2 degrees before,

since all tires are on terra firma!

The first picture is before, second after. Hard to capture in picture but very noticeable in person.

I also backed up on the ramp, really tests the front. They are the last 4 pictures.

A couple observations:

The front was just touching the stops on the ramp.

The front shocks get within 1/4" of being totally compressed. May address that since this is a static test, moving at speed will flex/compress more.

The rear springs were just on the overload spring at full compression. Could get more flex by removing but it is staying since the rear will be getting heavier.

Rear shocks still had 1 1/4" to go at full compression and about 3 extended, so calling them good.

Not enough seat time to properly excess the ride quality but it is very smooth.

Amazing what happens when a lift is done "the right way"!

13652
 

Attachments

  • s10 front 32.JPG
    s10 front 32.JPG
    96.6 KB · Views: 15
  • s10 front 33.JPG
    s10 front 33.JPG
    136.6 KB · Views: 17
  • s10 front 34.JPG
    s10 front 34.JPG
    126.5 KB · Views: 15
  • s10 front 35.JPG
    s10 front 35.JPG
    82.8 KB · Views: 15
  • s10 front 36.JPG
    s10 front 36.JPG
    84.9 KB · Views: 14
  • s10 front 37.jpg
    s10 front 37.jpg
    132.9 KB · Views: 14
  • s10 front 38.jpg
    s10 front 38.jpg
    76.6 KB · Views: 15
  • s10 front 1.JPG
    s10 front 1.JPG
    104 KB · Views: 15
Last edited:

Meili

Adventurer
After running around doing errands today, definitely will need some sort of a sway bar soon.

I had figured as much but the extra weight really can be felt in turn. Besides that, ride is almost car like, at least compared to before.

So I started the mock up of a 2wd S10 I had picked up just for this. Don't worry how some things look, this is day one!

Also going to use, small joint type links to keep articulation combined with the smaller bar. Look at the restrictive stock set up for comparison.

The bar is 23mm (estimate, no metric wrenches that big) vs the one that I removed at 28MM. Since sway bars stiffness raises by a power of 4,

the 23mm is 54% less stifferer.;)

While I had it crudely mounted ran up my ramps (approximately 1 foot tall) making it all crossed up.

While not as severe as the 19 inch ramp, using 2 really tests the suspension. The front was only 6 degrees from level, rear was better at 4 degrees.

Very happy!

Not sure if you remember, when I added the rear shock extenders I commented that I was glad they moved the lower mount point 90 degrees.

Look at the picture of the shock angle to see why, rotates nicely on the shaft. Never understood why manufactures make the mount east/west vs north/south?

Ease of production?

Once I get the bar sorted out may try the big ramp up front and smaller one outback!

Still keeping an eye out for a small rear bar I can adapt, have a feeling I am going to need it. 23mm or smaller.

13808
 

Attachments

  • s10 sway 1.JPG
    s10 sway 1.JPG
    99.8 KB · Views: 13
  • s10 sway 2.JPG
    s10 sway 2.JPG
    119 KB · Views: 13
  • s10 sway 3.JPG
    s10 sway 3.JPG
    109.1 KB · Views: 13
  • s10 sway 4.jpg
    s10 sway 4.jpg
    50.9 KB · Views: 13
  • s10 sway 5.JPG
    s10 sway 5.JPG
    50.9 KB · Views: 13
  • s10 sway 6.JPG
    s10 sway 6.JPG
    112.4 KB · Views: 12
  • s10 sway 7.JPG
    s10 sway 7.JPG
    92.9 KB · Views: 13
  • s10 sway 8.JPG
    s10 sway 8.JPG
    107.5 KB · Views: 12
  • s10 sway 9.JPG
    s10 sway 9.JPG
    128.7 KB · Views: 13
Last edited:

Forum statistics

Threads
185,830
Messages
2,878,684
Members
225,393
Latest member
jgrillz94
Top