SUV Rear Storage System Feedback Request. Ideas

Kosmo

Adventurer
Expedition: Long term travel of the Americas. Approximately 3 years
Equip: SUV and Trailer
Tow Vehicle: 2007 Jeep Grand Cherokee Diesel
Trailer, Current: Kodiak 214 Hybrid
Plan: Move from location to location, set up trailer, and go on day trips exploring surrounding areas
Rear Drawer Requirement:

  • Store necessary tools and equipment while towing trailer, and while off-road without trailer
  • Lockbox for electronics tools, more expensive equipment
  • Refrigerator for day trips
  • Second battery system with fusing, breakers etc
  • Air compressor (and tank?)
  • Slide out table top?

Feedback from more experienced overlanders and what they liked, missed, added, felt was necessary

Payload is an issue with the tow vehicle, so with trailer connected and tongue weight the rear storage area needs to be light weight while towing.

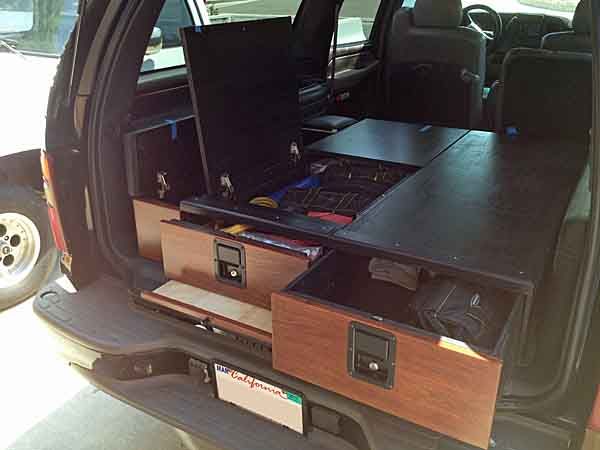
Here is a mockup of the basic idea. I am considering using a Wabasto Isotherme as a slide-out fridge if we decide a fridge is really necessary equipment. My idea is to make one drawer large enough to slide in an Isotherme Cruise 36 if we decide later this is a necessity.

N.B. There is a Travall Bolt in Pet Guard that separates the rear storage section from rear seats.

DSC_1513.jpg
A lot of people make 7" high drawers, but I would be going with 10" high frame for the drawer, which would allow a Wabasto unit to slide right in.

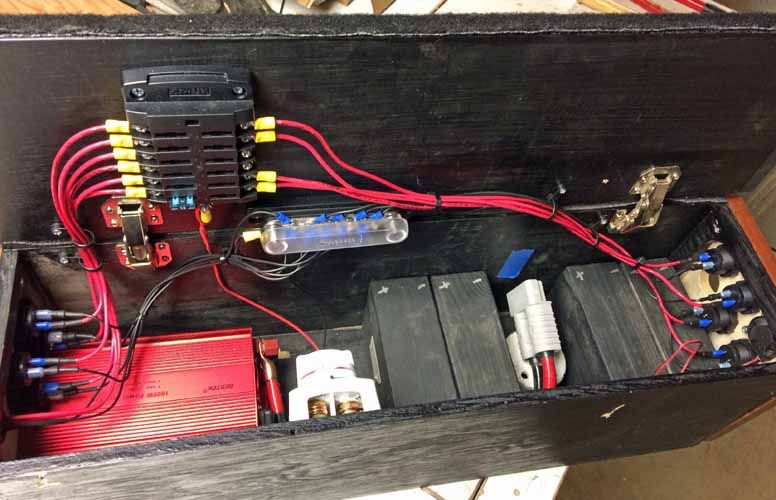
In the photo it shows space on the left for a AGM battery (It may be mounted under the floor and not in the cab. Inverter for 110 volt, fuse panel, breaker, possibly air tank, and other permanent items.

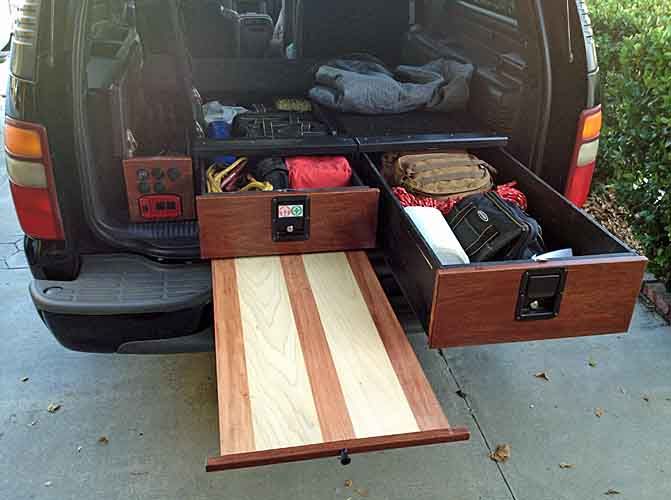
Red box on top is locking tool drawer, meant more for electronics and higher value items that can be kept locked when rear lift gate is open without concern. Fridge can be seen on the right. This is a cheap one we picked up this summer to experiment with and see if we actually need/want a fridge with us all the time.

DSC_1516.jpg

Feedback request

Looking for any feedback or ideas based on experience. I am located in Canada, so can be harder to get certain equipment and parts; however I do travel to the states for work, and can order online and pick things up on trips.

Thanks in advance.
 

Kosmo

Adventurer
Well since there has been no feedback, I have been driving around experimenting with how this system feels, and have finally started to cut 1/2" Birch Marine Grade plywood. So far only the floor pan.
 

MattL

Adventurer
Well since there has been no feedback, I have been driving around experimenting with how this system feels, and have finally started to cut 1/2" Birch Marine Grade plywood. So far only the floor pan.

Most important thing I've learned is to drive around to feel/see how things shift in transit. How do you plan to secure the platform and items on/in it?
 

rayra

Expedition Leader
I would suggest a platform setup that still allows some visibility over the luggage. And I'd dump the metal toolbox and go with tool rolls. Lot of wasted volume in such a box and quite a bit of racket off of a paved highway.

Is the trailer living quarters or gear? WIll you be able to sleep in yoru setup without having valuable gear laying around on the gear?
 

Kosmo

Adventurer
Slip in Tab system

Hi:

For now I have utilized the stock anchor points and fabricated a slip in tab system similar to stock.IMG_4731.jpg
 

Kosmo

Adventurer
Rear storage area arrangement

Rayra:

Thanks for the feedback. I purchased the red storage box more for an organized lock box secure location. My tools will likely be in some other sort of setup, likely in a drawer. During setup, knockdown, out and about, I want to have a secure location in the Jeep while it is unlocked, or windows open so I don't have to worry about crimes of convenience, quick smash and grabs etc. Will likely hold things like electronics, documents, passports, etc. The trailer is for living in, the Jeep will not be slept in, but used for day trips. The idea is to get to an area, dock the RV trailer, and then explore the area by hiking, biking, 4x4.

WK Kodiak.JPG

Considering this is going to be a long term trip, I am committed to sacrificing rear visibility for storage. That being said, the red box, may have the option of going form the Jeep to the RV while RV is docked, and we are on day trips. I am currently considering a slideout for the red drawers, and or the fridge. Keep in mind if we decide a fridge is a must have part of our setup, I have designed the bottom drawer area so it will take a Webasto Isotherme CR 36 insert.

Webasto CR 36.jpg

I would suggest a platform setup that still allows some visibility over the luggage. And I'd dump the metal toolbox and go with tool rolls. Lot of wasted volume in such a box and quite a bit of racket off of a paved highway.

Is the trailer living quarters or gear? Will you be able to sleep in your setup without having valuable gear laying around on the gear?
IMG_4727.jpg
 
Last edited:

rayra

Expedition Leader
One of the intents in my own platform / drawer design was to provide storage for all the gear I wanted to carry in the vehicle while keeping it out of sight. Someone looking in my windows sees nothing but an empty floor. I don't expect that to be attainable in an 'expedition' loadout, but my point is whether you put tools in that big toolbox or not, a potential thief is going to see a large red toolbox and imagine there's a relative fortune in tools in there. So I would suggest finding a way to either camoflage or conceal that box, or craft some other 'secure' storage location for the stuff you want to keep in it. Don't be wed to such a potential theft target just because you have it. Paint it some muted color or cover it in a trashbag or something.


Here's a couple pics of my build. It's roughly 13cu' of storage space and from outside the vehicle you see nothing. Both drawers have lockable paddle latches on them.

storagebuild120_zpscfjscude.jpg
auxbatt062%20current_zpsxu1s588o.jpg


eta

storagebuild131_zpsorwoyxoj.jpg


http://forum.expeditionportal.com/threads/161631-Storage-Drawers-Platform-for-my-GMT800-Suburban-WIP
 
Last edited:

Kosmo

Adventurer
Good security Points. Thanks

@Rayra

I definitely agree with you on the security points. At the moment it is just a big red lock box, that being said, right or wrong, I purchased it specifically for this purpose. :)

My rear windows are already very dark, and the sides will likely be covered over with metal or wood to allow to be used as a storage area. Rear window is heavily tinted, and painting the box a darker color or covering it with diaper box labelling is a good idea.

Your build looks great, and for the most part during normal day to day that is how mine will be. That being said we are selling our house, and going on the road for three years, and I want to be able to leave the trailer and have a reasonably secure vehicle. Nothing will stand up to thieves if they are left alone with the vehicle for a long period of time, or steal the vehicle itself. Heavy lockboxes and safes can all be figured out with a bit of time. Additionally there will be a few other systems which I will not be posting online to minimize these things. Staying low key, trying to be non-descript are the first steps.

The rear window is a quick smash and grab away from losing whatever is loose in the rear storage area, so I am doing my best to address the different levels of security.

BTW I have a lot of aftermarket parts stickers if anybody wants them, because they sure as h*#l wont end up on the outside of my Jeep. :)

Thanks again for your feedback.
 

Kosmo

Adventurer
@Rayra: Thanks again for feedback, much appreciated.

A cpl questions about your design.

Any rhyme or reason to cutouts to maximize strength to weight ratio?
I see a lot of people put their inverter, USD cable plugs up against the tailgate, but I am thinking they may come in handy while driving as well.

ANy thoughts on this, can you access the plugs with lift-gate down?
 

rayra

Expedition Leader
I mostly just winged it. You can cut out quite a bit and still retain sufficient strength for piling gear on top. As much as half of the area. I chose to make the cuts I did partly to keep some vertical support at short intervals and partly for cosmetics (even though it can't be seen when installed). Plus my top deck was 3/4" and fully glued. The whole thing makes a very sturdy truss structure. Too, I made my drawer units separate, so there's four vertical walls in only ~40" of the width. I'm a big dude, walked and jumped around on it without a creak.
The idea of the truss / box comes from a master carpenter named Ron Paulk, who has published an extensive series of YouTube design videos about mobile workshops and work tables. I'd used his design (paid him his low asking price for blueprints) to re-work my own workshop table. The drawer modules I built were not much different from those designs. Just tweaked in several ways.

as to the power outlets I felt the same way, so I put a variety on the front end of that power module too. The module itself is sized to fit / remain, even if I put the 3rd row seat back in (the two drawer sections would have to come out for that). I wanted maximum flexibility in arrangements and power sources. Lots of details in my complementary build topic on the power stuff (as well as a lot of unhelpful derision from the 'experts')

http://forum.expeditionportal.com/t...-seeking-inputs-on-my-inputs-and-ouputs/page3

powermodule124_zpsojum1ut2.jpg


Ultimately I ran heavy gauge cabling from my aux battery to my rear cargo area, as a branch circuit. Then added a variety of things to it. Future additions will be front and rear bumper connections for a hitch/carrier-mounted winch. I planned for that from the begining, when I went with the heavier cabling. Right now it's overkill for my usages.

Another future expansion will include several small SLA batteries inside that box as well as solar power integration. And mounting solar panels on my roof rack hard deck, in a setup that can be unlatched and optimally placed on the ground, as well.

I've been doodling these various design ideas for several years, long before I actually started looking for a project vehicle. We've had Tahoes since '99. I wanted to make more extensive mods, so it had to be something other than the missus' daily driver. So there's a lot of interplay between all the projects. Everything' smeant to work together to some degree.
 

Kosmo

Adventurer
Fantastic, thanks.

I am at the next pause point of my design. Have my drawer box finalized, with two top pieces on, and big section for door cut, but now sure how to finalize overhand, integration to walls etc. Now have to figure out how to mesh it all in with interior pieces, either original, or plywood aftermarket and wiring. I like what you did there with your box for inverter fuse panel. I guess that is a stand alone unit which can be unplugged easily?
 

rayra

Expedition Leader
Yes, that power box is essentially standalone. I detailed the connection in that 12v forum topic. The large gray connector in the right third of the box passes thru a round hole in the side of the box (cut after the picture was taken) which aligns with a similar hole cut in my cargo sidewall plastic trim panel. I have a mating connector mounted there. If I want to take everything out, I just unplug the box, unbolt it from the factory floor anchor point, put the rubber safety on the mounted plug and cover the hole with a cosmetic round plate. And the pwoer can be disconnected with a rotary cutoff at the Aux battery positive terminal.

I was fortunate in the design sense with the Suburban in that the cargo sidewalls are essentially flat panels, inside the rear wheel tubs. There's a 49" spacing between the panels just as there is between the wheel well tubs of a full sized pickup, and for the same purpose, so 4'x8' sheet materials will fit. That simplified fitting my design in the vehicle. If you have a more oddly shaped spaces on the sides of the cargo area, there are a lot of pictured design solutions in the big stuck topic in this subforum. Lots of hinged wing panels and the like, so you can readily utilize and odd-shaped space and fill it with soft gear, recovery straps, tool rolls, jumper cables and the like. Stuff that can conform to odd spaces. That way you can make maximal use of the odd spaces, freeing up room in drawers for boxier things.
 

Kosmo

Adventurer
Drawer slides in.

Made some progress today after receiving the new drawer slides.

Since the drawer slides weigh 17 pounds a pair, I am opting to go with one big drawer. In the end it takes a lot of analysing at each stage of the build in order to come up with what seems to be the best option. That being said, I am sure there will be things I wish I had done differently. I made the drawer end flush with the front of the box, and still have not decided how I am going to finish it. I recessed the Lock/release handles slightly.
IMG_4772.jpg
IMG_4775.jpg

Not sure you can see the detail here, but I saw a design which uses an overlap side. Gives a bit more space at the top, and provides a bit more rigidity and lesser clearance between drawer sides and drawer wall sides. Should create less movement over time.
This is the concept.
Overlap side.jpg

The Lock in Lock out drawer slides are super heavy duty. and I am certainly never going to have any great amount of weight in the drawers. IMG_4773.jpg

You can see there is a 3" space under the floor that will not be visible by most people unless they know it is there, and how to access. There is no back on the drawer yet, but once it is there hidden floor will not be visible.
IMG_4775 (1).jpg


In the last photo you can see a couple details.

1: Floor was clamped in an arc to create a convex shape that should help floor to have extra strength and not sag. I will add UHMW tape, or heavy duty roller bearings under the center.

2: I may add a flat board that will make the drawer look more like a tank with no access, but we will see. One step at a time.

IMG_4777.jpg
 

Forum statistics

Threads
185,837
Messages
2,878,726
Members
225,393
Latest member
jgrillz94
Top