You are using an out of date browser. It may not display this or other websites correctly.
You should upgrade or use an alternative browser.
You should upgrade or use an alternative browser.
Trucky McTruckface - Overland Adventure Truck
- Thread starter pnwginger
- Start date
NorthwestNorthernOntario
Observer
Cool. Let me know when you get the panels in. Going to Denver on the 12th to pick up the Freightliner. I was on work trip and saw Bahn Campers and Earthcruiser over in Bend. Both of them are very busy with several builds. Impressive shops.
pnwginger
Adventure Truck Builder
Hey! Great rig! I met you at the overland show at Sasquatch Mt. resort. Glad to have found your thread on there.
Keep up the great work!
Thank you Eric! that sure was a fun time up there!
pnwginger
Adventure Truck Builder
I noticed that you have an air condition evaporator. Did you install a kit? Is it stock?
Sent from my iPhone using Tapatalk
its a red dot unit with the proper specs for this application. I've been slowly piecing together the ac system. just hoses left now!
pnwginger
Adventure Truck Builder
Busy, Busy, Busy!
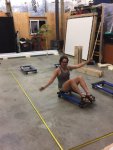
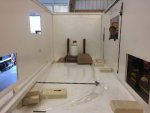
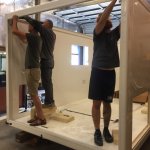
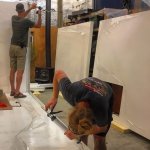
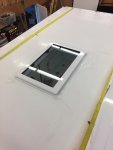
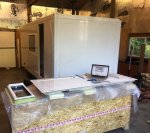
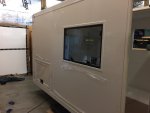
Since returning from both the northwest overland rally and the BC overland rally, progress on the truck was paused until my shipment of Total Composites panels arrived. thats not to say that i remained idle by any means... building and installing a few slide out bed platforms for sprinter vans, beginning to pack up the shop, backpacking around Mt. St. Helens and getting a few other projects in. While planning for our shipment to arrive, we were able to find a shipping terminal just minutes away from the shipping port in seattle. This allowed us to transload the panels into our extra large cargo trailer. With a few helping hands we were able to maneuver two full sets of panels into the trailer, in just an hour and a half we were loaded and secured to make the drive back down to portland where we unloaded one set of panels at their destination and headed for home. after three busy days of making preparations, organizing a crew and planning the assembly; it was time to assemble the habitation box. with the help of friends and family, we worked for two and a half days dry fitting and then glueing together the habitation box. despite the 100+ degrees, fiberglass dust, sticky adhesive, and a few moments of panic, the last piece finally went on. while allowing the adhesive to dry, we wasted no time in beginning the installation of the Outbound windows and hatches. we are very excited to be at this stage of the build and intend on mounting to the chassis this weekend once i have a chance to run a few wiring circuits and finish cleaning and sealing the box.
Since returning from both the northwest overland rally and the BC overland rally, progress on the truck was paused until my shipment of Total Composites panels arrived. thats not to say that i remained idle by any means... building and installing a few slide out bed platforms for sprinter vans, beginning to pack up the shop, backpacking around Mt. St. Helens and getting a few other projects in. While planning for our shipment to arrive, we were able to find a shipping terminal just minutes away from the shipping port in seattle. This allowed us to transload the panels into our extra large cargo trailer. With a few helping hands we were able to maneuver two full sets of panels into the trailer, in just an hour and a half we were loaded and secured to make the drive back down to portland where we unloaded one set of panels at their destination and headed for home. after three busy days of making preparations, organizing a crew and planning the assembly; it was time to assemble the habitation box. with the help of friends and family, we worked for two and a half days dry fitting and then glueing together the habitation box. despite the 100+ degrees, fiberglass dust, sticky adhesive, and a few moments of panic, the last piece finally went on. while allowing the adhesive to dry, we wasted no time in beginning the installation of the Outbound windows and hatches. we are very excited to be at this stage of the build and intend on mounting to the chassis this weekend once i have a chance to run a few wiring circuits and finish cleaning and sealing the box.
Last edited:


pnwginger
Adventure Truck Builder


pnwginger
Adventure Truck Builder
A summary of my experience over the past week.
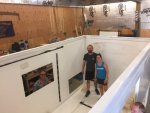
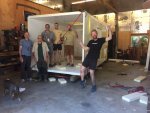
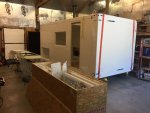
for months I've been anticipating this process. assembling the habitation box is a major milestone in the truck building process and I've finally reached it. this coming weekend the box will be mounted and final connections for driving lights, backup cameras and LED lights will be made. at that point the truck will look complete from the outside observer. All of the work this past week couldn't have been possible without help from family, friends and members of the expedition portal community. our experience with the Total composites panel system was good with a just few minor challenges that were easily worked through with their excellent customer service. The basic idea behind the assembly of the box is simple and fairly strait forward, though reaching the end result takes patience, forethought and manpower. the use of the Outbound brand windows makes for a very clean look and feature high quality hardware. installation went fairly smoothly.
from receiving our panels to having a fully assembled (minus corner caps) box in just a week blows my mind, especially since we only spent 3 days.
Last edited:
Quade -
Awesome work at incredible speed and what looks like great craftmanship! I'm loving all the photos!
Is that plastic lining that is on the outside of the windows and panels to protect it during assembly?
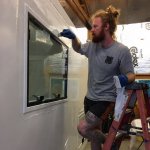
In Post #102, are you smoothing out the Sikaflex for the window while on the ladder?
How has the habitation box to frame marriage gone, and do you have any photos of that? What prep was needed to make sure things line up?
If the panels didn't come with instructions, do you have any advice on getting a team comfortable to do the same thing (putting together a habitation box)?
Thanks!
Awesome work at incredible speed and what looks like great craftmanship! I'm loving all the photos!
Is that plastic lining that is on the outside of the windows and panels to protect it during assembly?
In Post #102, are you smoothing out the Sikaflex for the window while on the ladder?
How has the habitation box to frame marriage gone, and do you have any photos of that? What prep was needed to make sure things line up?
If the panels didn't come with instructions, do you have any advice on getting a team comfortable to do the same thing (putting together a habitation box)?
Thanks!
pnwginger
Adventure Truck Builder
Scott,
thank you for the kind words.
the plastic is a protective film. i'll be peeling it of once it is mounted on the truck this weekend.
a heavy soap solution sprayed onto the excess adhesive made cleanup much easier.
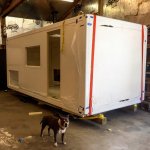
the box is not mounted to the frame ye. it will be lifted this weekend. with having steel inserts in my floor panel at the same locations as my subframe connection points, it will match up and join just as planned.
the kit does come with a booklet that outlines the basic steps, though there are many details that must be learned and practiced during assembly. my advice is to dry fit everything before applying any adhesive. make sure your crew is 6-8 strong for maneuvering both the floor and ceiling panels. go buy at least two or three pneumatic/electric caulking guns. the adhesive provided is the sausage type tubes and has a very small working time before it sets up based on the heat and humidity. as you'll be planing this, you will be much more familiar with the system than your crew. take the time to teach them about the system and their specific role at each and every stage.
quade
thank you for the kind words.
the plastic is a protective film. i'll be peeling it of once it is mounted on the truck this weekend.
a heavy soap solution sprayed onto the excess adhesive made cleanup much easier.
the box is not mounted to the frame ye. it will be lifted this weekend. with having steel inserts in my floor panel at the same locations as my subframe connection points, it will match up and join just as planned.
the kit does come with a booklet that outlines the basic steps, though there are many details that must be learned and practiced during assembly. my advice is to dry fit everything before applying any adhesive. make sure your crew is 6-8 strong for maneuvering both the floor and ceiling panels. go buy at least two or three pneumatic/electric caulking guns. the adhesive provided is the sausage type tubes and has a very small working time before it sets up based on the heat and humidity. as you'll be planing this, you will be much more familiar with the system than your crew. take the time to teach them about the system and their specific role at each and every stage.
quade
Quade -
Awesome work at incredible speed and what looks like great craftmanship! I'm loving all the photos!
Is that plastic lining that is on the outside of the windows and panels to protect it during assembly?
In Post #102, are you smoothing out the Sikaflex for the window while on the ladder?
How has the habitation box to frame marriage gone, and do you have any photos of that? What prep was needed to make sure things line up?
If the panels didn't come with instructions, do you have any advice on getting a team comfortable to do the same thing (putting together a habitation box)?
Thanks!
pnwginger
Adventure Truck Builder
nice job, will you detail expenses when you're done?
we are keeping a detailed record of cost of materials, components, consumables and time. we are still quite a ways out!