"Wynona" - 2000 Chevrolet Express

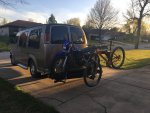
Hello all! My name is Scott, 39 years old from Springfield Missouri. I've been lurking here for a few weeks gaining lots of good info so I thought I would start a thread on my van "Wynona". I've owned this van for almost 4 years and should have taken more pictures of the build as I went. I've done all the work myself and once I get into a big project I rarely take time to wash my hands and take pictures as I'm going. So for now I will post a recent picture of her and then backtrack with what pics I have.
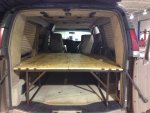
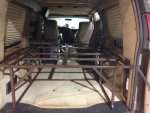
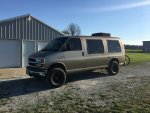
Current pic
UBe7A5n.jpg


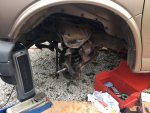
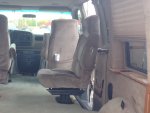
When I first bought her
T9cy5qN.jpg


2000 Chevrolet Express 2wd G1500 Conversion van purchased fairly cheap with 200k miles and a blown transmission. The body and interior was in great shape for it's age and came with a stack of maintenance reciepts. Gave $1200 for it and then spent another $1200 on a GM reman 100k mile warranty 4L60E transmission and had it back on the road in a days work.
 
Last edited:
The first thing I did was to remove the seats. It was the typical 7 passenger layout with 2 captains in the middle row and a bench/bed combo in the back. I will use the term bed very loosely. It did fold flat but I hardly could see it as being comfortable for anything more than a quick nap.

My intentions from the beginning was to build a camper van for two. I wanted as large of a bed as possible and a place for two people to be able to sit and relax, eat a meal, and watch a movie.

So I took the best condition of the two rear captains chairs, unbolted it from the base and mounted it permanently 90 degrees sideways. Then bought the rather overpriced discountvantruck.com swivel for the passenger front seat.
 

Attachments

  • 104.jpg
    104.jpg
    298.4 KB · Views: 117
  • 103.jpg
    103.jpg
    536.3 KB · Views: 122
  • 102.jpg
    102.jpg
    535.5 KB · Views: 125
My plan for the bed was a permanent metal frame with plenty of storage room underneath. After taking careful measurements I figured I could fit a queen size mattress with a few inches trimmed off the end and a little trimmed off the sides near the rear doors. So off to amazon for an 8" memory foam mattress that could be trimmed with an electric carving knife.

The frame for the bed is 1x1 square steel tubing and the legs were spaced so it would utilize the original rear seat mounting points. It should remain solidly stationary in the event of an accident. The platform is thick plywood.
 

Attachments

  • 107.jpg
    107.jpg
    8.2 KB · Views: 103
  • 106.jpg
    106.jpg
    535.1 KB · Views: 106
  • 105.jpg
    105.jpg
    7.5 KB · Views: 123
  • 109.jpg
    109.jpg
    544.1 KB · Views: 136
  • 108.jpg
    108.jpg
    554.9 KB · Views: 132
I wanted a table for food prep and other tasks and rather than trying to source a section of counter top I used some left over wood from the bed platform and a few pieces of self adhesive floor tile trimmed to fit. It has held up well. The frame for the table is the same 1x1 square tubing as the bed frame and bolts to the end of the bed. Not pictured here but I have a microwave underneath the table also. It's to the left of where the storage containers are and shoved all the way back against the wall of the van. It's sort of awkward to use but it's out of the way. I also left room for a small cooler to the side of the table just behind the drivers seat. Plenty of room under the bed for a larger cooler.
 

Attachments

  • 111.jpg
    111.jpg
    535.4 KB · Views: 75
  • 110.jpg
    110.jpg
    531.9 KB · Views: 77
The intention for the van was to utilize shore power or a small Honda generator for the majority of the needed power. I do now have a single deep cycle battery, a Renogy portable suitcase solar panel, and a small inverter. But haven't as of now wanted any long term off grid sustainability. More of a weekend getaway type of vehicle. So here is what I did for the shore power inlet. And a picture of the bed all made up and led rope lighting. Also pictured is my original tv display which was actually a computer monitor and speakers but has since been switched out for a 24" LG TV on a swivel mount but in the same location.
 

Attachments

  • 114.jpg
    114.jpg
    510.1 KB · Views: 85
  • 113.jpg
    113.jpg
    521.4 KB · Views: 78
  • 112.jpg
    112.jpg
    526.9 KB · Views: 80
I found a motorcycle hauler off craigslist that is heavy duty and meant for the back of an RV with a 3 point hitch mount. I decided rather than cutting off the additional mounts I would modify my hitch for the van. I bought some 2 inch square tubing, a couple harbor freight hitch adapters and made side extensions. The hauler is very stable and allows me to also pull a trailer behind it or carry a bicycle hauler at the same time.
 

Attachments

  • 116.jpg
    116.jpg
    561.3 KB · Views: 89
  • 117.jpg
    117.jpg
    560.2 KB · Views: 94
I got the windows tinted, bought and trimmed reflectix for the front and back windows for privacy when parked and this is how I utilized the van for the past three years.
 

Attachments

  • 115.jpg
    115.jpg
    576.6 KB · Views: 75
This is one of those projects that I was so intent on not screwing up, I took absolutely zero pictures of it as I was doing it. I wanted to add a roof top A/C and heater. I didn't want a tall, gaudy, heavy unit that stuck out like a sore thumb and caused my roof to bow under the weight. So I researched and bought the rather expensive Coleman Mach 8 cub. It's one of the lowest profile and lightest units out there as of 2016 when I installed it. I really, really didn't want to drop the headliner but also didn't want to cut through one of the main cross supports so I found a Express cargo van with the supports exposed and took several measurements to determine exactly where the supports were that were hidden by my interior. I climbed up on the roof and masked out my 14"x14" hole, said a little prayer, and slowly cut the roof opening with a cutting disc on my grinder. After breathing a sigh of relief from not cutting through a roof bow, or starting a fire from the sparks in the headliner insulation, I simply used a razor blade from above to cut through the headliner.

I framed the hole with some wood scrap pieces I had and dropped the unit in place. I've added the Coleman heating unit made for the Mach 8 and now have heat and air providing I have shore power or want to run my EU2000 generator. It has shown no signs of sagging since I installed it last summer.
 

Attachments

  • 119.jpg
    119.jpg
    506.5 KB · Views: 81
  • 118.jpg
    118.jpg
    557.3 KB · Views: 78
I have enjoyed the van immensely the past few years and have taken it on many road trips and camping trips and has been a base camp for back road exploring on my Yamaha TW200 and a rolling man cave hangout at the local mountain bike park. I can easily watch netflix from my iphone on the tv using the inverter and deep cycle house battery for several hours at a time without the need to run a generator.

So that pretty much catches up to last month and the modifications that brought me here to this site.

I have found myself a few times wanting to take the van a little further down a dirt road or across a field to camp by a river with major ground clearance hesitation. I have a Jeep TJ setup for rock crawling and deep exploring but still wanted to access some off the beaten path camping spots with my van.

I began researching lift kits and more offroad friendly setups for vans. While I do drool over some of the Quigley equipped vans and other 4wd conversions, I just didn't see that as being a direction I want to go with mine. I figured better ground clearance, decent tires, some recovery gear, and common sense will get me 99% of the places I want to go. First things first, fiberglass running boards had to go. I was pleased to find no rust upon removal.
 

Attachments

  • 120.jpg
    120.jpg
    475.4 KB · Views: 74
Last edited:
I found that GM used the same front spindle on the 96-02 2wd G1500 Express van as the 90's 2wd 1500 C platform pickup trucks, Suburbans, Tahoes. So the readily available 4" lift spindles for those trucks would be a bolt on deal for my van. I ordered Rough Country 7500 lift spindles, lift blocks, and a u-bolt kit. I figured as long as I was pulling everything apart it would be a great time for new upper and lower ball joints, any needed steering components, and new shocks front and back.

A long day of driveway wrenching and Wynona is taller...
 

Attachments

  • IMG_7127.jpg
    IMG_7127.jpg
    569 KB · Views: 116
  • IMG_7128.jpg
    IMG_7128.jpg
    486 KB · Views: 120
  • 122.jpg
    122.jpg
    550.4 KB · Views: 121
  • 123.jpg
    123.jpg
    532.9 KB · Views: 122
Last edited:
New shoes were clearly next on the agenda and the stock 15" wheels were so close to the new spindles I had to remove the inner wheel weights for them even to spin. Ordered 16" Pro Comp 7069 aluminum wheels and 265/75r16 Cooper Discoverer AT3 tires. After trimming the front lower bumper cover extension, this is how she sits now.
 

Attachments

  • 124.jpg
    124.jpg
    561.9 KB · Views: 143
  • 125.jpg
    125.jpg
    572.9 KB · Views: 140
  • 126.jpg
    126.jpg
    584.1 KB · Views: 127
The maiden lifted voyage was a trip to the local mountain bike park this past weekend to enjoy the beautiful weather.
 

Attachments

  • 128.jpg
    128.jpg
    563.5 KB · Views: 101
  • IMG_7145.jpg
    IMG_7145.jpg
    549.9 KB · Views: 99
Last edited:

tmo2460

Observer
Looking good! Tires and wheels make a huge difference on the look of a van.

Also your local bike park has way cooler features than mine!
 

Forum statistics

Threads
185,829
Messages
2,878,656
Members
225,393
Latest member
jgrillz94
Top