The Camp 4x4 Bus - 1973 Suburban 8.1 Swap & Build

camp4x4

Adventurer
Little more progress today and the last couple evenings. The floor has been stripped down with a wire brush, ready for the Corroseal, then the patch panels, then the Lizard Skin. I finally decided to do the patch panels with Smart Small Panel Adhesive. Apparently this stuff cures as hard as steel. This will dramatically simplify filling the holes in the floor, and if I do it thoroughly everything should be fairly well sealed up without requiring welding. Is it perfect? No. Will it last until when (if) I can get it repaired perfectly. Definitely.

Got a bunch of things bolted on and a bunch of things torqued to spec after being just loosely bolted on. Picked up a fresh paint pen to mark everything that was torqued. Helps me keep track as well as helps me keep an eye on things down the road if anything loosens up.


I also finally found the right Energy Suspension poly transmission mount bushing, and I found that the 87's transmission crossmember matches the 4L80E mount pattern. Unfortunately when I used the jack to press the crossmember up against the frame I found the mounting holes nearly match, but are far enough off there's no way to make it work. Unfortunately this leaves me in a tough position because I don't feel comfortable drilling the mounting holes so close to the old holes. I'm thinking I have two options: weld on an 1/8" bit of flat to reinforce the frame in that area, or I've been thinking about having a crossmember build; something like the ORD engine crossmember I have up front. Some 1/4" angle with gussets, couple W-bent DOM tubes and a bit of plate for the bushing mount... probably big money but would be trick. I'll probably do the simple fix.


In other news I took some measurements and I think I need to rethink the short 32-spline input shaft I'm using on the NP205. It seems I'll only have about 1.25" of engangement between the transmission output shaft and the transfer case input shaft right now. Which just doesn't seem like enough. There's definitely more output shaft available, so I think I'm going to have to pick up the long input shaft for the NP205 and swap that in. With the Northwest Fab Works figure-8 to circle six adapter taking up a little over .5" between the transfer case and the transmission mount I think it should be just right. :/ I've been less than impressed with the myriad of conflicting and incomplete info online about putting this transmission and this transfer case together.... The alternative appears to be swapping the transmission to transfer case adapter for one of the TH400 to NP205 ones that don't require the figure-8 to circle-6 adapter. These, however, have a taller "foot" which means I'd have to get a different transmission crossmember... FUUUUUUUU.... guess this is what you get when you mix and match.

Anyway... it'll be little by little the rest of the way.
 

locrwln

Expedition Leader
Got a bunch of things bolted on and a bunch of things torqued to spec after being just loosely bolted on. Picked up a fresh paint pen to mark everything that was torqued. Helps me keep track as well as helps me keep an eye on things down the road if anything loosens up.


I have yet to have u-bolts that didn't stretch after installing them, so I would make sure to give everything a re-torque after you drive it. I'm not sure how the OEM's get u-bolts tight without the need for a re-torque. Doesn't seem to matter whether I source them locally or aftermarket name brand u-bolts. I've even tried over-torqueing them hoping they would stretch into the final setting, even that didn't work.

Jack
 

camp4x4

Adventurer
This project has had a fair amount of second guessing, back tracking and re-thinking. And right now I'm re-thinking a few things.

First, I'd recently been thinking I'd simply swap my old '87's doors onto the '73 since it already had the power locks, power windows and the glass I want to use. But, that leaves me with a very mismatched paint job. Not awesome. Since the guts of '73 and '87 doors won't interchange the only other option was to convert the manual to power and tint the glass to match what I want.

One of my biggest hesitances with going the manual > power conversion route was the issue of what to do about the hole that'd be left from taking the crank off. The kit I bought came with some janky looking switches that appeared to be big enough to cover the holes, but I didn't think the stock ones would be large enough. After finding the image below I'm starting to think I can use OEM switches to fill the holes. The power lock kit will be easy enough. That just leaves me with tinting the windows to match the '87's I'm going to put in the rear.

1008cct_23_o-1979_chevrolet_c10_upgrades-power_window_switch.jpg


The second thing I'm rethinking is my NP205 > NL80E adapter. For the longest time I'd only seen the two 32-spline input shaft options referred to as "short" and "long". But last night I found the actual dimensions of them: 7" and 10". I also did some measuring and at the moment it looks like I'm only going to have about 1.25" of output/input shaft engagement between the trans and transfer case. That's not enough. Since I have the short input shaft I initially thought about switching to the 10", long, input shaft. But, after measuring the actual available output shaft length - 3" - the 10" input shaft option seems like it is going to be too long. So, what I believe I'm left with is getting rid of the NFW figure-8 to circle-6 pattern adapter and just using the Advanced Adapters reproduction TH400 > NP205 transfer case mount. This mount will directly mount to the 4L80E and the NP205, which should give me nearly 2" of engagement between the output/input shafts. Shame to have spent the money on the NWF adapter though. This will also mean I can't use the '87's transmission crossmember, OR the bushing I just bought, since the foot of this adapter is taller and narrower. :-/

513202_WEB.jpg
 

FBJR

Adventurer
All builds change as they progress. Extra parts always show up, sometimes they are pricey.

I like the 2 in engagement but think 1.25 would still be fine.

Hard to go wrong with AA and the 205.
 

camp4x4

Adventurer
I like the 2 in engagement but think 1.25 would still be fine.

I'm really curious what other people think of this. I REALLY don't want to be in a situation where one of the components shears, but sticking with the 1.25" of engagement would REALLY make my life easier right now...
 

nitro_rat

Lunchbox Lockers
The square GM factory window switch definitely covers the window crank holes. You will probably just need to square up the round hole. I’ve put plenty crank window door panels on power door trucks. That is the same place GM put the switch too so it looks factory. You will have to hack the driver door for the big 4 window switch though!

The manual windows are one of my favorite things about my ‘84 Burb though...
 

camp4x4

Adventurer
The square GM factory window switch definitely covers the window crank holes. You will probably just need to square up the round hole. I’ve put plenty crank window door panels on power door trucks. That is the same place GM put the switch too so it looks factory. You will have to hack the driver door for the big 4 window switch though!

The manual windows are one of my favorite things about my ‘84 Burb though...

That’s awesome to hear! Thanks! I’m a convenience guy... so power stuff is pretty much a requirement.
 

camp4x4

Adventurer
Well, I figured out a few things about my power window conversion last night. First thing I figured out is that crank clips are a pain in the *****. Literally could not get this one out so....


The second thing I figured out is there's no way I'm going to be able to use the OEM switches to fill in the crank hole with this conversion kit. Since this is a '73, I can't use the OEM regulator and motors (I've read) to retrofit. I will likely tear into my '87 doors just to see the differences side by side and figure out if I there's a way to make it happen or not. The aftermarket retrofit kit I bought mounts onto the shaft that the crank did and uses cable and gears to rotate it. The problem, though, is the shaft remains in the hole, leaving no room for the switch. Bummer.

However! As I was looking at the door trim panels I realized that the switch pods that came with the kit actually wouldn't look too out of place. So that's the direction I'm thinking I'll go now. It would require no modification to the door guts, minor cutting of the door trim panel and generally not look half bad in the end.


On another front, I picked up some new seats from a craigslist add today. For a while now I've been wanting to use the middle row seats from a Honda Odyssey. I've seen this done with some other square body vehicles and have really liked the outcome. They're nearly perfect in total width and look to be a whole lot more comfortable than the benches that were in the truck or the junkyard bucket seats I'd put in my '87 previously. All the projects I've seen have used the 2011-2017 model seats. Unfortunately those are A) hard to come by and B) pricey when you can find them. Typically these are available from handicap conversion companies, but at $300+ a piece and the fact that they are pretty much only available in Arizona (there's a conversion company in Phoenix apparently) so I would have to pay shipping or gas to get them here, that becomes a pricey proposition for front and back seats. Fortunately I was able to find some 2006 seats right here in San Jose. A guy had swapped his entire Odyssey interior in order to upgrade to leather from cloth. I got the entire middle row for $80 and didn't even have to leave home. I've also found a 2006 Odyssey with the same interior at the Sacramento Pick-n-Pull. Though they are fairly well covered in oily junkyard parts, the seats appear to be in good shape otherwise. With Pick-n-Pull doing a $15/seat promo this weekend I'll be up there scoring the set (it's technically 3 seats) for $45 + tax and some gas money! Throw in some professional steam cleaning and they're still a deal.

The one bummer is they don't have cup holders in the back of the fold-down center seat like the 2011-2017 models do. But, I think that's likely a problem that can be remedied fairly easily either with some aftermarket ones or perhaps a little fiberglassing... we'll see.


Oh yeah, and I found this little inspection(?) slip behind the firewall jute when I pulled it over the weekend. Anyone know what D.R.C Acceptance means?


bknudtsen

Expedition Leader
Width looks good on the seats. Do you have a plan for the height? Looks like the mounts will separate from the sliders...
 

camp4x4

Adventurer
Width looks good on the seats. Do you have a plan for the height? Looks like the mounts will separate from the sliders...

Yeah, so the quick release brackets come off the bucket seats very easily, leaving the sliders in place with some mounting bolts I can build a frame for. That will take them down about 2 inches. The jump seat on the other hand appears to not have the same setup. At least at initial inspection... so I’ll have to figure that out.
 

camp4x4

Adventurer
Progress continues...

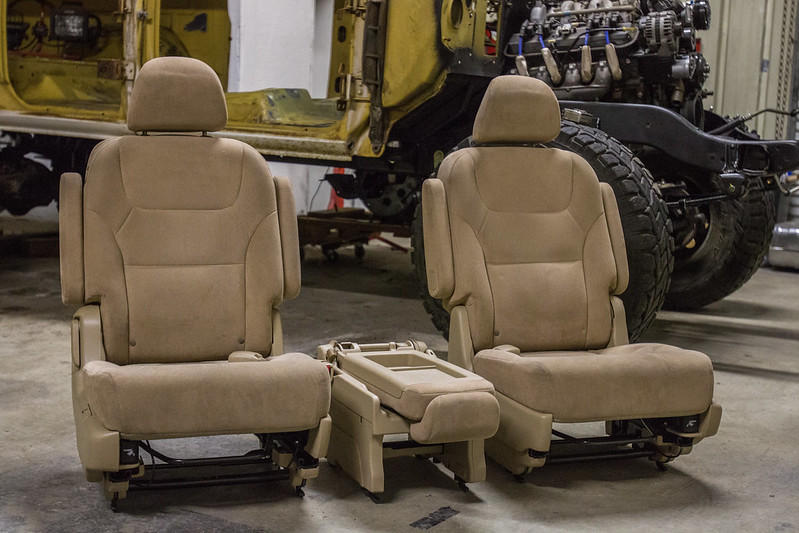
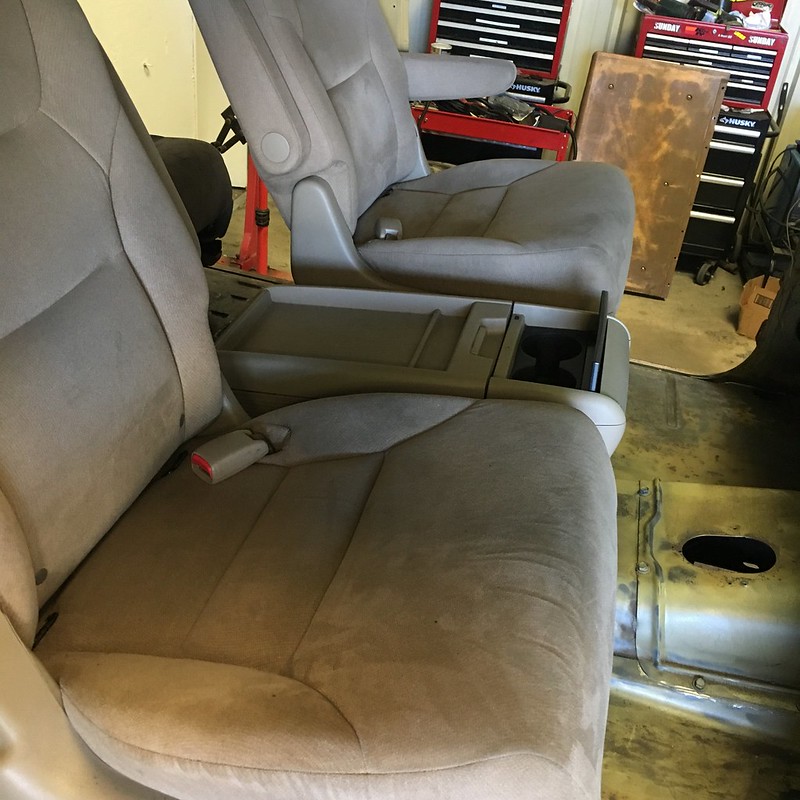
First a few quick updates. More parts are rolling in. I picked up a center console as an option for the front seat. $40 on Craigslist seemed like money well spent for cupholders. Plus the Mrs. likes to put her books and junk in the cubby.

40319988492_f727a385d2_c.jpg


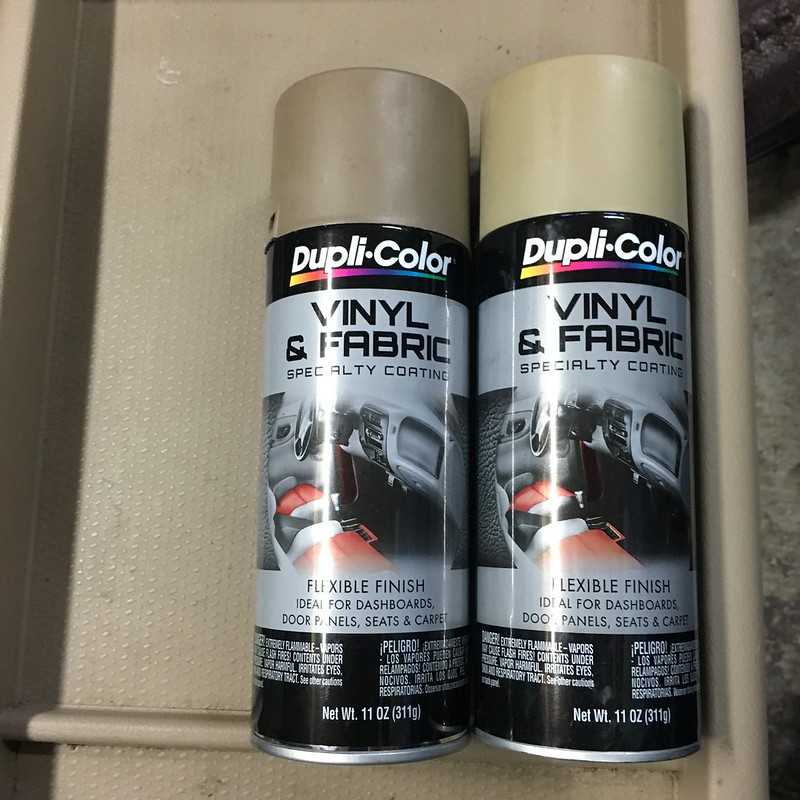
Also picked up some Duplicolor Vinyl & Clothe paint to try and match the Chevy trim with the Honda seat plastic. More on that later.

40319997762_a64eb14c47_c.jpg


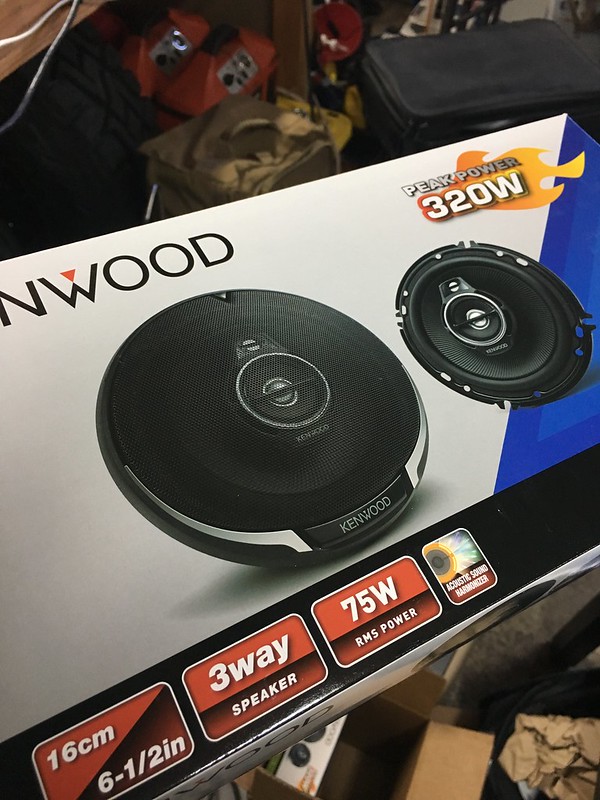
Also picked up some 3-way 6.5" speakers that'll be mounted in the doors. I've thought about the various ways of doing component speakers and blah blah blah. This is easy and effective. I'm not looking for competition level sound, just want my tunes. I'll likely be putting some 8" shallow-mount subs built into the storage tray I'll be making for the cargo area, just in front of the rear wheel wells and behind the back seats. Between these and those I'm sure I'll be more than happy with the sound.

40365358981_065f0be4f5_c.jpg


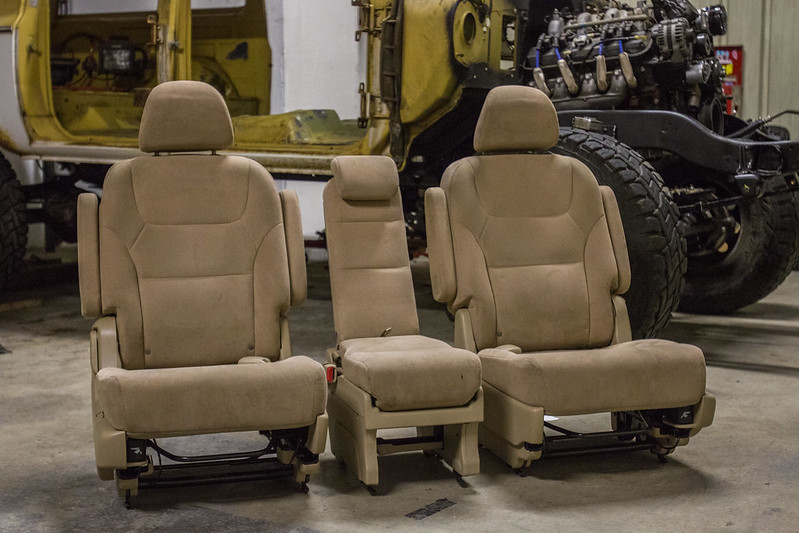
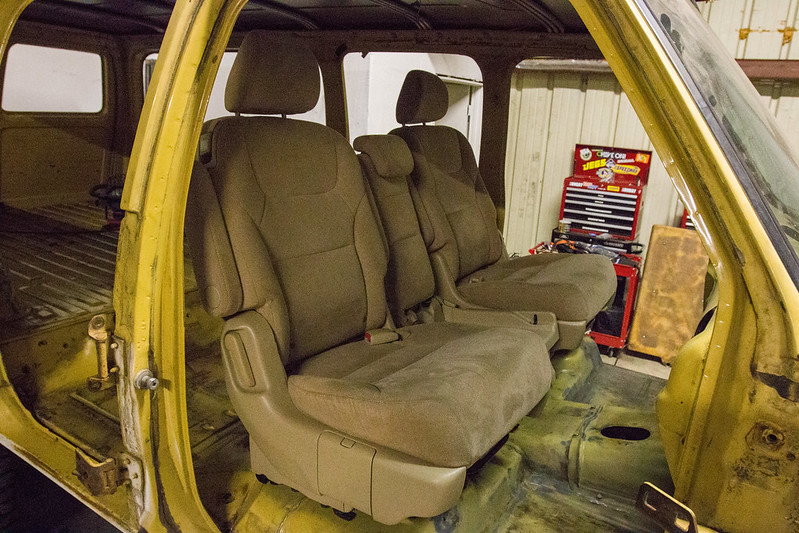
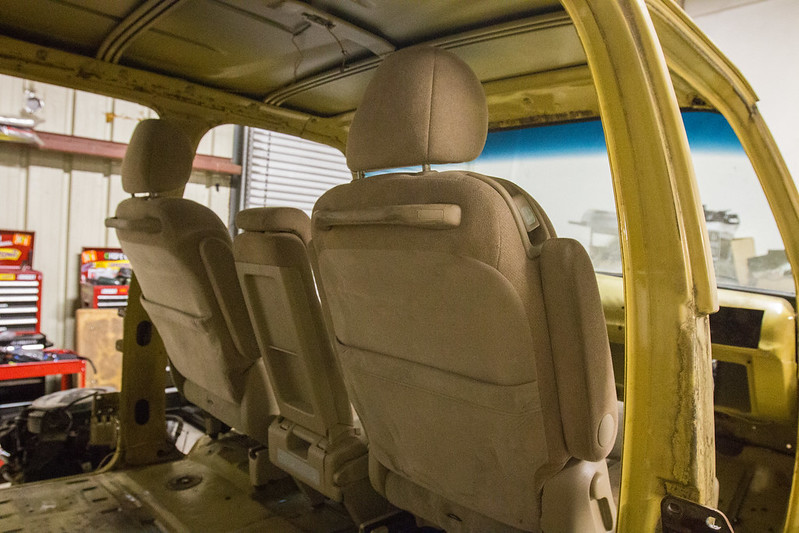
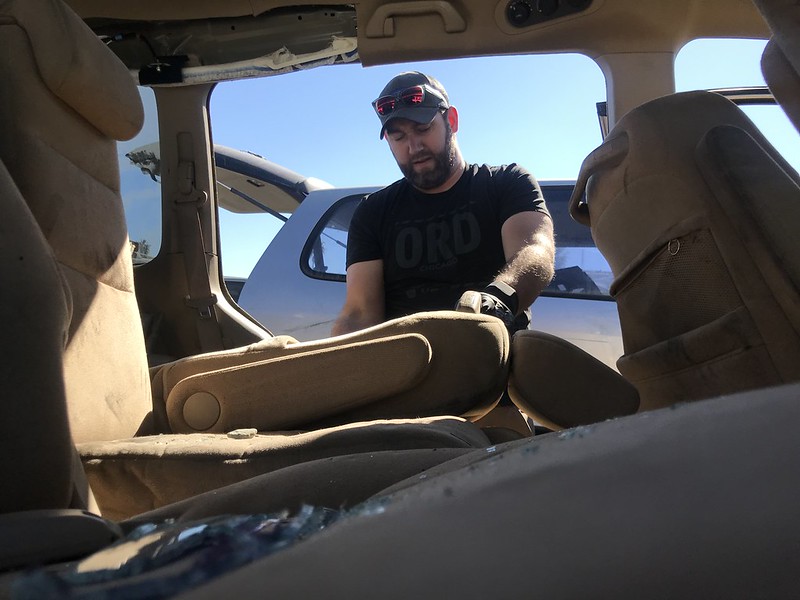
Now, on to the weekend. Saturday was spent driving about 5hrs for 15min worth of work at the Sacramento Pick-n-Pull. But, that and $50 net me a matching set of Honda Odyssey middle-row seats to be used for the "middle" row of the 'Burb. I put middle in quotes because the truck really will only ever have a front and back row. I don't ever plan on using the 3rd row seats again.

These seats had a bunch of random parts tossed on them, so they're oily and dirty but overall in pretty good shape. They'll definitely take some cleaning but there's nothing on them that shouldn't come off with enough soap and effort. They are, unfortunately, missing the fold-out cup holders that sit on the side. I'm not terribly worried about them, so in the mean time I'm just going to keep my eyes out for another Odyssey in the junk yards (thanks Row52 search notices!). If I really get antsy they seem to be available online for $50 (though I'd feel like an idiot paying as much as I did for the whole set of seats).

Next up for seating is gonna be removing the quick-release clamps and fab'ing a couple of mounting brackets. I read the front bench seat bracket and be tweaked to make the front ones work. The rears should be a pretty easy endeavor as well.

40365002601_39656eba65_c.jpg


39468327675_7fde1dc911_c.jpg


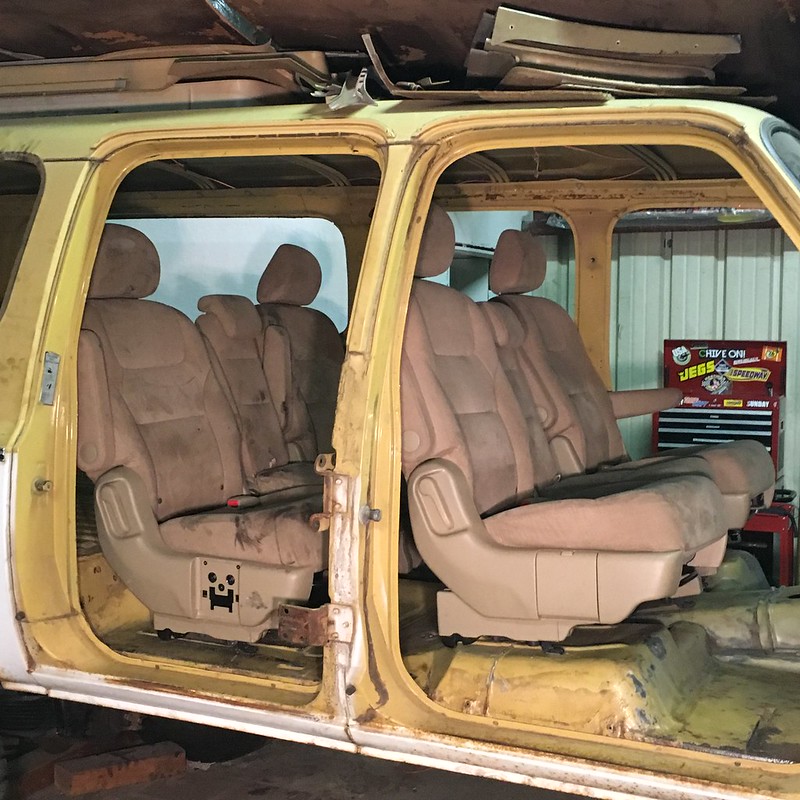
Sunday was a terrifically productive day. Started out by seeing how the center console would work. I think its going to be great.

39652867164_545acebd59_c.jpg


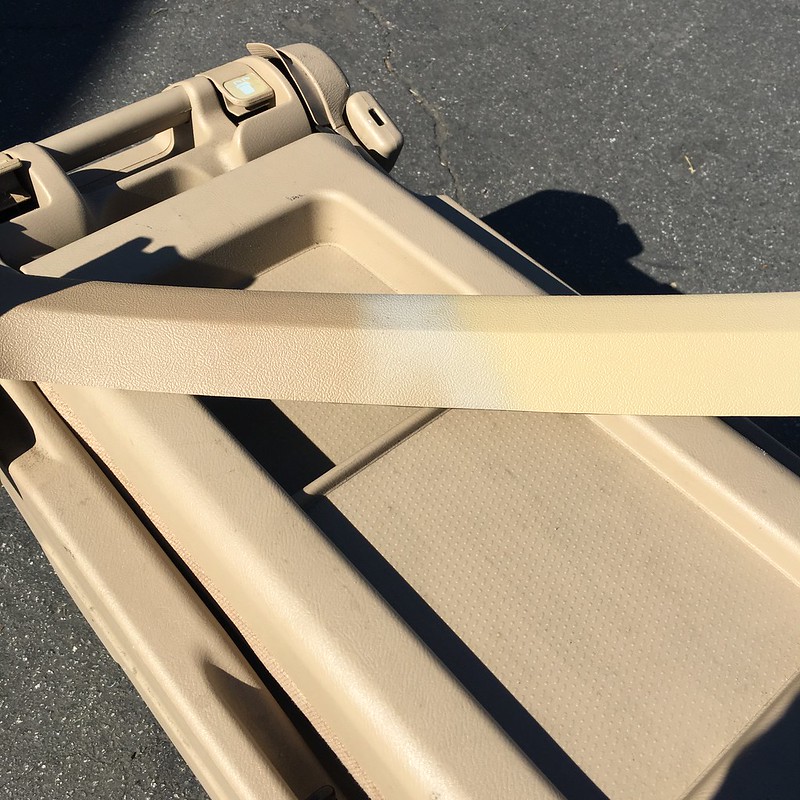
Next I wanted to see which of the Duplicolor paints would best match the plastic on the seats and center console. I took one of the extra trim pieces from the trucks and sprayed a color on each end. I have to say that this stuff is pretty awesome. It was dry within a few minutes and the coverage is terrific. Seems very durable as well. I gave it a few good scratches and it took it well. While neither of their tans - Medium Beige (left) and Sand (right) perfectly match the Odyssey seats’ plastic, the Medium Beige is closer though darker, and less yellow. I believe I’ll be painting the trim with that. May go all out and do the seat plastic to match... maybe.

39652870144_38a78162dc_c.jpg


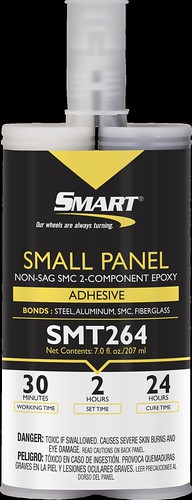
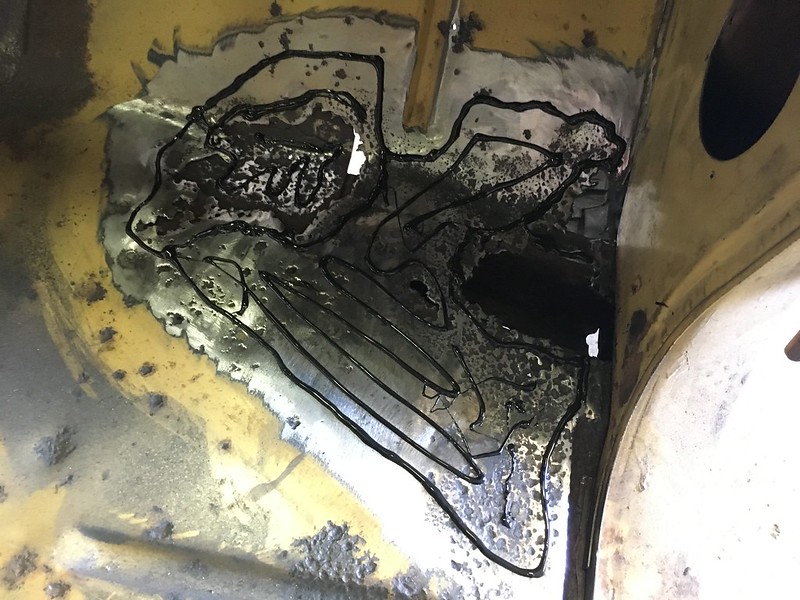
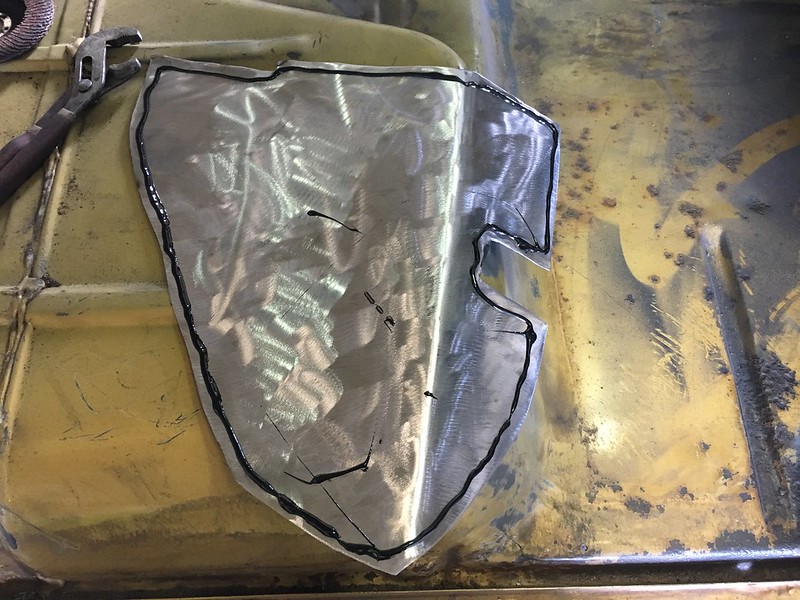
Next up I got after the floor holes. Last week I picked up some Smart Small Panel Adhesive from Finishmaster. The guy in the shop next to me suggested I give this stuff a go instead of cutting and welding. I looked into it a bit and it seems to be pretty solid stuff. Since the underlying metal seems to be solid I expect this will work just fine.

40328593972_62ab8a8777.jpg


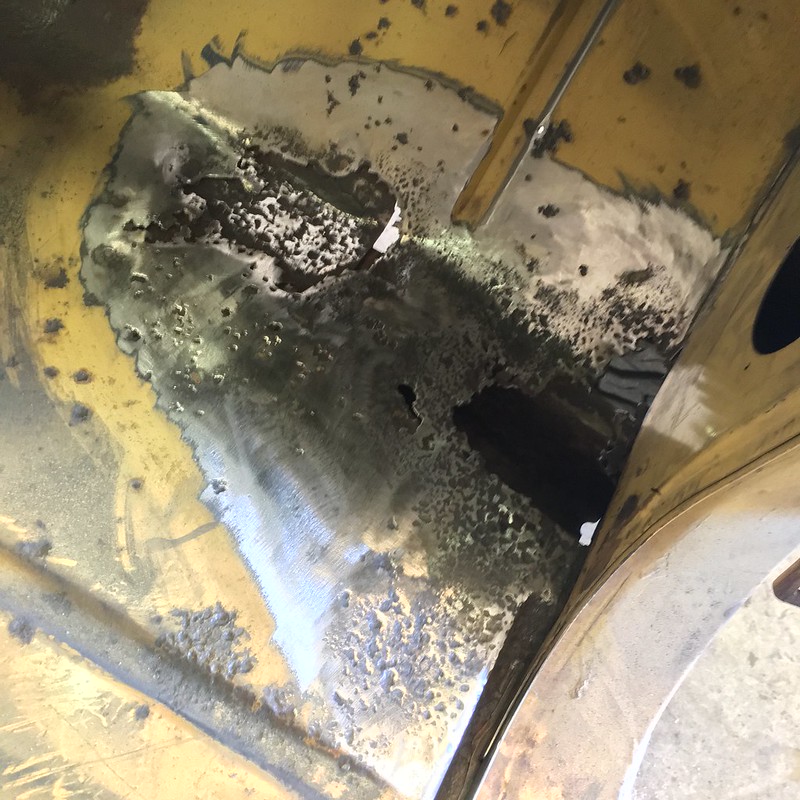
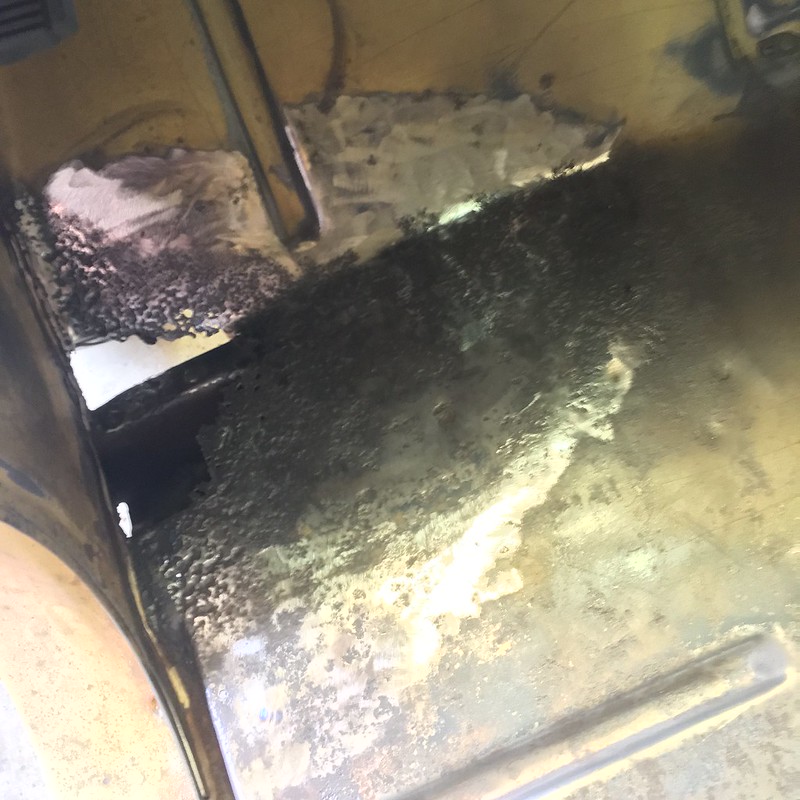
First up I ground down around the area I was going to patch 'til I got to bare metal. I tried to get as much of the rust off as possible. I feel like I got a pretty good amount of it off. I didn't want to get to the point was I was making the hole significantly larger, so I left it at that.

39652873464_bc777486f0_c.jpg


39652876194_fec52697c7_c.jpg


Next I applied the adhesive liberally to the floor, making sure to get full rings around the holes. My one concern is that the bare metal will start to rust again, so when I put the patch sheet down I made sure to shimmy it around a bit to spread the adhesive and cover as much as possible. I also intend to put some sealant on the outside for the holes that went through. It isn't going to be pretty but I expect it'll hold up for quite a few years. At least until I can get the floor done up professionally.

39466662665_221744e091_c.jpg


39652878804_dd36a1fa96_c.jpg


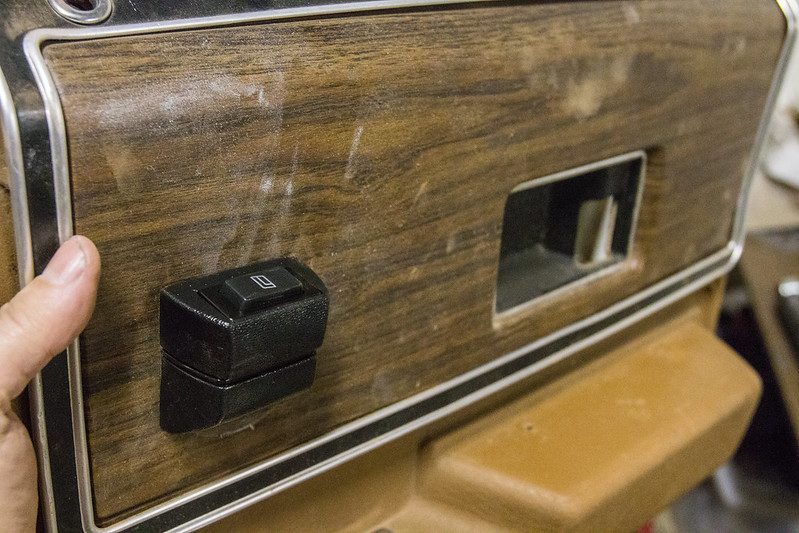
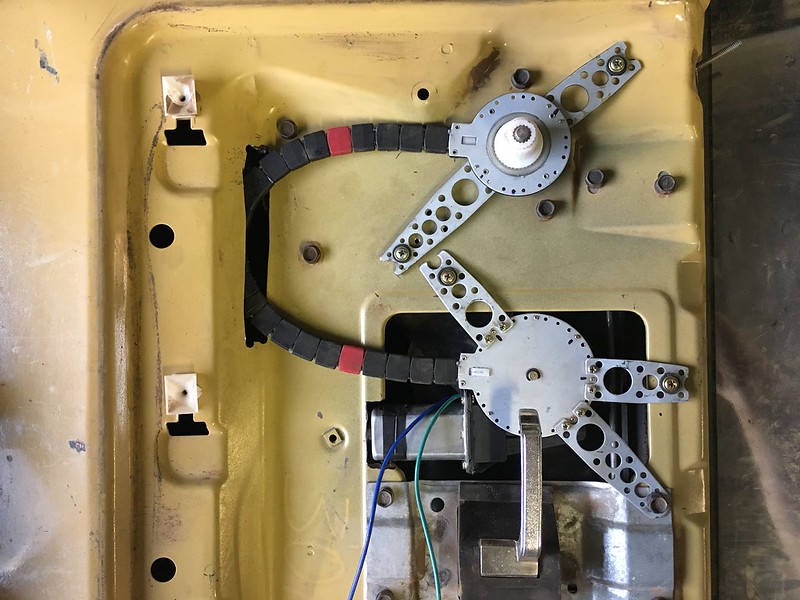
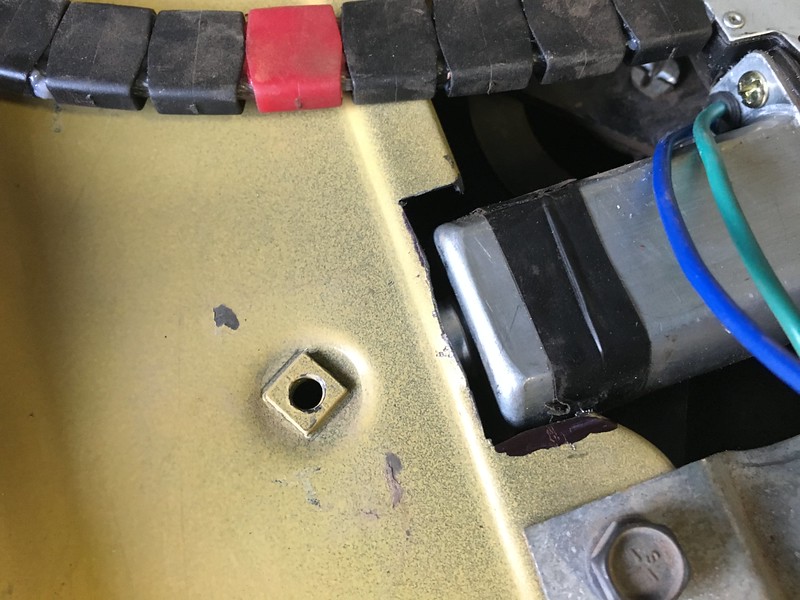
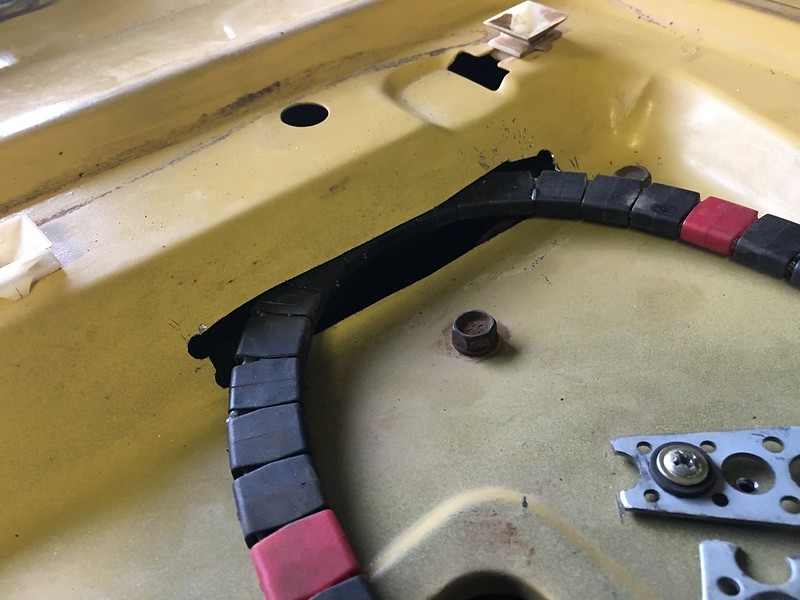
Then, once both sides were weighted down and curing I got to figuring out how to mount the power window conversion kit. It took a little fiddling and a bit of cutting, but I finally sorted out a placement that wouldn't interfere with the door locks, the handle, the trim panel or the window mechanism. For such a large door it was surprisingly hard to find anywhere to mount this thing. As it is I had to trim out the door handle pocket on the plastic trim bit. Fortunately the wood grain trim bit covers that. Now, just 3 more doors to do in the same way...

39652818994_141aa61902_c.jpg


40363650551_7cd0abcaea_c.jpg


40318426782_ac7c61af3c_c.jpg


Last edited:

Forum statistics

Threads
185,825
Messages
2,878,599
Members
225,378
Latest member
norcalmaier
Top