The Camp 4x4 Bus - 1973 Suburban 8.1 Swap & Build

marshal

Burrito Enthusiast
But now I'm wondering if this would be workable for a 30-foot paint job on the whole truck to refresh the factory paint... I still LOVE the idea of a full bed-liner exterior, but the color mismatch is still a bit of a bummer. I'm gonna call around to see if any of the local paint shops can mix up the specific kind of tint Monstaliner says to use since I think it is a bit different than normal paint tint... But this factory color rattle can paint job idea has got me thinking....

you seem handy enough with a HVLP gun, why not just get a gallon of paint mixed up and spray it yourself?
 

camp4x4

Adventurer
you seem handy enough with a HVLP gun, why not just get a gallon of paint mixed up and spray it yourself?

I am, and you’re right... i’m Just being lazy and silly. The can will definitely be handy for the interior touch up though... :)
 

zoomad75

K5 Camper guy
Oh boy... new wrinkle...

As you can see in the above photos of the floor, there's some areas on the cargo area walls that are missing paint. Apparently GM put the rear seat latches on before they painted... odd. Since I'm not keeping the rear bench seats I removed the latches. Obviously those big grey patches look like crap, so I've been looking around for color-match spray paints. I'd seen them on Mighty Car Mods but the brand they used was only available in Australia. Finally today I found these guys: AutomotiveTouchup.com AND they have Adonis Yellow specifically listed!

So I've got a can of paint and a can of clear ordered up to arrive next week. At the very least this'll be great for touching up the interior paint.

But now I'm wondering if this would be workable for a 30-foot paint job on the whole truck to refresh the factory paint... I still LOVE the idea of a full bed-liner exterior, but the color mismatch is still a bit of a bummer. I'm gonna call around to see if any of the local paint shops can mix up the specific kind of tint Monstaliner says to use since I think it is a bit different than normal paint tint... But this factory color rattle can paint job idea has got me thinking....

I actually did something similar with my K5. The local Napa store sells automotive paint that we buy from at work. I pulled the WA# for the factory doeskin tan of my truck and they mixed up some paint and loaded them into rattle cans for me. Wasn't cheap, but I got a decent color match and was able to recover all the interior painted surfaces. I think it ran me $12 per can.

Good progress too!
 

chilliwak

Expedition Leader
Nice job spraying that stuff Aaron. How much does that paint cost? Looks like you did a nice job. Cheers, Chilli...:)
 

camp4x4

Adventurer
Well, it's been another productive weekend, though not a terribly flashy one.'

Saturday I ran a few errands in the morning - got a fresh tank of gas for the welder, swapped the propane tank so I could heat the shop, etc - so I only had the afternoon to work. The door I had added the power window motor to was bugging me. I really didn't like that the trim under the door handle was slightly bulging from hitting the motor, and that the window mechanism was basically touching the motor at full roll-up. So I spent a while reworking the placement. I'd had the idea for this new placement before, but I didn't want to cut up the door quite so much initially. I don't think the extra cut has caused any issue with the door's integrity and it definitely is a much better placement; there's no interference with the trim or the window mechanism.

After that I spent a while trying to place the door lock popper for the auto door lock. There's a lot more restrictions on the placement of the popper due to the way that it needs to move the lock mechanism. It took a while to find a place but I managed to find a spot that doesn't interfere with anything and pops the lock perfectly.

Both the lock and the window mechanism were REALLY helped by the liberal application of some WD-40 silicone lubricant.


Since I had the door up on the table anyway I figured I'd get the speaker in too. So that's done.

For a while now I've known that my rear shackle hangers needed to be moved 4" backwards. When I had initially put the rear axle under the truck I noticed the shackles were nearly parallel to the ground. That's definitely not right. What I figured out is that the '73 originally had 52" springs. The springs I ordered were for the '87 and 56" long. So today I took to moving them backwards. That was an easy, but time consuming task. Now they're sitting nice and upright. This has put the back sloped up when it was sitting very flat before. I'm a lot happier with it now as it'll surely squat a bit with all the extra weight that's going in it.


After I finished that up my wheeling friend Ron showed up to lend a hand getting the gas tank installed. With a new tank and new straps this was a pretty easy endeavor, but having Ron there to hold the tank up while I managed getting the straps in place really helped. I don't think I could have managed that without him. Having the tank in means I can start running the fuel lines, which is awesome. It also means I got to check out how the access panel lines up and works. And I gotta say, it is pretty rad! This is going to make accessing the fittings sooo much easier. I also think that 10" was the perfect size for the access panel. Any smaller and I think I'd start having issues accessing the fittings. Any larger seems like it would be unnecessary.


bknudtsen

Expedition Leader
Are you going to paint your new gas tank? Also, did moving your shackle hangers shift the axle placement in your wheel well at all?
 

camp4x4

Adventurer
Are you going to paint your new gas tank? Also, did moving your shackle hangers shift the axle placement in your wheel well at all?

Nope, just gonna leave it the plain galvanized steal, and no, changing the shackle hanger placement only effects the orientation of the shackle. The axle only changes location in the wheel well minimally when compressed, and since the spring isn’t compressing any more with the hangers here than where they were before the axle is in the same place.
 

FBJR

Adventurer
That is some nice access to the tank there. I have seen that for batteries too, getting them out of the engine compartment.

Video was good, wish that stuff was cheaper. I hear your can make your own using paint and media.

Did moving the shackle change the shaft angle?

I will be getting a new tank for mine. Wish I could find it in poly vs just steel. It is nice having 40 gallons though.
 

AlexCold

Observer
I will be doing the access panel the next time I drop the tank. That’s way too nice to work with.


Sent from my iPhone using Tapatalk
 

camp4x4

Adventurer
Bit of an emotional roller coaster last night. I was super excited to get my Advance Adapters TH400 -> NP205 adapter in, expecting it'd be the solve to my output/input shaft engagement concerns. To review, the stock 4WD 4L80e adapter, plus the Northwest Fab Works Circle-6 to Figure-8 adapter setup I was going to use leaves me with a bit more than 1.5" of overlap between the transmission output shaft and the transfer case input shaft. I felt like there should be more. In the mean time I'd found Advance Adapters has a reproduction TH400 -> NP205 adapter (these apparently are incredibly rare in the wild, so AA sells freshly cast ones). Thinking, "oh great, this'll just get ride of the 5/8-in. adapter from NFW and I'll be that much better off," I bought it. Well, it got delivered yesterday and like a kid at Christmas I tore open the box and ran down to the shop to try it out. Pretty quickly realized reality wasn't going to match expectations.


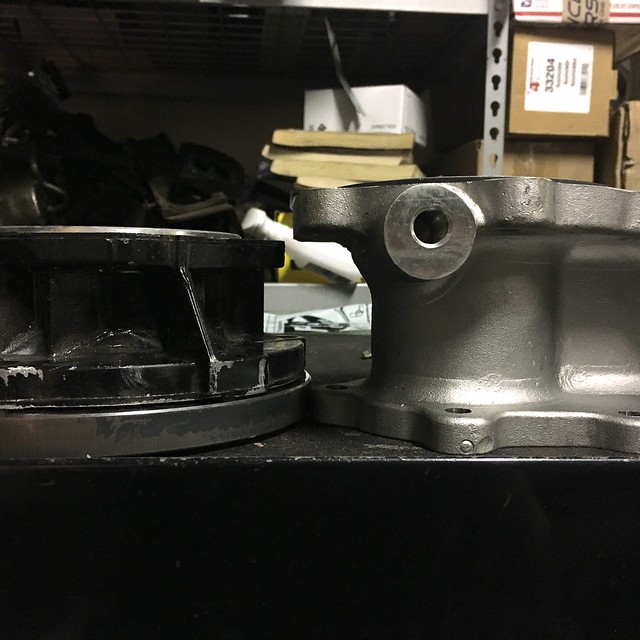
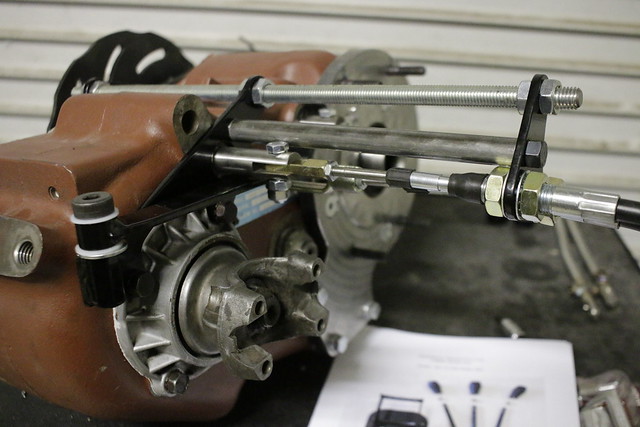
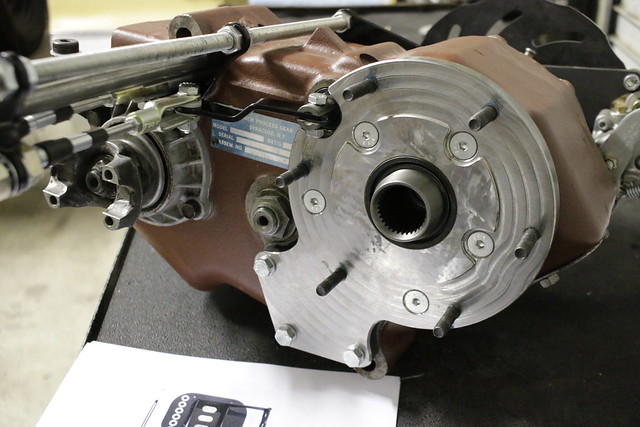
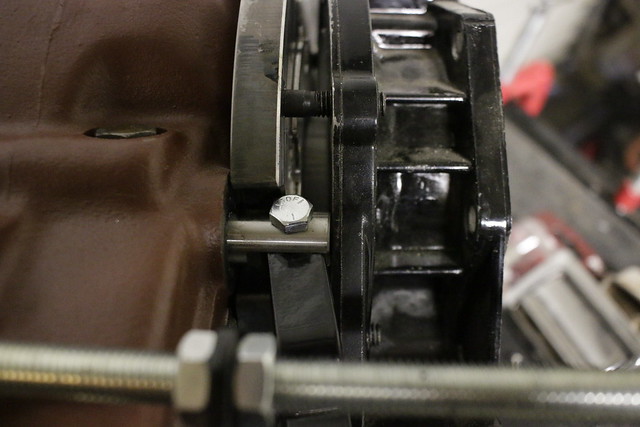
On the left you can see the stock 4wd 4L80e adapter plus the NFW bolt pattern adapter. On the right the TH400 -> NP205 adapter. You can see the problem. Just to confirm I loosely bolted up the AA adapter and sure enough, the output shaft doesn't even exit the adapter, and even with the input shaft now having an extra 5/8" from the mounting face on the NP205... I was calculating less than an inch of engagement between the two. What I hadn't read is that the full kit AA sells includes the LONG NP205 input shaft. :squint: Read the details dumba**.

Fortunately Northwest Fab Works piped up in my Instagram when I mentioned them in the photo and confirmed that the short input shaft is what most of their customers run and they haven't heard of problems. After doing the math the long input shaft wouldn't even work with the stock adapter. So for now I'm gonna stick with this setup and return the AA adapter. Ultimately I'd like to get NFW's BlackBox underdrive, and this Circle-6 to Figure-8 is what is required to adapt an NP205 to that, and it mates to the 4L80e directly.


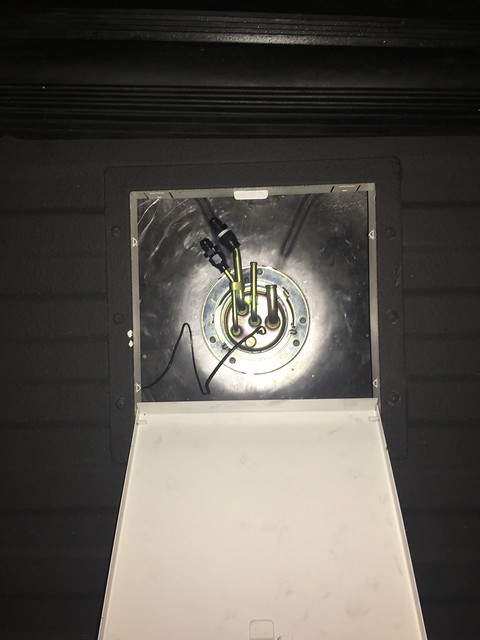
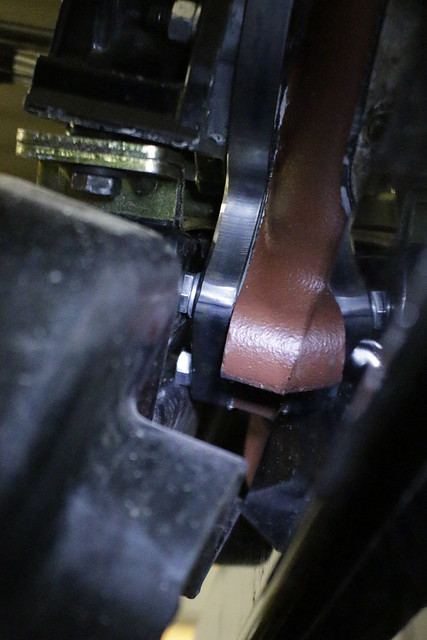
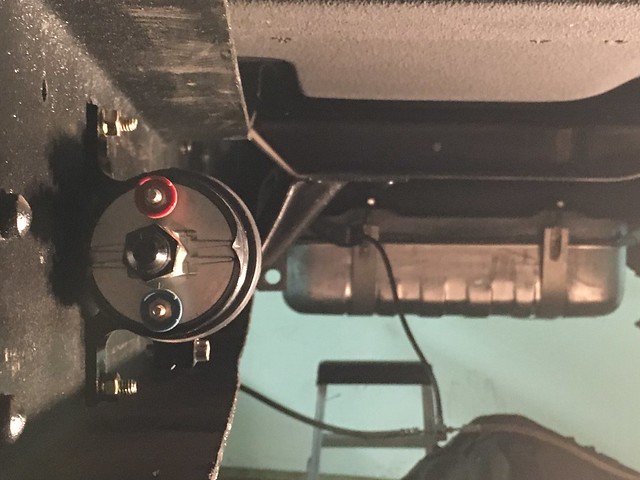
Another thing I checked off yesterday was mounting the fuel pump to the frame. As you can see from the picture the pump will end up being just above the bottom of the fuel tank. Between this placement and the Hydramat in the tank I'm feeling pretty good about things. With the pump installed I can start running fuel lines. I've been re-thinking having the fuel pressure regulator under the truck and looking at places I can put it in the engine bay. I've also picked up some hard line to run from the pump to the regulator since it is a pretty straight shot, and should only require a few bends to get up the firewall.


The truck's carpet gets here today, so I'll be picking that up and heading down to the shop again to lay that out to let it relax. Pretty excited to see how it looks! I've started painting the trim pieces with the Duplicolor Vinyl & Fabric paint, and they're looking great. Probably gonna focus on getting the doors finished so I can put them back on.

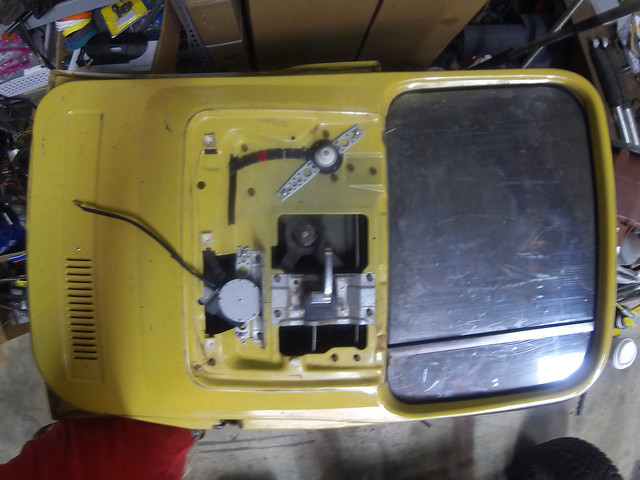
Oh! I also made a final decision about paint. I did a little cleaning of the truck the other day. Sitting in the shop for a year has gotten it pretty dusty and grimy. After getting all the gunk off I realized that the yellow paint is actually in pretty good shape. There's a few nicks and scratches here and there, but over all I think it is salvageable. SO... to start out I'm just going to clean and treat the problem rust and do the white in bed liner. I'm going to get the yellow parts professionally clayed and run it like that. This should be both cheap and easy, and cosmetically I think very good - keeping the original colors and protecting the lower part of the truck. As always I may completely change my mind in a week but I think after all the consideration I've done on bed liners and color matching and such, buffing the original back into shape is the idea that pleases me the most.
 

camp4x4

Adventurer
Well, yesterday was another 2 steps forward, 1 step back kind of day. This transfer case adapter situation continues to be a PITA. I'm genuinely starting to think I'm doing something wrong in the big picture...

It started off on a good note though. I've been using an air impact gun for most things, and a corded impact for the really stubborn stuff. Unfortunately the corded one has a pretty junky cord that I need to replace that has been acting up a bit lately, and my air hose isn't as long as I'd like it to be. For a while I've been eyeing a cordless impact, and finally decided to pull the trigger on Milwaukee's mid-torque M18 Fuel impact gun. I've pretty well bought into the M18/M12 ecosystem already so this will be a nice addition. For no particularly good reason I decided to also pick up the M18 Fuel cordless grinder. And of course a few extra batteries.


My plan for the day was to get the transfer case bolted up to clear off space on the work bench to work on electrifying the rest of the doors. I got started putting on parts for the cable shifter assembly. This all went fairly smoothly, with pretty good instructions from NWF.


Since I had the stock 4L80e transmission to transfer case adapter off (see previous post) I figured I'd test fit it on the transfer case. Boy am I glad I did, because a new problem presented itself immediately.


No where in my online reading has this issue been mentioned. So this is where I start thinking I'm doing something wrong/different. I'm gonna hit up NWF with an email to ask ******. In the mean time though I figured I'd plow ahead. The modification needed seemed easy enough with likely minimal impact on the strength of the adapter. A little paint pen, a hole saw and drill press later... problem solved.


Well, that problem anyway. Once I got the adapter fitting nicely in place I noticed that the feet were pretty darn close to the transfer case. So, rather than have any nasty surprises later I figured I'd go ahead and test fit the transmission mount bushing and crossmember. Fail. Right away I could tell that the bushing was hitting 2 of the 3 hex head bolts used a the bottom of the adapter. Why NWF went with hex head for these three vs the flat head used on the rest of the adapter I don't know. Price saving I guess? Well, doesn't work here. I was able to tighten the bushing bolts, but the head is well pressed into the polyurethane and will likely destroy it pretty fast if left like that. Lastly I tried to bolt up the stock crossmember I planned to use. Fail. This too hits one of the hex head bolts, AND the adapter plate itself. So a simple flat head bolt isn't gonna fix this. Now I'm looking at a custom crossmember. I was really hoping to avoid that. I may be able to cut a hole in the cross member to simply clearance this one small area, but I'm not 100% on that... will see today.


The moral of the story for me is: I should have planned a bit better, asked a few more questions and likely I would have ended up going with Advance Adapters' full kit that included the long input shaft and OEM TH400 to NP205 adapter. Now I'm stuck doing more customizing than I really wanted to. I'm gonna press forward... countersinking the adapter holes and using flat head bolts should work just fine for the bushing issue. Then it's just going to come down to figuring out the crossmember issue. If I can modify it easily enough then I'll be bolting this bad boy up today. If not I'll be getting to work on a custom crossmember.
 

Forum statistics

Threads
185,828
Messages
2,878,635
Members
225,393
Latest member
jgrillz94
Top