Not So Subtle E350 Shuttle - 100% Satisfaction Guaranteed

sakurama

Adventurer
Okay, I promised some action on the interior. Here we go.

i-qJHcf2B-X2.jpg


I'm in the middle of trying to make some major changes in my life/career and one of the things that I'm working to resolve is a way too crowded shop. It's next to impossible to work as it's so crowded with motorcycles so I'm starting to sell them all off. Well, not all. Most.

i-CRXDjS6-X2.jpg


The interior is a bit dirty as the van has been doing it's job of hauling dirt bikes. But it's not really set up for it. So the plan is to pull the current seats, pull the floor and put in a track system. MG sold me his prototype floor system and the seats from his Transit and I'm going to try to make them work.

i-Qn2p6Hc-X2.jpg


i-Qm5khwm-X2.jpg


I'm lucky to have my sister and her ex visiting and volunteering to help in exchange for a day of dirt biking. First up we pull all the seats which are bolted through the floor in a million places. It's a pain.

i-Lx89XhT-X2.jpg


i-5qMKkjd-X2.jpg


The floor is some kind of vinyl on top of 1/4" plywood on top of 1/2" particle board. I guess it makes sense in terms of speed for the original coach builder but it's a bit of a mess.

i-53sf2bk-X2.jpg


i-dfwtXBX-X2.jpg


The particle was screwed to the floor with self tapping screws and the 1/4" ply was stapled onto that then the vinyl was glued.

i-NqQHmKM-X2.jpg


I like finding remnants of the van's past - this was under the door step cover.

i-MJWtCLh-X2.jpg


There was a small amount of surface rust from what looked like a leak on the back drivers corner. Not sure from where. I hit it with a wire brush to get the loose rust off...

i-G8dvj8H-X2.jpg


...and was picking these out of my legs for the rest of the day. Ouch.

i-NrGgbV2-X2.jpg


Once the interior was clean we test placed the MGMetalworks floor panels but my rear heater is right behind the driver so we had to cut off the front of the left section.

i-7fBvcpb-X2.jpg


Once we freed up that the two panels test fit just fine.

And that's what we accomplished today. Well, I've also wiped down the floor again with some acetone and put a small heater in the van and painted the rusted sections to just make sure we arrest that rust right now before it can do anything. There are a few dozen holes in the floor but my plan is to not bother with them. We're going to cover the entire floor in sound deadener (FatMat) and that stuff should seal up all the openings very well.

Tomorrow I'm hoping we get the full floor wrapped in the sound material.

Stay tuned!

Gregor
 

bknudtsen

Expedition Leader
Nice! In regards to the FatMat... the van needs to be warm and dry. Any condensation on the sheet metal will prevent good adhesion. I used a heat gun to carefully warm the mat when working it into the contours. Just be careful not to overheat it or the foil will separate from the asphalt mastic. If you have the base level FatMat, watch the foot traffic on it. The foil is thin and tears from the mastic easily. Gloves are a good idea because aluminum foil cuts hurt. Have fun! Look forward to seeing the results.

Brad
 

mothgils

Member
What material is the floor plate made from? How do you plan to attach it to the van floor?


Sent from my iPhone using Tapatalk
 

sakurama

Adventurer
Curious why 100% coverage with FatMat? I've always read vibration dampers only need 25%?

Yes, I’ve heard that too. I did a lot or research and most of that 25% coverage is directed at doors and panels in regards to car stereo installation. I think that the more you cover the more the sound is attenuated but perhaps at a rate of diminishing returns.

I’ve opted for 100% coverage - well, more like 90% probably. Why? Because I have a 7.3 diesel and I want every single percentage that I can get. While this isn’t going to be scientific I decided to do some experimenting and record the sounds and while I’m only part of the way through I’ll share it now and at the end. For a point of reference I’ve included my pickup which is a 5.4L 2003 F150 Supercrew. It’s a pretty quiet truck but no Lexus. All numbers are Db average from my phone’s holder in the middle of the console with all accessories, fans etc off.

Pickup Idle: 52
Pickup Highway: 71-73

Van original idle: 64
Van original highway: 80-82

Van empty idle: 67
Van empty highway: 84-86

Van Rattletrapped idle: 63
Van Rattletrapped highway: 78-80

We’ve not quite finished the Rattletrap application to the floor but we’re doing nearly 100% coverage. As you put it down you can hear it get much quieter. Now, to be fair, my van had a bunch of coach built seats that were removed and that meant a lot of holes when the van was finally completely empty. Sort of like driving a loud slice of Swiss cheese down the highway. I had tested the van before we did anything and while the interior was all in place and it was in the 80-82 range. That’s with seats and the original floor so clearly the Rattletrap is making a huge difference already.

Tonight as we finished everyone was remarking on how much quieter the empty van was with just the floor done. I had done a coverage experiment on my sink when I was putting them in and more was better there as well. So, if it’s diminishing returns I’m going to take them because I just spent two days tearing out the floor, cleaning it and addressing the rust spots. The real cost here is my time. The other factor is that I’m not trying to make a stereo sound better. I’m trying to eliminate the noise in the van and the majority of that comes from the engine and the road so it makes sense to put extra effort towards the floor where nearly all the road noise comes from.

So far I’m pretty happy but I have a lot more planned. I have a full layer of Mass Loaded Vinyl (MLV) sheet that I’ll be putting under the floor plate. On top of the floor plate will be closed cell vulcanized rubber like is used in weight lifting rooms. That will fit between the L-Track to create a flush floor.

Anyway, more tomorrow and with some photos.

Gregor
 

86scotty

Cynic
Just info, not trying to have the upper hand. I've had lots of E-series vans and got them as quiet as I could but I was stoked to find out the other day that my Transit cruises along at 75 mph at only 70 db. This is with BFG KO2's.

I forgot I had that app on my phone for a couple years.
 

sakurama

Adventurer
Just info, not trying to have the upper hand. I've had lots of E-series vans and got them as quiet as I could but I was stoked to find out the other day that my Transit cruises along at 75 mph at only 70 db. This is with BFG KO2's.

I forgot I had that app on my phone for a couple years.

Yes, I know that's the great advantage of a newer vehicle. That and mileage. Of course it's an apples and watermelons comparison... Nonetheless you've set a bar for which I'll try to aim.

Okay, the other day we managed to get the full interior stripped out down to the steel. We cleaned it and scrubbed it and took off the little bit of rust and that night I wiped it down with acetone and plugged in a space heater to get the interior warm and then gave it a quick spray with rustoleum.

i-G6Gnm4Z-X2.jpg


i-xRGRGWc-X2.jpg


In the morning with the space heater keeping the van warm Lara started to install the Rattletrap onto the floor. We didn't overlap but we butted most of the pieces together so as to leave little to no steel showing. To keep the Rattletrap mastic sticky and flexible we'd warm it in front of the space heater.

i-TCgt9t3-X2.jpg


It took pretty much the whole day to do the interior of the van and we also started on the back doors. I ordered 100sq/ft but so far we've barely used more than the first of the two rolls. That said I want to do the door interiors and the front floors when it's time.

i-Fks5nmN-X2.jpg


Meanwhile Rob and I were drilling additional holes into the plates. MG's V1 plates ran the 100" track from the back to 100" in and I wanted the option of stacking two benches in tight so I moved the track forward about 14" or so and drilled holes to accept that.

i-9n66KQb-X2.jpg


The plates are 1/4" mild steel but still pretty tough. It was a chore to drill all the holes and I was glad that most all were predrilled/cut out.

i-V23vDqx-X2.jpg


Only one of the plates had nuts already welded on - MG does revisions quickly - so the second one was mine to do. In order to make sure the plates were straight and parallel I measured off the middle edge and aligned the track there then aligned the next one to that one and so on. And since we extended the track run it was a lot of attaching and removing the track while checking and welding the nuts on the back.

Oh, and I tig welded the nuts on my side. I don't have a mig yet and while it would be useful I figure every chance to weld is a chance to practice my tig skills...

i-DxcJWRQ-X2.jpg


After school the kids came home and my boy is starting to develop a lot of curiosity about the shop. It's beginning to dawn on him that shop is capable of making the world work like Lego - you can build whatever you imagine. This was the first time he wanted to see welding and he grasped the idea pretty quickly.

i-zbP8TfQ-X2.jpg


Then we transported the plates over to my sisters place where there was room to paint them inside. My garage is so crowded right now that I can barely move and it feels like each time I get rid of something two things take it's place or expand into two things.

Rob gave the plates a quick shot of Hammerite to cover the bare steel and keep it from rusting. It will be covered but nonetheless it gives some protection.

Next up is another layer of sound barrier then the plates go in.

Gregor
 

Arctic Travelller

Adventurer
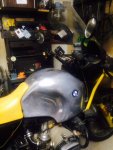
Great progress and photos. Why did Mike choose steel rather than aluminum for the plate and what's the story on that BMW tank? I've got one hand made in aluminum by Evan Wilcox that's about 10 gallons, but I've never seen one like yours.
 

thescottgivens

New member
Gregor this is such an amazing journal of your build. I appreciate the detail, pictures, and time that you put into this. So helpful for me as I plan my build. Thank you!!

I am really interested to see what you do with the doghouse. I have read about a few methods to sound proof it, but I also think the firewall and area under the dash on the vans is a big noise producer. I am trying to mentally figure out how to create a sound barrier that works with all the wiring, etc., along that front part of the van. There has to be room to pack more stuff into that space!!

And your garage reminds me of mine, with the slight difference that your garage appears to have cool stuff in it....mine is full of an insane amount of kids toys, play set pieces, wifes junk, etc.....
 

java

Expedition Leader
Very interested to see how the rattle trap works out. I would like to do the firewall, doors and floor in my F450, mine is not so much tractor diesel, but still diesel noise and the highway gets noisy.
 

sakurama

Adventurer
Very interested to see how the rattle trap works out. I would like to do the firewall, doors and floor in my F450, mine is not so much tractor diesel, but still diesel noise and the highway gets noisy.

It makes a HUGE difference. I'll detail it a bit more further down but Rattletrap makes a bigger difference than the MLV but they all help.

I ordered some mass loaded vinyl off Amazon and what came was not what MG had suggested I get. I tried ordering the VB4 MLV from the place MG specified - Cascade Audio Engineering - and got frustrated with the ordering process. It required actually calling them, on the phone, several times. How do places stay in business like that? After a few tries I gave up and ordered something on Amazon which turned out to be not that great. So I went to the place that installed my stereo in the van and they had the good stuff. It was more expensive than if I'd bought it from Cascade but at least I got the right stuff.

Also, I asked them how much coverage they do for Rattletrap/Dyanmat and they said 100%. He said it makes a huge difference and if you've gone to the trouble to pull the entire interior why wouldn't you? While I was there I saw a very sweet custom Firebird and the entire interior was pulled and every square inch was covered in Dynamat. Now I'm going to go back over the wheel wells and cover them completely. He also asked if I'd pulled the side panels and done the walls yet which I hadn't. He strongly suggested that the walls get covered too.

So.

i-4TZj6TL-X2.jpg


Here is full coverage with Rattletrap then full coverage with the VB4 mass loaded vinyl. Here you see it under the steel plates - two different layers of foam basically. But first a side note...

When I bought the MLV I took the 50" roll and unrolled it down the middle of the van for the ride home - you know, just to see. This stuff is amazing! I checked the Db's because I could suddenly hear the stereo way better and more clearly - it sounded much more solid. My suspicion was confirmed - the sound on the highway dropped to 74Db which was nuts. At this point it was very clear that all the noise was coming from the cab of the van - the back was super quiet. That's a 12Db drop from empty.

Anyway on to the frustrating day. As this was MG's very first test plate the holes didn't quite line up - he's since discovered that most vans aren't exact enough to line up. No problem as I bought it with the understanding that I'd have to make it work.

i-txDgHwm-X2.jpg


So my entire day was spent in the pursuit of drilling twelve holes. In order to not swiss cheese my fuel tank I put a sleeve of aluminum on the 1/2" drill bit which worked great as a stop. I drilled through first with a quarter than (later) with a 3/8" and then with the 1/2" and finally with the counter sink. I bought $100 of stainless 1/2" flat head bolts and nylock nuts and stainless fender washers for the underside.

i-x2th3NL-X2.jpg


I had to resharpen my 1/2" bit twice and I completely burned up my $50 countersink. Probably my own fault because I didn't want to do the job right - ie. pilot drill the entire plate and then pull the plates out to drill with cutting fluid on the saw horses and then reinstall. So I skipped the cutting fluid so all I had to do was vacuum the chips.

i-qfqw324-X2.jpg


So after spending the day drilling the holes - okay, some of the day was spent prepping dirt bikes for tomorrow - I managed to get the holes all drilled and countersunk.

i-T3KBMXw-X2.jpg


Once Rob and Lara came back over we attempted to bolt down the plates but we kept having trouble getting the nuts tight. It didn't occur to me that they could be galling until about the 5th one and the second that bound so tight we had to cut the head off. Is that really what's going on? I know stainless can gaul but this seems a bit excessive. It got dark before I could put some anti-seize on the bolts and test the theory. I'm a bit nervous as I've now got to remove about four completely gauled fasteners...

Okay but onto the sound. Like I said, with the MLV just laid out I was getting 74Db's or so. Once the plate was in the sound actually went up but still was less than the Rattletrap alone. Right now it's at about 76-78Db's so the MLV was worth 2Dbs but... BUT! I have to point out that now the van is very quiet in back. The sound is almost exclusively coming from the cabin which I know has not been treated in any way. So I think there's a lot of low hanging Db fruit waiting to be snuffed out with some Rattletrap on the floor and fire wall of the cabin. I'm tempted to just do it now even without removing the seats - just pull the mat and do whatever steel I can.

Great progress and photos. Why did Mike choose steel rather than aluminum for the plate and what's the story on that BMW tank? I've got one hand made in aluminum by Evan Wilcox that's about 10 gallons, but I've never seen one like yours.

Evan is the MAN! Fun fact - he used to live one block from my house here in Portland. I've known him for almost 20 years and who'd have guessed I'd have moved into his old hood. He used to be the "motorcycle guy" in the hood and now that's me. Onto your question.

i-PPS8FGx-X2.jpg


That bike was hand made by an engineer in Canada. It came up for sale and I wasn't in the position to buy it and then a few months later the chance came again and I jumped. My next goal is to build a similar but more refined airhead GS style dirt bike. This one had done a lot of the things I wanted to try and I'm looking forward to trying it out once I get it plated. It's a very highly modified BMW with lots done that isn't seen.

i-ZRg3HjG-X2.jpg


Anyway, the van isn't done darn it. I'd hoped I'd be finished by the end of the week but it hasn't come to pass. Hopefully next week.

And if you have advice on why the stainless would gaul - let me know. I'd hate to have to go back to steel but I know I wouldn't have that problem. I'm guessing I should have just put antisieze on them and it would have been fine.

Gregor
 
Last edited:

java

Expedition Leader
Stainless gauls, to he point I get frustrated. Are they fine thread? I have had bad luck with the fine thread.

Also different suppliers seem to be better or worse.... Ace hardware (green box) seems to be the worst, Tacoma screw stuff is better, but still gauls.

Thanks for the rattle trap info. I will order some for a summer time install on my truck. Seems well worth it.
 
Last edited:

mgmetalworks

Explorer
And if you have advice on why the stainless would gaul - let me know. I'd hate to have to go back to steel but I know I wouldn't have that problem. I'm guessing I should have just put antisieze on them and it would have been fine.

I've had this problem before with stainless fasteners. In all of the cases where I've had a nut/bolt seize up, it was when I was in a hurry and of course on a part that was finish painted and completely inaccessible for any sort of removal techniques. It's an issue with stainless that just is. Lots of google info on the subject, example: http://www.atlanticfasteners.com/tech-tips/how-to-stop-thread-galling-on-stainless-fasteners/

The best thing is to slow down, use thread lube of some sort and only use stainless fasteners for sailboats :) I kid, I kid...

I did 100% coverage up front on the SEMA van as far up the firewall as we could get (without removing the dash and wiring harnesses) and it made a HUGE difference. Over the Dynamat we used Dynapad (similar products to what you used on the floor under the plates). Thinsulate does really well in the walls and doors and is very easy to install.

The floor is lookin' good! I forgot to tell you that I just had some trim pieces made to finish off the front and rear transitions for the two vans I'm working on now. I'll try to remember to send you some pictures and details tomorrow via text.
 

Arctic Travelller

Adventurer
Not to muck up your thread, but I thought you might like to see Evan's handywork. It might be the only reason I still have the bike.
 

Attachments

  • FullSizeRender (30).jpg
    FullSizeRender (30).jpg
    112.1 KB · Views: 59

Forum statistics

Threads
185,911
Messages
2,879,535
Members
225,497
Latest member
WonaWarrior
Top