Roof repair Northstar TS1000

kerry

Expedition Leader
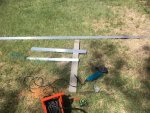
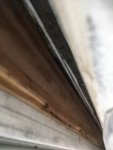
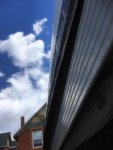
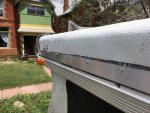
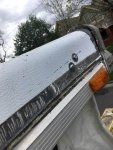
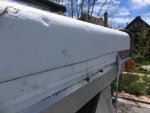
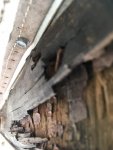
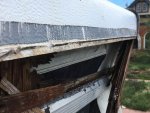
The front 'side' of the my roof has some serious delamination and rot. The other three sides seem pretty solid. How easy is it to remove that front piece and splice in a new one? It has to be easier than the back since there's no lift mechanism attached to it. I've considered just bolting together 2 pieces of 3x1/8" aluminum stock, one on the inside and one on the outside to reinforce it. But if I could replace it with a piece of treated wood inside without a heck of a lot more work it would be better. How are the corners joined together? My insurance company did pay for a replacement roof due to hail damage (this delamination is unrelated to that) but the roof replacement will take months to get the roof and install it so I'm looking for a fix for this summer and perhaps longer if I decide the roof replacement isn't worth it.
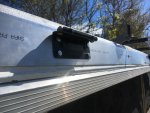
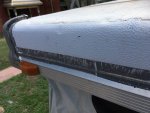
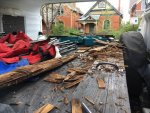
I'm thinking the process would be to unscrew the canvas, unscrew the bottom aluminum piece, remove the large corner covers, bend up the aluminum roof, and then disconnect the joints at the corners. Does that sound about right?

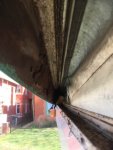
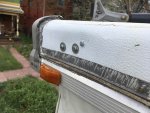
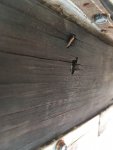
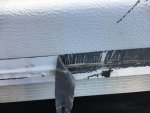
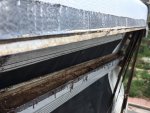
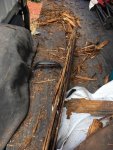
Further inspection reveals the canvas is attached to the top and not to the side so I don't think the canvas needs to be disconnected in order to replace that front side, near as I can tell.
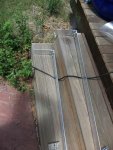
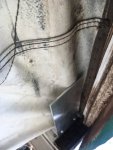
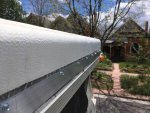
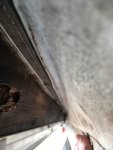
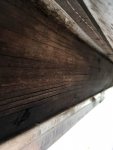
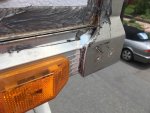
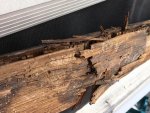
Even more inspection reveals that the wood at the corners is pretty solid. It's delaminated about 18" in from the corners. So now I'm thinking that my original plan may be best. A plate of aluminum on the outside and inside bolted together. That 'side' of the roof doesn't carry much load anyway since there are no lifting brackets attached to it.
 
Last edited:

kerry

Expedition Leader
The problem really isn't visible. I can reach up my hand under the front edge of the roof and feel the delamination but it's not obvious by just looking at the roof. On Northstar and other similar roofs there is about a 4" rim around the roof made out of plywood (not a good design in my view) and the aluminum on the roof folds over the edge and down that 4" section.
 

kerry

Expedition Leader
I had a short piece of 1/8 x 3 aluminum stock which I stuck up behind the plywood. It fits nicely on top of the lip of the bottom piece of aluminum which runs around the roof. and goes right up to the top edge of the existing plywood. So I''m definitely leaning towards sandwiching that old plywood between two pieces of aluminum and then running some eternabond tape of the top edge of the aluminum on the outside.
 

kerry

Expedition Leader
Well I decided the aluminum plate repair wasn't going to work. The pictures will speak for why that was the case.
 

Attachments

  • roof1.jpg
    roof1.jpg
    49.6 KB · Views: 58
  • roof2.jpg
    roof2.jpg
    49 KB · Views: 56
  • roof3.jpg
    roof3.jpg
    39.4 KB · Views: 55
  • roof4.jpg
    roof4.jpg
    45.2 KB · Views: 49
  • roof5.jpg
    roof5.jpg
    44.7 KB · Views: 45
  • roof8.jpg
    roof8.jpg
    48.7 KB · Views: 52
  • roof9.jpg
    roof9.jpg
    57.3 KB · Views: 53
  • roof10.jpg
    roof10.jpg
    59.1 KB · Views: 55
  • roof13.jpg
    roof13.jpg
    64.2 KB · Views: 56

kerry

Expedition Leader
More of the destruction. I plan to replace it with 1" treated deck board cut to size and tie it in to the sides with aluminum reinforcement.
 

Attachments

  • roof14.jpg
    roof14.jpg
    71.5 KB · Views: 36
  • roof15.jpg
    roof15.jpg
    68.3 KB · Views: 35
  • roof17.jpg
    roof17.jpg
    53.9 KB · Views: 34
  • roof18.jpg
    roof18.jpg
    98.2 KB · Views: 29
  • roof19.jpg
    roof19.jpg
    73 KB · Views: 36
  • roof21.jpg
    roof21.jpg
    101.2 KB · Views: 39
  • roof23.jpg
    roof23.jpg
    96.8 KB · Views: 40

kerry

Expedition Leader
The eterna bond tape was a couple of years old. Still very sticky. To remove it you have to pull it away (the white top material is pretty strong) and then make perpendicular cuts to the butyl rubber right where it is pulling up. Process of removing the wood was to remove all screws thru the bottom aluminum into the wood, drill out the rivets connecting corner pieces to lower aluminum piece, and finally remove the screws from the L brackets at the corners. The rotten woods just pulled away from those screws in my case. Nothing connects the front wood to the top of the roof. It is only connected at the sides with the L brackets.

In case it's not obvious, the eternabond tape was added far too late in the life of this camper roof.
 
Last edited:

kerry

Expedition Leader
The real problem with this design is that the plywood sits in a piece of aluminum channel and the roof skin slides behind the channel between the plywood and the outer edge of the channel. Any small failure in the caulking at that point feeds water directly down into the channel where it has no place to escape, leaving the plywood sitting in water. Hence the rot. The caulking bond between the roof skin and the channel is extremely small leading to failure. If that joint had been taped with 2 or 3" Eternabond when my camper was new, I doubt my current problems would have occurred or at least they would have been less severe. If you have a camper roof like this in halfway decent shape, Eternabond that joint between the skin and the lower aluminum channel. Also, water can also enter that channel from the corner brackets so I'd Eternabond around those also. The design solution would have been to have a triple channel with the plywood between the inner two and the roof skin going between the outer two with weep holes into that outer channel. keeping the water away from the plywood.

Of course, the other solution would have been to use something other than plywood for the outer rim of the roof.
 

zidaro

Explorer
Damn! that mess is stressing me out.

Have you contacted Northstar and given them pics of said issue? Ive found them very helpful in brainstorming small repairs. Nothing to that extent.
 

kerry

Expedition Leader
You think it's stressing you out. I've been pre-occupied for days. :) No I didn't talk to Northstar. I have talked to them in the past and they have been helpful. I did talk to them when the roof was hail damaged about a replacement roof. The problem with that is that it is a long process. Northstar has to build the roof, ship it to a local dealer, then the dealer has to schedule the installation. I needed the roof to be functional this summer.
Today I got the 3" aluminum plate reinforcements on either side of the right front and an L bolted to it to go around the corner and attach to the new front piece of wood. I should be able to get the other side done a little quicker tomorrow now that I know what I am doing and once that reinforcement is in place I can reinstall the front piece of wood.
It really is an awful design and I'm very reluctant to put a new roof of the same design on it. At a minimum I think all the plywood in the roof should have been coated with epoxy to resist rot. I see no evidence of any attempt to seal the original plywood. Putting the cut edge of plywood in a place where it will inevitably be sitting in water is a disaster waiting to happen.

If you're roof is a similar design I would put Eternabond tape over the seam where the roof skin enters the bottom aluminum channel.
 

kerry

Expedition Leader
Some more photos as work progresses. That's 3" x 1/8" aluminum stock. The L shaped pieces will fit inside the two sides with the short section extending across the front so I can bolt the new front wood to it. Piece of aluminum on the outside forming a 'sandwich' with the original roof side as the filling. The plywood on the sides of the roof is in better shape than the front but far from perfect. The left side is in worse shape than the right side so I'm extending the reinforcement further back along the side on the left. I drilled the outer aluminum first as I had to get the holes in the right place to match the original holes for my roof rack gutter. I then put the inside piece of aluminum in place and clamped the two pieces together so I could drill the holes for the thru bolts.
 

Attachments

  • roof repair26.jpg
    roof repair26.jpg
    143.7 KB · Views: 30
  • roof repair27.jpg
    roof repair27.jpg
    67.4 KB · Views: 28
  • roof repair28.jpg
    roof repair28.jpg
    89.7 KB · Views: 24
  • roof repair29.jpg
    roof repair29.jpg
    40.7 KB · Views: 27
  • roof repair 30.jpg
    roof repair 30.jpg
    37.1 KB · Views: 25

kerry

Expedition Leader
Photos of the progress. Both sides splinted but not all splint bolts installed yet. New wood installed across the front. Had to slice off a saw blade's width to get it to fit nicely in the aluminum channel. Putting the aluminum roof skin inside the channel by the wood was a headache. Then I realized it was a bad idea anyway. So I will screw a piece of 1 1/2" aluminum bar over the roof skin and into the front piece of wood to hold the roof skin in place. Everything will eventually be covered in Eternabond tape
 

Attachments

  • roof repair 31.jpg
    roof repair 31.jpg
    28.6 KB · Views: 29
  • roof repair 32.jpg
    roof repair 32.jpg
    38.8 KB · Views: 29
  • roof repair33.jpg
    roof repair33.jpg
    50.5 KB · Views: 24
  • roof repair 34.jpg
    roof repair 34.jpg
    59.3 KB · Views: 24
  • roof repair35.jpg
    roof repair35.jpg
    65.7 KB · Views: 28
  • roof repair36.jpg
    roof repair36.jpg
    47 KB · Views: 23
  • roof repair37.jpg
    roof repair37.jpg
    37.1 KB · Views: 21

kerry

Expedition Leader
More progress. Now I just need to drill and bolt the remaining splint bolts before Eternabonding everything. The Eternabond I removed to do this job is at least two years old yet the remnants were still sticky enough to hold that piece of flat bar stock in place while I drilled and screwed it.
 

Attachments

  • roof repair 38.jpg
    roof repair 38.jpg
    40.6 KB · Views: 28
  • roof repair 39.jpg
    roof repair 39.jpg
    70 KB · Views: 23
  • roof repair 40.jpg
    roof repair 40.jpg
    70.1 KB · Views: 29
  • roof repair41.jpg
    roof repair41.jpg
    72.5 KB · Views: 24

Sock Puppet

Adventurer
Nice work, thank you for sharing. I'm doing something similar on my Sun Valley but it's been on hold for a few months.
 

Forum statistics

Threads
185,917
Messages
2,879,616
Members
225,497
Latest member
WonaWarrior
Top