Smittybilt Scout Trailer Reviews?

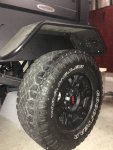
Hi, guys, thank you all for the great ideas. I got mine a couple days ago from my local 4wheel parts as a display unit. They knocked around 18%off. I am in the process of lossen all the bolt, apply thread locks and torque them to spec. I still have some questions regrading the build. From the previous threads, I have a general idea of how to align the toe and camber. However, i don't know how to adjust the trust angle mentioned in the manual. Anybody with ideas? I can't really take this trailer to a alignment shop and do a 3-axle since I messed up my Jeep's rear trust angle.

you dont need to break everythign loose, just check torque then use some green loc-tite. its a wicking loc-tite that you can apply after you torque the hardware.
 

YYCRod

Member
What model is that shower enclosure? I have the Ozark Trail quick setup enclosure with two rooms, its very nice as it gives you a changing area/toilet area. But it does take up a bit of space in the trailer.

It’s called the Quick Pitch ensuite from South Africa. The US imprter is in Seattle (can’t remember their name unfortunately)

B1C2BC1B-6592-4925-9C58-630CE5098B1A.jpeg
Folded up, it takes no space. It is the black bag below the green foxwing bag.

It takes a few seconds to deploy and gives loads of space. Here it is deployed.
CEB2A298-279E-41FA-805D-81D281F1BD0A.jpeg
 
Than you so much for that info, I would definitely use that.

FYI it will not come loose. you will need heat to remove the bolts. So i wouldnt put it on the cam bolts, maybe use blue on the cam bolts. Ive been thinking of replacing the nuts on the cam bolts with a stover nut or maybe just using a nord-lock washer.
 

Anvoy

New member
FYI it will not come loose. you will need heat to remove the bolts. So i wouldnt put it on the cam bolts, maybe use blue on the cam bolts. Ive been thinking of replacing the nuts on the cam bolts with a stover nut or maybe just using a nord-lock washer.
I will use that on the hub nuts and some body mount nut. I will not remove whose anymore. Do you have any idea of adjusting trust angles?
 

ebrabaek

Adventurer
The thrust angle is set with your toe adjustment as well. Imagine both wheels being parellel but both angled left 10 deg. Your trailer will now ride behind (hopefully) :) and to the left. The main wheels needs not only to be parallel to each other but also to the frame. You can do this a few different ways. I mounted a laser on the frame and shone it forward and marked a few dots. Then back wards with a few dots. Then I did the same mounted on the rims. Distances were compared front and rear. Camber adjusted to match left and right. Then rims against each other. That is how I did it, rather than cris crossing a tape under the frame. I'm sure there are other ways,but that's how I did it.
Welcome to the party....
 

wellred

New member
What model is that shower enclosure? I have the Ozark Trail quick setup enclosure with two rooms, its very nice as it gives you a changing area/toilet area. But it does take up a bit of space in the trailer.
this is what i use and i love it (wife does too)
 

Bullseye240

Adventurer
However, i don't know how to adjust the trust angle mentioned in the manual. Anybody with ideas? I can't really take this trailer to a alignment shop and do a 3-axle since I messed up my Jeep's rear trust angle.

You can adjust the thrust angle by using a string. Attach the string to the tongue dead center of the ball and run it to the rear and attach it dead center there. You can then measure the distance between each rim front and back. Adjust the suspension until those readings are the same. This means that you need to get both rims the same distance from the centerline as each other not just the same distance per wheel. If the tires are square to the centerline but their centerline is off center to that of the trailer can still bulldog while being towed which means you are essentially dragging your tires slightly sideways down the road. If you are looking down on the trailer with the hitch at the top you would imagine an inverted "T" representing the ideal you are looking for.
 

Anvoy

New member
The thrust angle is set with your toe adjustment as well. Imagine both wheels being parellel but both angled left 10 deg. Your trailer will now ride behind (hopefully) :) and to the left. The main wheels needs not only to be parallel to each other but also to the frame. You can do this a few different ways. I mounted a laser on the frame and shone it forward and marked a few dots. Then back wards with a few dots. Then I did the same mounted on the rims. Distances were compared front and rear. Camber adjusted to match left and right. Then rims against each other. That is how I did it, rather than cris crossing a tape under the frame. I'm sure there are other ways,but that's how I did it.
Welcome to the party....
Thank you for the detailed info. So basically, I only get two sets of the cam bolts which are used to adjust my toe, camber, and trust angle. One more question, do you jack your trailer up ( no load on suspension) while work on this adjustments? I got mine fully build today, still need to convert my Jeep's 4 pin to 7 pin. Thank you again.
 

Anvoy

New member
You can adjust the thrust angle by using a string. Attach the string to the tongue dead center of the ball and run it to the rear and attach it dead center there. You can then measure the distance between each rim front and back. Adjust the suspension until those readings are the same. This means that you need to get both rims the same distance from the centerline as each other not just the same distance per wheel. If the tires are square to the centerline but their centerline is off center to that of the trailer can still bulldog while being towed which means you are essentially dragging your tires slightly sideways down the road. If you are looking down on the trailer with the hitch at the top you would imagine an inverted "T" representing the ideal you are looking for.
So many great ideas. I now know which cam bolts I can use to adjust my trust angle, and I will report back once I got those set. Thank you
 

ebrabaek

Adventurer
Thank you for the detailed info. So basically, I only get two sets of the cam bolts which are used to adjust my toe, camber, and trust angle. One more question, do you jack your trailer up ( no load on suspension) while work on this adjustments? I got mine fully build today, still need to convert my Jeep's 4 pin to 7 pin. Thank you again.

Yeppers...… You adjust the suspension loaded. So the trailer will be on the ground. I had plenty of toe adjustment for both in/out and thrust. I am however out of camber adjustment. I just had enough adjustment to run a 3'ish deg negative camber. One side was at full and the other had a little left, but both sides were matched. But once I began loading the trailer with gear, awning, tent, etc, it squatted a bit more, and I suspect that I am around 5 deg negative chamber now. Not detrimental, but I would have preferred neutral. I suspect that Smitty designed the suspension unloaded.
If it really buggers me, then I can just grind the stops off the adjustments, and reweld another set on. 5 deg aint a killer either, but it will wear the tires a bit on the inside.
 
I bought this scout trailer by Smittybilt 6 months ago, I have read negative and some positive reviews about this company. Anyway, I purchased this because this trailer has options for me to customize, likewise make it more robust. I have currently made some changes with this trailer.

First, I removed the spare tire carrier install a 19 gallons water storage measuring 35"x7.5"x19"H and a Jerry can mount 5gal/2L, 2 pcs. that can accommodate 2 Sceptor gas container.

I have removed the current wheels and place a wheel adopter to accommodate my Toyota TRD wheels, so that my current toyota spare tires can also fit the scout trailer. Likewise the ground clearance is now the same with my 4Runner, and looks good with the same TRD wheels.

I am planning to re-inforce the current trailer hitch, do some welding stuff to make it more sturdy to accommodate my Wilco Hitchgate and were I can place my spare tire for the trailer or else I can always use the 4Runner spare tire.

I'm on the process of looking for a quality 4 person Roof Top Tent for this trailer, and a sturdy Shower Curtain.

Any suggestions would be greatly appreciated.
 

Attachments

  • IMG_1923.JPG
    IMG_1923.JPG
    2.1 MB · Views: 178
  • IMG_1925.JPG
    IMG_1925.JPG
    2.1 MB · Views: 190
  • IMG_1926.JPG
    IMG_1926.JPG
    1.6 MB · Views: 182

YYCRod

Member
FYI the Smittybilt element ramps can mount using the awning knobs. I can only fit one per side due to thread length, I am going to change out the set screw in the knob with a longer one so i can mount 4 ramps stacked up on one side. They had this one at overland expo.
View attachment 454205
I mounted mine similarly. I used 3/8" S.S. threaded rod with enough length to store 4 of them.


IMG_3184.jpg

IMG_3181.jpg

IMG_3183.jpg
 

YYCRod

Member
After our first outing with Smitty, we had a few tweaks to work. The rotating jack mounts in the back had to have the holes enlarged just about 0.5mm.
Then next one totally got me by surprise and I have none to blame but myself. If I extend the awning I cannot use that side rain fly as the steel rods would have to go through the awning...lol. oversight on my behalf.
Cut a couple of aluminum blocks. Drilled holes. Mounted them on top of the awning rack. Shortened the two rods and we are golden.
View attachment 454443
View attachment 454444
View attachment 454447

Brilliant solution! Your fix got me motivated to fab-up a solution to clear my Foxwing.
I didn't have any 1" aluminum on hand so I used 1-1/2" angle steel for the mounts, 1" square stock for the vertical risers and 1/4" coupling nuts with the backs welded over to hold the steel fly rods.
Welded it all together and bolted them on the awning support arms.

Thanks for the inspiration Ebrabaek.

IMG_3185.jpg
 
Last edited:

ebrabaek

Adventurer
Brilliant solution! Your fix got me motivated to fab-up a solution to clear my Foxwing.
I didn't have any 1" aluminum on hand so I used 1-1/2" angle steel for the mounts, 1" square stock for the vertical risers and 1/4" coupling nuts with the backs welded over to hold the steel fly rods.
Welded it all together and bolted them on the awning support arms.

Thanks for the inspiration Ebrabaek.

View attachment 456183

Yeppers....
That looks very clean. Beautifully done.?
 

Forum statistics

Threads
185,841
Messages
2,878,760
Members
225,393
Latest member
jgrillz94
Top