Storage boxes

D

Deleted member 144409

Guest
@NatersXJ6 - what did you use to finish the box? I'd like to do a tan or gray paint of some kind but I don't want to be asphyxiated. ..as much fun as that sounds.
 

Superduty

Adventurer
Those iris boxes look nice and good value. But unfortunately it won't fit

Sent from my SAMSUNG-SM-G930A using Tapatalk
 
Last edited:

NatersXJ6

Explorer
Finish with ...

So I finger jointed all sides of my chuck box with 1/2" fingers. It is ridiculously strong. There were some minor tear out issues, but they filled really nicely and then stained right into near invisibility.

I used a stain conditioner from Minwax, General Finishes "black cherry" water based stain, and then about 6-7 coats of Minwax Oil-Modified Water Based Polyurethane for floors. I sanded it at 320 grit between coats. I've used this finish combination throughout my house on all of my oak floors, and it holds up beautifully, in addition to being extremely fast drying and low odor. On the floors, I can recoat within about 45 minutes. On the chuckbox, it was about the same.

It takes a little patience to get the finger joints right, and you need to build a pretty long jig to do something as big as a foot locker, but it turns out nice. There is a bit of chunking out at the 3-joint corners, but I plan on covering them with brass corner blocks anyway.

I'm about 7 months into using this thing, and I have found a few improvements for V2, but it is highly functional.
 

Attachments

  • IMG_2028.jpg
    IMG_2028.jpg
    500.6 KB · Views: 18
  • IMG_3556 Resized.jpg
    IMG_3556 Resized.jpg
    364 KB · Views: 23

Superduty

Adventurer
Natersxj6,

Finger jointing the bottom is nice work! No room for mistakes. Measure a dozen times and cut once.

Awesome job.

Sent from my SAMSUNG-SM-G930A using Tapatalk
 

NatersXJ6

Explorer
Thanks! I cut all of my panels first, then spent a few days fine tuning and practicing on my jig until I could joint a 20" long scrap. Cut up most of the scraps into 2" practice strips and jointed a bunch of them.

Then I did the main panels, and screwed up one side... So the whole box got 1/2" shorter when I cut off the joints to try again!

Dry fitting and careful planning are your friend, but it is totally doable by anyone not afraid to try.
 

jgaz

Adventurer
NatersXJ6
It's not my intention to hijack this thread but would you be willing to provide more info on the finger joint jig that you used for this large of a panel.


This is the jig I use (I love finger or box joints) but the largest panel I've done to date is approx 11"x18". It would be difficult to go a lot larger with this size jig
IMG_0145.jpg

If you want, send me a private message, and we can talk further
 

NatersXJ6

Explorer
Jiggy

This was my first finger jointing adventure. Go big or go home right?

I thought about building a jig that was adjustable and re-useable like you have. I'm glad it didn't do that. I was going to use brass or keystock as a guide, and ended up not doing it because i don't have a mill to knock it down to the right thickness.

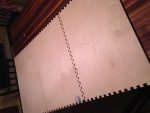
So, I used some scrap 1/2" oak ply from home cheapo that was sitting around. I think the parts were about 8x48, 2 of them. I ripped a rabbit about 1/2 the depth about 3" in from the edge. Across the back, I ripped in rabbits all the way to the line from the back edge every 8". I glued one board vertical in the rabbit and then glued in 4 or 6" squares in ever slot to make a very rigid structure.

I don't have many good pictures, but hopefully from this description and the one photo you can see it.

SAFETY NOTE: I did not build any handles, and the blade comes back into the work area, so you need to be REALLY CAREFUL where you put your hands. I didn't cover the blade, because I wanted to see it!

Originally I was pushing it with a miter gauge similar to how you are. That had too much slop, so I added a wood piece to slide in the miter slot in the table saw. That still had too much slop, so I added a second one in the next slot, and spread them slightly. Lots of drag but no slop at all. And you can still push the jig.

The hardest part was getting the spacer blocks right. A deviation of only a few thousands of an inch here can cause an epic fail. I cut about 10 of them really close in thickness (trying to match the dado head at 1/2"). I picked the one that was closest, and failed miserably. Then I figured out to actually measure the thickness of the dado stack with a caliper, and found that the little guidebook included with my relatively nice dado set is not all at accurate. It was off by at least .004. After measuring that, I was able to measure the gap between fence and blade stack and cut much more accurate spacers.

Then I went and set up the first cut slot and set up the first spacer. I brad-nailed the spacer to the surface. I did about 6 slots and made another mating piece. It fit aswesomely. So I made a pair of 24" scraps and jointed them. They failed miserably. They first 3 slots or so were dead on and then they got steadily worse until there was almost 3/16 to 1/4 misalignment on a 1/2" tab. ******?

This is when I got the calipers out and discovered that the slot spacer was 0.004 thinner than the dado stack. Multiply .004 by each and every tab across 24" and you get something in the area o 1/4"

I figured out 2 problems:

I was only holding the work against the jig, so it ended up being pushed all the way against one side, making the slop all hit one side of the joint and not average out. After getting the right size spacer, I clamped every move, so I could sort of make sure that the slop felt even. I was down to about .001 now, and try to make that "feel even" on a table saw!

I also added 3 more spacers so that the work engaged 4 instead of 1. It sped up alignment significantly. After everything was done, I had sanded all of the joints with 120 grit to ease the transitions in and made sure that everything fit really smoothly.

I don't have any special skills, I'm just dead stubborn on doing things the way I want, and I'm willing to fail. I have built a lot of furniture and cabinetry, and houses and whatnot... so I don't scare easily. I would recommend anyone with a tablesaw, a dado set, and a caliper to try this.

Enjoy, it was very satisfying. And having a chuck box that fits perfectly in my jeep and holds my stuff perfectly is well worth the long winter nights in the shop... Especially, because winter in Fresno is freekin awesome!

IMG_2019.jpg
 

jgaz

Adventurer
Thank you sir. You are so right about the thickness of "key"! Also about any slop in the whole system. I can expand the bar of my miter gauge until there is no slop, that is the only way I can make the joints fit correctly.

I quit trying to use my dado set. I'm using the blade set that Freud sells for finger joints. This blade set limits me to cutting 1/4" or 3/8" fingers.

Again, nice work! You've really got me thinking about building my own box

My machinist chest made from 1/2" solid oak.
Wooden Tool Box 002.jpg
 
Last edited:

Kmrtnsn

Explorer
Thank you sir. You are so right about the thickness of "key"! Also about any slop in the whole system. I can expand the bar of my miter gauge until there is no slop, that is the only way I can make the joints fit correctly.

I quit trying to use my dado set. I'm using the blade set that Freud sells for finger joints. This blade set limits me to cutting 1/4" or 3/8" fingers.

Again, nice work! You've really got me thinking about building my own box

My machinist chest made from 1/2" solid oak.
View attachment 417605

That is beautiful!
 

Forum statistics

Threads
185,819
Messages
2,878,556
Members
225,378
Latest member
norcalmaier
Top