02TahoeMD
Explorer
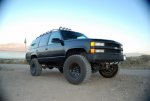
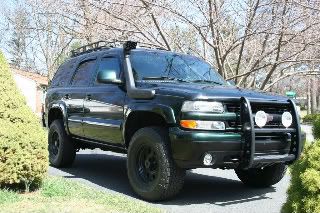
Since I am cursed with owning a Chevy Tahoe for which there are few Expeditionary....uhm, "toys" available for it, I have been forced to convert things to work and do some modifications along the way. It's my biggest project to date, as for the amount of work involved as well as for engineering it on the fly. I hope that this write up can be of assistance to anyone who may aspire to adapt a snorkel to their vehicle, regardless of make.
Safari Snorkel with Volant Cold Air Intake Conversion
What you will need:
Safari Snorkel SS60HF
Volant Cold Air Intake
3" duct extension
heat gun
air hammer or cutting torch
drill
files
grinder
92mm hole saw
black silicone sealant
rust resistant paint
assorted hand tools
bottle of Tums or your favorite antacid
bottle of Advil
Since I got my Tahoe in 2005 I have often wanted to do a snorkel for it. I do not have an urgent need for one, as my water crossings are rare and at random. But, some of the trails I have run on out in North Arizona / South Utah cut through dry riverbeds, and just about anytime we have a big rainstorm here in MD many of our roads in the lower end of the county go under water. So, it is kind of a case of "rather have it, and not need it, than to need it, and not have it".
Late last year, while surfing the internet, I saw that Volant offered a Jeep snorkel refit kit for their CAI. I had also found a guy on CarDomain that had converted a Safari Snorkel to fit his Suburban. Not to mention, there is the Suburban in Dante's Peak that had a snorkel as well. So, I just HAD to do this.
I researched snorkels a lot, but pretty much was sold on Safari Snorkels since the Suburban had one for a Toyota that was feeding a 5.7L engine. So, I figured if that would be adequate for feeding the good ole original Chevy smallblock, then it should work fine for the 5.3L in my Tahoe. After viewing about 40 different Toyota Land Cruisers on the internet with Safari Snorkels, I settled on the SS60HF as being the one closest to the contours on my body style Chevy truck, that would require the least amount of modifications.
Over the past winter I obtained a used Volant CAI and got the Safari Snorkel when 4WheelParts was having a free shipping sale. Before committing to the build, I installed the Volant and mated it to the SS, covered up the side opening on the Volant with 2 layers of duct tape, and then fired up the truck. I let her run for over 20 minutes on a 70 degree day and it only got to 180 deg on the engine temp, and the throttle response seemed fine. Satisfied that it would work once installed, I bit the bullet and started the work.
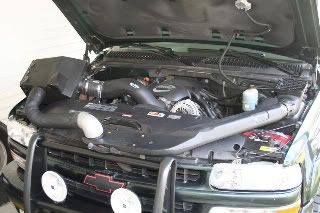
First, I dismantled the Volant CAI and set it aside for later modification. Then, I dismounted the coolant overflow tank, it has 1-10 mm bolt and 1-10 mm nut holding it on. It then lifts free easily and sets aside by resting on the valve covers of the engine. I then took off the firewall to fender brace, which has 4-13mm bolts. This frees up your work area.
Now is when I would recommend starting in on the Tums and Advil. Purposefully cutting a 3.1 inch hole in the side of your truck does take some guts to do. Talk about being nervous! I laid down a couple of layers of blue painters tape to protect the paint, and then held the snorkel up in the position I wanted. I marked the main hole and cut away with a jigsaw. I did not have a hole saw, since I thought I would only be cutting a single layer of sheet metal. WRONG!!! If you do this, save yourself some time and aggravation and spend the $30 - 40 for the proper sized hole saw.
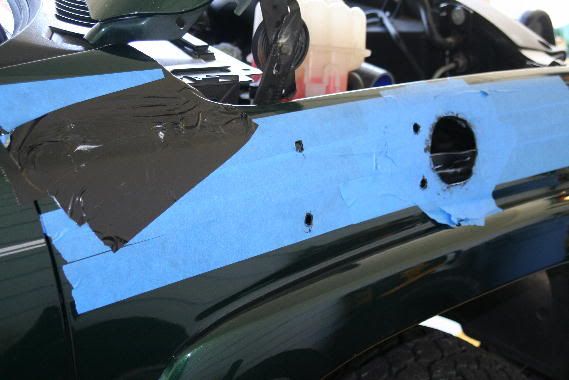
This revealed the first of my surprises. The fender actually consists of THREE layers of sheet metal, and the inner layer actually runs at a 90 deg angle through the center of the fender. This is where having a cutting torch or an air chisel for trimming sheet metal will be invaluable.
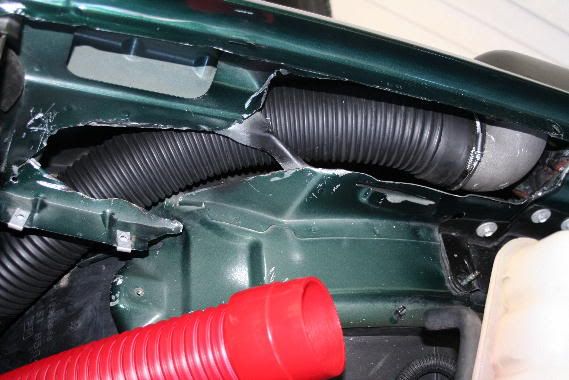
Trim away the outer layer of sheet metal inside of the engine compartment. This will give you access to the inner layer of sheet metal that is next to the exterior sheet steel. Be VERY VERY careful here, as I gave myself a glancing blow with the chisel and now have a small ding in the middle of my fender that needs some body work. I thought I had been careful enough, but I was not. Trim out a channel to reach down into the space between the front wheel well and the radiator. Note that there is a fourth layer of sheet metal that acts as a brace from the corner of the fender down to the wheel well itself. Leave this be, as it appears to be vital to the structural integrity. Clean up the edges of the steel by grinding them and also folding the steel over as needed. If you knocked the fender side of the CAI mounting plates loose, just reattach them with screws.
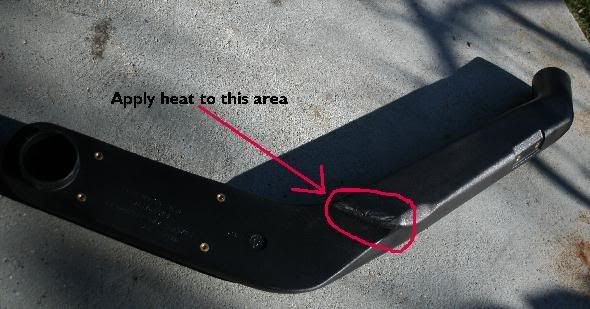
Now, back outside of the truck, clean up your initial ducting hole and place the snorkel in the hole. This gives you a chance to test fit and observe the area that you will need to soften up with the heat gun to get it to fit to the side of the body. After test fitting fire up the heat gun and settle in for a few minutes. I think it took me about 7 minutes at 1700 degrees to soften up the area that I needed to compress. When the plastic gets a wet look in the area indicated in the photo, it should be ready to compress. Immediately place it up against the body, placing the duct end in its hole and then leaning up against the heated end of the snorkel. Hold it there for a minute or so and it should have cooled. If the fit is not right, then repeat the procedure until you are satisfied with the fit.
I then used the kit template to mark the rest of the holes for the bolts and drilled the holes. I then deburred all the holes and painted the edges with Rustoleum flat black and painted the interior of the newly cut open area with the paint as well. After the paint dries it is time to mount the snorkel! Mount the studs from the kit to the Snorkel, line the studs and duct connection with black silicone, I think the more the better since you are sealing up the holes. Then mount it to the fender. I was only able to get nuts onto 3 of the studs, the stud next to the hood hinge was completely inaccessible. Be very, very careful here with the nuts as they will disappear into the lower recesses of the fender in a heartbeat.
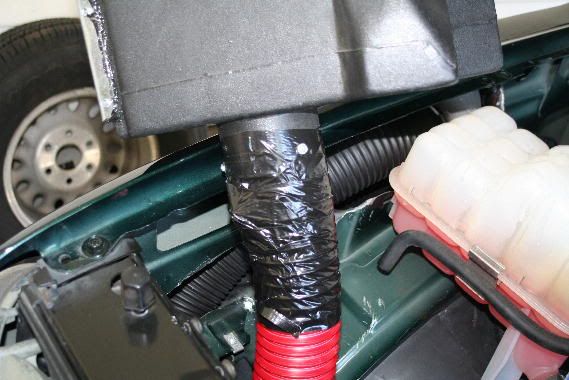
Then join the duct tube that came with the kit with an accessory extension. The one I used is a Pep Boys product and comes in various colors, though red was just about the only thing they had left when I went shopping. I joined the two of them together, and also attached them with duct tape, since I didn’t want them to come part. Ever.
I then routed the new duct tubing through the channels I had cut, and mounted the duct to the 90 deg angle tube that came in the Safari kit. I then mounted the assembly to the snorkel itself.
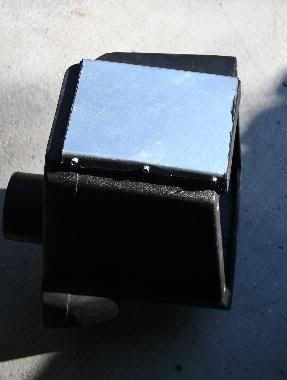
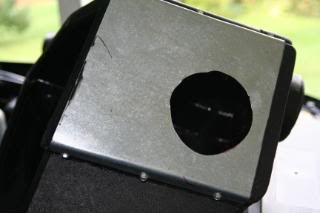
Next, you need to seal up the Volant CAI. The open side of the intake I closed up with a piece of sheet metal, screwed to the box and then sealed with black silicone.
Then reattach the coolant tank to its proper location, and set the Volant box on top. The duct hose should be able to reach the bottom of the airbox. Attach to the airbox (I used a combination of duct tape and screws) and position the airbox down on its mounting holes. After running the 4 mounting bolts down I sealed them with black silicone as well. I finished installing the CAI per the Volant instructions. Replace the fender bracket and double check everything for tightness.
To finish up I ran a thin bead of black silicone along the top of the snorkel housing itself, which gave it a bit more of a finished look. I installed the snorkel top, and I put heat shrink tubing on the hose clamp that holds the top on to trim up the look as well as give it a more durable finish.

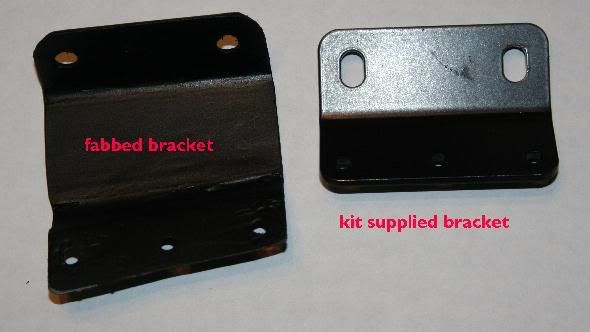
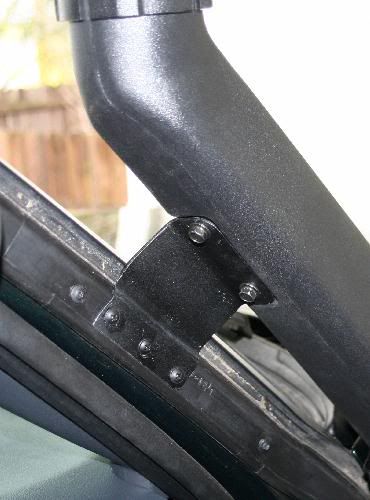
The only thing left is to make a bracket to secure the upper portion of the snorkel to the A pillar of the Tahoe. The bracket that comes with the Safari kit is too short to be used to secure the upper portion of the snorkel to the A pillar on the Tahoe. It is made from heavy gauge steel, way too thick to be cut and fabbed at home.
My solution was to get 22 gauge sheet metal, which is fairly heavy duty, but is bendable. I used the factory bracket as my starting template, to trace onto the steel, and then I cut out a piece that was about 5 inches long. I cut the holes for the screws that go into the snorkel, bent it at a 90 degree angle using the factory bracket to show where to bend.
Then, I went out to the Tahoe, and screwed the sheet metal to the snorkel, and then peeled back the weather stripping showing the A pillar underneath. I then marked where my bends needed to be and took off the bracket, and made my bends on a small portable vise I have. Note that the bends will be angling towards the bottom of the bracket and not parallel. After trimming off the excess metal that went beyond the channel in the weatherstrip trim, I reattached it and checked it for fit, and did some minor adjusting using a small hammer.
Satisfied with the contour, I took the bracket off and went back to work. I then cut 2 extra pieces of steel and cut them to fill in the upper portions of the bracket. I then mixed up some JB Weld and attached them to either sides of the bracket, clamped them, and let them set up overnight. JB Weld is great stuff, very strong, so I applied a skim coat of it to either side of the complex curve at the A pillar side of the bracket.
Once it was all set, I redrilled the needed holes and ground down the JB Weld with my Dremel tool, and then sanded and painted the entire assembly.
I then went back out and mounted the bracket to the A Pillar and Snorkel using the supplied hardware from the kit. I had to drill 3 small holes in the A pillar for the screws, and shot them with a bit of WD40 for protection from rust and to make the install a bit easier.
I hope this covers everything, it took me about 10 hours to do this, but most of that was because I was "pathfinding". I would presume it should take someone else much less time. ANY questions, don't hesitate to ask! I do not consider myself to be of any particular talent in the area of fabbing things up, and just about anyone with some time, patience, and a few tools could do this for their vehicle.
Safari Snorkel with Volant Cold Air Intake Conversion
What you will need:
Safari Snorkel SS60HF
Volant Cold Air Intake
3" duct extension
heat gun
air hammer or cutting torch
drill
files
grinder
92mm hole saw
black silicone sealant
rust resistant paint
assorted hand tools
bottle of Tums or your favorite antacid
bottle of Advil
Since I got my Tahoe in 2005 I have often wanted to do a snorkel for it. I do not have an urgent need for one, as my water crossings are rare and at random. But, some of the trails I have run on out in North Arizona / South Utah cut through dry riverbeds, and just about anytime we have a big rainstorm here in MD many of our roads in the lower end of the county go under water. So, it is kind of a case of "rather have it, and not need it, than to need it, and not have it".
Late last year, while surfing the internet, I saw that Volant offered a Jeep snorkel refit kit for their CAI. I had also found a guy on CarDomain that had converted a Safari Snorkel to fit his Suburban. Not to mention, there is the Suburban in Dante's Peak that had a snorkel as well. So, I just HAD to do this.
I researched snorkels a lot, but pretty much was sold on Safari Snorkels since the Suburban had one for a Toyota that was feeding a 5.7L engine. So, I figured if that would be adequate for feeding the good ole original Chevy smallblock, then it should work fine for the 5.3L in my Tahoe. After viewing about 40 different Toyota Land Cruisers on the internet with Safari Snorkels, I settled on the SS60HF as being the one closest to the contours on my body style Chevy truck, that would require the least amount of modifications.
Over the past winter I obtained a used Volant CAI and got the Safari Snorkel when 4WheelParts was having a free shipping sale. Before committing to the build, I installed the Volant and mated it to the SS, covered up the side opening on the Volant with 2 layers of duct tape, and then fired up the truck. I let her run for over 20 minutes on a 70 degree day and it only got to 180 deg on the engine temp, and the throttle response seemed fine. Satisfied that it would work once installed, I bit the bullet and started the work.
First, I dismantled the Volant CAI and set it aside for later modification. Then, I dismounted the coolant overflow tank, it has 1-10 mm bolt and 1-10 mm nut holding it on. It then lifts free easily and sets aside by resting on the valve covers of the engine. I then took off the firewall to fender brace, which has 4-13mm bolts. This frees up your work area.
Now is when I would recommend starting in on the Tums and Advil. Purposefully cutting a 3.1 inch hole in the side of your truck does take some guts to do. Talk about being nervous! I laid down a couple of layers of blue painters tape to protect the paint, and then held the snorkel up in the position I wanted. I marked the main hole and cut away with a jigsaw. I did not have a hole saw, since I thought I would only be cutting a single layer of sheet metal. WRONG!!! If you do this, save yourself some time and aggravation and spend the $30 - 40 for the proper sized hole saw.
This revealed the first of my surprises. The fender actually consists of THREE layers of sheet metal, and the inner layer actually runs at a 90 deg angle through the center of the fender. This is where having a cutting torch or an air chisel for trimming sheet metal will be invaluable.
Trim away the outer layer of sheet metal inside of the engine compartment. This will give you access to the inner layer of sheet metal that is next to the exterior sheet steel. Be VERY VERY careful here, as I gave myself a glancing blow with the chisel and now have a small ding in the middle of my fender that needs some body work. I thought I had been careful enough, but I was not. Trim out a channel to reach down into the space between the front wheel well and the radiator. Note that there is a fourth layer of sheet metal that acts as a brace from the corner of the fender down to the wheel well itself. Leave this be, as it appears to be vital to the structural integrity. Clean up the edges of the steel by grinding them and also folding the steel over as needed. If you knocked the fender side of the CAI mounting plates loose, just reattach them with screws.
Now, back outside of the truck, clean up your initial ducting hole and place the snorkel in the hole. This gives you a chance to test fit and observe the area that you will need to soften up with the heat gun to get it to fit to the side of the body. After test fitting fire up the heat gun and settle in for a few minutes. I think it took me about 7 minutes at 1700 degrees to soften up the area that I needed to compress. When the plastic gets a wet look in the area indicated in the photo, it should be ready to compress. Immediately place it up against the body, placing the duct end in its hole and then leaning up against the heated end of the snorkel. Hold it there for a minute or so and it should have cooled. If the fit is not right, then repeat the procedure until you are satisfied with the fit.
I then used the kit template to mark the rest of the holes for the bolts and drilled the holes. I then deburred all the holes and painted the edges with Rustoleum flat black and painted the interior of the newly cut open area with the paint as well. After the paint dries it is time to mount the snorkel! Mount the studs from the kit to the Snorkel, line the studs and duct connection with black silicone, I think the more the better since you are sealing up the holes. Then mount it to the fender. I was only able to get nuts onto 3 of the studs, the stud next to the hood hinge was completely inaccessible. Be very, very careful here with the nuts as they will disappear into the lower recesses of the fender in a heartbeat.
Then join the duct tube that came with the kit with an accessory extension. The one I used is a Pep Boys product and comes in various colors, though red was just about the only thing they had left when I went shopping. I joined the two of them together, and also attached them with duct tape, since I didn’t want them to come part. Ever.
I then routed the new duct tubing through the channels I had cut, and mounted the duct to the 90 deg angle tube that came in the Safari kit. I then mounted the assembly to the snorkel itself.
Next, you need to seal up the Volant CAI. The open side of the intake I closed up with a piece of sheet metal, screwed to the box and then sealed with black silicone.
Then reattach the coolant tank to its proper location, and set the Volant box on top. The duct hose should be able to reach the bottom of the airbox. Attach to the airbox (I used a combination of duct tape and screws) and position the airbox down on its mounting holes. After running the 4 mounting bolts down I sealed them with black silicone as well. I finished installing the CAI per the Volant instructions. Replace the fender bracket and double check everything for tightness.
To finish up I ran a thin bead of black silicone along the top of the snorkel housing itself, which gave it a bit more of a finished look. I installed the snorkel top, and I put heat shrink tubing on the hose clamp that holds the top on to trim up the look as well as give it a more durable finish.
The only thing left is to make a bracket to secure the upper portion of the snorkel to the A pillar of the Tahoe. The bracket that comes with the Safari kit is too short to be used to secure the upper portion of the snorkel to the A pillar on the Tahoe. It is made from heavy gauge steel, way too thick to be cut and fabbed at home.
My solution was to get 22 gauge sheet metal, which is fairly heavy duty, but is bendable. I used the factory bracket as my starting template, to trace onto the steel, and then I cut out a piece that was about 5 inches long. I cut the holes for the screws that go into the snorkel, bent it at a 90 degree angle using the factory bracket to show where to bend.
Then, I went out to the Tahoe, and screwed the sheet metal to the snorkel, and then peeled back the weather stripping showing the A pillar underneath. I then marked where my bends needed to be and took off the bracket, and made my bends on a small portable vise I have. Note that the bends will be angling towards the bottom of the bracket and not parallel. After trimming off the excess metal that went beyond the channel in the weatherstrip trim, I reattached it and checked it for fit, and did some minor adjusting using a small hammer.
Satisfied with the contour, I took the bracket off and went back to work. I then cut 2 extra pieces of steel and cut them to fill in the upper portions of the bracket. I then mixed up some JB Weld and attached them to either sides of the bracket, clamped them, and let them set up overnight. JB Weld is great stuff, very strong, so I applied a skim coat of it to either side of the complex curve at the A pillar side of the bracket.
Once it was all set, I redrilled the needed holes and ground down the JB Weld with my Dremel tool, and then sanded and painted the entire assembly.
I then went back out and mounted the bracket to the A Pillar and Snorkel using the supplied hardware from the kit. I had to drill 3 small holes in the A pillar for the screws, and shot them with a bit of WD40 for protection from rust and to make the install a bit easier.
I hope this covers everything, it took me about 10 hours to do this, but most of that was because I was "pathfinding". I would presume it should take someone else much less time. ANY questions, don't hesitate to ask! I do not consider myself to be of any particular talent in the area of fabbing things up, and just about anyone with some time, patience, and a few tools could do this for their vehicle.
Last edited:
")